Page 1 of 1
A10 a wee bit over-powerful?
Posted: Thu Jun 22, 2023 12:34 pm
by skeletonboi
I just finished playing through Mission 4 of the E. German campaign, and I have to say, those A10s are nasty. I'll just share some pictures and anecdotes and someone can tell me if I did something wrong. Some mild spoilers for Mission 4 Valley of the Damned here, so reader beware.
Figure 1: Destroyed BMP company
- Figure 1 BMP Company.png (560.21 KiB) Viewed 1793 times
Early on, the pair of A10s showed up in the mission and hit one of my full-strength BMP companies moving through a wood (I think it was a hasty move). My pair of Shilkas engaged them (but not my Strelas: I assume cloud cover was too low?) but to no result, and you can see there the entire company wiped out in that hex.
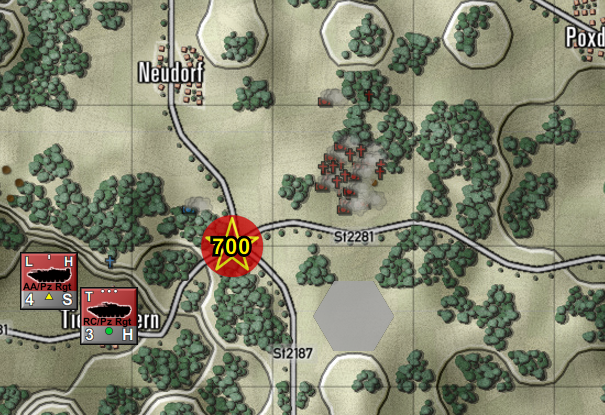
Figure 2: Destroyed T72 and BMP company

- Figure 2 Tank and BMP.png (322.99 KiB) Viewed 1793 times
Not content with wiping out a brave NVA company from the face of the earth, Hog Flight returned later to hit my T72 company holding position in heavy forest (circled in red) and caught (I think) the nearby BMP company pathing through their hex in a Deliberate move. Perhaps foolish on my part, but I assumed parking the Shilkas on an overlooking ridge (circled in blue) would have some effect. Nope: those titanium bathtubs shrugged off the quadcannons, dropped their Rockeyes and wiped out
everything in that hex once again.
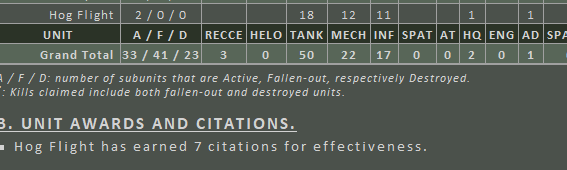
Figure 3: Awards all round for NATO flyboys
- Figure 3 Final Result.png (12.67 KiB) Viewed 1793 times
And this is the final tally: I got a contested result, in no small part because of Hog Flight wiping out 3 entire companies (though looking at the numbers it might have been two tank companies and one BMP company) for no losses, and receiving an incredible
seven citations for effectiveness. I assume those pilots clink when they walk now because they're festooned in medals.
It was a little frustrating because I was replaying this mission and trying to baby my formations with the assigned AD and only moving through cover, but the A10s still did a number on me. It honestly felt like there was no good counterplay here.
Now, I know CAS is effective and the A10 is designed to take hits yada-yada, but I'm a little leery about how just two warthogs seem to have done so much in a single mission. Are the A10s / Rockeye calculations working as they should?
Re: A10 a wee bit over-powerful?
Posted: Thu Jun 22, 2023 9:11 pm
by WildCatNL
Do you have save games available that you can share? Preferably saves preceding the turn where the A-10 engaged.
I'd like to check the A-10's attack.
Re: A10 a wee bit over-powerful?
Posted: Fri Jun 23, 2023 1:45 am
by skeletonboi
Here's one. I had to dig through my save files a bit because I played through the scenario twice. This doesn't match the positioning of the units in my original post, but the isolated BMP company I've snuck forward in my southern push gets wiped out by the A10s at around 0646 despite making a deliberate move through forest cover.
Re: A10 a wee bit over-powerful?
Posted: Fri Jun 23, 2023 3:20 pm
by cbelva
JIRA'ed at FPSS-4592.
Re: A10 a wee bit over-powerful?
Posted: Mon Jun 26, 2023 8:06 pm
by WildCatNL
skeletonboi wrote: ↑Fri Jun 23, 2023 1:45 am
Here's one. I had to dig through my save files a bit because I played through the scenario twice.
A10 Attack Files.zip
Thanks a lot for the same game.
Your unit is receiving four passes of an A-10 dropping 14 Mk82 Snakeyes, from a two-ship A-10 flight armed with 28 Mk82 Snakeyes each.
We're taking a second look at how effective those Mk82 Snakeyes should be.
Re: A10 a wee bit over-powerful?
Posted: Thu Jul 06, 2023 10:16 pm
by pullg
Without knowing how the team modeled the Shilka and the SA-9, the AD performance doesn't seem to be out of line. You actually did the ADA a disservice by placing it higher than the targets it defended. Both systems are subject to ground clutter at low elevation angles -- the Shilka because of the radar, and the SA-9 because of the missile seeker design. (There are some physical reasons why boxed SAMs launched at low elevation angles suffer, but that's probably more detail than is modeled.) Bottom line: you want your AD looking up, not down!
Re: A10 a wee bit over-powerful?
Posted: Sun Jul 16, 2023 8:53 pm
by hank
What's the opinion of the Mi-24D Hind-D ?
Its eats up my armor every game so far and hard to kill. I'm a newb and I'm playing Nato (veteran) all the Large sce's in chronological order; I'm 5 battles in so far.
Awesome game and looking forward to more DLC.
Re: A10 a wee bit over-powerful?
Posted: Sat Oct 28, 2023 9:02 am
by skeletonboi
pullg wrote: ↑Thu Jul 06, 2023 10:16 pm
Without knowing how the team modeled the Shilka and the SA-9, the AD performance doesn't seem to be out of line. You actually did the ADA a disservice by placing it higher than the targets it defended. Both systems are subject to ground clutter at low elevation angles -- the Shilka because of the radar, and the SA-9 because of the missile seeker design. (There are some physical reasons why boxed SAMs launched at low elevation angles suffer, but that's probably more detail than is modeled.) Bottom line: you want your AD looking up, not down!
A bit of thread-necromancy here, but I only just read this. I didn't know this about ADA! So the Shilkas should be placed at the base of hills rather than at the top (bearing in mind LOS)?
That said, I'm ok with the Shilkas not being super effective at damaging a flight of A10s, even if the A10s are a little more resilient than they might be in real life. For me, the issue was the damage calculation for the Rockeyes, and how those two planes took out entire companies in a single pass.
Re: A10 a wee bit over-powerful?
Posted: Thu Nov 16, 2023 1:26 am
by pullg
Expect attackers to hide behind terrain. Fly around or between hills rather than over them. Skim over ridgelines and get down into valleys. Position your short-range ADA to catch them at it. Your long-range SAMs -- SA-6s & SA-4s -- may end up on hilltops to give them some visibilty, but they're looking for higher-flying, more distant targets. Staying alive over a '70s or '80s battlefield usually meant flying down in the weeds to avoid the long-range SAMs, and counting on surprise, speed, and large crossing angles to limit exposure to guns and short-range missiles. It still would have been carnage even then, and as low-altitude ADA has become better, it's gotten tougher.
Rockeyes were impressive little suckers. And the file referenced above was four passes releasing 14 (500 lb) Mk 82s each?! That's alot of boom!