


Hi
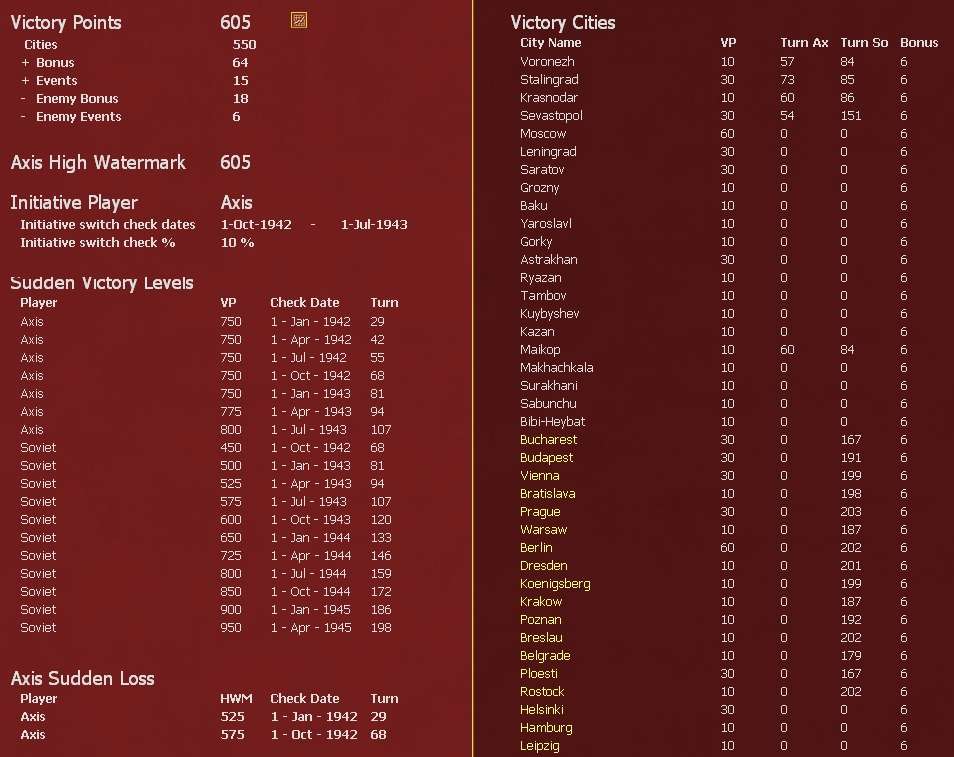
Switch is checked every turn Oct 42-July43, if the current VP score is 10% under HWM it flips to the Soviets (permanently). If this hasn't happened by July 43 then it is done automatically.
At the switch, the City VP scores are cleared and then recreated using held cities at that point (& any earlier time bonuses are regained). You're right at one level it doesn't matter too much when this occurs but the Soviets can lose some potential bonus if they don't have the initiative (esp for cities that have never been lost but were historically). The reality, as you note, is you want to advance/delay this more as an indicator of relative performance.
Only the initiative player can win via sudden death so even if the Soviets could have say 450 VP on 1 October that is irrelevant till they gain the initiative.
So at the switch, the HWM is frozen for the rest of the game. The German VP score (for cities) is cleared and replaced by a Soviet score. The Germans keep their VP for time bonus and other theatres as that is now deducted off the Soviet score (in the same way that the Soviet values are deducted off the German score at this stage of the game).
I guess the key difference is that the initiative player can feasibly win at any check date and is the one with the positive VP score for cities held. Both sides have VP for time or theatre bonus with these added or deducted accordingly.
We'll come back to Theatres and their rules in the next game post by Red Lancer. But all of Rumania-Hungary and Austria are fully playable. E Serbia starts as a theatre box and comes onto the map after the Soviets knock Rumania out of the war.. This allows 4 Ukr to take its historical route into Hungary after the liberation of Belgrade. It also changes the dynamics of the actual campaign in Hungary making Lake Balaton quite important.
Defending the Rodina - A Soviet WiTE2 AAR
Moderator: Joel Billings
-
Headshotkill
- Posts: 5
- Joined: Mon Jan 18, 2021 1:37 pm
RE: Winning and Losing the game
Thanks Loki100 for the quick reply!
It's alot clearer for me now knowing the initiative system can only switch once to the soviets. Otherwise multiple switches would potentially reset either side's VPs over and over probably resulting in very weird situations.
So the biggest penalty of losing the initiative as axis player is losing any chance of a sudden death victory, while allowing the soviet to now potentially win a sudden death victory.
The fact it can only switch starting from 1-okt-1942 means the axis player is protected from losing initiative during the 1941 winter counter-offensive of the soviets, this was one of the things that confused me at first because during this time the soviets certainly had the initiative so I figured it had to switch to soviet and then back to axis after second battle of kharkov. But this way bypasses that problem with I guess minimal effect on the campaign. It might look weird seeing the soviets penetrate your lines and still read it as axis having the initiative but I guess it only means the soviets can't quickly win if they demolish the germans in winter 1941 and push them back to poland but have to wait till 1-okt-1942 for initiative to switch allowing them to instantly win at their earliest date possible.
RE: Winning and Losing the game
you're welcome. Its one of those rules/concepts that are a bit hard to describe in the abstract but very intuitive in practice. I guess it frames the game as the Soviet winter offensive is a temporary shift in operational balance while the post-Stalingrad Soviet offensive marked a fundamental shift (in that the Soviet Union was going to 'win' the war, all that now remains is to sort out the price and when).
Anyway, mentioning the winter offensive very conveniently brings us to the next post [8D]
Anyway, mentioning the winter offensive very conveniently brings us to the next post [8D]
T24
6 December 1941
This update is based on the on-map situation at the end of turn 24
Background
By 5 October the Soviet position at Leningrad rapidly deteriorated. Not only had the Germans regained control of the west bank of the Volkhov but a massive attack had breached the Neva with German motorised troops across the river. Soviet resistance prevented any attempt to reinforce this bridgehead as Leningrad Front prepared to strike back. Equally the Germans made steady progress towards Moscow reaching a line from Kaluga to Borodino. In the Ukraine, Kharkov and the Dnepr bend all fell to the Germans as their spearheads approached Stalino.
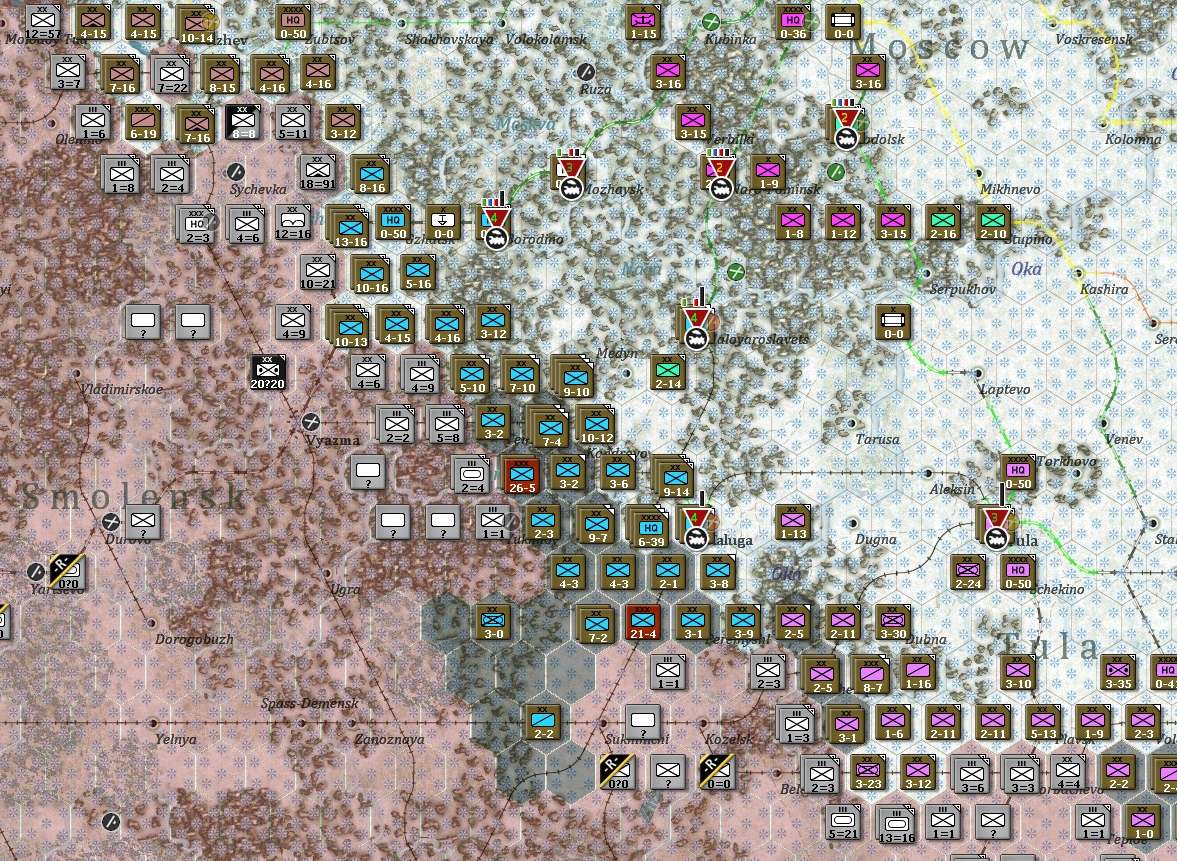
12 October brought heavy rains [1] and some slowing of the German offensive. Leningrad Front managed to regain the line of the Neva after heavy reinforcements [2]. However, Western Front was thrown back all along its defensive line with Kaluga and Borodino lost [3]. Despite the crisis in the Ukraine (where Kursk and Stalino were lost) Stavka pulled the few reserves from SW Front to help defend Moscow [4].
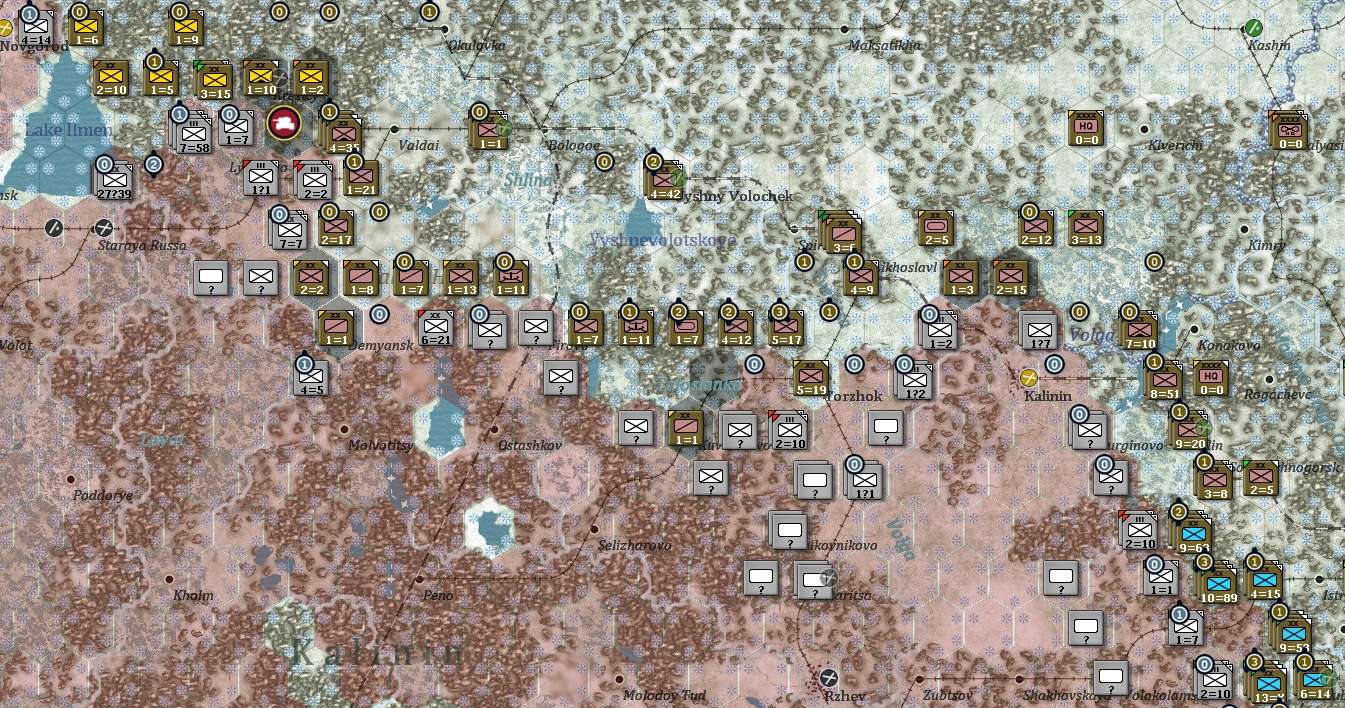
19 October saw ground conditions worsen and the German offensive stall with their spearheads 60 miles from Moscow. This respite continued in the next week and Kalinin Front managed a limited offensive around Torzhok to force the Germans to redeploy mobile units to back up their infantry on that sector.
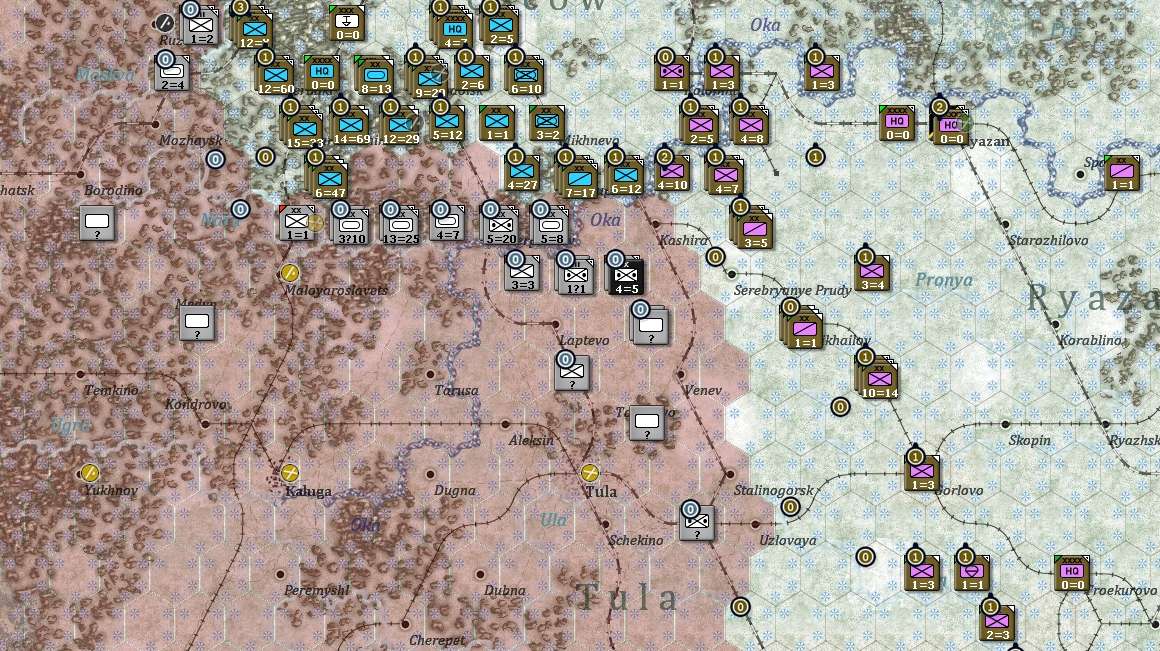
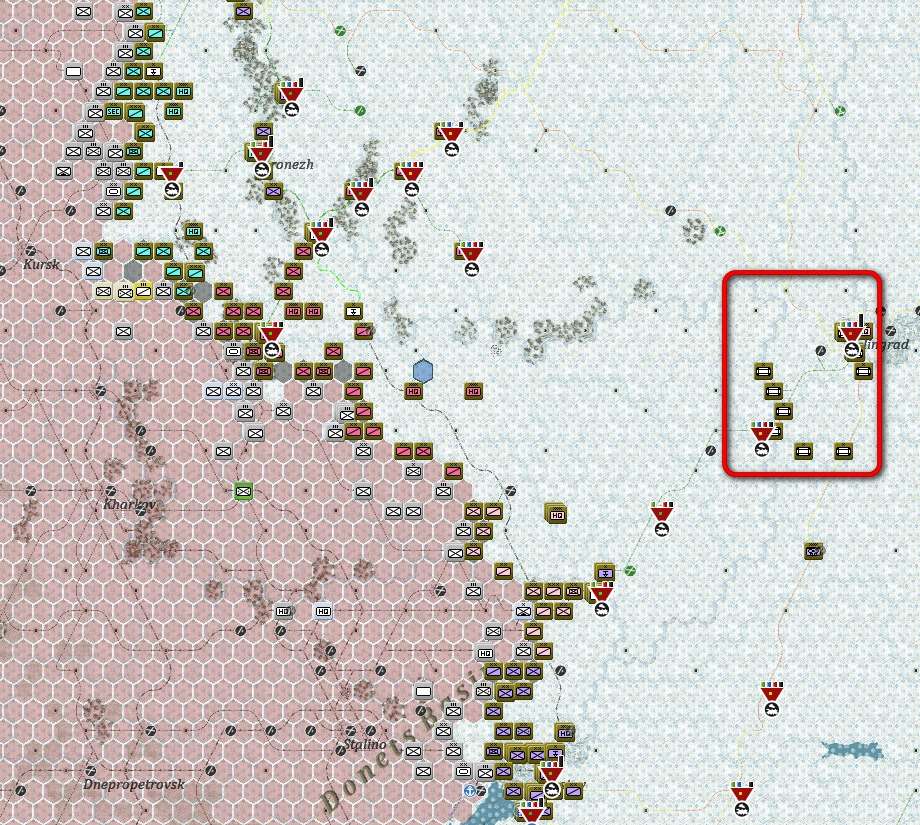
2 November saw the first snows of winter across most of the front apart from at Leningrad where the rains persisted. The Torzhok offensive and a steady build of Western Front stopped the direct German offensive towards Moscow but to the south the Soviet defences collapsed. Byransk Front sought to defend Tula with a scattering of weak formations and a combination of Central and SW Fronts held a line from Lipetsk to Voronezh as German troops approached Rostov. In the Crimea the Germans pushed back the Soviet screen and advanced towards the well defended Sevastopol.
9 November saw the first direct assault on Leningrad but the situation at Moscow improved. The need to eliminate the salient created by Kalinin Front diverted at least one Panzer Group even as Western Front rapidly built up. To the south of the Oka, the Germans renewed their attacks towards Tula while they advanced at will on the southern sector.
16 November saw the first blizzards of winter. At Moscow German troops maintained their offensive, surrounding Kalinin, capturing Tula and pushing along the north bank of the Oka. However, Stavka was finally able to start mustering a reserve [5] on this sector rather than commit the freshly arriving Siberian forces into the battle. In the south, logistics rather than Soviet resistance limited the German advance but both Rostov and Sevastopol fought off initial assaults.
23 November saw a fresh crisis at Leningrad as the Germans forced the line of the Neva again and pushed back NW Front both on the Volkhov and around Lake Ilmen. At Moscow, the strengthening Soviet lines were enough to slow the Germans to a crawl as the blizzards produced deep snow drifts. In the south, Rostov fell and Axis troops pushed over the lower Don.
Early December
Apart from some final gains at Leningrad, it was clear the German offensive was over for 1941. I’ll discuss the winter rules (and the more general weather rules) in the usual second post, here the focus is on the options. The weather this turn mostly changed to snow rather than blizzards.
Clearly, for the first time in the game, I choose the tempo and location of operations. But I don’t have much to do this with. The more I managed to keep out of combat in November (so those units built up their CPP), the more useful units I have to hand. I need high CPP in part for the obvious combat bonus but also for the secondary MP rules. Essentially in determining MP, high CPP can help offset the often low admin scores of many Soviet commanders. Given that deep snow costs more MP than most other conditions, I need high MP if I am to sustain any sort of offensive. That in turn means an attacking army will become exhausted after 2-3 weeks of action.
Now so far, I’ve been living hand to mouth with manpower reserves and administrative point allocations. I’ve just received a large (if untrained) cadre of manpower and that will help refit the numerous rifle divisions destroyed so far. In a few turns, I will receive an allocation of extra administrative points.

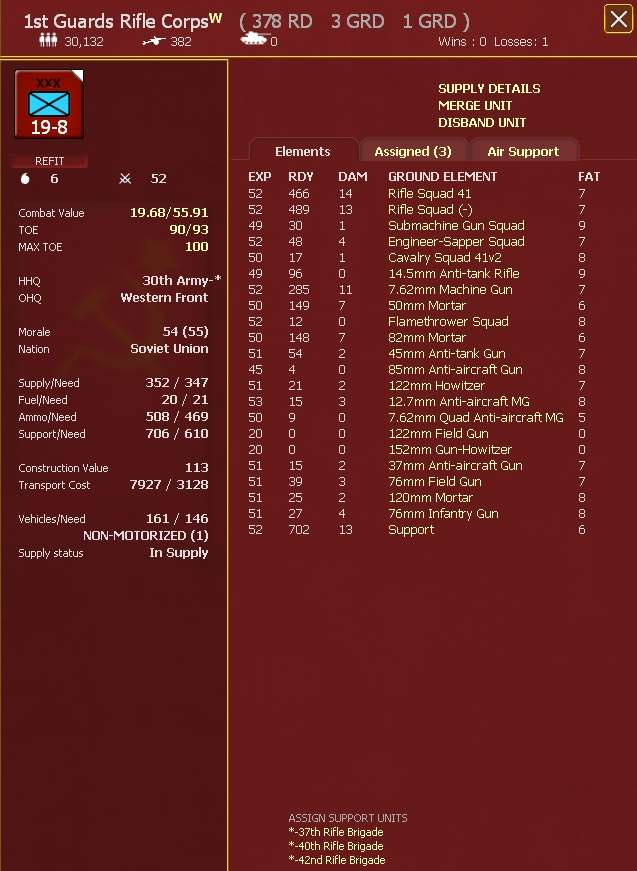
That will allow me to start reshaping my army. I gain the ability to build two Guards Rifle Corps and a number of Cavalry Corps in the next turn. Unlike in WiTE1, tank brigades are an off-map Support Unit so ideal to allocate to the Cavalry formations. Rifle brigades can be on or off-map, allocating 3 to a Gds Rifle Corp can transform a powerful unit into something that can break down a defensive strong point (and then needs to refit). There are plenty of other changes to WiTE1 but its worth noting I have two NKPS rail repair HQs which gives me a bit of flexibility over rail repair (or – probably better – they can help with my logistics).
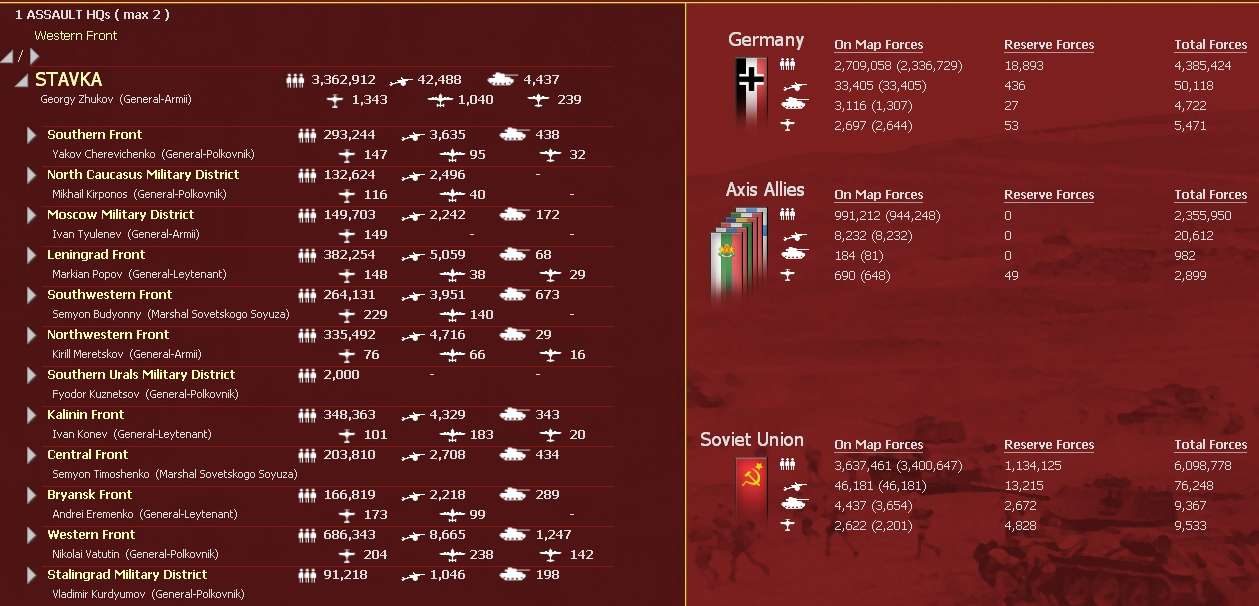
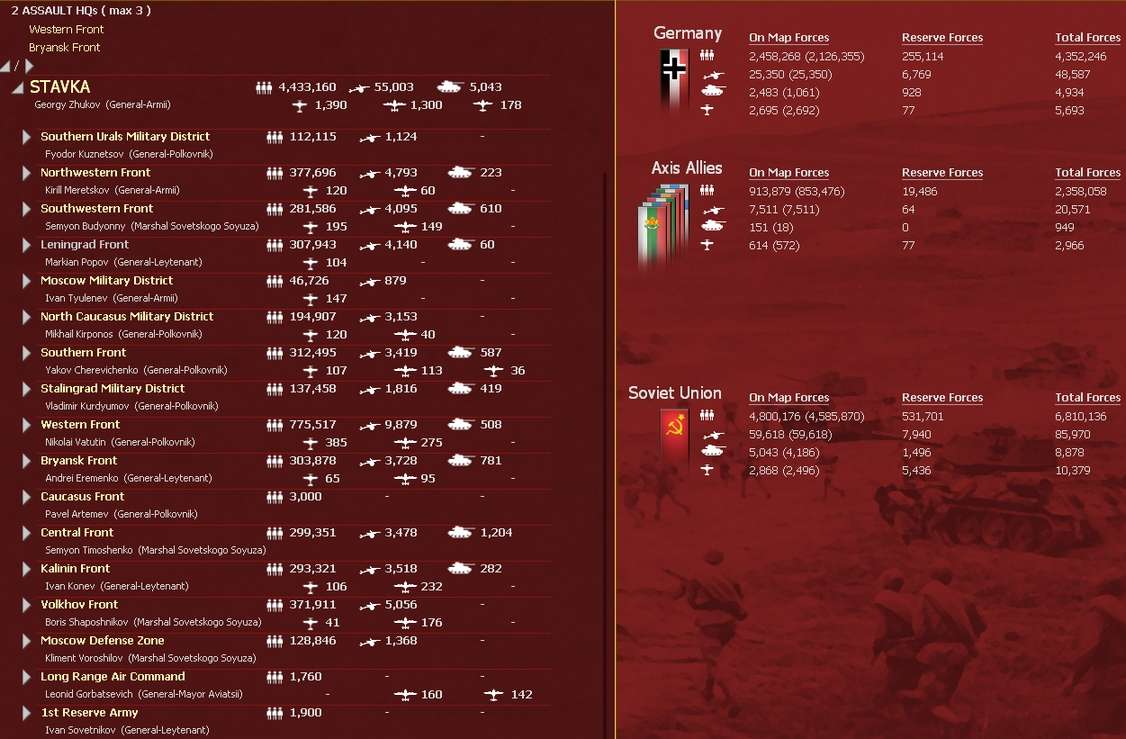
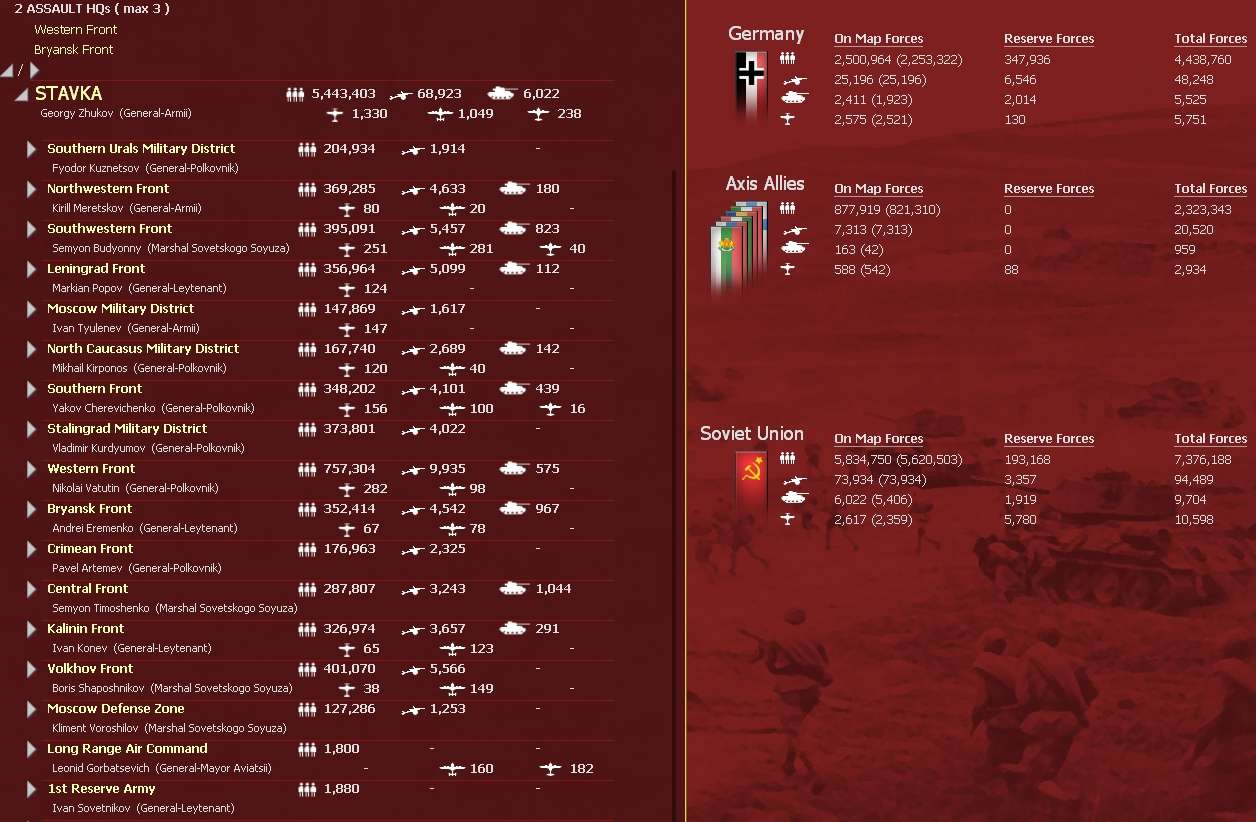
To put this into context, I have 325 on map divisions (2 are Guards, one of which is unready). 3 of these are depleted and 44 unready. The 30 unready or depleted rifle divisions average 5,000 men and 70 guns each. The 189 that are ready average 9,000 men and 140 guns each. So at a crude estimate, to bring them up to their TOE would need 350,000 men and 55,000 guns (i.e. take most of my recent reinforcements). An artillery shortage is going to be a problem well into 1943.
So time to plan what is feasible.
If I can, I want to ease the pressure on Leningrad as ideally I want a land connection which will mean I can replace the worn down divisions now defending the city. Linked to that I want to regain the dual track rail and Kalinin-Rzhev. Kalinin Front itself is too strung out to achieve much.
However, being pragmatic, I am not going to do much around Leningrad itself unless the AI weakens its forces:
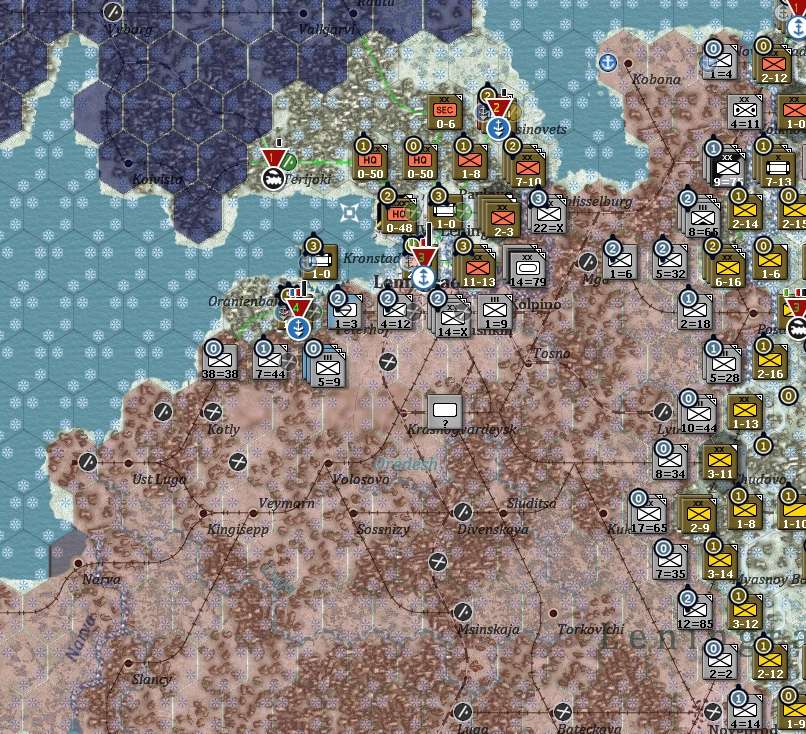
Which makes attacking along the Kalinin Front critical, not just for the local gains but to dislocate the wider German defensive lines.
One of Western Front's more decent armies (24) is well placed to help. Western Front is particularly important as it is the only Assault Front I have (which increases the speed at which I gain CPP).
Not that impressive but its as good as I have. 13 and 30 A (West) and 43 A (Bryansk) have some capacity (and 43 A will get at least 2 cavalry corps). Basically I want Borodino-Kaluga-Tula mainly to give me depth for the summer of 1942.
Central and SW Fronts have some capacity but there is no real target, anything I take I'll lose. So my goals are to force the Germans into an open retreat, see if I can win a few battles.
To the south, Southern Front and Stalingrad MD should make some gains it is going to be ephemeral. I want Rostov back, I can't see any encirclement, so again its going to be opportunistic. The arrivals from Iran will help build up here.
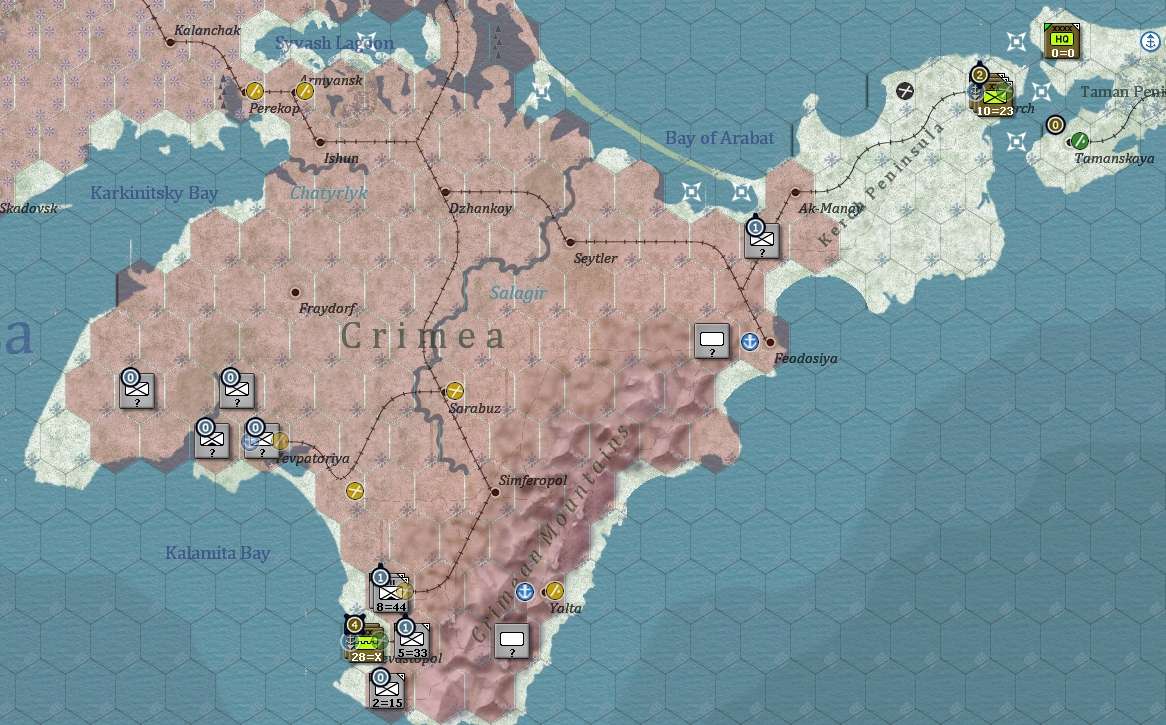
Finally the Crimea. The AI did not push towards Kerch and Sevastopol is safe till the Spring.
And the VP situation. Well the AI is safe from a Sudden Loss.
[1] but due to the new weather rules, only light mud
[2] This takes at least 3 turns to manage but I sent almost all my available rifle brigades to reinforce the local Rifle Divisions and my few effective artillery formations – as it turned out, just in time.
[3] As ever, its not just being forced to retreat, this reduced about 15 divisions to unready or depleted status.
[4] Basically I have no combat ready formations left in the Ukraine. Notionally there are 193 Rifle Divisions on map and of these 55 are depleted or unready, of the rest, they average 8,500 men and 110 guns each.
[5] The Siberian formations arrive with nil CPP but a much better TOE. I finally found the spare admin pts to place Western Front on 'assault' status so this radically improves their CPP gain (if they stay out of combat). As already stressed, high CPP is not just an offensive combat tool, it feeds into better movement capability (so the ability to move and attack in deep snow for example).
This update is based on the on-map situation at the end of turn 24
Background
By 5 October the Soviet position at Leningrad rapidly deteriorated. Not only had the Germans regained control of the west bank of the Volkhov but a massive attack had breached the Neva with German motorised troops across the river. Soviet resistance prevented any attempt to reinforce this bridgehead as Leningrad Front prepared to strike back. Equally the Germans made steady progress towards Moscow reaching a line from Kaluga to Borodino. In the Ukraine, Kharkov and the Dnepr bend all fell to the Germans as their spearheads approached Stalino.
12 October brought heavy rains [1] and some slowing of the German offensive. Leningrad Front managed to regain the line of the Neva after heavy reinforcements [2]. However, Western Front was thrown back all along its defensive line with Kaluga and Borodino lost [3]. Despite the crisis in the Ukraine (where Kursk and Stalino were lost) Stavka pulled the few reserves from SW Front to help defend Moscow [4].
19 October saw ground conditions worsen and the German offensive stall with their spearheads 60 miles from Moscow. This respite continued in the next week and Kalinin Front managed a limited offensive around Torzhok to force the Germans to redeploy mobile units to back up their infantry on that sector.
2 November saw the first snows of winter across most of the front apart from at Leningrad where the rains persisted. The Torzhok offensive and a steady build of Western Front stopped the direct German offensive towards Moscow but to the south the Soviet defences collapsed. Byransk Front sought to defend Tula with a scattering of weak formations and a combination of Central and SW Fronts held a line from Lipetsk to Voronezh as German troops approached Rostov. In the Crimea the Germans pushed back the Soviet screen and advanced towards the well defended Sevastopol.
9 November saw the first direct assault on Leningrad but the situation at Moscow improved. The need to eliminate the salient created by Kalinin Front diverted at least one Panzer Group even as Western Front rapidly built up. To the south of the Oka, the Germans renewed their attacks towards Tula while they advanced at will on the southern sector.
16 November saw the first blizzards of winter. At Moscow German troops maintained their offensive, surrounding Kalinin, capturing Tula and pushing along the north bank of the Oka. However, Stavka was finally able to start mustering a reserve [5] on this sector rather than commit the freshly arriving Siberian forces into the battle. In the south, logistics rather than Soviet resistance limited the German advance but both Rostov and Sevastopol fought off initial assaults.
23 November saw a fresh crisis at Leningrad as the Germans forced the line of the Neva again and pushed back NW Front both on the Volkhov and around Lake Ilmen. At Moscow, the strengthening Soviet lines were enough to slow the Germans to a crawl as the blizzards produced deep snow drifts. In the south, Rostov fell and Axis troops pushed over the lower Don.
Early December
Apart from some final gains at Leningrad, it was clear the German offensive was over for 1941. I’ll discuss the winter rules (and the more general weather rules) in the usual second post, here the focus is on the options. The weather this turn mostly changed to snow rather than blizzards.
Clearly, for the first time in the game, I choose the tempo and location of operations. But I don’t have much to do this with. The more I managed to keep out of combat in November (so those units built up their CPP), the more useful units I have to hand. I need high CPP in part for the obvious combat bonus but also for the secondary MP rules. Essentially in determining MP, high CPP can help offset the often low admin scores of many Soviet commanders. Given that deep snow costs more MP than most other conditions, I need high MP if I am to sustain any sort of offensive. That in turn means an attacking army will become exhausted after 2-3 weeks of action.
Now so far, I’ve been living hand to mouth with manpower reserves and administrative point allocations. I’ve just received a large (if untrained) cadre of manpower and that will help refit the numerous rifle divisions destroyed so far. In a few turns, I will receive an allocation of extra administrative points.
That will allow me to start reshaping my army. I gain the ability to build two Guards Rifle Corps and a number of Cavalry Corps in the next turn. Unlike in WiTE1, tank brigades are an off-map Support Unit so ideal to allocate to the Cavalry formations. Rifle brigades can be on or off-map, allocating 3 to a Gds Rifle Corp can transform a powerful unit into something that can break down a defensive strong point (and then needs to refit). There are plenty of other changes to WiTE1 but its worth noting I have two NKPS rail repair HQs which gives me a bit of flexibility over rail repair (or – probably better – they can help with my logistics).
To put this into context, I have 325 on map divisions (2 are Guards, one of which is unready). 3 of these are depleted and 44 unready. The 30 unready or depleted rifle divisions average 5,000 men and 70 guns each. The 189 that are ready average 9,000 men and 140 guns each. So at a crude estimate, to bring them up to their TOE would need 350,000 men and 55,000 guns (i.e. take most of my recent reinforcements). An artillery shortage is going to be a problem well into 1943.
So time to plan what is feasible.
If I can, I want to ease the pressure on Leningrad as ideally I want a land connection which will mean I can replace the worn down divisions now defending the city. Linked to that I want to regain the dual track rail and Kalinin-Rzhev. Kalinin Front itself is too strung out to achieve much.
However, being pragmatic, I am not going to do much around Leningrad itself unless the AI weakens its forces:
Which makes attacking along the Kalinin Front critical, not just for the local gains but to dislocate the wider German defensive lines.
One of Western Front's more decent armies (24) is well placed to help. Western Front is particularly important as it is the only Assault Front I have (which increases the speed at which I gain CPP).
Not that impressive but its as good as I have. 13 and 30 A (West) and 43 A (Bryansk) have some capacity (and 43 A will get at least 2 cavalry corps). Basically I want Borodino-Kaluga-Tula mainly to give me depth for the summer of 1942.
Central and SW Fronts have some capacity but there is no real target, anything I take I'll lose. So my goals are to force the Germans into an open retreat, see if I can win a few battles.
To the south, Southern Front and Stalingrad MD should make some gains it is going to be ephemeral. I want Rostov back, I can't see any encirclement, so again its going to be opportunistic. The arrivals from Iran will help build up here.
Finally the Crimea. The AI did not push towards Kerch and Sevastopol is safe till the Spring.
And the VP situation. Well the AI is safe from a Sudden Loss.
[1] but due to the new weather rules, only light mud
[2] This takes at least 3 turns to manage but I sent almost all my available rifle brigades to reinforce the local Rifle Divisions and my few effective artillery formations – as it turned out, just in time.
[3] As ever, its not just being forced to retreat, this reduced about 15 divisions to unready or depleted status.
[4] Basically I have no combat ready formations left in the Ukraine. Notionally there are 193 Rifle Divisions on map and of these 55 are depleted or unready, of the rest, they average 8,500 men and 110 guns each.
[5] The Siberian formations arrive with nil CPP but a much better TOE. I finally found the spare admin pts to place Western Front on 'assault' status so this radically improves their CPP gain (if they stay out of combat). As already stressed, high CPP is not just an offensive combat tool, it feeds into better movement capability (so the ability to move and attack in deep snow for example).
Weather Rules (esp for the first winter)
Winter Weather
We’ve already discussed how the weather system works in WiTE2, here I’ll focus on how it affects the next period of game play. The first thing to note is it will be variable between games but careful use of the forecasting table will give the Soviet player a good feel for which turns will see snowfall and which blizzards. This distinction matters in terms of the effect on the game. The second thing to note is that for the Soviets, there are no direct bonuses connected to the winter rules, the impact is all about modelling the relative lack of German preparations.
There are plenty of other interesting rules including the Lake Ladoga ice-road and the climatic oddities for the Sea of Azov., but here I’ll keep to the big picture.
Soviet perspective
Oddly this takes us back to Assault Fronts and CPP retention and recovery. As you can see from the OOB chart in the main post, I only have one of these (feasibly I could have two but can’t afford the 20 Admin Pts that could cost – this will improve in mid-December and I’ll allocate a second one). Now assault fronts have a problem in that their component units (any combat unit reporting to one of the assigned armies) can’t create fortifications better than level 1 but critically they double the rate at which units regain their CPP. If their component units are well placed they can gain up to 50 CPP per turn so units that have been in heavy combat can recover in a couple of weeks.
Now one way the CPP matters is obvious, it boosts the attack strength making it easier to break down the German defensive lines. But it also helps keep MP values high and this is especially useful for the Soviets with a lot of low initiative/low administration value leaders. Basically, 100 CPP means these checks are automatically passed when calculating MP so the adverse effects can only come from fatigue, supply/fuel or truck shortages (not leadership failures).
This improvement to MP matters as the ground conditions are going to be mostly deep snow and this can make the difference between being able to move into contact and attack as opposed to just following up a German retreat. In this game, I am looking to Western Front to deliver the opening blows and sustain its offensive in the hope of regaining some depth at Moscow for 1942.
In addition, the OOB in WiTE2 is very different. First I have two NKPS formations available. These can be used to repair rail links or, perhaps more usefully, to create key (‘super’) depots behind the most important sectors – we’ve covered logistics and I’ll come back to this in a later post.

Second, I will be able to build 8 Cavalry Corps (and more at the start of 1942) and tank brigades are only off-map Support Units. The combination can be very effective, especially if used in conjunction with any remaining Tank Divisions (fragile but very mobile). Third I can build 2 Guards Rifle Corps and again, attach support units (Rifle brigades by choice at this stage of the war). This gives me the ability to stack considerable combat power in a hex (till they run down their CPP).
[1]
It may take a while before you can have both in operation but combined (and using attached brigades) they effectively stack the equivalent of 9 divisions (you can add one more division/brigade combination) in a hex. Keep the CPP as high as you can and that has real combat power.
In effect, the Soviets can hit hard, have the assets to take any hex but lack the means to sustain this. CPP loss from combat and high MP costs combine to wear down rapidly attacking formations (and that is before any German counter-attacks).
German perspective
First their logistics have already been hampered all through 1941, that is now going to become worse. Second in any hex with blizzard conditions, or snow level 6 or higher will trigger more vehicle breakdowns, extra fatigue and more damaged elements (unless they are in a level 2 fort or city or urban hex).
As we will see, this will reduce the number of combat ready tanks to under 1,000 across the front (as in the main post they already have a serious problem in this regard) and see the combat formations steadily weaken. The good news is most of these extra losses will be recovered in the spring.
In combination this creates an interesting dilemma. As we saw, when discussing VP, there is a real incentive (possibly a real need) for a German November offensive, but they also benefit from a well prepared defensive line.
[1] We'll come back to discuss that 'W' next to the unit name in one of Red Lancer's post - its a really neat addition to the game [;)]
We’ve already discussed how the weather system works in WiTE2, here I’ll focus on how it affects the next period of game play. The first thing to note is it will be variable between games but careful use of the forecasting table will give the Soviet player a good feel for which turns will see snowfall and which blizzards. This distinction matters in terms of the effect on the game. The second thing to note is that for the Soviets, there are no direct bonuses connected to the winter rules, the impact is all about modelling the relative lack of German preparations.
There are plenty of other interesting rules including the Lake Ladoga ice-road and the climatic oddities for the Sea of Azov., but here I’ll keep to the big picture.
Soviet perspective
Oddly this takes us back to Assault Fronts and CPP retention and recovery. As you can see from the OOB chart in the main post, I only have one of these (feasibly I could have two but can’t afford the 20 Admin Pts that could cost – this will improve in mid-December and I’ll allocate a second one). Now assault fronts have a problem in that their component units (any combat unit reporting to one of the assigned armies) can’t create fortifications better than level 1 but critically they double the rate at which units regain their CPP. If their component units are well placed they can gain up to 50 CPP per turn so units that have been in heavy combat can recover in a couple of weeks.
Now one way the CPP matters is obvious, it boosts the attack strength making it easier to break down the German defensive lines. But it also helps keep MP values high and this is especially useful for the Soviets with a lot of low initiative/low administration value leaders. Basically, 100 CPP means these checks are automatically passed when calculating MP so the adverse effects can only come from fatigue, supply/fuel or truck shortages (not leadership failures).
This improvement to MP matters as the ground conditions are going to be mostly deep snow and this can make the difference between being able to move into contact and attack as opposed to just following up a German retreat. In this game, I am looking to Western Front to deliver the opening blows and sustain its offensive in the hope of regaining some depth at Moscow for 1942.
In addition, the OOB in WiTE2 is very different. First I have two NKPS formations available. These can be used to repair rail links or, perhaps more usefully, to create key (‘super’) depots behind the most important sectors – we’ve covered logistics and I’ll come back to this in a later post.
Second, I will be able to build 8 Cavalry Corps (and more at the start of 1942) and tank brigades are only off-map Support Units. The combination can be very effective, especially if used in conjunction with any remaining Tank Divisions (fragile but very mobile). Third I can build 2 Guards Rifle Corps and again, attach support units (Rifle brigades by choice at this stage of the war). This gives me the ability to stack considerable combat power in a hex (till they run down their CPP).
[1]
It may take a while before you can have both in operation but combined (and using attached brigades) they effectively stack the equivalent of 9 divisions (you can add one more division/brigade combination) in a hex. Keep the CPP as high as you can and that has real combat power.
In effect, the Soviets can hit hard, have the assets to take any hex but lack the means to sustain this. CPP loss from combat and high MP costs combine to wear down rapidly attacking formations (and that is before any German counter-attacks).
German perspective
First their logistics have already been hampered all through 1941, that is now going to become worse. Second in any hex with blizzard conditions, or snow level 6 or higher will trigger more vehicle breakdowns, extra fatigue and more damaged elements (unless they are in a level 2 fort or city or urban hex).
As we will see, this will reduce the number of combat ready tanks to under 1,000 across the front (as in the main post they already have a serious problem in this regard) and see the combat formations steadily weaken. The good news is most of these extra losses will be recovered in the spring.
In combination this creates an interesting dilemma. As we saw, when discussing VP, there is a real incentive (possibly a real need) for a German November offensive, but they also benefit from a well prepared defensive line.
[1] We'll come back to discuss that 'W' next to the unit name in one of Red Lancer's post - its a really neat addition to the game [;)]
RE: Weather Rules (esp for the first winter)
ORIGINAL: loki100
Winter Weather
The second thing to note is that for the Soviets, there are no direct bonuses connected to the winter rules, the impact is all about modelling the relative lack of German preparations.
There are plenty of other interesting rules including the Lake Ladoga ice-road and the climatic oddities for the Sea of Azov., but here I’ll keep to the big picture.
Would love more info on the above items when you get a chance. Thanks for the detailed updates!
"The Navy has a moth-eaten tradition that the captain who loses his ship is disgraced. What do they have all those ships for, if not to hurl them at the enemy?" --Douglas MacArthur
RE: Weather Rules (esp for the first winter)
ORIGINAL: dwesolick
ORIGINAL: loki100
Winter Weather
The second thing to note is that for the Soviets, there are no direct bonuses connected to the winter rules, the impact is all about modelling the relative lack of German preparations.
There are plenty of other interesting rules including the Lake Ladoga ice-road and the climatic oddities for the Sea of Azov., but here I’ll keep to the big picture.
Would love more info on the above items when you get a chance. Thanks for the detailed updates!
glad they are useful.
For Lake Ladoga, you get easier supply into Leningrad when the lake is frozen but the situation is really dire in those turms with enough ice to disrupt shipping but not enough to support trucks. You can't move combat units over the lake (which is why I really want a land connection to the city) in either state.
Sea of Azov is very shallow (& largely fresh water) so it freezes more readily than the Black Sea. This can really make a mess of cross sea supply but has little other effect. So it really depends on the geography of the front but units that need to draw supply off a port that is connected to the Sea will suffer in winter.
So in this game, for this winter the Azov rules have no practical impact this winter. I'm firmly on the SE shore and the Germans along the Ukrainian side.

RE: Weather Rules (esp for the first winter)
No questions so far, but I have to say I really appreciate these updates. Cant wait to get my hands on the final game. Keep up the good work!
-
EddyBear81
- Posts: 157
- Joined: Fri Feb 10, 2012 4:07 pm
- Location: Lille, France
RE: Defending the Rodina - A Soviet WiTE2 AAR
From the AAR, I have the feeling that with the "preparation points" system, we will actually see 1941 soviet counter attacks : is it something that you have experienced ?
By preparing in advance, the "defending side" can have the opportunity to strike back significantly. In a WITW setting for example, this would make room for an Adrennes offensive that is mostly out of the equation in the current game. If this becomes a reality in WITE 2, it's a big step forward to reconcile historical perspective and wargame mechanics.
Can't wait for the release date !
RE: Defending the Rodina - A Soviet WiTE2 AAR
ORIGINAL: EddyBear81
From the AAR, I have the feeling that with the "preparation points" system, we will actually see 1941 soviet counter attacks : is it something that you have experienced ?
By preparing in advance, the "defending side" can have the opportunity to strike back significantly. In a WITW setting for example, this would make room for an Adrennes offensive that is mostly out of the equation in the current game. If this becomes a reality in WITE 2, it's a big step forward to reconcile historical perspective and wargame mechanics.
Can't wait for the release date !
yes, spoiling attacks etc are now very much part of the game. If you push back a formation it sheds all its CPP, so if you spot a build up a well timed counter-stroke can really gain an advantage (also, as in WiTW, units that are attacked lose MP for the next phase). In the context of the Summer of 1941 its likely you risk the attacking force (from a Soviet POV) but it may also blunt one part of a planned major encirclement.
One critical turn for this sort of thing is the transition in November from rains to snow. As historically that can be a good time for a German offensive (& they may well need it due to the VP situation), if they leave Pzrs in the front line its an open invitation for the Soviets to hit them ... now of course in turn that could well be a planned trap (such are the joys and perils of MP games).
Also, it allows the notionally weaker side to horde a reserve that they keep out of immediate combat and then attack when your opponent is over-extended, you may well have 2-3 turns when a relatively weak force is dominant on a given sector as a result.
In general, I'd say that CPP is the core currency in WiTE2. There is plenty else that matters but given they influence combat (obv for the attacker, indirect for the defender), MPs and the supply system then getting used to building them up and when to expend is a key skill.
T32
31 January 1942
This update is based on the on-map situation at the end of the T32.
Background
I’ll change the reporting structure a bit so as to discuss each of the main sectors across the eight turns rather than a turn by turn summary.
Leningrad
By early January the newly created Volkhov Front had made gains and had mostly cleared the Germans from the shores of Lake Ladoga. A series of German attacks from 5-18 January 1942 stopped this local offensive and drove Soviet forces back almost to their starting lines. However, in turn this exhausted the local German forces and by 24 January, Volkhov Front had managed a secure land connection to Leningrad.
[key issue on this sector – you can only take what is offered, its really hard to build up critical mass given the supply problems]
Kalinin-Rzhev
This sector attacked on 14 December and gained a small breakthrough south of Torzhok with this steadily escalating into a clear breakthrough by 27 December. Linked with the gains by Western Front this started to threaten Rzhev. Soviet cavalry managed to briefly liberate the city on 3 January 1942 as the Germans pulled back under pressure from Western Front. The city was lost to a German counterattack but then retaken on 11 January as the Germans fell back.
After a short rest, elements of the Kalinin Front managed to break the German lines south of Rzhev encircling several German divisions.
[key issue on this sector – a non-assault front simply needs to stop operations every 2-3 turns]
Kaluga-Tula-Orel
The first week of the Soviet counter-attack was limited to this sector. Western Front made some limited gains around Podolsk and Bryansk Front managed to break through the weakly held German front to the east of Tula. By 20 December fighting was going on all along this sector but with limited gains.
By the 27 December, both Fronts were in action across the entire line with Western Front breaking the German defensive line and Bryansk Front regaining Tula.
Western Front sustained this pressure into early January [1] but Bryansk Front was unable to move beyond Tula. By 10 January, AGC was starting to crumble under the sustained pressure [2] but both Western and Bryansk Fronts (this is now set as an Assault Front too) were becoming exhausted. This led to the liberation of Kaluga by 17 January.

[3]
[key issue here – Assault fronts recover quickly and have the MP to exploit gaps. Also the Soviets can probably afford to use echelon targets on a single sector – and given the importance of Moscow, this is a good choice]
The South
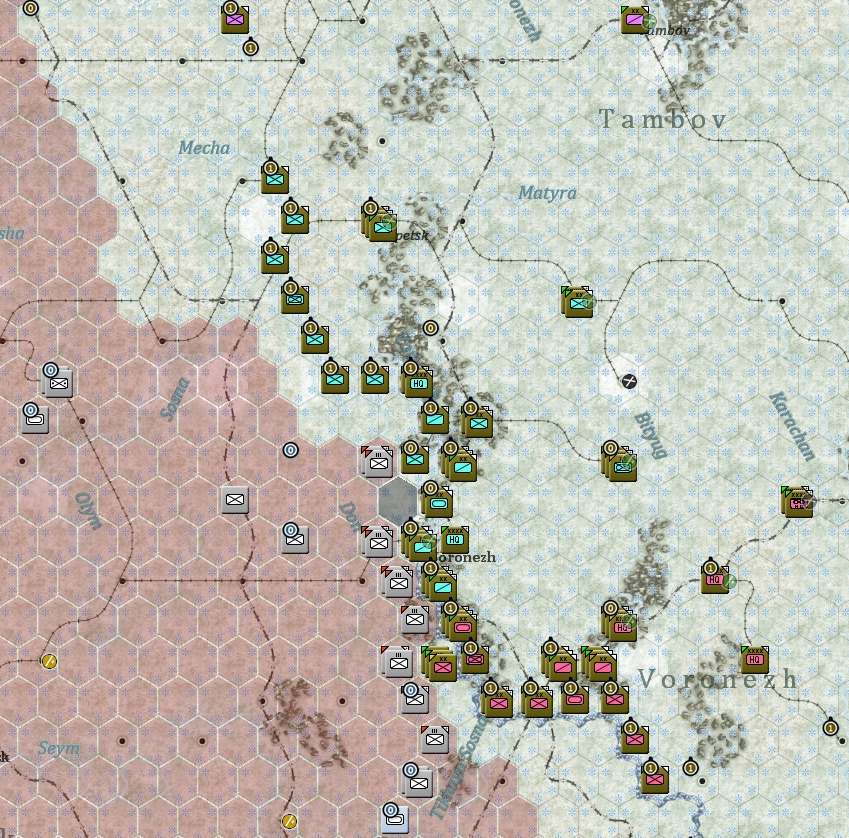
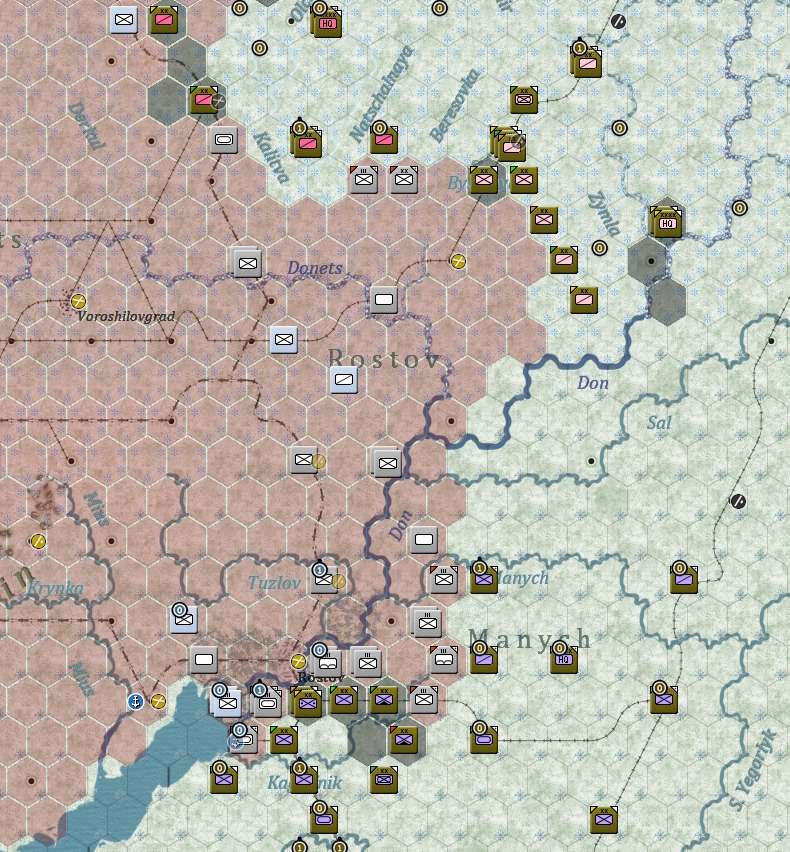
10 January saw the first significant gains on this sector. Early fighting had been localised as the Soviets lacked the forces to generate a sustained attack. However, elements of Southern Front managed to liberate Rostov and South-Western Front had regained most of the critical rail line running south of Voronezh. Over the following weeks, the Germans steadily pulled back from their positions to the east of Rostov.
[key issue here – regaining Rostov is essential for the VP score, really nothing else matters and any gains are likely to be lost in Spring-Summer 1942 in any case].
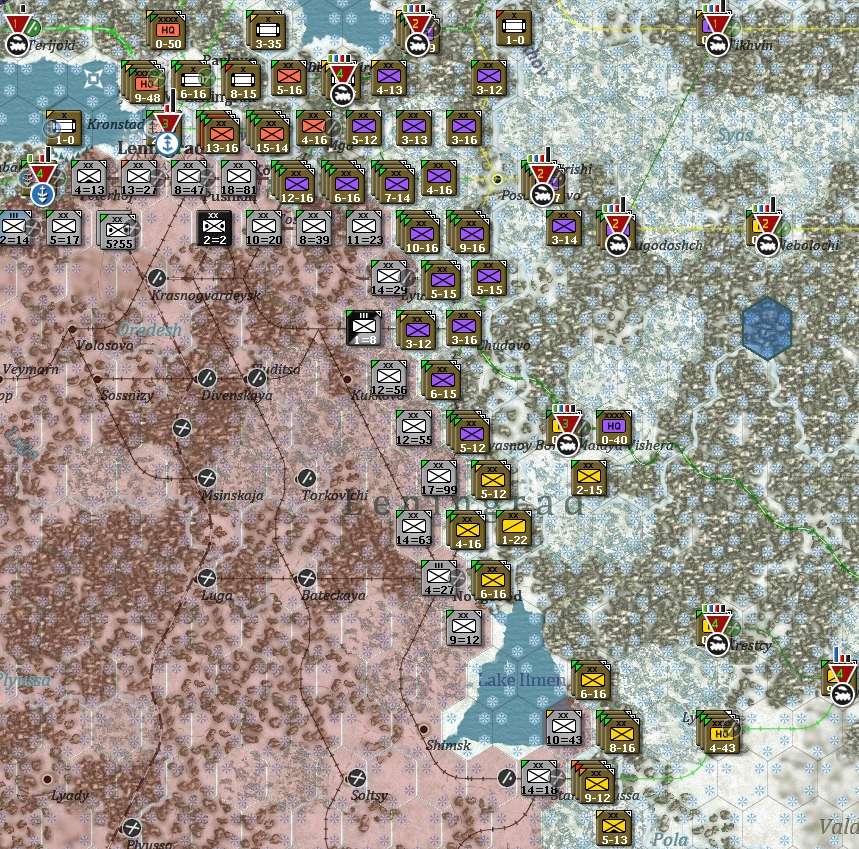
T32: 24 January 1942
At Leningrad, Volkhov Front has managed to secure a reasonably deep defensive belt covering Lake Ladoga.
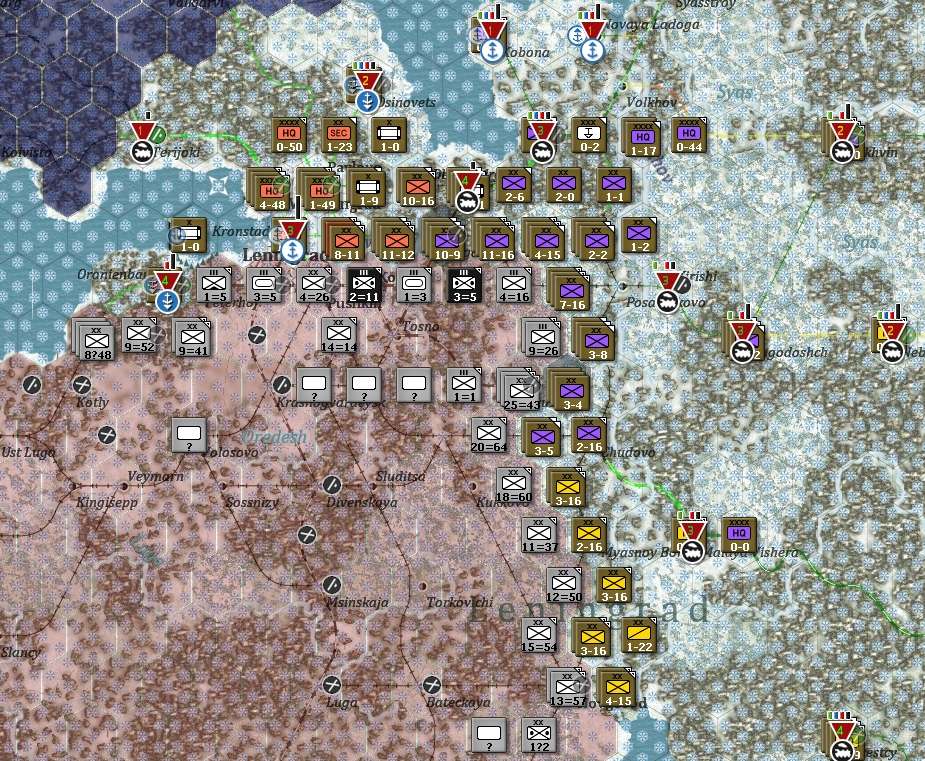
Several things worth noting. At the moment this sector has some of my best commanders as protecting Leningrad has been a major goal. Supply remains a real challenge. The dual track rail via Kalinin is helpful but most of the freight is being claimed further east. The main supply routes are the 2 single track rails to the north. One practical problem is it becomes very hard to refit under-strength formations (we’ll talk about logistics in the related post).
To help, I am using one of my NKPS formations. At this point it is repairing the rails next to Shisselburg (as it is even harder to push supply and replacements into Leningrad) but it will create a ‘super-depot’ soon.
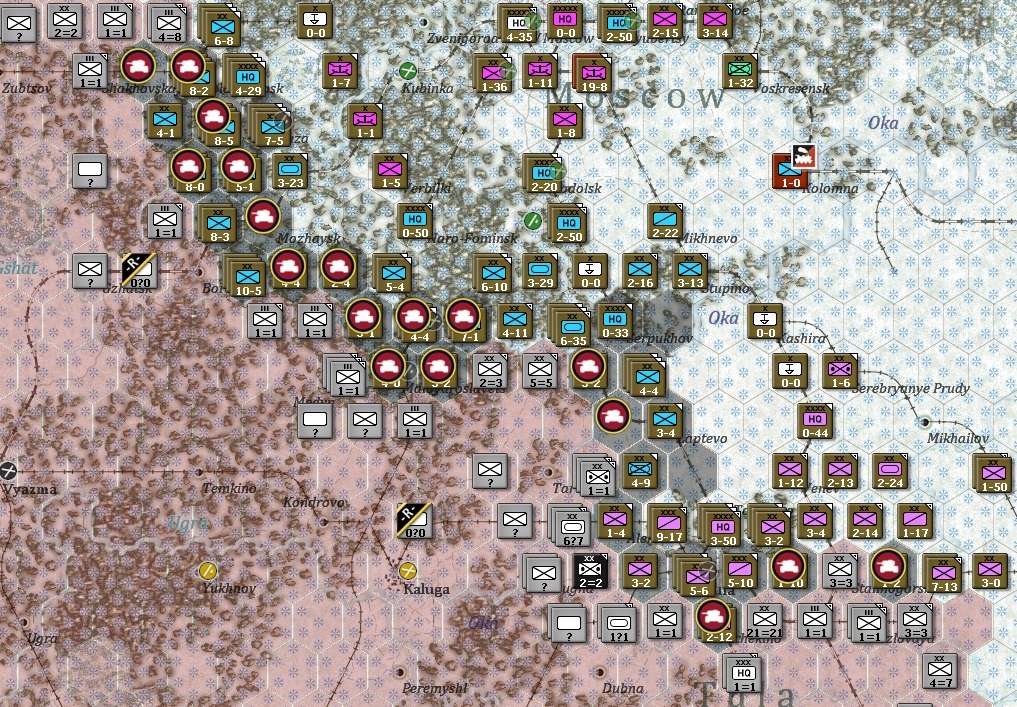
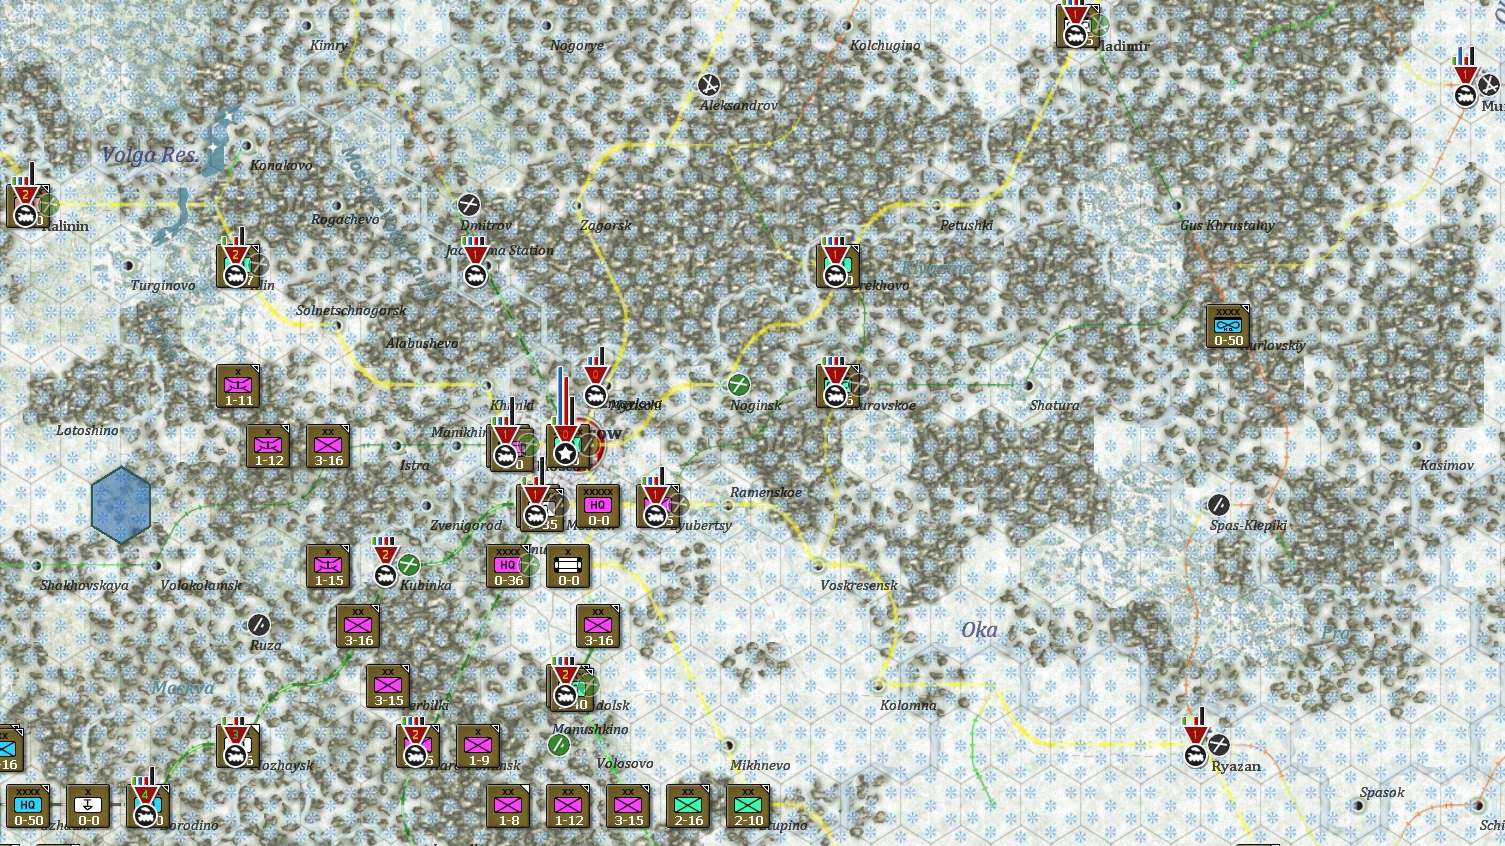
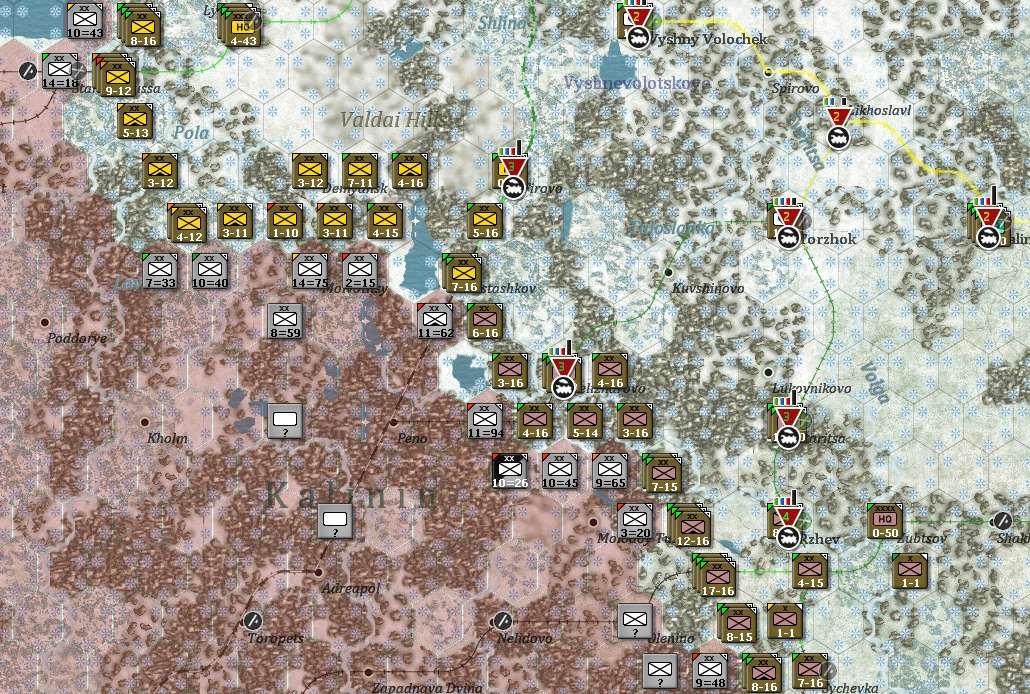
Situation at Moscow is better.
Following my capture of Kaluga the local German lines fell apart. As a reminder, at this stage of the war well supplied Mech Divisions (the few you have left) can be very mobile (if vulnerable in combat). Allow them to build up their CPP (to protect the MP) and they can exploit this sort of gap.
To the south, there is very little happening. In practice this sector is a potential death trap when the Germans attack again in 1942 so anything I take, I’ll lose. The units from Iran are reinforcing Southern Front and may make it possible to briefly retake Stalino.
Since I am cautious (or just pessimistic), a fortification line is being constructed at Stalingrad [4].
The order of battle reflects the severe problems the Germans have in bringing up replacements and the impact of the weather on their ready tanks.
I’m struggling to keep my Fronts below their command capacity, which is why several MDs are in use. At Moscow the Moscow MD and the MDZ are handy as their formations can dig entrenchments over level 1 which means I can set up prepared lines just in case.
A few things worth noting. The Soviets start to gain a cluster of ‘Reserve’ Armies at this stage. As such they are not much use (their low TOE hampers their command effectiveness) but can still be placed on depots to improve their capacity. Also many flip to normal armies (some even to Guards) as 1942 progresses. So as with the at-start Corps, don’t disband them.
I could have 3 assault fronts but am only using 2. In part as I am still short of admin pts (I had 9 left at the end of that turn) and the 20 cost is a real drain but also I’m not sure where I want to place this. At the moment the ability to dig in over level 1 forts is attractive.
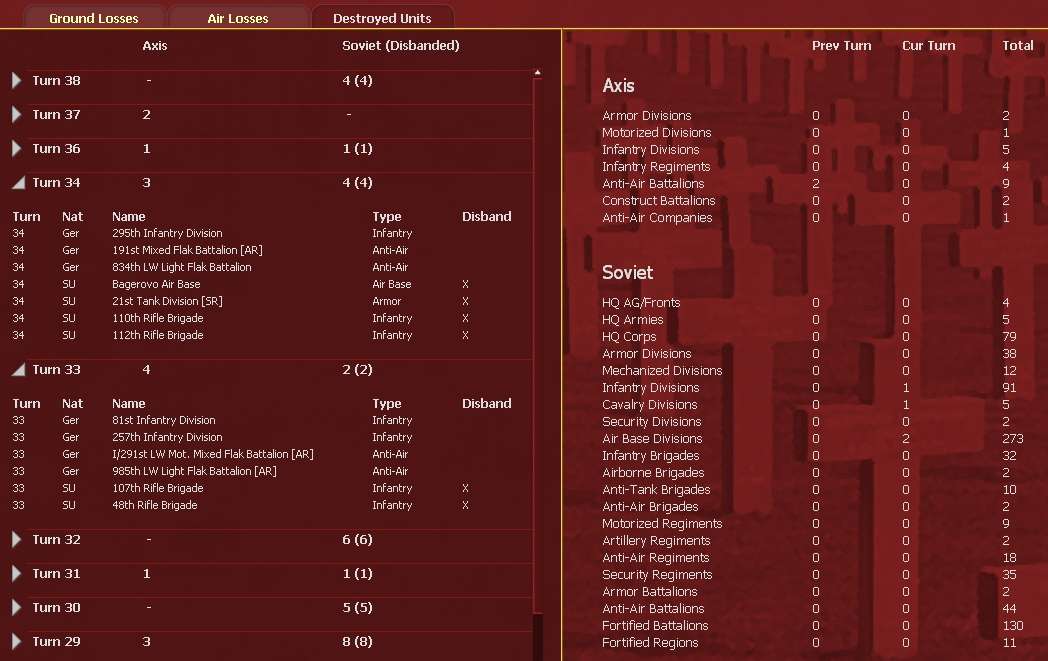
Losses.

Again a few things to note. While the Axis losses are high, most are disabled (the weather effect) and a large number of them will return come the Spring. This might give German players a hint as to how to handle refits from say October onwards. There is relatively little to gain to pushing replacement manpower up to the front line formations given that most will then be sent back as disabled. The time to rest and refit the Ostheer is April-May 1942.
Note I have lost 3.3m men, 2m as permanent losses. At this stage of the war my manpower pool was down to 210,000 (mainly due to refitting all the returning rifle divisions).
To put this in context, I had the equivalent of 238 Rifle Divisions (on map) and 7 of these were Gds (6 in the 2 Corps). 12 Mechanized Divisions were still in action (these will convert to Rifle Divisions fairly soon). 13 Cavalry Corps (the maximum possible) and 26 Cavalry Divisions. As off-map Support Units I have 48 tank brigades (almost all attached to the Cavalry Corps at this stage).
[1] Key here is this is the one sector where I have an operational reserve. An army can attack for 2-3 turns, and then fall back and be replaced. Since it is an ‘assault’ front, I can maintain a relatively high CPP and that not only helps with combat power but also keeps my MP relatively high.
[2] Since it has lost the fort line it is now fighting in the open, the destruction is less related to direct combat losses and more damaged elements due to the winter attrition rules. But those losses can’t be replaced (probably till April-May) as the German logistics system is under severe strain.
[3] Even worn down by fairly constant action, the Gds Rifle Corp is central to these set piece assaults. There, combined with its 3 attached rifle brigades, it contributed 540 of the original 779 CV.
[4] Something to watch out for is that forts over level 2 are very expensive in terms of their supply cost (as are air bases over level 1). So can only be built in areas with good supply – or very slowly. Some of those will not be really ready (spoiler) for when they are needed in the summer of 1942.
This update is based on the on-map situation at the end of the T32.
Background
I’ll change the reporting structure a bit so as to discuss each of the main sectors across the eight turns rather than a turn by turn summary.
Leningrad
By early January the newly created Volkhov Front had made gains and had mostly cleared the Germans from the shores of Lake Ladoga. A series of German attacks from 5-18 January 1942 stopped this local offensive and drove Soviet forces back almost to their starting lines. However, in turn this exhausted the local German forces and by 24 January, Volkhov Front had managed a secure land connection to Leningrad.
[key issue on this sector – you can only take what is offered, its really hard to build up critical mass given the supply problems]
Kalinin-Rzhev
This sector attacked on 14 December and gained a small breakthrough south of Torzhok with this steadily escalating into a clear breakthrough by 27 December. Linked with the gains by Western Front this started to threaten Rzhev. Soviet cavalry managed to briefly liberate the city on 3 January 1942 as the Germans pulled back under pressure from Western Front. The city was lost to a German counterattack but then retaken on 11 January as the Germans fell back.
After a short rest, elements of the Kalinin Front managed to break the German lines south of Rzhev encircling several German divisions.
[key issue on this sector – a non-assault front simply needs to stop operations every 2-3 turns]
Kaluga-Tula-Orel
The first week of the Soviet counter-attack was limited to this sector. Western Front made some limited gains around Podolsk and Bryansk Front managed to break through the weakly held German front to the east of Tula. By 20 December fighting was going on all along this sector but with limited gains.
By the 27 December, both Fronts were in action across the entire line with Western Front breaking the German defensive line and Bryansk Front regaining Tula.
Western Front sustained this pressure into early January [1] but Bryansk Front was unable to move beyond Tula. By 10 January, AGC was starting to crumble under the sustained pressure [2] but both Western and Bryansk Fronts (this is now set as an Assault Front too) were becoming exhausted. This led to the liberation of Kaluga by 17 January.
[3]
[key issue here – Assault fronts recover quickly and have the MP to exploit gaps. Also the Soviets can probably afford to use echelon targets on a single sector – and given the importance of Moscow, this is a good choice]
The South
10 January saw the first significant gains on this sector. Early fighting had been localised as the Soviets lacked the forces to generate a sustained attack. However, elements of Southern Front managed to liberate Rostov and South-Western Front had regained most of the critical rail line running south of Voronezh. Over the following weeks, the Germans steadily pulled back from their positions to the east of Rostov.
[key issue here – regaining Rostov is essential for the VP score, really nothing else matters and any gains are likely to be lost in Spring-Summer 1942 in any case].
T32: 24 January 1942
At Leningrad, Volkhov Front has managed to secure a reasonably deep defensive belt covering Lake Ladoga.
Several things worth noting. At the moment this sector has some of my best commanders as protecting Leningrad has been a major goal. Supply remains a real challenge. The dual track rail via Kalinin is helpful but most of the freight is being claimed further east. The main supply routes are the 2 single track rails to the north. One practical problem is it becomes very hard to refit under-strength formations (we’ll talk about logistics in the related post).
To help, I am using one of my NKPS formations. At this point it is repairing the rails next to Shisselburg (as it is even harder to push supply and replacements into Leningrad) but it will create a ‘super-depot’ soon.
Situation at Moscow is better.
Following my capture of Kaluga the local German lines fell apart. As a reminder, at this stage of the war well supplied Mech Divisions (the few you have left) can be very mobile (if vulnerable in combat). Allow them to build up their CPP (to protect the MP) and they can exploit this sort of gap.
To the south, there is very little happening. In practice this sector is a potential death trap when the Germans attack again in 1942 so anything I take, I’ll lose. The units from Iran are reinforcing Southern Front and may make it possible to briefly retake Stalino.
Since I am cautious (or just pessimistic), a fortification line is being constructed at Stalingrad [4].
The order of battle reflects the severe problems the Germans have in bringing up replacements and the impact of the weather on their ready tanks.
I’m struggling to keep my Fronts below their command capacity, which is why several MDs are in use. At Moscow the Moscow MD and the MDZ are handy as their formations can dig entrenchments over level 1 which means I can set up prepared lines just in case.
A few things worth noting. The Soviets start to gain a cluster of ‘Reserve’ Armies at this stage. As such they are not much use (their low TOE hampers their command effectiveness) but can still be placed on depots to improve their capacity. Also many flip to normal armies (some even to Guards) as 1942 progresses. So as with the at-start Corps, don’t disband them.
I could have 3 assault fronts but am only using 2. In part as I am still short of admin pts (I had 9 left at the end of that turn) and the 20 cost is a real drain but also I’m not sure where I want to place this. At the moment the ability to dig in over level 1 forts is attractive.
Losses.
Again a few things to note. While the Axis losses are high, most are disabled (the weather effect) and a large number of them will return come the Spring. This might give German players a hint as to how to handle refits from say October onwards. There is relatively little to gain to pushing replacement manpower up to the front line formations given that most will then be sent back as disabled. The time to rest and refit the Ostheer is April-May 1942.
Note I have lost 3.3m men, 2m as permanent losses. At this stage of the war my manpower pool was down to 210,000 (mainly due to refitting all the returning rifle divisions).
To put this in context, I had the equivalent of 238 Rifle Divisions (on map) and 7 of these were Gds (6 in the 2 Corps). 12 Mechanized Divisions were still in action (these will convert to Rifle Divisions fairly soon). 13 Cavalry Corps (the maximum possible) and 26 Cavalry Divisions. As off-map Support Units I have 48 tank brigades (almost all attached to the Cavalry Corps at this stage).
[1] Key here is this is the one sector where I have an operational reserve. An army can attack for 2-3 turns, and then fall back and be replaced. Since it is an ‘assault’ front, I can maintain a relatively high CPP and that not only helps with combat power but also keeps my MP relatively high.
[2] Since it has lost the fort line it is now fighting in the open, the destruction is less related to direct combat losses and more damaged elements due to the winter attrition rules. But those losses can’t be replaced (probably till April-May) as the German logistics system is under severe strain.
[3] Even worn down by fairly constant action, the Gds Rifle Corp is central to these set piece assaults. There, combined with its 3 attached rifle brigades, it contributed 540 of the original 779 CV.
[4] Something to watch out for is that forts over level 2 are very expensive in terms of their supply cost (as are air bases over level 1). So can only be built in areas with good supply – or very slowly. Some of those will not be really ready (spoiler) for when they are needed in the summer of 1942.
Game Concepts: Logistics
Logistics
We have discussed the logistics model in a separate thread, so here I’ll focus on what it means for the Soviet player.
The real issue for the Soviet player at this stage is you have sectors where you have relatively few problems (such as Moscow) as you are near to your National Supply Sources (NSS) and areas where the single track rails, small railyards and limited depots all add to major problems in supply delivery.
So let’s start with Moscow.
Before talking about logistics – note the large airbases behind Moscow. All those have built since the start of the game. They are not much use at the moment as longer ranged Level Bombers take heavy operational losses in poor weather. Come the spring, I can fill them out with both normal bombers and the heavier Il4s etc. The latter will then mostly be used to attack the German logistics network, by bombing a railyard you decrease the capacity of the attached depot.
So the basics of a WiTE2 logistics network. The NSS generate supplies etc and are given a notional importance of 0. They also have a lot of rail capacity.
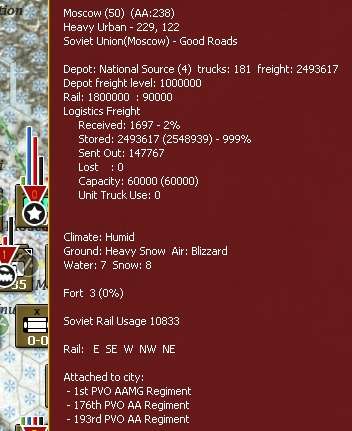
They actually have more freight than they can use up but even so that is the core of the Soviet logistics system.
Freight moves from depot to depot, up the chain of priority (so a priority 1 can claim from a priority 0 but not another priority 1). So a priority 4 depot can only claim freight, not send it to another depot. So moving to Borodino:

It is taking all its received freight from Moscow. The rail yard is not fully repaired so capacity is less than it should be. However, the army command (in this case 13A) can add up to 20k of freight capacity (this may be reduced if it has missing support squads) to the depot. Sometimes this makes little difference as insufficient freight can be delivered (or stored) but here Borodino is far more efficient as a result. In turn that means the Soviet front line units can draw their supply from a closer location so they can keep their trucks for unit mobility.
On the other side of the coin, resupply to the Volkhov formations is a challenge.
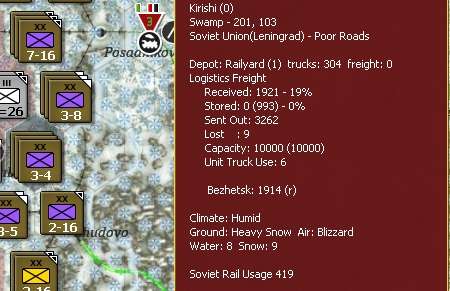
There is no real need to stack a HQ there (though if you can, you should) as it receives far less than it can process in any case. Note here it is drawing supply from an intermediate depot – you always need these chains.
If you press the ‘8’ key you can an overview of how your combat units are being supplied.
So the depot we have just reviewed is the source of supply for the 12 divisions defending the upper Volkhov line. And even for a static sector, that is really not enough
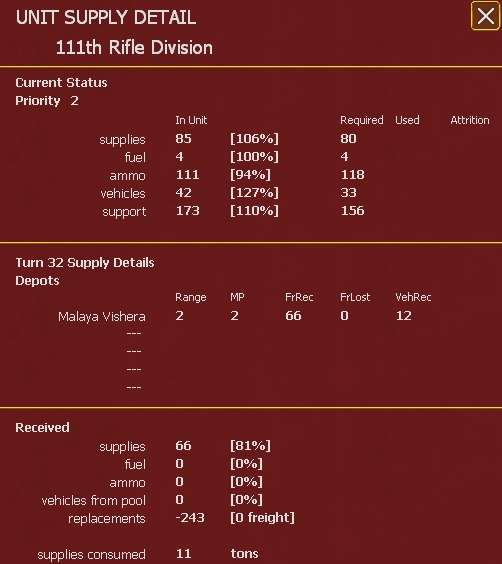
Since that unit is not actually fighting it is ok for supply and ammo but if it was attacking it would soon run down its stocks.
Final bit before closing this discussion. At this stage of the game the ‘super-depots’ are of limited gain. But as the Soviets go over to the offensive (or in a supply poor region) they become critical. If a NKPS (or FBD) is stacked on a depot (and does not move in the previous turn), that depot will claim the majority of supplies from the local network. If a HQ is present to improve capacity, then such a depot can really alter the local supply networks.
To see that in practice, late 1944 (ok this is a real spoiler) and the 1 Ukrainian Front has broken the German line in Silesia, fuelled by the depot at Tarnow. Its working at capacity, pulling in the freight needed to sustain a front with 9 Mechanized or Tank Corps.

Having such a depot nearby makes it easier to send the fuel, ammunition, supply and replacements needed for such a collection of units (that Front has over 1 million men and over 6,000 tanks).
Contrast that with a normal depot that is not being allocated the freight it has the capacity to process.

The key challenge for the German player in 1941 is how to balance using their FBD rail repair HQs to push the rail lines east or to set up these super-depots. Often this boost to the local supply network is of far more value than a rail head notionally closer to the actual front line.
We have discussed the logistics model in a separate thread, so here I’ll focus on what it means for the Soviet player.
The real issue for the Soviet player at this stage is you have sectors where you have relatively few problems (such as Moscow) as you are near to your National Supply Sources (NSS) and areas where the single track rails, small railyards and limited depots all add to major problems in supply delivery.
So let’s start with Moscow.
Before talking about logistics – note the large airbases behind Moscow. All those have built since the start of the game. They are not much use at the moment as longer ranged Level Bombers take heavy operational losses in poor weather. Come the spring, I can fill them out with both normal bombers and the heavier Il4s etc. The latter will then mostly be used to attack the German logistics network, by bombing a railyard you decrease the capacity of the attached depot.
So the basics of a WiTE2 logistics network. The NSS generate supplies etc and are given a notional importance of 0. They also have a lot of rail capacity.
They actually have more freight than they can use up but even so that is the core of the Soviet logistics system.
Freight moves from depot to depot, up the chain of priority (so a priority 1 can claim from a priority 0 but not another priority 1). So a priority 4 depot can only claim freight, not send it to another depot. So moving to Borodino:
It is taking all its received freight from Moscow. The rail yard is not fully repaired so capacity is less than it should be. However, the army command (in this case 13A) can add up to 20k of freight capacity (this may be reduced if it has missing support squads) to the depot. Sometimes this makes little difference as insufficient freight can be delivered (or stored) but here Borodino is far more efficient as a result. In turn that means the Soviet front line units can draw their supply from a closer location so they can keep their trucks for unit mobility.
On the other side of the coin, resupply to the Volkhov formations is a challenge.
There is no real need to stack a HQ there (though if you can, you should) as it receives far less than it can process in any case. Note here it is drawing supply from an intermediate depot – you always need these chains.
If you press the ‘8’ key you can an overview of how your combat units are being supplied.
So the depot we have just reviewed is the source of supply for the 12 divisions defending the upper Volkhov line. And even for a static sector, that is really not enough
Since that unit is not actually fighting it is ok for supply and ammo but if it was attacking it would soon run down its stocks.
Final bit before closing this discussion. At this stage of the game the ‘super-depots’ are of limited gain. But as the Soviets go over to the offensive (or in a supply poor region) they become critical. If a NKPS (or FBD) is stacked on a depot (and does not move in the previous turn), that depot will claim the majority of supplies from the local network. If a HQ is present to improve capacity, then such a depot can really alter the local supply networks.
To see that in practice, late 1944 (ok this is a real spoiler) and the 1 Ukrainian Front has broken the German line in Silesia, fuelled by the depot at Tarnow. Its working at capacity, pulling in the freight needed to sustain a front with 9 Mechanized or Tank Corps.
Having such a depot nearby makes it easier to send the fuel, ammunition, supply and replacements needed for such a collection of units (that Front has over 1 million men and over 6,000 tanks).
Contrast that with a normal depot that is not being allocated the freight it has the capacity to process.
The key challenge for the German player in 1941 is how to balance using their FBD rail repair HQs to push the rail lines east or to set up these super-depots. Often this boost to the local supply network is of far more value than a rail head notionally closer to the actual front line.
RE: Game Concepts: Logistics
Is it correct to understand that Grds units will be automatically upgraded on a predetermined date? Does the player have any influence over which units will be upgraded and the timing of these upgrades?
RE: Game Concepts: Logistics
WoW - will it be possible to export in CSV all these data regarding depots?
Chancellor Gorkon to Captain James T. Kirk:
You don't trust me, do you? I don't blame you. If there is to be a brave new world, our generation is going to have the hardest time living in it.
You don't trust me, do you? I don't blame you. If there is to be a brave new world, our generation is going to have the hardest time living in it.
RE: Weather Rules (esp for the first winter)
ORIGINAL: loki100
ORIGINAL: dwesolick
ORIGINAL: loki100
Winter Weather
The second thing to note is that for the Soviets, there are no direct bonuses connected to the winter rules, the impact is all about modelling the relative lack of German preparations.
There are plenty of other interesting rules including the Lake Ladoga ice-road and the climatic oddities for the Sea of Azov., but here I’ll keep to the big picture.
Would love more info on the above items when you get a chance. Thanks for the detailed updates!
glad they are useful.
For Lake Ladoga, you get easier supply into Leningrad when the lake is frozen but the situation is really dire in those turms with enough ice to disrupt shipping but not enough to support trucks. You can't move combat units over the lake (which is why I really want a land connection to the city) in either state.
Sea of Azov is very shallow (& largely fresh water) so it freezes more readily than the Black Sea. This can really make a mess of cross sea supply but has little other effect. So it really depends on the geography of the front but units that need to draw supply off a port that is connected to the Sea will suffer in winter.
So in this game, for this winter the Azov rules have no practical impact this winter. I'm firmly on the SE shore and the Germans along the Ukrainian side.
An ice road across the Sea of Azov was actually used by parts of 1st Panzerarmy's retreat from the Caucasus in the end of January/beginnig of February 1943, while Rostov as main escape route was threatened by capture by Soviet armoured spearheads.

RE: Weather Rules (esp for the first winter)
ORIGINAL: ncc1701e
WoW - will it be possible to export in CSV all these data regarding depots?
Yes.
John
WitE2 Asst Producer
WitE & WitW Dev
WitE2 Asst Producer
WitE & WitW Dev
RE: Game Concepts: Logistics
ORIGINAL: robinsa
Is it correct to understand that Grds units will be automatically upgraded on a predetermined date? Does the player have any influence over which units will be upgraded and the timing of these upgrades?
Combat Units key off their number of wins/year date. Its a bit random so an eligible unit may not convert despite passing the thresholds.
Gds Army HQs are handled via the reinforcement system, so yes they appear from their historical source at the correct date. The WiTE1 model gives a bit of a false impression, some like 8 GA were indeed battlefield promotions but a lot were simply redesignated from the Reserve Army HQs.
But you have % caps by unit type. So x% of tank formations can be Gds in a given year, and once this cap is met, then you can't promote any more.
I'll talk about Gds air formations in a later post.
T38
14 March 1942
This update is based on the on-map situation at the end of T38.
Background
This summary can be more brief as in this phase of the campaign most turns see relatively minor adjustments to the front. The Soviets lack the assets to really break the line and exploit and the German formations steadily recover from their low point in January. In addition to a strong seasonal element to the flow of the game, I think the game fairly naturally has these periods when, for an awful lot of effort, not much really changes in the short term.
At Leningrad, the AI pulled back enough to allow me to re-establish a link to Leningrad that was some 20-30 miles deep along the shores of Lake Ladoga.
Kalinin and NW Fronts struggled to make any gains in this period, since both were too strung out to allow them to concentrate and refit.
Even at Moscow, gains were limited. Here this was less due to Soviet weaknesses and more that the AI prioritised this sector. It took 5 turns to reach the outskirts of Vyazma.
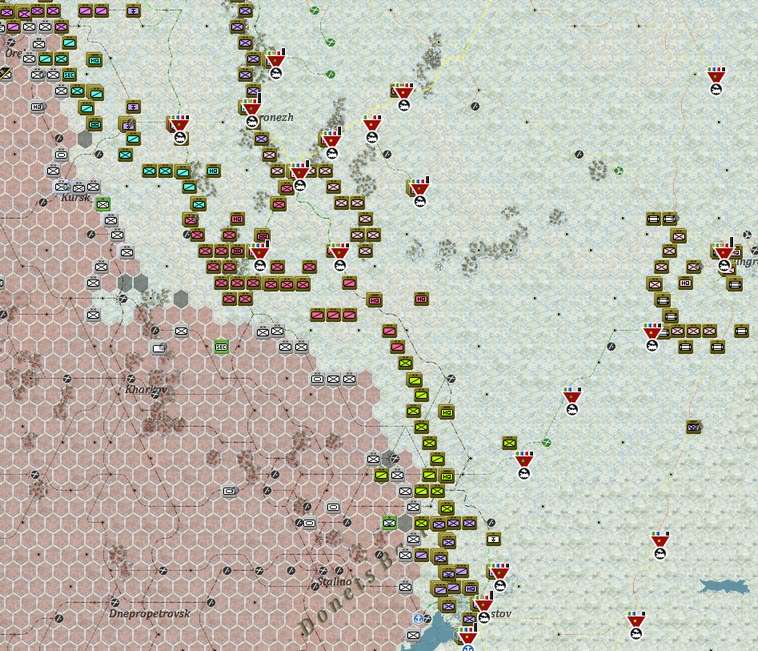
The advantage to me of this concentration came in Southern Russia where Byransk Front managed to almost reach Orel and Central Front Kursk by 8 March. To the south, Southern and SW Fronts had regained Voroshilovgrad.
T38 – 8 March 1942
As may be obvious from the summary. this is not a phase with sweeping movements or dramatic gains. The Soviet player has the initiative but it is limited (in reality you can pick one sector where you can try to make sustained gains – almost everywhere else it is a case of taking what is offered). You are very reliant on the cavalry formations for mobility as you steadily lose the last of your Tank and Mechanized Divisions. As discussed in the last post, at the far northern and southern ends of the line supply is also a constraint, even if you can bring in fuel and ammunition, you can’t readily replace losses.
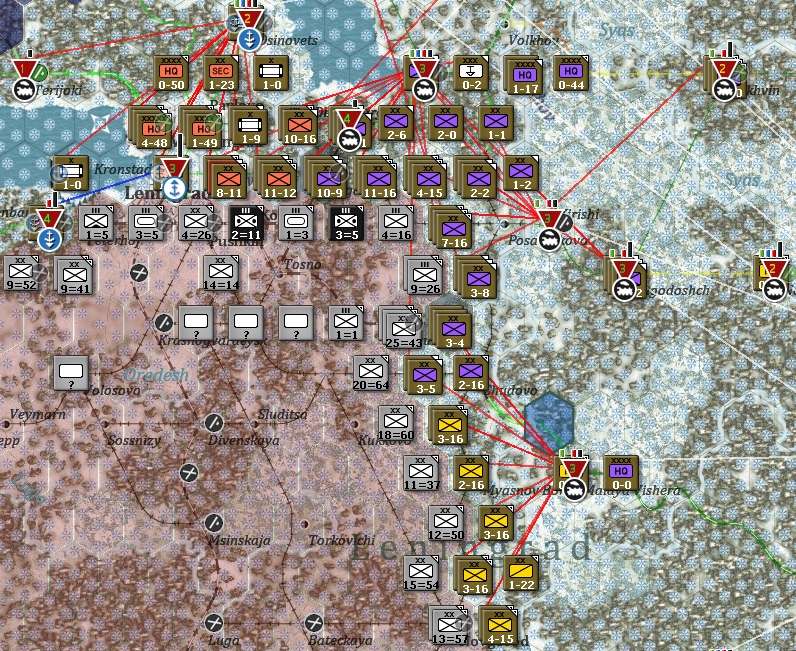
Looking at the front lines from north to south.
Leningrad-Lake Ilmen is now stalemated, I have a good connection to the city and the start of a decent depot network. The gamble is every time I risk an attack I may well fail and bring the whole, rather fragile, defensive line down.
The long front across the Kalinin-Valdai sector is much the same. Since the dual track rail towards Leningrad is firmly in my hands I am content to let this stall as well.
Around Moscow, Western Front has battered its way to the outskirts of Vyazma. Bryansk Front has finally gained some momentum as the Germans weaken, in part by choice as the AI has focussed on holding Vyazma and partly as this sector is open terrain so its hard for either side to stall an offensive once it has some momentum. As you can see, Orel should fall in the next turn and there is a small pocket to the north.

In Southern Russia effectively both sides have largely disengaged. I can’t take Kursk-Kharkov and strongly suspect I’ll just lose everything in a renewed German offensive. As maybe clear, I have started creating my defensive lines (and building airbases to the east and north of the Don).
The respective OOBs reflect recent events. The Germans are actually recovering (the low point was less than 900 ready tanks) and have a substantive reserve (this will be formations refitting and also the manpower lost to attrition starting to filter back). I’ll talk about the Soviet reserve in the second post.
Worth noting two things from the detailed Soviet list. First I am making a lot of use of the MDs, especially the two connected with Moscow. This is less due to command capacity (between Western and Bryansk Fronts I have a lot due to the Assault Front rules) and more that the formations linked to the MDs can dig fortifications over level 1. Now while I expect the AI to go for Stalingrad it makes a choice and if it goes for Moscow I need to be ready.
Second a tranche of fairly weak ‘Reserve Armies’ appear around now. Historically they were used for training new formations but in WiTE2 that goes on in the Reserve. They lack support squads so will fail most leader checks but are handy to sit on depots (more capacity) and give command to units in the rear. Don’t disband them – they are also the cadres of many of your 1942 armies including several Guards and Tank Armies.
Losses so far. Perhaps the main thing to note is the number of German disabled. A number of those (10-15%) will be back come the summer and the Axis will gain from a wider improvement in their supply efficiency. That will bring a much needed batch of replacements and upgrades [1].

The list of destroyed units. I haven’t destroyed much and the AI has the manpower and production to recover those formations. Note I am still merging Rifle Brigades to reinforce weakened Rifle Divisions – especially at Leningrad where it is hard to bring in replacements.
So what now? Well the weather is going to improve and the AI will regain its offensive capacity. As maybe clear, I have more or less abandoned any more gains in the south. There is a small VP gain if I can retake say Kharkov or Stalino at this phase but the risk of over-extension is real. By contrast, if I can gain Vyazma and the broken terrain around it that will give me 3 belts of defensive terrain in front of Moscow – or a jumping off spot for a later offensive towards Smolensk (mostly over clear terrain).
In the main in WiTE2 the strong advice is never to attack ‘just because you can’ as the loss of CPP will hamper you. This phase, as the Soviet player, is possibly an exception. I may as well inflict losses and see if I can generate more Guards formations, this is my current list:

[1] – Much needed by the Axis, it is surprising how fast the Ost Heer rebounds in terms of numbers and operational capacity in early spring 1942.
This update is based on the on-map situation at the end of T38.
Background
This summary can be more brief as in this phase of the campaign most turns see relatively minor adjustments to the front. The Soviets lack the assets to really break the line and exploit and the German formations steadily recover from their low point in January. In addition to a strong seasonal element to the flow of the game, I think the game fairly naturally has these periods when, for an awful lot of effort, not much really changes in the short term.
At Leningrad, the AI pulled back enough to allow me to re-establish a link to Leningrad that was some 20-30 miles deep along the shores of Lake Ladoga.
Kalinin and NW Fronts struggled to make any gains in this period, since both were too strung out to allow them to concentrate and refit.
Even at Moscow, gains were limited. Here this was less due to Soviet weaknesses and more that the AI prioritised this sector. It took 5 turns to reach the outskirts of Vyazma.
The advantage to me of this concentration came in Southern Russia where Byransk Front managed to almost reach Orel and Central Front Kursk by 8 March. To the south, Southern and SW Fronts had regained Voroshilovgrad.
T38 – 8 March 1942
As may be obvious from the summary. this is not a phase with sweeping movements or dramatic gains. The Soviet player has the initiative but it is limited (in reality you can pick one sector where you can try to make sustained gains – almost everywhere else it is a case of taking what is offered). You are very reliant on the cavalry formations for mobility as you steadily lose the last of your Tank and Mechanized Divisions. As discussed in the last post, at the far northern and southern ends of the line supply is also a constraint, even if you can bring in fuel and ammunition, you can’t readily replace losses.
Looking at the front lines from north to south.
Leningrad-Lake Ilmen is now stalemated, I have a good connection to the city and the start of a decent depot network. The gamble is every time I risk an attack I may well fail and bring the whole, rather fragile, defensive line down.
The long front across the Kalinin-Valdai sector is much the same. Since the dual track rail towards Leningrad is firmly in my hands I am content to let this stall as well.
Around Moscow, Western Front has battered its way to the outskirts of Vyazma. Bryansk Front has finally gained some momentum as the Germans weaken, in part by choice as the AI has focussed on holding Vyazma and partly as this sector is open terrain so its hard for either side to stall an offensive once it has some momentum. As you can see, Orel should fall in the next turn and there is a small pocket to the north.
In Southern Russia effectively both sides have largely disengaged. I can’t take Kursk-Kharkov and strongly suspect I’ll just lose everything in a renewed German offensive. As maybe clear, I have started creating my defensive lines (and building airbases to the east and north of the Don).
The respective OOBs reflect recent events. The Germans are actually recovering (the low point was less than 900 ready tanks) and have a substantive reserve (this will be formations refitting and also the manpower lost to attrition starting to filter back). I’ll talk about the Soviet reserve in the second post.
Worth noting two things from the detailed Soviet list. First I am making a lot of use of the MDs, especially the two connected with Moscow. This is less due to command capacity (between Western and Bryansk Fronts I have a lot due to the Assault Front rules) and more that the formations linked to the MDs can dig fortifications over level 1. Now while I expect the AI to go for Stalingrad it makes a choice and if it goes for Moscow I need to be ready.
Second a tranche of fairly weak ‘Reserve Armies’ appear around now. Historically they were used for training new formations but in WiTE2 that goes on in the Reserve. They lack support squads so will fail most leader checks but are handy to sit on depots (more capacity) and give command to units in the rear. Don’t disband them – they are also the cadres of many of your 1942 armies including several Guards and Tank Armies.
Losses so far. Perhaps the main thing to note is the number of German disabled. A number of those (10-15%) will be back come the summer and the Axis will gain from a wider improvement in their supply efficiency. That will bring a much needed batch of replacements and upgrades [1].
The list of destroyed units. I haven’t destroyed much and the AI has the manpower and production to recover those formations. Note I am still merging Rifle Brigades to reinforce weakened Rifle Divisions – especially at Leningrad where it is hard to bring in replacements.
So what now? Well the weather is going to improve and the AI will regain its offensive capacity. As maybe clear, I have more or less abandoned any more gains in the south. There is a small VP gain if I can retake say Kharkov or Stalino at this phase but the risk of over-extension is real. By contrast, if I can gain Vyazma and the broken terrain around it that will give me 3 belts of defensive terrain in front of Moscow – or a jumping off spot for a later offensive towards Smolensk (mostly over clear terrain).
In the main in WiTE2 the strong advice is never to attack ‘just because you can’ as the loss of CPP will hamper you. This phase, as the Soviet player, is possibly an exception. I may as well inflict losses and see if I can generate more Guards formations, this is my current list:
[1] – Much needed by the Axis, it is surprising how fast the Ost Heer rebounds in terms of numbers and operational capacity in early spring 1942.
Game Concepts: Production
Re-building the Red Army
We’ve already looked at the production system in some detail so this post will cover some of the main issues from a Soviet perspective, especially in terms of the differences to the WiTE1.
So the big differences are:
a) The Soviet player does not build new HQs and HQs are not ‘promoted’ to Gds status on the basis of wins. All this is handled in the reinforcement routines so a key bit of advice … do not disband your HQs (either army or the early game Corps);
b) Units gain Guards status purely on the basis of wins but the total percentage within categories is also limited. There is a random element here so meeting the threshold may not trigger an immediate swap;
c) Armament points are not such an important concept;
d) Soviet factory evacuation is automated and will mostly follow the historical schedules;
e) How you build Corps size combat formations is a mix of the familiar and rather different. This is well explained in the manual so I’m not going to cover the issues here;
f) The Soviet player does not build air groups, these too are automatically generated (in this post I am going to stick to ground formations and return to the VVS in a later update).
What are you used to? Well the rules for destroyed Soviet rifle divisions being placed back in the reserve are much the same. Tank Divisions convert to Tank Brigades after a while and so on.
One other important difference is that the Soviet player receives a lot of support units as automatic builds – again in the reserve. Equally many possible SU are free to build (in terms of administrative points) – just you lack the assets to bring them back to the map. One huge gap that plagues the Soviet player for most of the game is a historic lack of Heavy ArtilIery production, you can see this from the Events log:
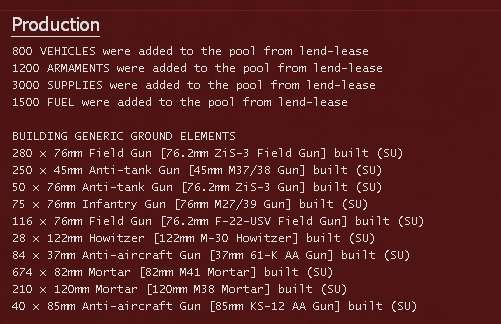
Those 28 I22mm guns are going to be very much in demand. This table varies from turn to turn across the game but is far more important in setting the parameters of Soviet artillery production than how many arms points you have stored.
While you are in the Events log, there is also a useful table as to how many Guards formations you have:

So to recap, you have a number of formations in the national reserve that were destroyed in the early game or automatically created for you.
If you want to create more units (and you will) then you use the build screen. Again what you can build, up to what limits and how much it costs (in terms of admin points) varies substantially across the game. For the current turn the screen shows:

Here it is worth noting that those Soviet artillery brigades function purely as off map Support Units (not on map as in WiTE1). To me, that makes them more useful, especially the light artillery variant which I will build as my shortage of 76mm guns is not so crippling.
So you have three bits of information. The cost in AP (& note these are not really a constraint), the number you currently have (and note that some units share the same pool eg all the artillery regiments) and the limit (& this number will vary a lot across the game).
On the right hand side is the TOE for the chosen unit, in this case a Rifle Division and some idea if suitable elements exist (this will include elements that can be used when the ideal one is missing).
Now not shown is your manpower pool so especially for the larger units you need to keep an eye on that (as a hint, now is not a good time to run it down to a low level). Equally you need to bear in mind your ability to supply such formations and your overall command capacity.
So the Soviet player can start to reconfigure their army but its best to be cautious at this stage. Build too much and your existing elements will be scattered across a number of incomplete units with low experience. Build too little and when you start taking losses (and you will in the Summer-Autumn of 1942) you’ll lack the reinforcements you now desperately need.
We’ve already looked at the production system in some detail so this post will cover some of the main issues from a Soviet perspective, especially in terms of the differences to the WiTE1.
So the big differences are:
a) The Soviet player does not build new HQs and HQs are not ‘promoted’ to Gds status on the basis of wins. All this is handled in the reinforcement routines so a key bit of advice … do not disband your HQs (either army or the early game Corps);
b) Units gain Guards status purely on the basis of wins but the total percentage within categories is also limited. There is a random element here so meeting the threshold may not trigger an immediate swap;
c) Armament points are not such an important concept;
d) Soviet factory evacuation is automated and will mostly follow the historical schedules;
e) How you build Corps size combat formations is a mix of the familiar and rather different. This is well explained in the manual so I’m not going to cover the issues here;
f) The Soviet player does not build air groups, these too are automatically generated (in this post I am going to stick to ground formations and return to the VVS in a later update).
What are you used to? Well the rules for destroyed Soviet rifle divisions being placed back in the reserve are much the same. Tank Divisions convert to Tank Brigades after a while and so on.
One other important difference is that the Soviet player receives a lot of support units as automatic builds – again in the reserve. Equally many possible SU are free to build (in terms of administrative points) – just you lack the assets to bring them back to the map. One huge gap that plagues the Soviet player for most of the game is a historic lack of Heavy ArtilIery production, you can see this from the Events log:
Those 28 I22mm guns are going to be very much in demand. This table varies from turn to turn across the game but is far more important in setting the parameters of Soviet artillery production than how many arms points you have stored.
While you are in the Events log, there is also a useful table as to how many Guards formations you have:
So to recap, you have a number of formations in the national reserve that were destroyed in the early game or automatically created for you.
If you want to create more units (and you will) then you use the build screen. Again what you can build, up to what limits and how much it costs (in terms of admin points) varies substantially across the game. For the current turn the screen shows:
Here it is worth noting that those Soviet artillery brigades function purely as off map Support Units (not on map as in WiTE1). To me, that makes them more useful, especially the light artillery variant which I will build as my shortage of 76mm guns is not so crippling.
So you have three bits of information. The cost in AP (& note these are not really a constraint), the number you currently have (and note that some units share the same pool eg all the artillery regiments) and the limit (& this number will vary a lot across the game).
On the right hand side is the TOE for the chosen unit, in this case a Rifle Division and some idea if suitable elements exist (this will include elements that can be used when the ideal one is missing).
Now not shown is your manpower pool so especially for the larger units you need to keep an eye on that (as a hint, now is not a good time to run it down to a low level). Equally you need to bear in mind your ability to supply such formations and your overall command capacity.
So the Soviet player can start to reconfigure their army but its best to be cautious at this stage. Build too much and your existing elements will be scattered across a number of incomplete units with low experience. Build too little and when you start taking losses (and you will in the Summer-Autumn of 1942) you’ll lack the reinforcements you now desperately need.
-
CapAndGown

- Posts: 3078
- Joined: Tue Mar 06, 2001 10:00 am
- Location: Virginia, USA
RE: T38
ORIGINAL: loki100
As maybe clear, I have started creating my defensive lines (and building airbases to the east and north of the Don).
I am afraid it is not clear AT ALL. The rivers are basically INVISIBLE.