Scenario Design AAR - Demjansk Pocket 42

Post new scenarios and mods here to share with other gamers.

Moderators: Joel Billings, Sabre21, bcgames

User avatar
Commanderski
Posts: 942
Joined: Sun Dec 12, 2010 8:24 pm
Location: New Hampshire

RE: Scenario: Demjansk Pocket 42

Post by Commanderski »

Um, so if I understand you correctly, the AI usage settings of 0 actually cancel out the Attack Stance settings you made in the previous step???

The first step is what is in the original scenario that he loaded. This last step is what he is changing it to...if I am not mistaken.

So far it's pretty easy to follow.
User avatar
bcgames
Posts: 3105
Joined: Wed Jun 02, 2010 1:24 pm
Location: Bramble Rose Farm, KS
Contact:

RE: Scenario: Demjansk Pocket 42

Post by bcgames »

ORIGINAL: redmarkus4

Um, so if I understand you correctly, the AI usage settings of 0 actually cancel out the Attack Stance settings you made in the previous step???
redmarkus4,

Yep, I screwed that up. I need to re-work this. Thanks for keeping a sharp eye.

v/r

bcgames

EDIT: Original Step 5 post corrected.
User avatar
bcgames
Posts: 3105
Joined: Wed Jun 02, 2010 1:24 pm
Location: Bramble Rose Farm, KS
Contact:

RE: Scenario: Demjansk Pocket 42

Post by bcgames »

Step 6. Set Pilot Quality:

These are the pilot quality settings used in the stock scenarios:

Pilot Quality
Year Axis/ Soviet
1941 85/ 50
1942 80/ 45
1943 75/ 52
1944 70/ 60
1945 65/ 65

The Demjansk Pocket scenario takes place in 1942 so we will use the 1942 Pilot Quality settings (Axis - 80, Soviet - 45). Click on the numbers to the right of the Axis and Soviet Pilot Quality labels and enter "80" and "45" respectively. If you have historical data that supports different numbers--feel free to use them.

Your screen should now look something like this:

Image
User avatar
mercho
Posts: 78
Joined: Wed Jul 06, 2011 4:25 pm
Location: Rhineland-Palatinate, Germany

RE: Scenario: Demjansk Pocket 42

Post by mercho »

Hi John,

Are you making some progress ? I really can't wait for the next steps ;-) I am looking forward in "learning" how to make my own small scenarios.
I know it is a lot of work for you to write down step by step, but it can't go fast enough for me ;-)

Keep it up !!!

mercho
Eine von einem Löwen geführte Armee von Rehen ist gefährlicher als eine von einem Reh geführte Armee von Löwen.

An army of deers led by a lion is more dangerous than an army of lions led by a deer. (Plutarch AD 46 – AD 120)
User avatar
bcgames
Posts: 3105
Joined: Wed Jun 02, 2010 1:24 pm
Location: Bramble Rose Farm, KS
Contact:

RE: Scenario: Demjansk Pocket 42

Post by bcgames »

mercho,

Thanks for your support. I'm glad you find this AAR useful.

v/r

bcgames.
User avatar
bcgames
Posts: 3105
Joined: Wed Jun 02, 2010 1:24 pm
Location: Bramble Rose Farm, KS
Contact:

RE: Scenario: Demjansk Pocket 42

Post by bcgames »

Step 7. Setting the Weather:

There are four weather zones in WitE. In the editor, these zones are named Zones 1 through 4. In the game, these zones are named as follows (I've added the editor zone numbers in white):

Image

The Demjansk scenario map area involves two zones (zones 3 and 4) as shown here:

Image

To set the weather for a zone, click on the current condition listed to the right of the zone number. The following pop-up menu will appear:

Image

Enter the weather condition number (0-3) and then press the Enter key, or select the the check button on the menu. The ice condition pop-up will appear automatically. Enter a number that best represents your understanding of the ice conditions for your scenario--0 = None; 10 = maximum. Do this for each of the zones involved in your scenario; in our case we need to enter the data for zones 3 and 4.
User avatar
bcgames
Posts: 3105
Joined: Wed Jun 02, 2010 1:24 pm
Location: Bramble Rose Farm, KS
Contact:

RE: Scenario: Demjansk Pocket 42

Post by bcgames »

Step 8. Set Production Usage and Surrender Flags:

Production Usage. Set the full campaign production to some lesser percent that replicates the equipment replacement rates for your scenario. A rule-of-thumb is to use a percentage based on how long the front is (in hexes) in your scenario and how long that front is in the campaign game taking place in the same year (1942 in our case). I'm going to guess that the Demjansk scenario covers about 5% of the front. Given that the Demyansk pocket became a major concern for both sides I'm going to add another 5% to both sides to replicate the priority of equipment replacements to this "main effort" scenario. Fine tune these numbers based on your playtesting results.

As there are no Axis Allies in this scenario, we will set their production level to 0%. If we did have Axis Allies in the scenario then assign them a percentage of the production given the total number of allies located elsewhere in the campaign.

In all these production usage percentages remember that--just like in horse shoe toss and hand grenades--close enough is good enough.

Surrender Flags. Left click on Yes/No to toggle the correct entry. The following is a list of historical surrender dates:

• Germany – 8 May 1945
• Finland – 19 Sep 1944
• Italy – 8 Sep 1944
• Rumania – 23 Aug 1944
• Hungary – 1 Apr 1945
• Slovakia – 8 May 1945
• Bulgaria – 16 Sep 1944
• Soviet Union – No surrender

Our Demjansk scenario starts (and ends) before any of these surrender dates apply so we will leave all the surrender flag settings as 'No'.

With these entries made, our Main tab should look like this:

Image

WHAT'S NEXT: The Scenario Description File. We will return to complete the rest of the Main tab entries when we have a clearer understanding of the total number of units available in the Demjansk scenario and the operational situation.
User avatar
bcgames
Posts: 3105
Joined: Wed Jun 02, 2010 1:24 pm
Location: Bramble Rose Farm, KS
Contact:

RE: Scenario: Demjansk Pocket 42

Post by bcgames »

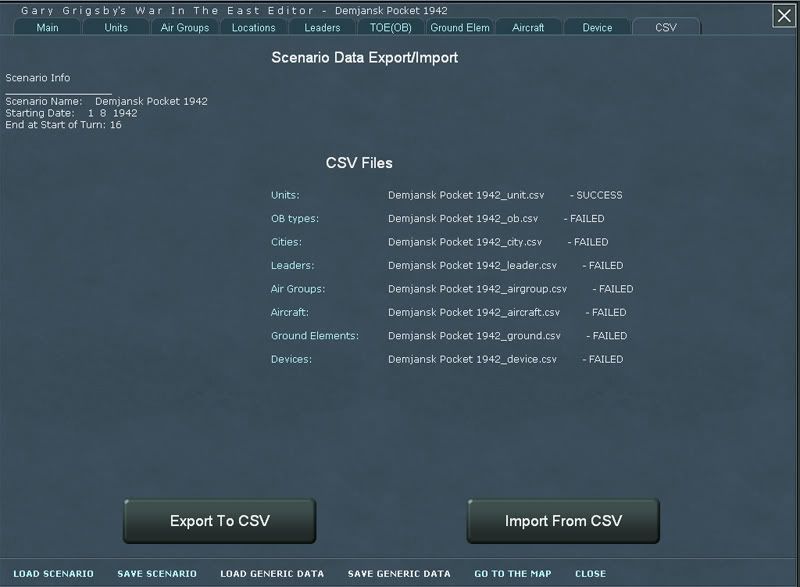
Step 9. Creating the Scenario Description.

Go to the Dat/scen folder of the main game directory and find the text file for the "1941-45 Campaign" scenario. Right click on the file name, then select Open with... and select 
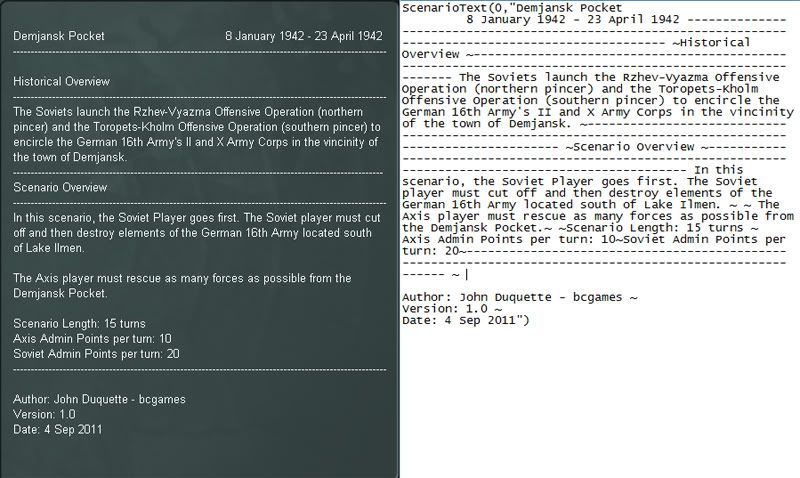
Notepad. You should see the text displayed below, right. On the left is how the scenario description appears in the game. Study these two images to see how the various entries in the text file correspond to the game screen display:

Image

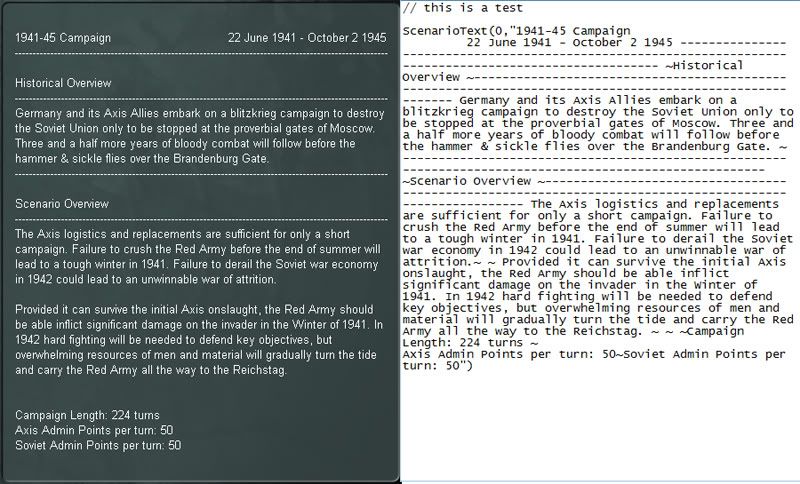
The scen.txt file can be no more than 29 lines in length (there is no scroll capability for the scenario description box).

Though you are free to use any format you choose, this is the one currently used for the GGWITE stock scenarios:

• Scenario Name and dates the scenario begins and ends
• Historical Overview (3-4 lines of text)
• Scenario Overview (6-10 lines of text)
• Scenario Length
• Axis Admin Points per turn
• Soviet Admin Point per turn

For user-created scenarios, I recommend adding the following to the above format:

• Author:
• Version:
• Date:

To create this file for the Demjansk scenario, we have opened an existing scenario description file (1941-45 Campaign). Save it using our new scenario name, "Demjansk Pocket 1942", and then edit the text to suit your needs.

NOTE1: When you save the scenario description (.txt) file, it must have exactly the same name as your scenario (.sce) file.

NOTE2: Your scenario file will still load even if you do not have a scenario text file.

Here’s what the symbols mean in the .txt file. The double slashes // on the first line are there for any commenting you wish to make about the file. These comments are for you; they are not used—nor required—by the computer. To enter your scenario description text, you must use the following command:

ScenarioText(0," ")

Everything in your scenario description must be added in between the two quotation marks. Your text is wrapped automatically when the file is loaded so no need to worry about that. Use the ~ symbol to start a new line (carriage return). You can use several carriage return symbols in a row if you want more lines between the sections of your text.

You will probably edit the contents of this file several times as you playtest the scenario so don't worry about getting it perfect on the first go around. Get the skeleton up and running and then move on to the next step.

Here's an example of how the Demjansk scenario description file might look:

Image
User avatar
bcgames
Posts: 3105
Joined: Wed Jun 02, 2010 1:24 pm
Location: Bramble Rose Farm, KS
Contact:

RE: Scenario: Demjansk Pocket 42

Post by bcgames »

Step 10. Plotting Hex Ownership.

For a scenario to work properly, every single hex in the active map area must be assigned to either the Axis Player or the Soviet Player. Here's a technique for performing this function. It requires a little prep work.

Image

Using Goran's map (shown above) and PhotoShop, I rotated the historical reference map counter-clockwise (about 8 degrees) so that it aligned roughly North-South with the WitE game map. I then highlighted the significant towns and the front line for the start of the Demjansk Pocket scenario. Doing this will help me place the front line on the game map.

NOTE: You don't need to have PhotoShop to do this. PaintShop, Paint.NET, PowerPoint, or OpenOffice Impress or Draw will also do the trick.

Image

Using Goran's modified map as a reference, I "eye-balled" in the front line using PhotoShop and an image of the Demjansk scenario game map. I placed little red hexagons (in layers) on the image and moved them around till they felt "about right".

NOTE: It is a rare occasion (in my experience) where the front line happens to align perfectly with the hex grid. A little judgment is required to make sure you capture the "operational flavor" of history when assigning hex ownership.

NOTE: If you are skilled with photo editing and/or presentation software programs, you could scale your reference map to fit the scale of the WitE map. After that, overlay the scaled historical map (using another layer) to the WitE Map and then set the transparency of the historical map to 25%. This will allow you to see the WitE map (and the hex grid) beneath. Now place your little red hexagons along the actual front line using the WitE hex grid and the historical map front line trace.

With this prep work accomplished, it is time to go to the editor...

User avatar
bcgames
Posts: 3105
Joined: Wed Jun 02, 2010 1:24 pm
Location: Bramble Rose Farm, KS
Contact:

RE: Scenario: Demjansk Pocket 42

Post by bcgames »

Step 10 (cont.)

If you haven't done so already, launch the WitE Editor and load the Demjansk Pocket 1942 scenario (If you have been following along--you've built it). Use the jump map, arrow keys, and/or mouse cursor to navigate to the Active Map Area.

Now select the Map Information tab. Make sure you toggle units OFF (so we can see the map clearly) and toggle enemy hexes ON (so we can see who controls what). Your screen should look like this (minus the labels I added):

Image

Notice that the game screen frame is gray. This means that the Axis Player is the Active Player. This also means that enemy controlled hexes will be highlighted in RED. Because we based our scenario on the 1941-45 Campaign scenario, all the hexes are controlled by the Soviet Player--that's how it was on June 22nd, 1941.

NOTE: To switch the Active Player to the Soviet Player, press the 'W' key; the game screen frame will turn brown. Try it.

For Step 10, make sure the Axis Player is the Active Player.

Now we will set the Axis front line hexes. We do this by clicking on the desired hex on the map and then pressing the "U" key. This designates control of the selected hex to the Axis Player. Using the reference map we made above, go ahead and assign the appropriate hexes for the Axis front line.

When you are done, the game map should look like this:

Image

If you make a mistake in assigning control of a hex, switch the Active Player to the Soviet Player (press the 'W' key to get a brown screen), assign the hex back to the Soviets, then switch back to Axis as the Active Player (gray screen).

NEXT: "Filling in the blanks..."
User avatar
bcgames
Posts: 3105
Joined: Wed Jun 02, 2010 1:24 pm
Location: Bramble Rose Farm, KS
Contact:

RE: Scenario: Demjansk Pocket 42

Post by bcgames »

Step 10 (continued).

Now we are going to learn how to auto assign control of a whole row of hexes with one key stroke--the 'S' key. Do this...

Image

Click on a row's eastern most hex for the Axis Player and then press the 'S' key. All the hexes to the west of that hex have their control auto-assigned to the Axis Player (as shown above). If we repeat this process for the remaining nine rows on our scenario map it should now look like this:

Image

All the unshaded hexes are Axis Player controlled and, by default, all the shaded hexes are Soviet Player controlled.
User avatar
bcgames
Posts: 3105
Joined: Wed Jun 02, 2010 1:24 pm
Location: Bramble Rose Farm, KS
Contact:

RE: Scenario: Demjansk Pocket 42

Post by bcgames »

Step 11. Setting Operational/Damaged Rail Lines.

When you assign control of a hex to a Player (Axis or Soviet) this assignment automatically sets the rail line setting for that hex to operational/repaired. Given this default setting, here's how our rail lines look after the hex control assignments we made in Step 10:

Soviet Player Rail Lines (Default):

Image

Axis Player Rail Lines (Default):

Image

The Soviets rail lines shown above look acceptable to me but the Axis rail lines are overly optimistic for this time in the war. Barring the presentation of historical evidence that proves otherwise, I think the Axis rail lines should be scaled back to something like this:

Image

To accomplish this end, click on the hexes containing rail lines that you wish to damage and then press the 'D' key. Make sure you have the rail damage button on the Map Information tab toggled ON so you can see the effects of your work.
User avatar
bcgames
Posts: 3105
Joined: Wed Jun 02, 2010 1:24 pm
Location: Bramble Rose Farm, KS
Contact:

RE: Scenario: Demjansk Pocket 42

Post by bcgames »

Step 12. Compile the Scenario's Orders of Battle.

This is always the most time intensive part of scenario development for me. Everything you need is never in one place and some of what you need would require a multi-lingual PhD's time and experience to unearth, analyze, and summarize into game-ready form. We will do the best we can.

Let's start with the Axis Player. Here's a down-loadable source of usable Axis orders of battle:

Image

GO HERE: http://www.cgsc.edu/carl/nafziger.htm

Get the following files:

942GAAC German Army Group North - 2 January 1942
942GAAI German 16th Army, Russian Front - 1 January 1942
942GCLA Organization of Luftflotte 1 - 31 March 1942
942GDAC German Army Group North - 22 April 1942
942GEAC German Army Group North - 11 May 1942

Look at these and think about what is required to reduce the information these documents contain into WitE game form.

Make sure you get the Nafziger OOB Finding Aid here: http://cdm16040.contentdm.oclc.org/cdm/ ... 11/id/1277
User avatar
bcgames
Posts: 3105
Joined: Wed Jun 02, 2010 1:24 pm
Location: Bramble Rose Farm, KS
Contact:

RE: Scenario: Demjansk Pocket 42

Post by bcgames »

Another good source of order of battle information are the Lage Ost Karte (East Situation Maps). Here is the Demjansk front as of 1 December 1941. In addition to division, corps, and army locations, the date of this map tells us that the forces involved in our scenario (start date 8 Jan 42) were in position for at least a month prior to the Soviet attack. This will influence our decision about the level of fortifications in each hex.

Image

Get more Lage Ost Karte here:

http://www.gutenberg-e.org/esk01/maps/

...and some more here:

http://www.wwii-photos-maps.com/
User avatar
bcgames
Posts: 3105
Joined: Wed Jun 02, 2010 1:24 pm
Location: Bramble Rose Farm, KS
Contact:

RE: Scenario: Demjansk Pocket 42

Post by bcgames »

Image

Soviet OBs? Oh, this will be fun:

http://victory.mil.ru/war/oob/

Here's some help from Google:

http://translate.google.com/?hl=en&tab=wT

Work it for best results.

User avatar
bcgames
Posts: 3105
Joined: Wed Jun 02, 2010 1:24 pm
Location: Bramble Rose Farm, KS
Contact:

RE: Scenario: Demjansk Pocket 42

Post by bcgames »

Step 13. Build the Units List.

Now let's build our unit list for the Demjansk Pocket scenario. There are two ways to do this. The first method is to use the generic units list which contains every single unit in the war. The second method is to create our own list from scratch. As the Demjansk Pocket is a small scenario, I prefer the second method...by a country mile. Here's what we are going to do:

1. Build a TEMPLATE_units.csv file.
2. Save the TEMPLATE_units.csv file by our scenario name (Demjansk Pocket 1942_units.csv).
3. Import the Demjansk Pocket 1942_units.csv
4. Enter the units and their data (as accumulated from our historical research) using the Units Tab of the editor.

User avatar
bcgames
Posts: 3105
Joined: Wed Jun 02, 2010 1:24 pm
Location: Bramble Rose Farm, KS
Contact:

RE: Scenario: Demjansk Pocket 42

Post by bcgames »

What is a TEMPLATE_units.csv file?

It is a blank _unit.csv file that allows you to build the unit list for your scenario without having to worry about the other 4000-5000+ units that exist on the master unit list (it's embedded in every stock WITE scenario).

Here's how I build a TEMPLATE_units.csv file:

- Open WITE and select the Editor button.
- Select Load Scenario.
- Select any scenario from the list; the 1941-45 Campaign is as good as any other.
- 'X' out of map mode to get to the editor's Main tab.
- Select the CSV tab and then select the Export to CSV button
- 'Export to CSV?' -- Select Yes

- Now navigate to the Matrix Games\Gary Grigsby's War in the East\Dat\CSV folder and open the 1941-45 Campaign_unit.csv file using Microsoft Office Excel or OpenOffice Calc.
- Copy Line 1 from the spreadsheet and paste it into lines 2 thru 8191
- Renumber column A from 0 - 8191
- Save the file as TEMPLATE_unit.csv

You now have a safe environment for building the unit list for your scenario.

Never
enter data into the TEMPLATE_unit.csv file...else you will have to make it over again. To use it properly, open it, save it using your new scenario name and you will be good to go; now you can enter your unit data.

User avatar
bcgames
Posts: 3105
Joined: Wed Jun 02, 2010 1:24 pm
Location: Bramble Rose Farm, KS
Contact:

RE: Scenario: Demjansk Pocket 42

Post by bcgames »

Inside the Matrix Games\Gary Grigsby's War in the East\Dat\CSV folder is the newly created TEMPLATE_unit.csv file (described in the post above). Make a copy of it by right clicking on the file name then Copy and Paste it inside the DAT\CSV folder. You should see something like this:

Image

Now rename the file TEMPLATE_unit - Copy as Demjansk Pocket 1942_unit. As you can see in the image above, I have already copied the file and renamed it.

Go to the Editor and select the CSV tab. Click on the Import From CSV button. The image below is what you should see after the importing of csv files is complete:

Image

As we only had 1 of the 8 possible csv files for this scenario located in the DAT\CSV folder (i.e. the Demjansk Pocket 1942_unit.csv file), all of the files show a FAILED flag except the one we actually wanted imported. That's O.K.

NOTE: CSV files MUST be closed in order to import them into the editor; files that are still open in Excel or Calc will give you a FAILED flag if you try to import them.

If you select the Units tab you will see that we now have a clean slate to start building our unit list.

Image

We'll start our unit list by creating the High Command headquarters for both sides...The O.K.H. and STAVKA...
User avatar
bcgames
Posts: 3105
Joined: Wed Jun 02, 2010 1:24 pm
Location: Bramble Rose Farm, KS
Contact:

RE: Scenario: Demjansk Pocket 42

Post by bcgames »

Creating and Placing the High Command HQs.

For the AI to work properly, the O.K.H. and STAVKA high command headquarters units must be placed in the active map area of your scenario. To create these units, go to the Units tab and follow the instructions in section 4.7.5. (How to Create a Unit) of the editor manual. Create the O.K.H. HQ in slot 1 and the STAVKA HQ in slot 2900.

NOTE: One of the benefits of creating and placing the High Command HQs on the map is that they cause the game screen to jump directly to the active map area of your scenario when you click on the GO TO THE MAP command. Without these HQs on the map, when you click on the GO TO MAP command, the game screen will launch the scenario map in the upper left hand corner of the campaign map.
User avatar
bcgames
Posts: 3105
Joined: Wed Jun 02, 2010 1:24 pm
Location: Bramble Rose Farm, KS
Contact:

RE: Scenario: Demjansk Pocket 42

Post by bcgames »

Create the O.K.H. and STAVKA headquarters in the editor and place them on the map as follows:

Image

For the AI to work properly, it is recommended that the entire chain of command of headquarters -- from the actual corps and army HQs that were historically physically located inside the playable area of the scenario, to the headquarters from corps/army through army group/front to the high command HQs -- all these HQs should be placed within the playable area of the scenario. The image above shows the high command HQs located inside the playable area. All other relevant HQs below the high command HQs must be located in this area also. Every unit you place on the map must be able to trace a chain of command up to the O.K.H. and the STAVKA HQs.
Post Reply

Return to “Scenario Design and Modding”