Defending the Rodina - A Soviet WiTE2 AAR

Please post your after action reports on your battles and campaigns here.

Moderator: Joel Billings

Post Reply
User avatar
loki100
Posts: 11705
Joined: Sat Oct 20, 2012 12:38 pm
Location: Utlima Thule

Defending the Rodina - A Soviet WiTE2 AAR

Post by loki100 »

This series of game reports is designed to give you some idea how WiTE2 plays and an insight into some of the new game mechanics.

It is played vs the Axis AI and is currently in early 1945 (you've already seen one screen shot from that phase of the game). The layout of the updates will follow a fairly standard pattern of setting the scene in the actual game and then a discussion of a particular game mechanism.

There will be other AARs, including at least one MP tussle, so with this one we are going to move fairly quickly. The goal is to give you an overview of how the game comes together rather a detailed turn by turn report.

Setting up the Game

For those of you used to the WiTx series, at first glance the game set up screen is familiar.

Image

There are 2 completely new controls though and note that, for these, both sides will play by the same rules depending on the options chosen.

The 'Automate AI Air Assist' will be discussed below as its a major topic.

The other new option concerns the concept of Theatre Boxes. If you have played WiTW then you will know that game had an 'Eastern Front' box that gave the Axis player some control over the flow of formations to and from the east. Well WiTE2 has the complete Axis and Soviet war commitment including Soviet forces in the Far East, the Axis war with the allies in North Africa (and later in Europe).

The war between the Soviet Northern Front and the Finnish and German armies is handled in a Theatre box as is the partisan war.

If you tick that box, you have substantial control over the allocation of forces.

Over-commit and you gain bonus victory points (again a topic for later) and can delay the Allied advance, potentially stopping or slowing their invasion of Europe. Under-commit and the reverse happens, you lose VP and maybe see the Allies in Italy in very early 1943.

For this game, I have left the Theatres out of my control. The only thing I can do is to voluntarily send additional formations to one or other of the theatres. I can't return these to the map so need to be very sure I'll never need them again.

Before going on, the AI is far better in WiTE2 than in any of the earlier games. It will shift strategic direction as well as make better operational choices. At the start, I strongly suggest do not give it any bonuses till you understand the main game mechanisms. After a while set the Soviet AI to at least 110 (if you are playing the Axis) and the Axis AI to at least 120. As ever, in a game with the AI you can adjust these but at those levels the AI gains substantial benefits that will ensure a much better game.

Even experienced testers are struggling against the Soviet AI at 110 morale, above that it is a fearsome opponent and you quite simply can't afford to make any mistakes or sub-optimal moves.
User avatar
loki100
Posts: 11705
Joined: Sat Oct 20, 2012 12:38 pm
Location: Utlima Thule

Events up to Turn 7

Post by loki100 »

3 August 1941

This update is based on the on-map situation at the end of turn 7.

Background

By the 29 June 1941 [1], the Germans were over the Daugava and outside Riga. AGC had taken Minsk, crossed the Berezina and was 50 miles from Vitebsk. AGS had had faced stiffer resistance [2] but have taken Lvov and was within 20 miles of Rovno.

By the 5 July, AGN had secured Riga and was half way from Daugavipils to Pskov. AGC was over the Dnepr at Orsha as the bypassed Soviet Western Front was slowly destroyed in the Bialystok pocket. AGS made slower progress but had captured Tarnopol. To the south, the German 11 Army and Rumanian forces had almost reached Kishinev.

By 12 July, AGN had reached Pskov and was pressing the Soviet 8 Army back in Estonia. AGC was at the outskirts of Smolensk and 50 miles from Gomel. AGS was making slower progress due to substantial Soviet resistance.

By 19 July,AGN had taken Pskov and was moving towards the Luga defensive line. AGC had captured Smolensk and the Soviet defenders had abandoned Vitebsk to escape encirclement. Stavka was allocating most of the immediately available formations to defend Vyazma and build up the Leningrad defences. AGS was making slow gains but 11 Army was over the Dnestr as Southern Front fell apart under pressure [3].

By 26 July, AGN had reached the Luga line but was facing strong resistance [4]. Fortunately AGC's advance slowed after the Smolensk battles as it resupplied but Gomel fell. AGS finally took Vinnitsa and Zhitomir as SW Front weakened. A major Soviet counter-attack pushed the Romanians back from Odessa.

Start of August

Leningrad Front had been substantially reinforced and briefly stalled AGN on the Luga line. NW Front was abandoning Estonia and defending Staraya Russa. From there to Velikie Luki the front was wide open [5]


Image

If you are used to WiTE1 most of that will be clear but there are 5 map features worth noting. 1 – is Finland (off map and axis controlled) while 2 is Soviet controlled but also off map (and will become Finnish controlled when they capture the Isthmus). 3 are examples of dual and single track rail lines. Single track rails can only carry 40% of the freight as a dual track. 4 is a hex with an 'average' road (most the Soviet Union has poor roads but there are some good roads). In clear weather this is only marginally important but once it starts to rain you will really notice the difference. 5 are the fixed on-map airbases.

AGC has slowed due to supply problems and the need for the infantry to reach the front. Also a major Soviet build up has stalled them for a while.

Image

AGS has stated to make quicker gains as SW and S Fronts weaken after 6 weeks of fighting. In the north, the Germans are only 20 miles from Kiev, in the south Odessa is surrounded.

Image

Not that Odessa will fall easily. A new concept in WiTE2 is the 'city fort' that allows over-stacking in urban hexes. This is especially useful in ports but can also turn urban centres in near impregnable fortresses. So Odessa is defended by 5 divisions (56,000 men).

Both sides have committed air assets to try and control the sea lanes but that is going to demand a significant effort by the axis to capture.

Image

And to put all this in context, here are the losses so far:

Image

The OOB screen shows the forces of both sides in three key aeas. On-map is fairly obvious. In addition to the theatres that represent real locations, both sides have an abstract strategic reserve. This is used to rebuild units, train fresh formations or to hold forces that you see as your ultimate reserve. At this stage, the Soviets lack the equipment to properly equip and reinforce most of the units in the reserve. The final column shows the total strength of both sides in all the possible locations.


Image

[1] Unlike in WiTE1, the first turn is a full week

[2] The special Turn 1 rules are different in the Ukraine to reflect that SW Front was better prepared. Forget all about 'Lvov' pockets - you can do something like that but it is not the best use of your assets

[3] Units that are weak on ToE and/or low morale/experience can collapse badly. The result, for the Soviets, is a fresh formation can often hold up the Axis for a week or so and then will fall apart under sustained pressure. Pockets are not the only way to destroy the Red Army in 1941/2.

[4] The terrain here is very different to the WiTE1 map, the few decent roads become a focus for both sides.

[5] The terrain effects are very different, it is safe not to defend a sector with poor roads and heavy woods as any movement there is slow and resupply very tricky.
User avatar
loki100
Posts: 11705
Joined: Sat Oct 20, 2012 12:38 pm
Location: Utlima Thule

Game Concepts: The Air War

Post by loki100 »

Managing the Air War

Those of you who have played WiTW will recognise the air mechanics as a distant cousin to that game. Some concepts remain, there is an air phase where some of the air action takes place but missions such as ground support, air transport and paratroop operations all take place in the ground phase.

Most air missions take place in one or another 'air directive'. In WiTE2 probably the main ones are reconnaisance missions, ground support and some tactical bombing for interdiction or to damage depots.

But there are large differences. Some come from the scale of the game, while the capacity to wage strategic bombing is present, in reality it is something that neither side can sustain. Most missions are directly connected to ground combat operations. Air groups are organised into Air Operational Groups (from 1-5 air groups) and these are the basis for moving air units between air bases and setting up air directives.

In WiTW you could wholly or partially automate the air war. At one level, you could hand it all over to the AI, at another you could set priorities and the AI would then generate the air directives. If you wanted you could then manually adjust these.

In WiTE2 there is a very useful AI-assistance but it requires some manual input as well. There are two variants. In one, when you start the air phase (or end the ground phase), the AI will generate air directives, carry them out and redeploy your air groups. In the other, when you invoke the assistant, the AI will carry out these actions but you can then manually alter some aspects if you want.

In both modes, the AI will rotate depleted or weak air groups to the reserve to refit, train new pilots etc. This function, when managing the Soviets in the early turns is a huge saving in player effort. It will also try to replace units sent to the reserve with similar planes (so fighters for fighters).

As a player you need to set the relative priority of each air command (this determines how your planes are distributed on the map) and which ground HQ you want it to support. This will influence the type of air directives and also how the AI moves your air groups around. Linked to this, you give the air command a 'stance'. If you set this to retreat, it will seek to pull your planes away from the front line towards the location of its linked ground HQ. Finally you can order certain air commands to carry out naval patrol missions (and set the port they will concentrate on).

Once all this is set up, you may only need to review the priorities and stances as the game develops.

You will still need to build or expand air bases. The locations of your various air operational groups and air commands are indicated on the map with lables as shown below.

Air commands will take on the colours of the ground HQ they are assigned to.

The information on the label changes according to how you are viewing the map. At closer zoom levels you can see the numbers and types of planes, the AOG orders and other useful information.

Image

The air war can be managed with a few clicks. So the 44 IAD, we can order supply for its airbases (the fighters may be on more than one), bring fresh air units from the reserve, change the controlling air command or alter its stance from 'retreat'.

Image

The WiTE2 UI has lots of these little pop-up boxes that make carrying out actions or accessing information very easy.
Kronolog
Posts: 138
Joined: Wed Mar 23, 2011 6:00 pm
Location: Sweden

RE: Game Concepts: The Air War

Post by Kronolog »

Is there some sort of incentive for the Soviet player to use his airborne forces primarily as infantry? In confess that I'm not knowledgeble in the historic circumstances regarding Soviet airborne doctrine and capabilities, other than that thay had many Guards airborne dvisions and conducted very few airborne assaults. Also, regarding the Germans: are they allowed to use their few airborne troops in the East for air assault operations despite the military views of Hitler after the battle of Crete?
User avatar
loki100
Posts: 11705
Joined: Sat Oct 20, 2012 12:38 pm
Location: Utlima Thule

RE: Game Concepts: The Air War

Post by loki100 »

ORIGINAL: Kronolog

Is there some sort of incentive for the Soviet player to use his airborne forces primarily as infantry? In confess that I'm not knowledgeble in the historic circumstances regarding Soviet airborne doctrine and capabilities, other than that thay had many Guards airborne dvisions and conducted very few airborne assaults. Also, regarding the Germans: are they allowed to use their few airborne troops in the East for air assault operations despite the military views of Hitler after the battle of Crete?

You can only drop at the sub-divisional level (so regiments/brigades) and in theory both sides can do so. The underlying mechanics are similar to WiTW where sub-divisional drops are a less than stellar choice.

The big constraint is transport aircraft and viable targets. For the Axis player in 1941 I can think of many better uses for my limited transport assets than paradrops (not least the FJ formations are rather useful in combat) and would struggle to think of sensible targets. For the Soviets, again you lack transport assets till later in 1941, you could try the historic pattern of drops around AGC (& probably end up with the same failures). Late war a variant of the Kanev operation is feasible but you'd need an important, but weakly held, sector for it to generate much impact. By definition that combination is going to be rare.

In this game, I did 2 sets of drops, one failed badly, one happened to coincide with where my spearheads were.

Remember also (again as in WiTW), you have to set up the mission a couple of turns before executing it.

Or ... as a shorter answer, the value to airborne operations is extremely limited but you may find it useful once in a blue moon.
Kronolog
Posts: 138
Joined: Wed Mar 23, 2011 6:00 pm
Location: Sweden

RE: Game Concepts: The Air War

Post by Kronolog »

Thank you for the answer. That seems reasonable. In WitW division-level drops could generate a quite a bit of interdiction but brigade/regiment-level drops were always a throw of the dice.
User avatar
dwesolick
Posts: 610
Joined: Mon Jun 24, 2002 7:33 am
Location: Colorado

RE: Defending the Rodina - A Soviet WiTE2 AAR

Post by dwesolick »

ORIGINAL: loki100

Before going on, the AI is far better in WiTE2 than in any of the earlier games. It will shift strategic direction as well as make better operational choices. At the start, I strongly suggest do not give it any bonuses till you understand the main game mechanisms. After a while set the Soviet AI to at least 110 (if you are playing the Axis) and the Axis AI to at least 120. As ever, in a game with the AI you can adjust these but at those levels the AI gains substantial benefits that will ensure a much better game.

Even experienced testers are struggling against the Soviet AI at 110 morale, above that it is a fearsome opponent and you quite simply can't afford to make any mistakes or sub-optimal moves.

[&o][&o][&o][&o][&o][&o][&o][&o][&o][&o][&o][&o][&o]
"The Navy has a moth-eaten tradition that the captain who loses his ship is disgraced. What do they have all those ships for, if not to hurl them at the enemy?" --Douglas MacArthur
vinnie71
Posts: 969
Joined: Wed Aug 27, 2008 7:32 am

RE: Defending the Rodina - A Soviet WiTE2 AAR

Post by vinnie71 »

Thanks for the information. I am really happy that a stronger AI is in the works as I am unable to commit to games as much as I wish...

Having said that, I have a few questions.

There were a number of airfields that were created at the beginning of the scenario. Will players be able to create airfields in appropriate hexes?

Am I understanding well that air commands have a counter on the map but use the surrounding airfields?

Will Air Divisions or Air Groups on the Axis side contain a mix of aircraft (ex fighters and ground attack) or will they be using one type of aircraft according to their mission profile?
User avatar
loki100
Posts: 11705
Joined: Sat Oct 20, 2012 12:38 pm
Location: Utlima Thule

RE: Defending the Rodina - A Soviet WiTE2 AAR

Post by loki100 »

ORIGINAL: vinnie71

Thanks for the information. I am really happy that a stronger AI is in the works as I am unable to commit to games as much as I wish...

Having said that, I have a few questions.

There were a number of airfields that were created at the beginning of the scenario. Will players be able to create airfields in appropriate hexes?

Am I understanding well that air commands have a counter on the map but use the surrounding airfields?

Will Air Divisions or Air Groups on the Axis side contain a mix of aircraft (ex fighters and ground attack) or will they be using one type of aircraft according to their mission profile?

we'll do a detailed post on the air war systems by Red Lancer. But briefly:

a) yes you can build more - in fact you need to (esp as the Soviet player). If you have decent supply, creating a level 1 airfield is relatively painless, but the bigger ones take some pre-plannning (supplies, engineering assets and starting them in better weather)

b) There is no direct relationship between air commands and bases, you can have a mix of commands using the same base. For the allocation of support squads an airbase is notionally linked to the air HQ with the most planes present (so this can shift during a turn). The on-map counter basically holds the leader and sets the range for support allocation. Since this is 90 hexes (as in WiTE1 and WiTW) they can be deployed well to the rear.

The label you see in the image indicates where the relevant air groups are based with the label as much at the centre of gravity as possible. You can do all sorts of game control functions from that but it has no actual on-map presence.

c) The AOG system is based on the concept of profiles. So for the Soviets, only fighters can go into an IAD, bombers a BAD etc. Similar on the axis side. Its all pretty intuitive and the controls are imposed automatically. You then build up a higher level air command using a mix of these (as you wish), so you can for eg commit a fairly balanced group of escorts and bombers to the same mission.

So, again, from the shown image, the Western Air Command contains fighter, bomber, mixed (SAD) and recon AOGs. So when putting together the missions I can draw off these assets as I need (the actual process for this is related to the approach in WiTW).
vinnie71
Posts: 969
Joined: Wed Aug 27, 2008 7:32 am

RE: Defending the Rodina - A Soviet WiTE2 AAR

Post by vinnie71 »

Thanks! Looking forward to other posts like this
Kronolog
Posts: 138
Joined: Wed Mar 23, 2011 6:00 pm
Location: Sweden

RE: Defending the Rodina - A Soviet WiTE2 AAR

Post by Kronolog »

One thing I alway's felt was missing in WitW was the ability to order air groups to avoid heavy concentrations of AA in their "operational square". In that game one could, for example, mark a 4x4 square for interdiction, and in a couple of hexes in that square there would be very heavy AA presensce. The aircraft would sooner or later try to interdict those heavily defended hexes, get mauled and then that particular directive would end badly or prematurely because of losess to aircraft and group morale. It would be nice if the player could deselect certain hexes in the operational square, or perhaps have the ability to set a limit for AA tolerance in the directive set up - "avoid hexes with light AA >X, heavy AA >Y". Of course FoW would still pose a risk.
User avatar
loki100
Posts: 11705
Joined: Sat Oct 20, 2012 12:38 pm
Location: Utlima Thule

T15

Post by loki100 »

4 October 1941

This update is based on the on-map situation at the end of turn 15.

Background

By 10 August, AGN had destroyed the Soviet Luga Operation Group holding the line north of Novgorod and had almost cut the main Leningrad-Moscow railway. AGC launched a major offensive towards Moscow breaking through across a 90 mile front. Fortunately, poor terrain and sustained Soviet resistance limited their gains but by the end of the week over 15 Soviet divisions had been shattered. In the Ukraine 5 Army held Kiev but the Soviet position was threatened as German panzers pushed past Chernigov and tried to cross the Dnepr at Cherkassy [1].

By 17 August, the threat to Leningrad increased as the Germans pushed along the Volkhov. In addition the situation at Moscow worsened as German troops captured Vyazma in heavy fighting against 24 Army. A second German drive made steady gains towards Kaluga. In the Ukraine, Stavka authorised Soviet forces at Kiev to fall back as the two German pincers threatened an encirclement [2]. Odessa fell at heavy costs to the axis forces, especially the Romanians who had lost over 25,000 men trying to capture the city.

The 24 August saw the increasing isolation of Leningrad as it became dependent on a one single track rail line for reinforcements and supply. Elements of NW Front contested every German gain along the Volkhov while Leningrad Front prepared to defend the city itself. AGC’s onslaught slowed as supply problems started to affect their spearheads and Stavka committed almost every available formation to a line from Rzhev to Kaluga. Lacking combat ready formations [3], the Soviet forces in the Ukraine steadily retreated.

By 31 August, a massive German offensive had cut off Leningrad, despite the crisis at Moscow, Stavka pulled an entire army from the reserve to reinforce NW Front and to hold Tikhvin and the Lake Ladoga ports. At Moscow, the Germans were briefly checked and had to divert some forces to clear out a Soviet salient near Yartsevo that was threatening their lines of communication. In the Ukraine, Axis forces captured Kherson and crossed the Dnepr. Elsewhere, all semblance of a front line was lost as Soviet rearguards tried to cling to vital rail junctions to slow the German advance.

September brought some respite at Leningrad. Using the fresh divisions, the German siege was briefly lifted as Soviet troops regained Mga. Briefly, the threat to Moscow also lifted and the main German offensive was an attempt to cut off Bryansk from the south.

14 September saw the Germans seal off land connections to Leningrad again, but a major Soviet offensive regained the west bank of the Volkhov. Soviet cavalry pushed deep into the rear of AGN (4). At Moscow, the Germans hit Reserve Front, capturing Rzhev. The Soviet position at Bryansk was now threatened by 2 pincers as elements of AGC attacked towards Orel. In the Ukraine, the Germans over-ran the last coherent Soviet defensive line and reached the outskirts of Kharkov.

21 September saw a reversal of fortunes at Leningrad. The Soviet Volkhov offensive made more gains while elements of Leningrad Front attacked eastwards, by the end of the week only a narrow 10 mile corridor kept the city isolated. However, the Germans renewed their drive on Moscow inflicting heavy losses on Reserve Front. Further gains north of Bryansk led to the Soviets abandoning the city to avoid encirclement. In the Ukraine, supply shortages rather than Soviet resistance were the main constraint on German advances.

Early-October

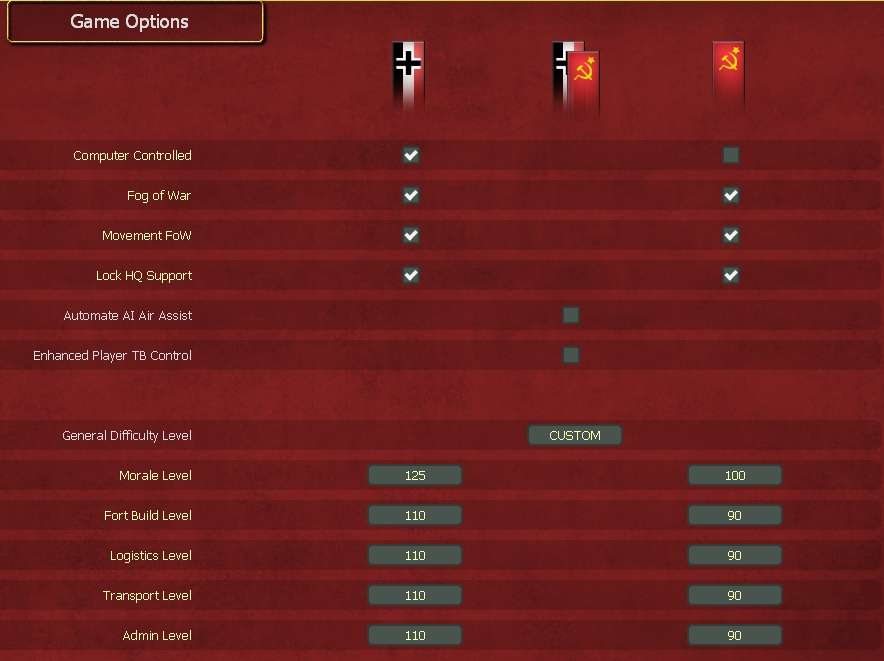
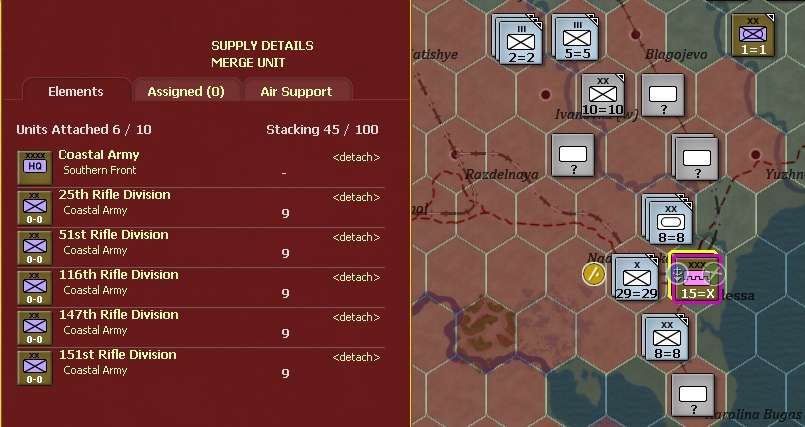
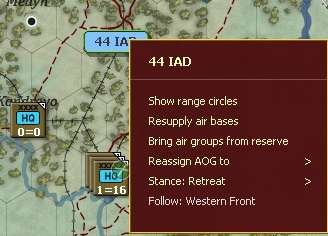
Before considering the details, a part of the new UI is the turn summary (you can turn this off if you want) that opens every time you start the game or open a new turn. How much use you make of this will vary according to your focus but it presents a useful overview and gives access to several other screens. I am transferring roughly 3 rifle divisions per turn from refitting in the reserve to the map.

But if you look at the bottom ‘combat unit alerts’ you can see the basic problem I have. About one unit in six is deemed ‘understrength’, 124 units are ‘unready’, 7 depleted and 35 cut off. I actually had only 162 combat ready rifle divisions (and 50 of those had a TOE below 60%). In effect, the Red Army is on the point of collapse.

Image

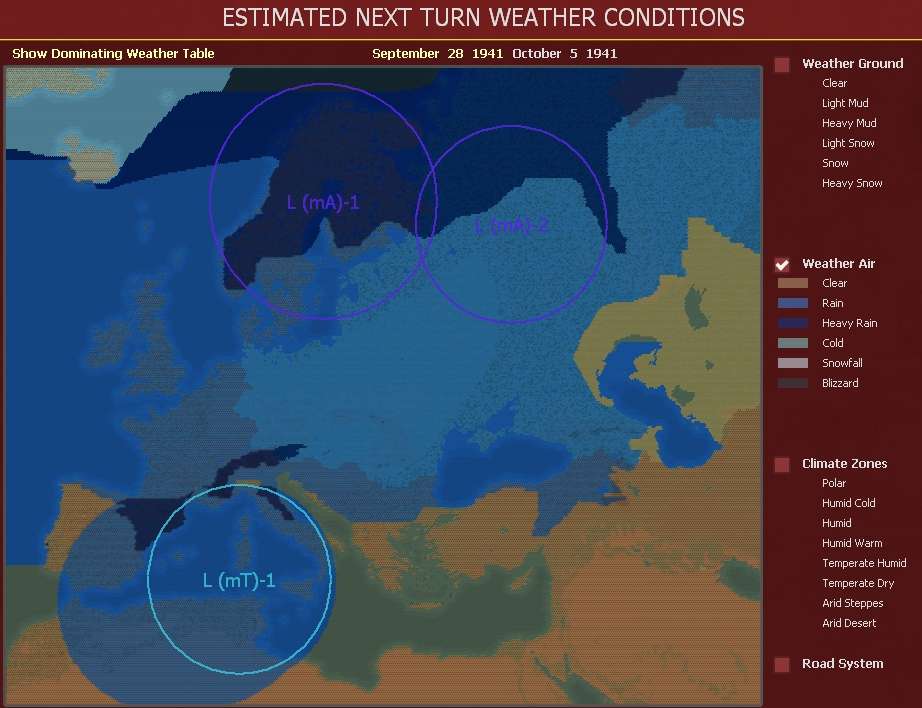
Which makes the weather very important. Next turn it is estimated it will rain over most of the front. This is very welcome, but will only have a marginal effect on operations. Most of the front will have light mud which increases MP costs and lowers attacking CV but not enough to bring offensive operations to a halt (and has relatively little impact if there are average or good roads in the hex).
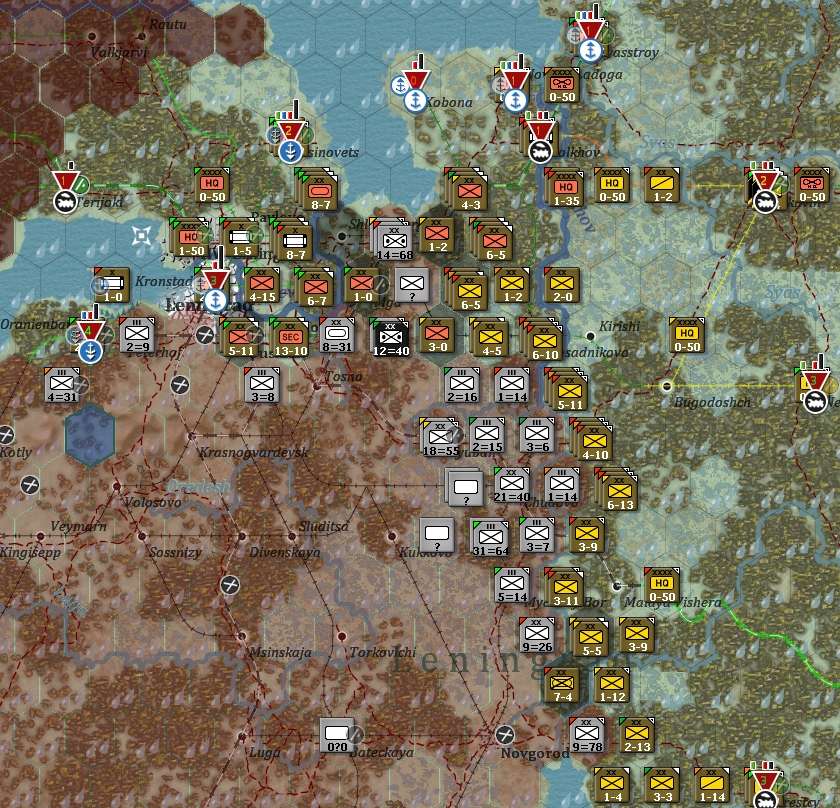
Image

Leningrad

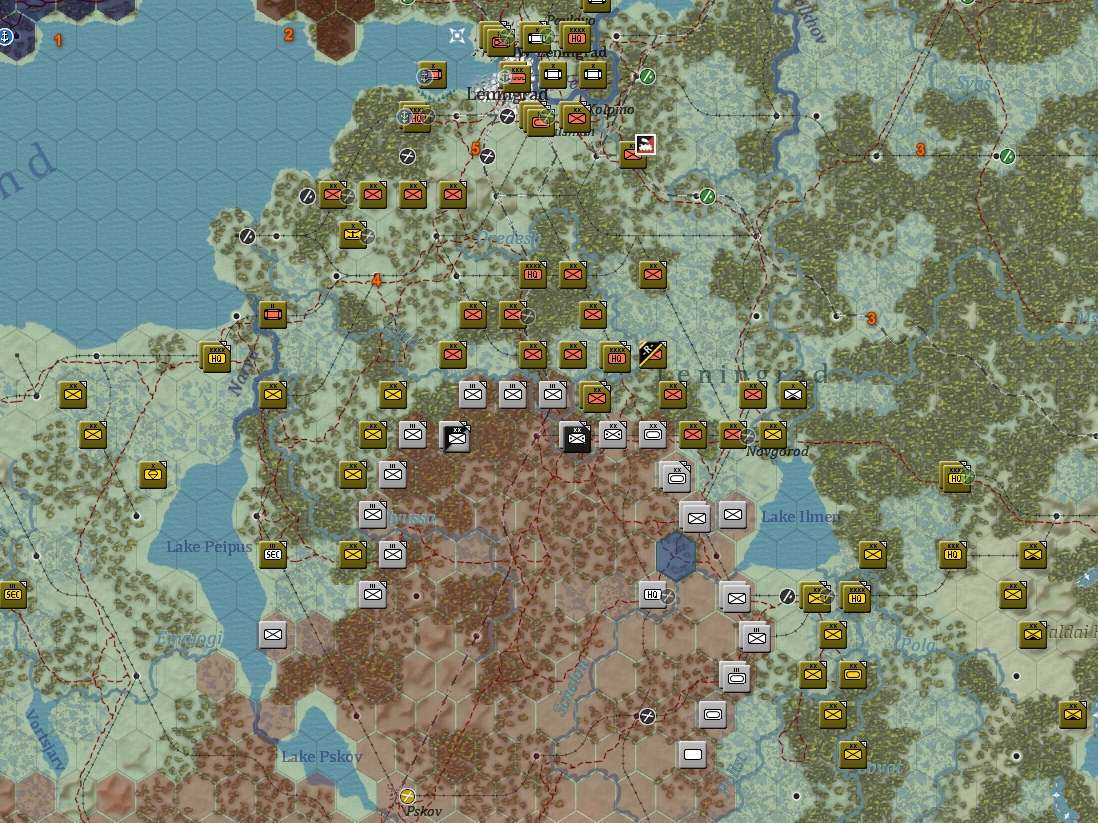
Here, last turn’s Soviet gains brought a robust response. The city is still only isolated by 10 miles, but now that gap is strongly held. NW Front has largely been driven back to its starting position. This makes it increasingly unable to attack again till it has had chance to recover its CPP. One key issue for the Soviets on this sector is it is incredibly hard to bring in substantial reinforcements meaning your front line units weaken over time.

Leningrad itself is strongly held with city forts at Oranienbaum and Leningrad itself. But the current defensive commitment is a finite resource. Again, it is nearly impossible to bring in normal replacements. The only feasible strategy is to allocate Rifle Brigades, convert them to on-map formations and merge them into the existing Rifle Divisions.
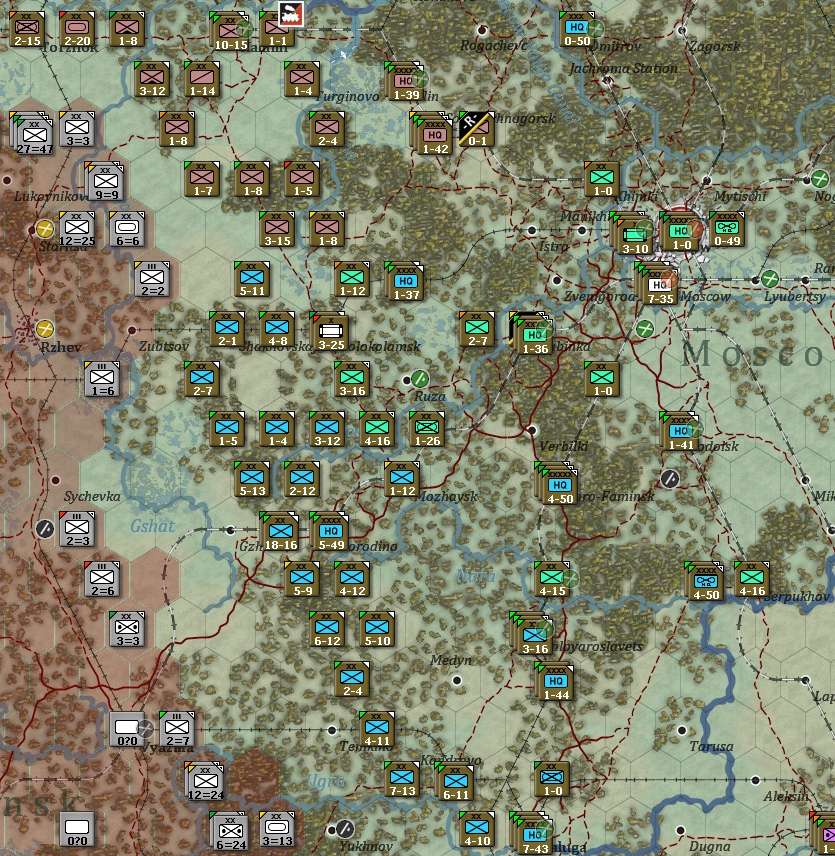

Image

Moscow

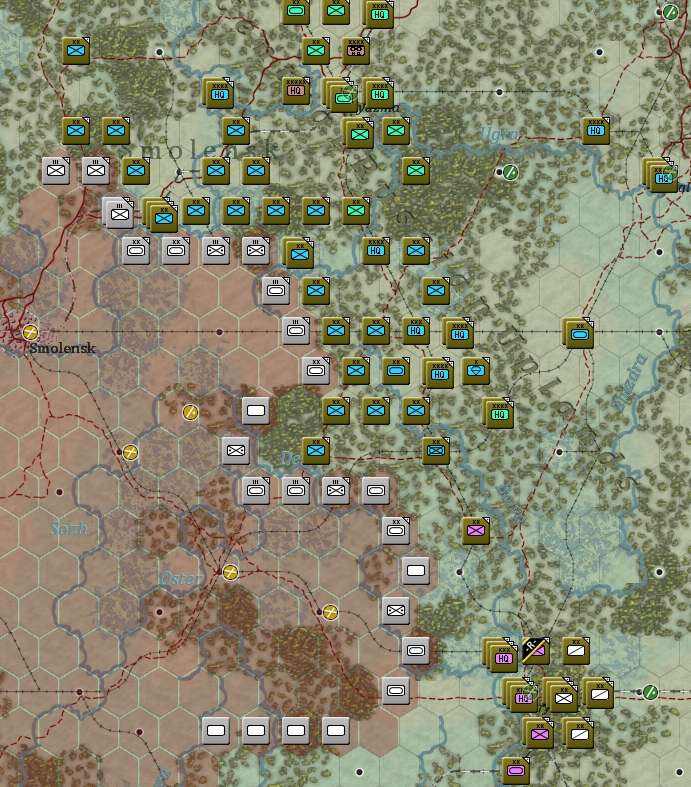
Here the Soviets have a decent defensive line. The terrain from the current front line to the city itself is terrible, especially the heavily wooded belt. Here the Minsk-Moscow motor road becomes key for both sides – it significantly speeds movement so if the Soviets lose control of it then the Panzers suddenly regain their mobility.

Overall, on this sector, it is easier to pull back weakened units to refit (Moscow itself is a National Supply Source) and return to the front lines so to some extent you can absorb serious losses.

Not shown on the map, but Tula is threatened and that can be an effective route for the Axis to take. Clear terrain and the chance to outflank all that good defensive terrain, and the Oka is likely to have frozen by late November.
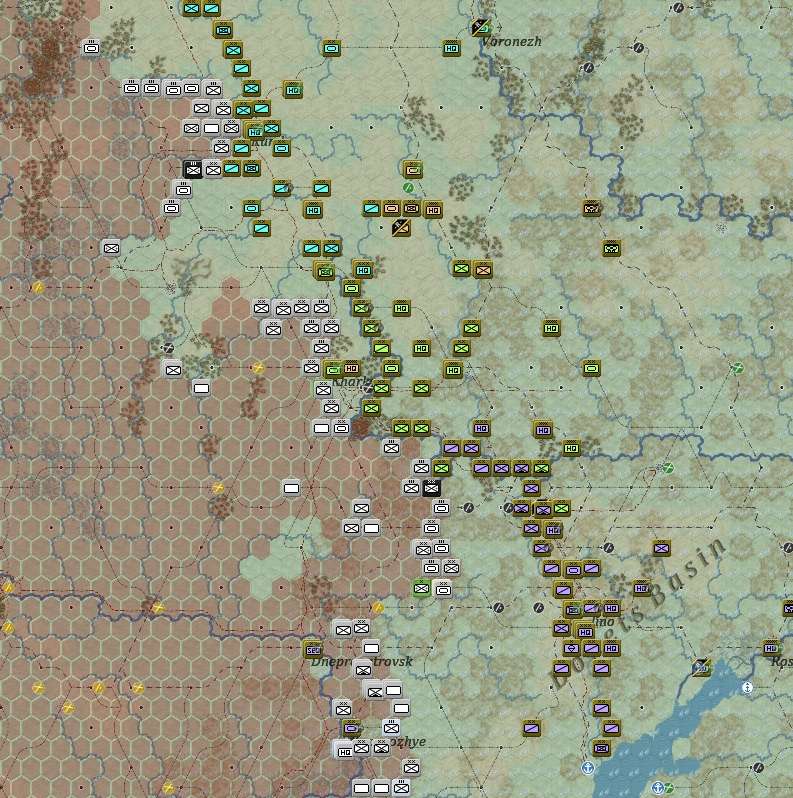
Image

The Ukraine

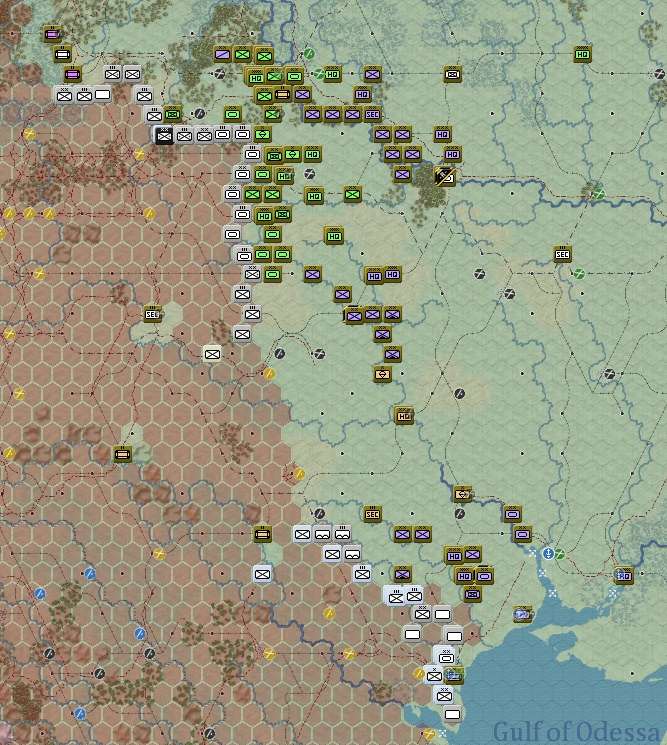
The Germans have reached Kursk and Kharkov, Dnepropetrovsk and Zaporezhye are besieged. The appearance of a defensive line is an illusion, most of those units are going to rout if attacked. The only bright spot is the Germans have not attacked into the Crimea and Sevastopol has been turned into another massive fortress.

Image

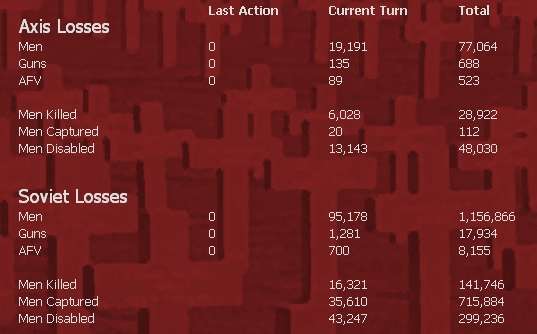
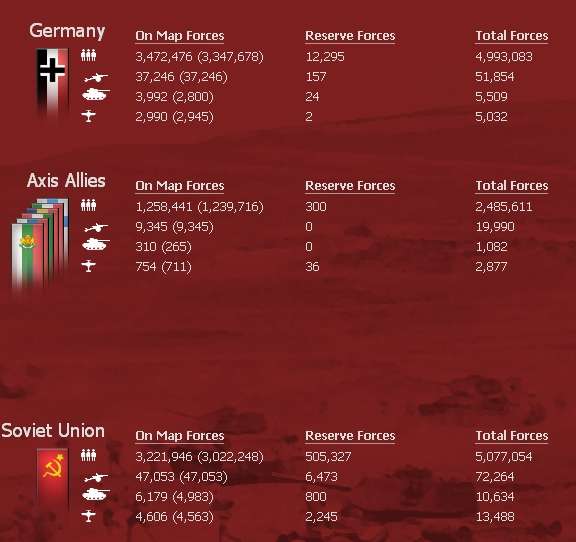
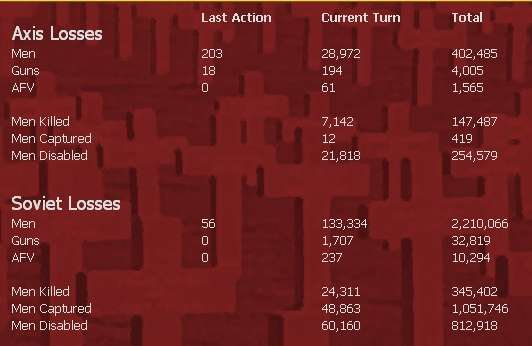
Soviet losses are already over 2.2 million with 1.4 million of those as permanent losses [5].

Image

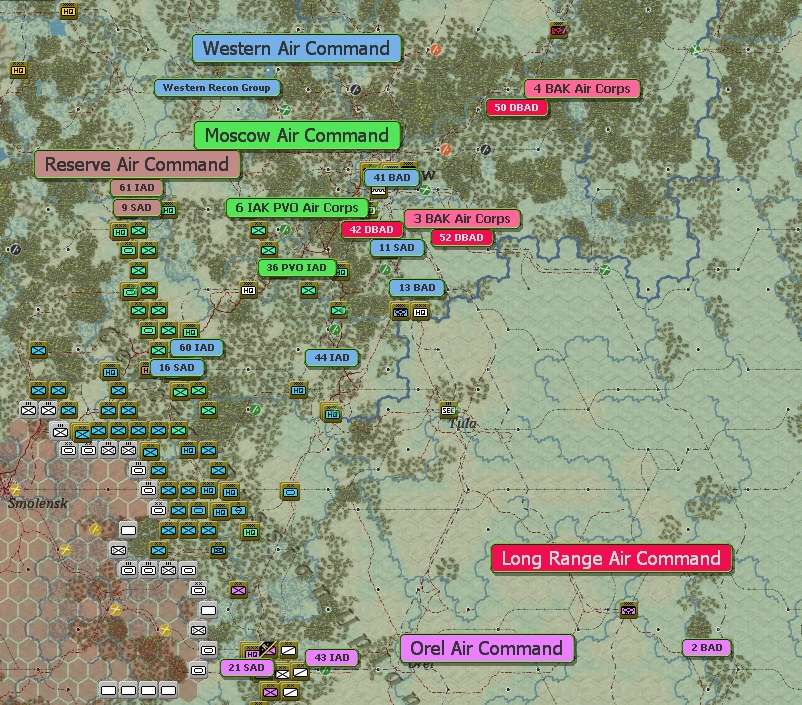
The air war has actually been less disastrous. If the VVS avoids direct engagement with the LW then it can be fairly effective (as it was historically) in 1941. The LW can’t cover everywhere, but the problem is it will be present at the key sectors. For the Soviets it’s a case of take your losses for the occasional reward.

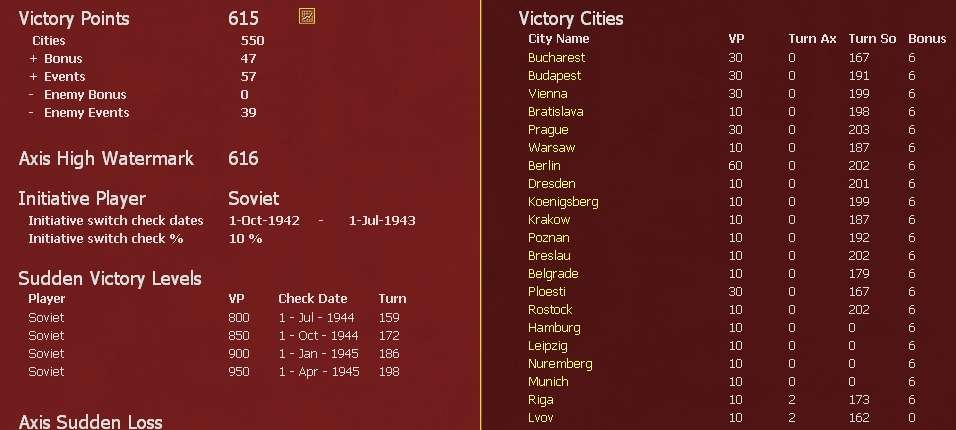
To understand the logic of the phase from now to December 1941 it is useful to review how you win the game, and how actions now can influence the results in May 1945. So the next post will consider winning and losing.

[1] What can be called a bad turn. The loss of the equivalent of 2 armies from Western and Reserve fronts can easily happen when low morale/experience formations are caught in sustained fighting.

[2] Not ideal – this is discussed in the second post about winning the game.

[3] This becomes a major problem for the Soviet player at this phase. Simply being in combat weakens your formations and it is very hard to bring them back to strength.

[4] As the Axis player, be aware of the mobility of the Soviet cavalry, tank and mechanized divisions in this phase, they are mostly fragile but can exploit any gaps in the lines.

[5] Expect to lose over 3 million in 1941 alone.

User avatar
loki100
Posts: 11705
Joined: Sat Oct 20, 2012 12:38 pm
Location: Utlima Thule

Winning and Losing the game

Post by loki100 »

Winning and Losing

We have already discussed the victory mechanics so the purpose here is to place that discussion in context.

So, for the current turn, here is where we are:

Image

So, at this moment, the Axis player is going to lose on 1 January 1942 as their High Water Mark score (513) is below the threshold for the game to carry on (525). Clearly the AI will pass that threshold as 4 major cities in the Ukraine are going to fall in the next turn or two (Kursk, Kharkov, Dnepropetrovsk and Zapororozhye) but it means a German player cannot be too cautious in planning their 1941 offensive.

The VP system has an impact on game play. The axis player can’t adopt what could be seen as a rational approach of complete their offensive over the next few turns and dig into a defensive line to see out the winter. Equally, they don’t need to hold onto everything – note their current VP is actually below the HWM (if I recall I retook a city and gained some VP from events). So winning and losing brings some political aspects into the game, the Germans can’t just stick to a 2 year war winning timetable – they have to over-extend in 1941.

Which brings me to the second way this game can end. If the Axis matches the victory level on a specific turn (so not their HWM but their current score), they win outright. Given a game that isn’t a mismatch, it’s unlikely for this to happen before April 1942 but the July and October 1942 checks can be very close – as an aside the Germans start the Stalingrad-Berlin scenario with 674 VP. So political decisions affect the Soviets too, they simply cannot give up too many turn bonuses (+6 if the city falls 3 turns early) or these checks become too close to call. So my early loss of Kiev really hurts, as that was another +6.

If we come to end of 1942 with the game undecided, the HWM comes back into play. At the moment, the Axis player has the ‘initiative’, they lose this if the actual VP is 10% below the HWM, so again both sides have incentives in late 1942 and early 1943 to hasten or delay this change.

Once it changes, the Soviet player can win a sudden death but it is not all over for the Axis. If the Soviet VP (reset to 0 and now gained from when the initiative changes) is below the HWM in December 1944, the Axis player wins. So again, a real incentive to push the HWM up as a high as possible, to contest Soviet gains in 1943 and 1944 and for the Soviet player to feel pressure to over-extend.

To put that in context, this test game was in June 1944 when this was written. The VP chart was:

Image

So the axis pushed their HWM up another 100 in 1942 (critically Stalingrad was held), the HWM is clearly going to be over-taken but a Soviet sudden victory is very unlikely. But all is not lost for the Axis, in this case victory is going to be defined by when Berlin falls.

But – pesky political constraints again – neither side can just focus on Berlin. If the Soviets over-run Rumania, Hungary and Austria early, there are enough VP for an early win. So both sides need to divert forces to the Balkan theatre as an insurance policy. If the HWM value was still in dispute, it is likely the VP for Rumania (60 plus any time bonuses) would become the critical sector to determine the December 1944 VP check.

Now there is another source of VP, by sending excess forces to the other Theatres. We’ll come back to this later but it’s worth noting these can make all the difference. In this game the Soviets have more VP for sending extra forces to other theatres than they have for taking cities early. So while the temptation may be to reduce your commitment to the wider war, there is a powerful incentive to take the opposite approach – of course divert too much and you will lose this war much earlier.


Sammy5IsAlive
Posts: 635
Joined: Sun Aug 03, 2014 11:01 pm

RE: Winning and Losing the game

Post by Sammy5IsAlive »

Really positive about the VP system. For all of the other improvements/refinements in terms of turn to turn game mechanics from WITE I really do think this is the biggest step forward in terms of improving the game at the most fundamental level.
User avatar
loki100
Posts: 11705
Joined: Sat Oct 20, 2012 12:38 pm
Location: Utlima Thule

RE: Winning and Losing the game

Post by loki100 »

ORIGINAL: Sammy5IsAlive

Really positive about the VP system. For all of the other improvements/refinements in terms of turn to turn game mechanics from WITE I really do think this is the biggest step forward in terms of improving the game at the most fundamental level.

it has that neat effect of creating a choice between less favourable options. As the Axis player, you need to overextend, but how much is in doubt, as the Soviet player you need to contest a set of cities that in terms of force preservation you might simply write off.

So it brings in the political/regime goal level that is missing from WiTE1 but in a manner that retains a lot of player agency and choice
User avatar
CapAndGown
Posts: 3078
Joined: Tue Mar 06, 2001 10:00 am
Location: Virginia, USA

RE: Winning and Losing the game

Post by CapAndGown »

I hope there is a "bitter end" scenario. I'm not sure I like this VP system. Berlin by May 45 or bust!!
User avatar
VigaBrand
Posts: 303
Joined: Fri Dec 19, 2014 3:51 pm
Location: Germany
Contact:

RE: Winning and Losing the game

Post by VigaBrand »

ORIGINAL: loki100

ORIGINAL: Sammy5IsAlive

Really positive about the VP system. For all of the other improvements/refinements in terms of turn to turn game mechanics from WITE I really do think this is the biggest step forward in terms of improving the game at the most fundamental level.

it has that neat effect of creating a choice between less favourable options. As the Axis player, you need to overextend, but how much is in doubt, as the Soviet player you need to contest a set of cities that in terms of force preservation you might simply write off.

So it brings in the political/regime goal level that is missing from WiTE1 but in a manner that retains a lot of player agency and choice
Sound very nice.
Did you have a city list with the dates?
So that every player could see, how long he must hold a city?
Will the german player get a negativ points, if kiev hold longer than in history? Are there events, which will randomly give you a political goal (the opponent doesn't know).


User avatar
821Bobo
Posts: 2409
Joined: Tue Feb 08, 2011 2:20 pm
Location: Slovakia

RE: Winning and Losing the game

Post by 821Bobo »

ORIGINAL: VigaBrand

Sound very nice.
Did you have a city list with the dates?
So that every player could see, how long he must hold a city?
Will the german player get a negativ points, if kiev hold longer than in history? Are there events, which will randomly give you a political goal (the opponent doesn't know).

If you look at the screenshots you will see there column Turn Ax/Turn So. These are the turns(dates) city were historically occupied. To get the bonus you need to take it before that turn.
No, you don't get negative points if you get city later or not at all.
User avatar
dwesolick
Posts: 610
Joined: Mon Jun 24, 2002 7:33 am
Location: Colorado

RE: Winning and Losing the game

Post by dwesolick »

ORIGINAL: CapAndGown

I hope there is a "bitter end" scenario. I'm not sure I like this VP system. Berlin by May 45 or bust!!

+1
"The Navy has a moth-eaten tradition that the captain who loses his ship is disgraced. What do they have all those ships for, if not to hurl them at the enemy?" --Douglas MacArthur
Headshotkill
Posts: 5
Joined: Mon Jan 18, 2021 1:37 pm

RE: Winning and Losing the game

Post by Headshotkill »

The new VP-system looks like a very elegant way to represent the pressure generals felt to perform. Underperform Barbarossa HWM by being too careful and Hitler dismisses you, same thing with soviets. I would like to hear some more info about the player/opponent initiative system and how it affects the dynamic of a game.
From what I understand from the text you say it switches sides whenever someone drops 10% VP below their HWM meaning they got pushed back from their furthest extend.

1. Is this only checked at predefined initiative check dates(In the VP-screen picture 1-okt-1942 - 1-july-1943), or can initiative change at any turn when one side loses 10% VP?)

2. I'm a bit confused with quote below:
ORIGINAL: loki100If we come to end of 1942 with the game undecided, the HWM comes back into play. At the moment, the Axis player has the ‘initiative’, they lose this if the actual VP is 10% below the HWM, so again both sides have incentives in late 1942 and early 1943 to hasten or delay this change.
What exactly is the incentive the hasten or delay the initiative switch, off cours at some point you have to attack your enemy to win the game which would automatically result in an initiative switch at some point, but is their an actual change in mechanics when it switches or is it more a status report of the front thing?

3. In case initiative doesn't get checked every turn but only at a couple predetermined turns, can you win sudden death if you don't have the initiative according to the system but do manage to reach enough VPs at a given date?(only case this could happen in from my understanding is, Axis overshoot a sudden death VP before the sudden death date, but get pushed back 10% and lose initiative, however they resist fiercely and maintain enough VPs to stay above the sudden death VP minimum)
ORIGINAL: loki100If Once it changes, the Soviet player can win a sudden death but it is not all over for the Axis. If the Soviet VP (reset to 0 and now gained from when the initiative changes) is below the HWM in December 1944, the Axis player wins. So again, a real incentive to push the HWM up as a high as possible, to contest Soviet gains in 1943 and 1944 and for the Soviet player to feel pressure to over-extend.
From quote it seems VPs are nulified at initiative switch except for the axis HWM or am I wrong?

Hopefully you can help me out, it wasn't easy for me to describe exactly what I'd like to hear about this new system so questions 2/3 may sound a bit confusing.
Perhaps a more detailed run down of what initiative is/does would be very appreciated.


Side questions:
-Is Rumania/Hungary/Austria a theatre box or fully playable terrain on map?
-If the player has full control of theatre boxes and unit allocation, is it possible to completely neglect a theatre box and lose the game that way?(example: completely ignoring Italy theatre box in 1943)


Thanks for reading!
Post Reply

Return to “After Action Reports”