


Defending the Rodina - A Soviet WiTE2 AAR
Moderator: Joel Billings

-
Sammy5IsAlive
- Posts: 635
- Joined: Sun Aug 03, 2014 11:01 pm
RE: T38
ORIGINAL: CapAndGown
I am afraid it is not clear AT ALL. The rivers are basically INVISIBLE.
I think it is because they are frozen - if you look at the screenshot of the same area at the top of the page the rivers are more visible and in the summer/autumn ones they are completely visible.
I'd agree that for planning purposes it would be good to have a way to see the rivers better in winter - maybe a hotkey to switch the hex art back to summer or at least to 'thaw' the rivers for display purposes.
[Edit - looks like the devs are one step ahead of us [:)]!]

RE: T38
ORIGINAL: CapAndGown
...
I am afraid it is not clear AT ALL. The rivers are basically INVISIBLE.
Well the view is zoomed to level 4 and yes they are all frozen. You can amend how the weather shows on the map to showing all effects (my usual), ground or air or none - when you effectively have the summer map view. Like a lot in this game, you can flip views to suit your needs.
I tend to use the summer view at the end of winter when I am thinking about how far to go and trading off bridgeheads against over-stretched supply lines during the spring rains.
edit: Here is much the same view with the weather effects disabled. So you can flip between them or decide its more useful to have a clearer view of the underlying terrain as opposed to a visual clue as to the weather conditions:

- Attachments
-
- 2021-01-25_122655.jpg (743.95 KiB) Viewed 640 times
RE: Game Concepts: Production
ORIGINAL: loki100
c) Armament points are not such an important concept;
d) Soviet factory evacuation is automated and will mostly follow the historical schedules;
First of all, thanks Loki for the great AAR reports!
Then couple of questions about production:
What kind of control does the Soviet player have over production then if armaments are not important and evacuation is automatic?
In WitE1, ARM points were the leash that was yanked by the Soviet player, either by tuning the division ToEs or building armament-hungry support units. I thought that was pretty nifty system to play with, although it definitely had many weak points and deficiencies.
Is there a production facility for every piece of equipment in WitE2 or do they still just use the generic ARMament pool? What creates the demand and sets the value for certain equipment's production rate, or is it just historically predetermined?
Is the evacuation schedule always the same or is there some random element? Can both players see the estimated evacuation dates? That will play a key role in strategic plans for both sides!
RE: Game Concepts: Production
ORIGINAL: Nix77
ORIGINAL: loki100
c) Armament points are not such an important concept;
d) Soviet factory evacuation is automated and will mostly follow the historical schedules;
First of all, thanks Loki for the great AAR reports!
Then couple of questions about production:
What kind of control does the Soviet player have over production then if armaments are not important and evacuation is automatic?
In WitE1, ARM points were the leash that was yanked by the Soviet player, either by tuning the division ToEs or building armament-hungry support units. I thought that was pretty nifty system to play with, although it definitely had many weak points and deficiencies.
Is there a production facility for every piece of equipment in WitE2 or do they still just use the generic ARMament pool? What creates the demand and sets the value for certain equipment's production rate, or is it just historically predetermined?
Is the evacuation schedule always the same or is there some random element? Can both players see the estimated evacuation dates? That will play a key role in strategic plans for both sides!
well with praise like that, lest see if we can help you [;)]
I'll assume you've read Red Lancer's basic discussion thread on production so I'll concentrate on the specifics.
1) Arms pts do matter, but in WiTE1 they were really important, in WiTE2 I very rarely pay attention to them - so its that shift of perspective that matters. When I first started testing WiTE2 (over 5 years ago), I kept on asking why I had so many and then realised it was because the production model works off different key criteria
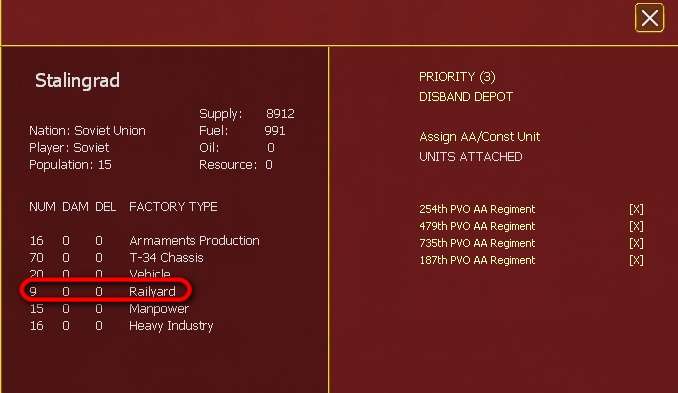
2) In a way the system builds off WiTW. Many elements are named and come from designated factories but those factories build the basic frame/chassis not the final product. So you have T34 factories, IS factories (later of course), Yak factories, Pe-2/3 factories. They operate taking arms pts to build frames (up to ther capacity) and then stuff like the guns/fuel tanks/radars are added to make that particular model (this last stage of building the actual tank etc takes supplies from your HI). In addition a lot of elements are produced from the generic HI such as the non-manpower elements of artillery and infantry squads. Some of this is built to need, some in fixed amounts but even the built to need often has a cap. For practical purposes that cap (as in the image from the Event log above) matters more than the resource input. I think this effectively replaces the role that arms pts play in WiTE1.
3) so not a lot, all the complex rules over expansion, all the odd gamey tricks of sending your factories to be captured, or moving them to reduce production fall away. So all those long discussions about how much HI/Arms Pt production the Soviet player needs to save ... no longer of any importance.
4) equally all that arcane lore of having German motorised divisions screaming around the map to trap factories can be forgotten. The factory, by default, moves on its historic date to its historic location with historic capacity on arrival. The Soviet player can move it earlier, it arrives earlier but with more damage, the German player can force an earlier transfer by capturing the city before the historical deadline. It arrives with more damage.
5) While in many ways this is a complex game (ahem) there has been a deliberate effort to reduce some of the demand on players (&, as a bonus, stop some of the more ahistoric actions based on nothing but the WiTE1 game engine). The production system is one - it works mostly in the background. The skill for a Soviet player is to manage the packaging of that production into combat and support units and between replacements and fresh formations. And that damn heavy artillery shortage is one that forces some hard choices and will see the Soviets very reliant on mortars and 76mm guns for much of 1942 and 1943.
-
CapAndGown

- Posts: 3078
- Joined: Tue Mar 06, 2001 10:00 am
- Location: Virginia, USA
RE: Game Concepts: Production
ORIGINAL: loki100
4) equally all that arcane lore of having German motorised divisions screaming around the map to trap factories can be forgotten. The factory, by default, moves on its historic date to its historic location with historic capacity on arrival. The Soviet player can move it earlier, it arrives earlier but with more damage, the German player can force an earlier transfer by capturing the city before the historical deadline. It arrives with more damage.
What about factories that were not moved? For instance, lets say I want to go for the Gorki complex in order to cripple Soviet vehicle production, what happens to those factories? IRL the Germans did consider bombing the industry in Gorki, it was that important.
RE: Game Concepts: Production
at the moment, you can't move them so they are lost. If you get to Gorki, you've won the game.
as in a lot else, if you want a single big message - don't play this as if it was WiTE1 with a different map.
as in a lot else, if you want a single big message - don't play this as if it was WiTE1 with a different map.
T48
23 May 1942
This update is based on the on-map situation at the end of T48.
Background
As in the last report, I’ll be brief here. The Soviet winter offensive continued much as reported above. By 21 March the Germans abandoned Vyazma [1] but had retaken Voroshilovgrad in the south (and it then changed hands several times up to mid-April). By 28 March, Bryansk Front finally liberated Orel. North of Bryansk-Orel, 5 April saw torrential rains that brought the attacks by Western and Bryansk Front to an end.

The rains briefly eased by 2 May (T45) and the Germans continued their offensive against Sevastopol.

[2]
The city fell the following week as the Germans started their 1942 offensive. Bryansk Front was driven back around Orel

[3]
To the south, the Germans probed the Soviet lines north of Rostov. This pattern of localised attacks in the south and stalemate in the north persisted into the following week until the main German offensive broke on 17 May.
T48
For context, the AI makes a choice as to whether to go for Moscow or the VP locations in the south. This adds a nice bit of tension, not helped as it persisted in a pattern of army size attacks around Orel and the Donets bend when it could in April-early May. One of these targets is a good set up for Moscow with all that clear terrain up to the Oka, the other clearly sets up a drive on Stalingrad.
Well it made up its mind

And it also managed to push over the Don east of Rostov.
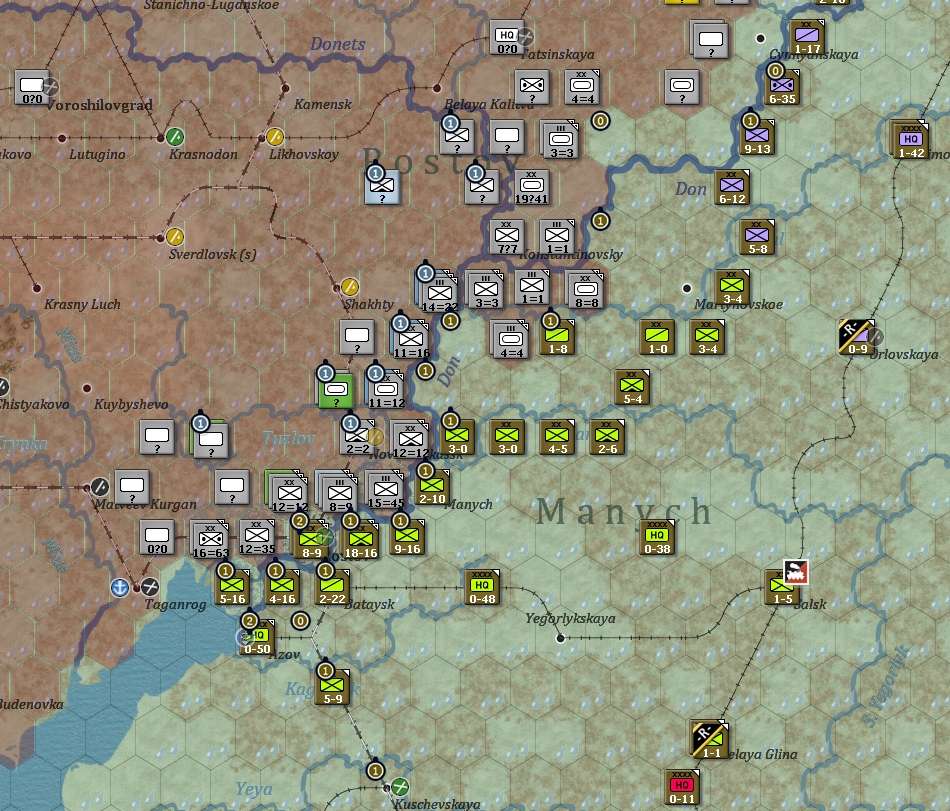
Now this is a sector where the rail nets oddly favour the Axis over the Soviets. Up to the Donets/Don line, assuming they have repaired the dual track lines and have a decent depot structure, the Axis can bring fresh formations, replacements and freight relatively close to the front.
The Soviets are dependent on their link to Moscow via 3/4 single track rails – use those for troop movements and you seriously reduce your movement of supplies. And of course, you (should) have a lot of units at Moscow.

Now you have two compensating advantages. Stalingrad is a major railyard, so while the single track rails will become congested, at least you have a lot of trains available to send out [4].
The other is you can use the National Reserve. You can set an arrival hex, it must be at least 10 hexes from the nearest Axis unit and pull formations (including entire armies) from the reserve. If you have kept a proper strategic reserve this is the time to use it.
This is not a one-sided gain though. Such formations arrive with 0 CPP, their HQs empty of Support Units. So it will take 1-2 turns (terrain and ground conditions affecting movement speed) to hurl them into the front line and they will have no CPP (as you will have gathered, this is not ideal).
While we are on the topic, there is another problem. I am going to have to allocate more formations (here and the Caucasus) than I can easily resupply (even using the reserve to funnel in fresh units). So I am going to really struggle to replace local losses. My solutions are to extract the damaged units back to the reserve to refit or use my stock of Rifle Brigades as emergency replacement formations (using the merge function).
So before we move on, usual summary screens.
Losses so far:

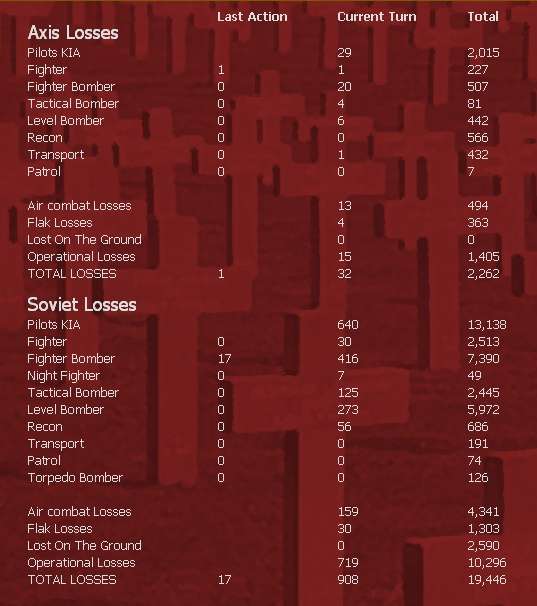
Air losses (I’ll talk about managing the air war in a later post) – my losses this turn were grim as I committed my level bombers to hitting the axis logistics system. I also used a lot of recon effort to work out how much the AI had sent towards Stalingrad.
And the order of battle summary. Note the Germans have rebuilt their Panzer divisions.

[1] In the main the AI is much more aware of the risk of encirclement – both tactically and over a larger scale. You will still pocket more than against a human opponent but it makes good choices in this respect.
[2] Few things worth noting there. I have a lot of units stacked in the city (this is the benefit of the city fort concept – and I find it is only useful if you commit 5+ divisions). Attacking losses are grim as WiTE2’s combat model penalises attempts to take defended fortifications or urban hexes (note that Sevastopol is treated as clear). The Germans reduced the fort by another level due to the number of infantry elements they contributed.
[3] These intense small sector offensives are very effective. My basic morale/experience is low enough that units will collapse under sustained pressure. Note my obsession with defending the line of the Don.
[4] The hugely enjoyable Stalingrad-Berlin campaign opens with this in German hands. Reclaiming it, and repairing it so it functions fully is utterly critical to any Soviet counter-offensive back towards Stalino. In general, the two late war starts are great fun in WiTE2 as they present very different challenges to 1941.
This update is based on the on-map situation at the end of T48.
Background
As in the last report, I’ll be brief here. The Soviet winter offensive continued much as reported above. By 21 March the Germans abandoned Vyazma [1] but had retaken Voroshilovgrad in the south (and it then changed hands several times up to mid-April). By 28 March, Bryansk Front finally liberated Orel. North of Bryansk-Orel, 5 April saw torrential rains that brought the attacks by Western and Bryansk Front to an end.
The rains briefly eased by 2 May (T45) and the Germans continued their offensive against Sevastopol.
[2]
The city fell the following week as the Germans started their 1942 offensive. Bryansk Front was driven back around Orel
[3]
To the south, the Germans probed the Soviet lines north of Rostov. This pattern of localised attacks in the south and stalemate in the north persisted into the following week until the main German offensive broke on 17 May.
T48
For context, the AI makes a choice as to whether to go for Moscow or the VP locations in the south. This adds a nice bit of tension, not helped as it persisted in a pattern of army size attacks around Orel and the Donets bend when it could in April-early May. One of these targets is a good set up for Moscow with all that clear terrain up to the Oka, the other clearly sets up a drive on Stalingrad.
Well it made up its mind
And it also managed to push over the Don east of Rostov.
Now this is a sector where the rail nets oddly favour the Axis over the Soviets. Up to the Donets/Don line, assuming they have repaired the dual track lines and have a decent depot structure, the Axis can bring fresh formations, replacements and freight relatively close to the front.
The Soviets are dependent on their link to Moscow via 3/4 single track rails – use those for troop movements and you seriously reduce your movement of supplies. And of course, you (should) have a lot of units at Moscow.
Now you have two compensating advantages. Stalingrad is a major railyard, so while the single track rails will become congested, at least you have a lot of trains available to send out [4].
The other is you can use the National Reserve. You can set an arrival hex, it must be at least 10 hexes from the nearest Axis unit and pull formations (including entire armies) from the reserve. If you have kept a proper strategic reserve this is the time to use it.
This is not a one-sided gain though. Such formations arrive with 0 CPP, their HQs empty of Support Units. So it will take 1-2 turns (terrain and ground conditions affecting movement speed) to hurl them into the front line and they will have no CPP (as you will have gathered, this is not ideal).
While we are on the topic, there is another problem. I am going to have to allocate more formations (here and the Caucasus) than I can easily resupply (even using the reserve to funnel in fresh units). So I am going to really struggle to replace local losses. My solutions are to extract the damaged units back to the reserve to refit or use my stock of Rifle Brigades as emergency replacement formations (using the merge function).
So before we move on, usual summary screens.
Losses so far:
Air losses (I’ll talk about managing the air war in a later post) – my losses this turn were grim as I committed my level bombers to hitting the axis logistics system. I also used a lot of recon effort to work out how much the AI had sent towards Stalingrad.
And the order of battle summary. Note the Germans have rebuilt their Panzer divisions.
[1] In the main the AI is much more aware of the risk of encirclement – both tactically and over a larger scale. You will still pocket more than against a human opponent but it makes good choices in this respect.
[2] Few things worth noting there. I have a lot of units stacked in the city (this is the benefit of the city fort concept – and I find it is only useful if you commit 5+ divisions). Attacking losses are grim as WiTE2’s combat model penalises attempts to take defended fortifications or urban hexes (note that Sevastopol is treated as clear). The Germans reduced the fort by another level due to the number of infantry elements they contributed.
[3] These intense small sector offensives are very effective. My basic morale/experience is low enough that units will collapse under sustained pressure. Note my obsession with defending the line of the Don.
[4] The hugely enjoyable Stalingrad-Berlin campaign opens with this in German hands. Reclaiming it, and repairing it so it functions fully is utterly critical to any Soviet counter-offensive back towards Stalino. In general, the two late war starts are great fun in WiTE2 as they present very different challenges to 1941.
The UI
The UI
Since this has come up in some of the discussions in this thread, seems useful to have a quick look at the UI. I’ll discuss the Commander’s Report in a different post as it is such an important tool with so much additional functionality.
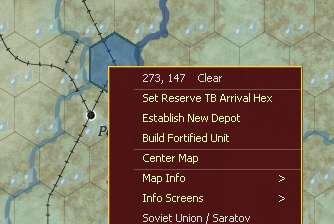
First off, there are often many ways to do something. So I can change the priority of a depot from the top of the screen, from opening the city details or simply right clicking on the hex:

Note I could have disbanded the depot that way, built an airbase (or expanded an existing one) or ordered the creation of a new fortified unit. This concept runs across the game, do this sort of in-game management using the approach that is easiest for you.
Right clicking also opens up all the various map modes or gives you access to the information screens.
Second the map view can be swapped around. We have already shown how you can display (or not) weather conditions on the map.
I tend to play with the supply network showing and hex control, I sometimes use the fort level view, sometimes not.
But for example I could add the VP locations to the view:
Show unit status (not just reserve/refit but also fresh arrivals or those due to be withdrawn). This shows my units that heed to refit (outlined in blue) after I had set my criteria using the Commander’s Report. Ideally they should be out of ZoCs and preferably based at a depot.
I use this mode a lot as it allows quick identification of the units I want to refit and I can then move them out of the front lines – well I can if I can spare them.

Another view is an estimate of the quality of command for each unit (this picks up command chain, leader values and supply state). I don’t use it very often but it can be handy at spotting gaps:
There green is good, red is poor. The fortified zones suffer from reporting to Stavka, so are outside command range, in the wrong command relationship and not able to gain much supply. But I have (locally) a lack of command capacity.
Also as WiTW, there are a range of metrics screens you can use to track key variables. So here is the manpower losses over the last 10 turns.

Basically the Axis losses dropped radically once the winter was over, mine spikes reflect the fall of Sevastopol (only 2 divisions escaped the final collapse) and the horror show as the AI swept away my defensive lines in the last turn.
So the game gives you a lot of information and a lot of neat ways of doing things (air transport is now so much easier to conduct). Quite often you can decide to use the approach that suits you. Some of the map modes and information screens you may never really look at from game to game, but they are there if you’d find it useful.
Since this has come up in some of the discussions in this thread, seems useful to have a quick look at the UI. I’ll discuss the Commander’s Report in a different post as it is such an important tool with so much additional functionality.
First off, there are often many ways to do something. So I can change the priority of a depot from the top of the screen, from opening the city details or simply right clicking on the hex:
Note I could have disbanded the depot that way, built an airbase (or expanded an existing one) or ordered the creation of a new fortified unit. This concept runs across the game, do this sort of in-game management using the approach that is easiest for you.
Right clicking also opens up all the various map modes or gives you access to the information screens.
Second the map view can be swapped around. We have already shown how you can display (or not) weather conditions on the map.
I tend to play with the supply network showing and hex control, I sometimes use the fort level view, sometimes not.
But for example I could add the VP locations to the view:
Show unit status (not just reserve/refit but also fresh arrivals or those due to be withdrawn). This shows my units that heed to refit (outlined in blue) after I had set my criteria using the Commander’s Report. Ideally they should be out of ZoCs and preferably based at a depot.
I use this mode a lot as it allows quick identification of the units I want to refit and I can then move them out of the front lines – well I can if I can spare them.
Another view is an estimate of the quality of command for each unit (this picks up command chain, leader values and supply state). I don’t use it very often but it can be handy at spotting gaps:
There green is good, red is poor. The fortified zones suffer from reporting to Stavka, so are outside command range, in the wrong command relationship and not able to gain much supply. But I have (locally) a lack of command capacity.
Also as WiTW, there are a range of metrics screens you can use to track key variables. So here is the manpower losses over the last 10 turns.
Basically the Axis losses dropped radically once the winter was over, mine spikes reflect the fall of Sevastopol (only 2 divisions escaped the final collapse) and the horror show as the AI swept away my defensive lines in the last turn.
So the game gives you a lot of information and a lot of neat ways of doing things (air transport is now so much easier to conduct). Quite often you can decide to use the approach that suits you. Some of the map modes and information screens you may never really look at from game to game, but they are there if you’d find it useful.
RE: The UI
Hi loki,
The AAR is awesome and very informative.
Just a couple of questions / concerns. Are CPP perhaps too determinative? I would hate to have only 1 factor be the only thing that really mattered.
Can the strategic reserve become gamey? Pulling whole armies off the map and having them magically reappear somewhere on the other side of the map?
I know you guys have been working on this for a long time so i doubt this will be the case, but it's just a couple of things that came to mind.
Keep up the great work!
-
CapAndGown
- Posts: 3078
- Joined: Tue Mar 06, 2001 10:00 am
- Location: Virginia, USA
RE: The UI
I notice there are stats on the number of pilots lost. I hope the game does not get down to the individual pilot level. While that concept was fun in WitP, it also added more complexity to the code making it just one more thing that could produce bugs.
RE: The UI
ORIGINAL: Wild
Hi loki,
The AAR is awesome and very informative.
Just a couple of questions / concerns. Are CPP perhaps too determinative? I would hate to have only 1 factor be the only thing that really mattered.
Can the strategic reserve become gamey? Pulling whole armies off the map and having them magically reappear somewhere on the other side of the map?
I know you guys have been working on this for a long time so i doubt this will be the case, but it's just a couple of things that came to mind.
Keep up the great work!
This is a fairly personal response (in that if reflects testing rather than game intent). Its more that if you get the CPP right, you probably are using the other tools effectively too. Not sure that makes sense but there is a lot going on to keeping your CPP high. Once you achieve that you get a number of rewards, for the Soviets they help off set the dire admin/initiative scores of a lot of your leaders as an eg (mainly for MP determination). This tends to come off operational pauses and also echelon attacks (where armies fall out of the way to be replaced - more feasible in 1944 than it is in mid-1942. You tend to get very powerful initial blows very quickly running out of steam.
Now for the German side, getting it right means phasing your moves with some care in 1941, trying to keep your infantry in zones already under your control as they move up (of course in turn, a Soviet player will be trying to deny you those zones). Later in the game, you start to face the dilemna of using your Pzrs for reserve activation (ie to stop breakthroughs) or for counter-attacks (ie to contest breakthroughs) as you can't sustain both. And needing to pull them off the line to regain their CPP (at a time when you also need them available).
As to the reserve-map transitions there are a few constraints. First it takes some discipline as those units are not sat digging in a rear defensive line (certainly still important up to late 1942). Second the distance to the front line can be an issue in poor weather. Third no CPP, means even if you then link them to a Front on Assault status (that raises the rate of regain of CPP), it'll take 3-4 turns to get them up into the 80s/90s. Finally, they need to be supplied where they appear, so can end up very short of Combat power and MP if this is marginal.
It seems to work perfectly well, not least for the first reason its hard to keep more than say 2 armies worth of formations back (& that takes some single minded planning).
ORIGINAL: CapAndGown
I notice there are stats on the number of pilots lost. I hope the game does not get down to the individual pilot level. While that concept was fun in WitP, it also added more complexity to the code making it just one more thing that could produce bugs.
It follows the WiTW method in that regard, works well and pretty much out of sight in terms of its direct impact on game play. Its how the game holds statistics such as experience (skill) and morale which are then aggregated up the air group level.
-
CapAndGown
- Posts: 3078
- Joined: Tue Mar 06, 2001 10:00 am
- Location: Virginia, USA
RE: The UI
You mention having an assault front. What about assault armies? Does it have to be an entire front? Right now, in my Soviet game in spring of 1942, I am setting up reserve armies behind the front whose task will be to launch counter attacks on German penetrations. They are mostly subordinated directly to Stavka. I wouldn't want to have any assault fronts at this time, instead relying on local armies for counter attacks.
RE: The UI
ORIGINAL: CapAndGown
You mention having an assault front. What about assault armies? Does it have to be an entire front? Right now, in my Soviet game in spring of 1942, I am setting up reserve armies behind the front whose task will be to launch counter attacks on German penetrations. They are mostly subordinated directly to Stavka. I wouldn't want to have any assault fronts at this time, instead relying on local armies for counter attacks.
well I'll start with the usual point (as it can't be said too many times)
this is not WiTE1 with a dollop of WiTW. For all practical purposes its a new game and the quicker players shed their WiTE1 approach the quicker they will adapt (& the manual has about 4 pages on just the really big stuff that is different).
You set assault status at Army level (axis) or Front level (Soviet), all the attached commands then take on that characteristic (there are a load of secondary rules but that is the core relationship)
RRs
I confess I tried to get an answer to this on another thread, and got 2 answers which weren't answers to my question. So I want to try my luck with loki100 and different phrasing.
Is there any differential in German RR repair as to either time or place?
Historically, the RR destruction was more miss than hit in the first couple of weeks of the campaign and the Germans got their first trains through to Minsk and Riga very early.
In WITE1 this is modelled by having a region where repair is faster (the Baltic states, basically).
In TOAW Barbarossa scenarios this is modelled by leaving some or all RR hexes intact after conquest in early turns, varying by scenario modeller.
Is there anything like either of these mechanisms in WITE2?
RE: RRs
yes - if you capture a hex in the Baltic states in the first 4 turns (if my memory is correct) then you have a % chance it is undamaged. So you end up with a bit of a patchwork in that area of repaired stretches and the occasional break (luck or combat).
In testing, most German players are then putting the auto repair rail repair units into the components of AGN so all these odd not quite complete lines come into use without having to divert the FBD from their main tasks
As to rest, you can and should get the rail line to Minsk by about T3, but doing it takes some care in unit placement and how you handle the Bialystok pocket
RE: Game Concepts: The Air War
I really like WITE....I bought WITW, but really struggled with the Airwar system...Even my regular opponent did..hence we tried two games and ended both before there time and never played it again leaving with us both feeling rather confused trying to manage the aircraft which always has messy feeling. I preferred the Airsystem in WITE as it was alot easier to under stand and manage. So far every aspect of WITE looks pretty good and encouraging...however it seems the Air system seems to be that horrid confusing one that is in WITW? or has it been improved and more easily managed?
-
Joel Billings

- Posts: 33474
- Joined: Wed Sep 20, 2000 8:00 am
- Location: Santa Rosa, CA
- Contact:
RE: Game Concepts: The Air War
There is an AI assist system you can use (and you can automate it so both sides have to use it). This system should be very easy to use. You tell different air operational groups to follow land units, and they set up their air directives accordingly.
It's a good place to start. Later, you can advance to using the AI assist and then adding in or modifying air directives. Lots of things have been done to make it easier to deal with the air units (the idea of AOGs that are a grouping of air units for one) so the air game should be easier to get into. One advantage is once you know how to use it, you save hundreds of mouse clicks (at least when compared to how skilled players played the air game in WitE).
It's a good place to start. Later, you can advance to using the AI assist and then adding in or modifying air directives. Lots of things have been done to make it easier to deal with the air units (the idea of AOGs that are a grouping of air units for one) so the air game should be easier to get into. One advantage is once you know how to use it, you save hundreds of mouse clicks (at least when compared to how skilled players played the air game in WitE).
All understanding comes after the fact.
-- Soren Kierkegaard
-- Soren Kierkegaard
T57
25 July 1942
This update is based on the end of T57
Background
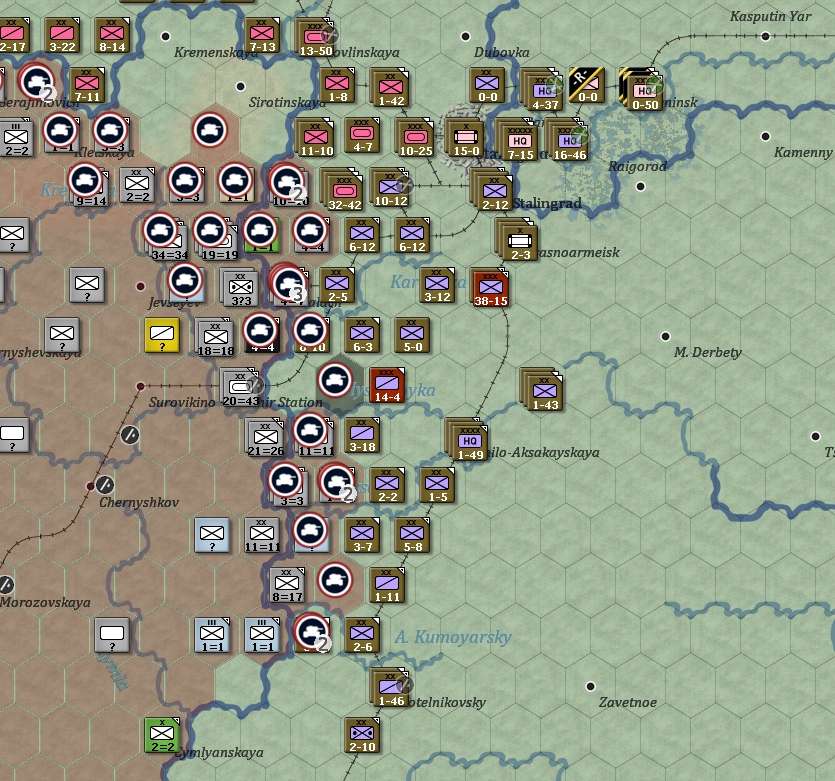
By early June, the Soviet build up at Stalingrad had stalled the direct German attack towards the city on the line of the Don. However, Rostov fell on 6 June as the Germans breached the Soviet lines on the lower Don and the Germans started to steadily push south.
In response Stavka ordered Bryansk Front over to the offensive around Orel in an attempt to draw off the German reserves. Heavy German attacks from 14-24 June threw the Soviet forces back to their starting lines [1], while North Caucasus Front was being forced back into the Caucasus. By the 27 June the Soviets were just clinging to the line of the Kuban and in full retreat in the sector to the south of Stalingrad.
However, it was at Stalingrad their main blow fell. Heavily reinforced and rested, the Germans simply overwhelmed the Soviet line on the east bank of the Don.
[2]
By 11 July, the Germans had reached the outskirts of Stalingrad and defeated an attempted counter-attack by SW Front from the north, the following week saw a similar pattern as SW Front tried to deflect the German drive on the city but only succeeded in seeing its recent reinforcements wrecked in the subsequent German counter-attack.
T57
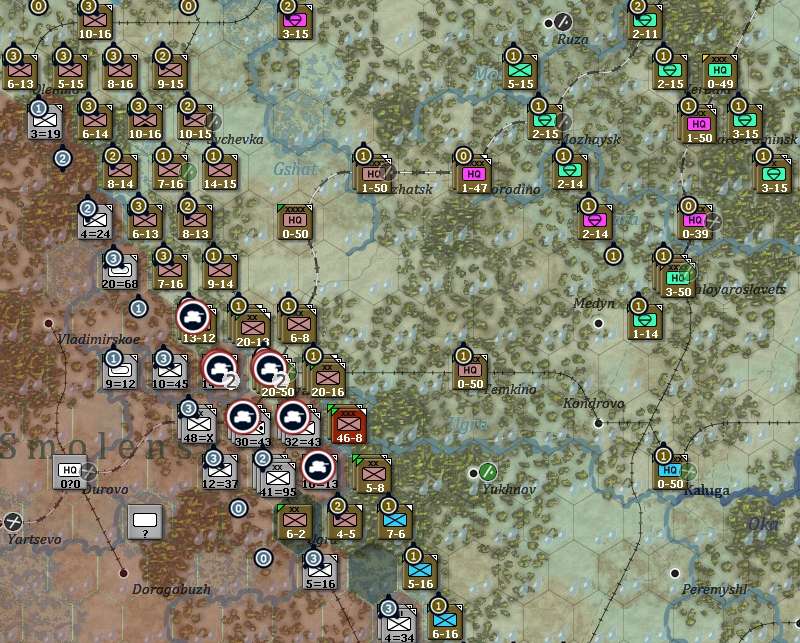
This turn saw action almost across the map. Kalinin Front was pushed back around Vyazma but managed to hold onto the city itself.
[3]
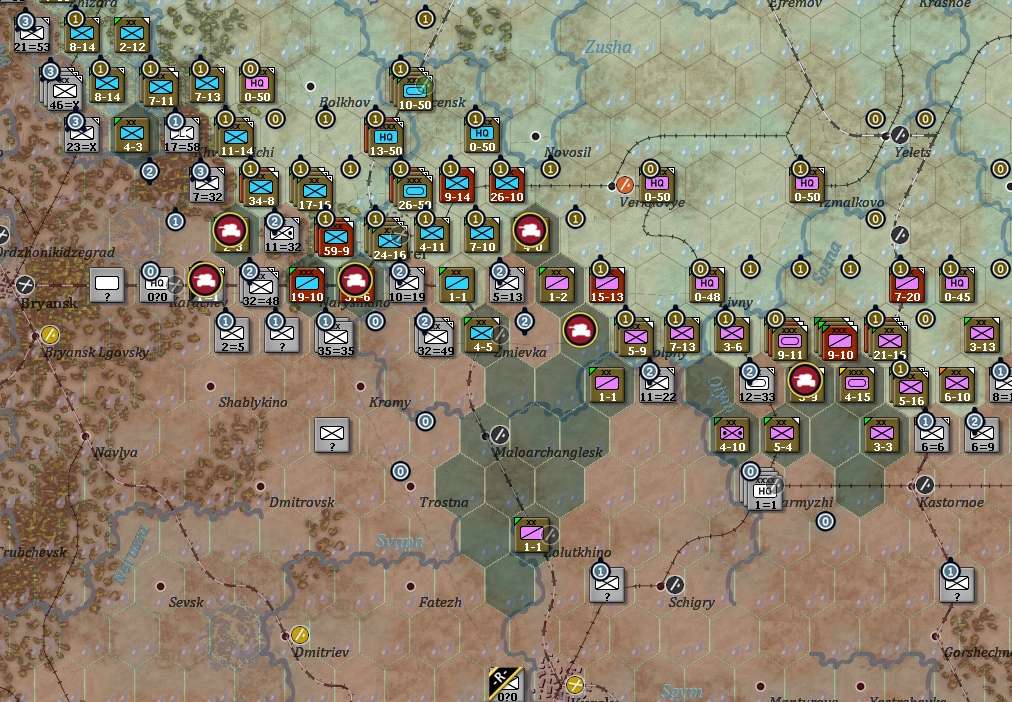
In turn, Western and Bryansk Fronts renewed their offensive around Orel. A lack of local reserves allowed the Soviets to break the German front and cavalry formations were able to push deep into the German rear, almost reaching Kursk.
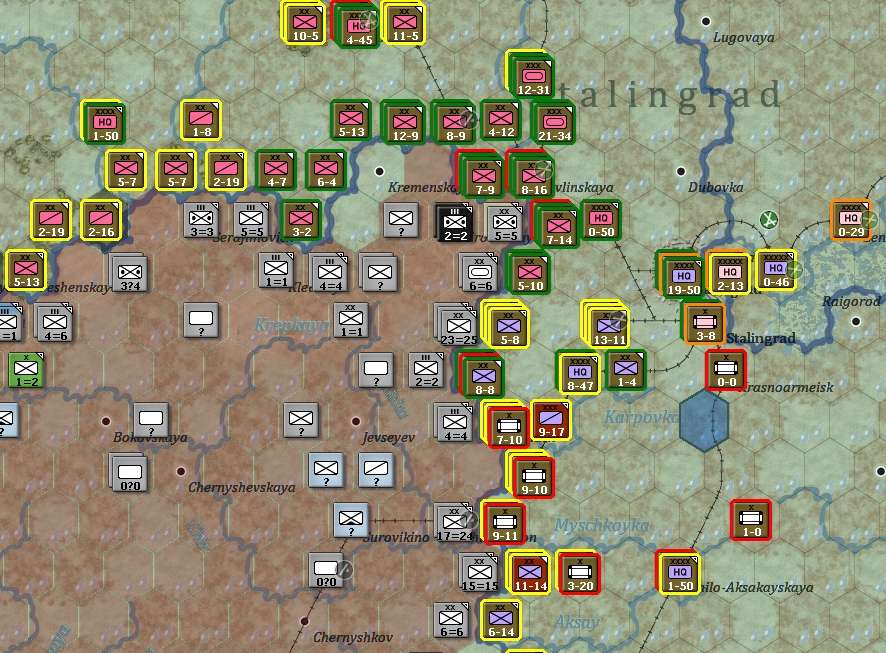
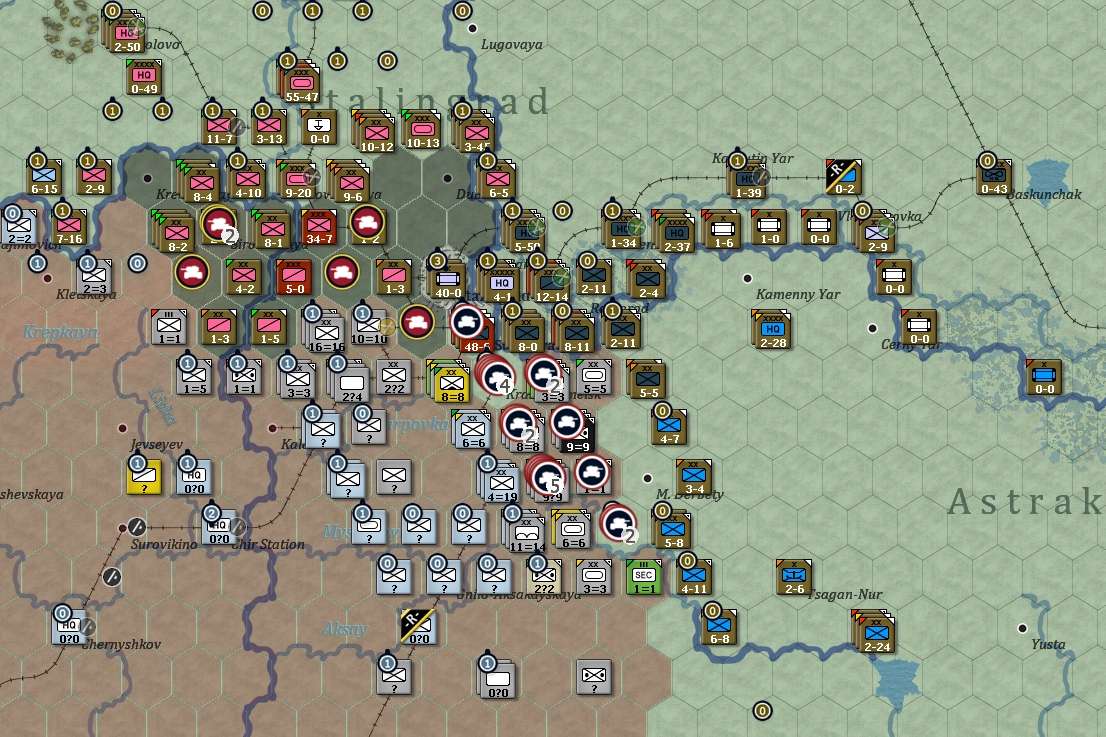
Stalingrad itself saw mixed fortunes. The Germans overwhelmed the Soviet lines to the south of the city in hard fought battles while SW Front launched yet another attack from the north. This time the Soviets were able to hold onto their gains and make inroads to the south and east of the Don.
[4]
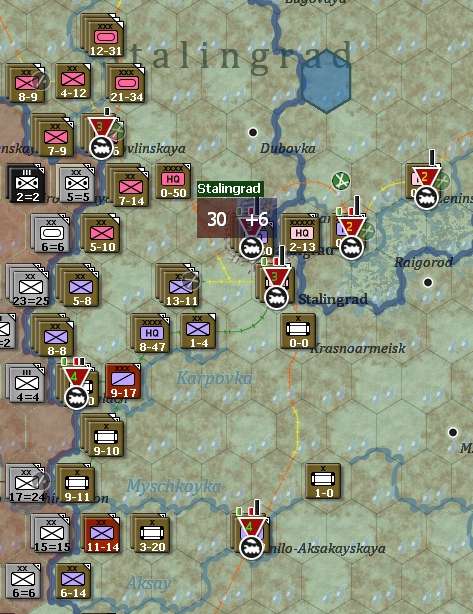
Stalingrad itself was well prepared for the expected assault.
[5]
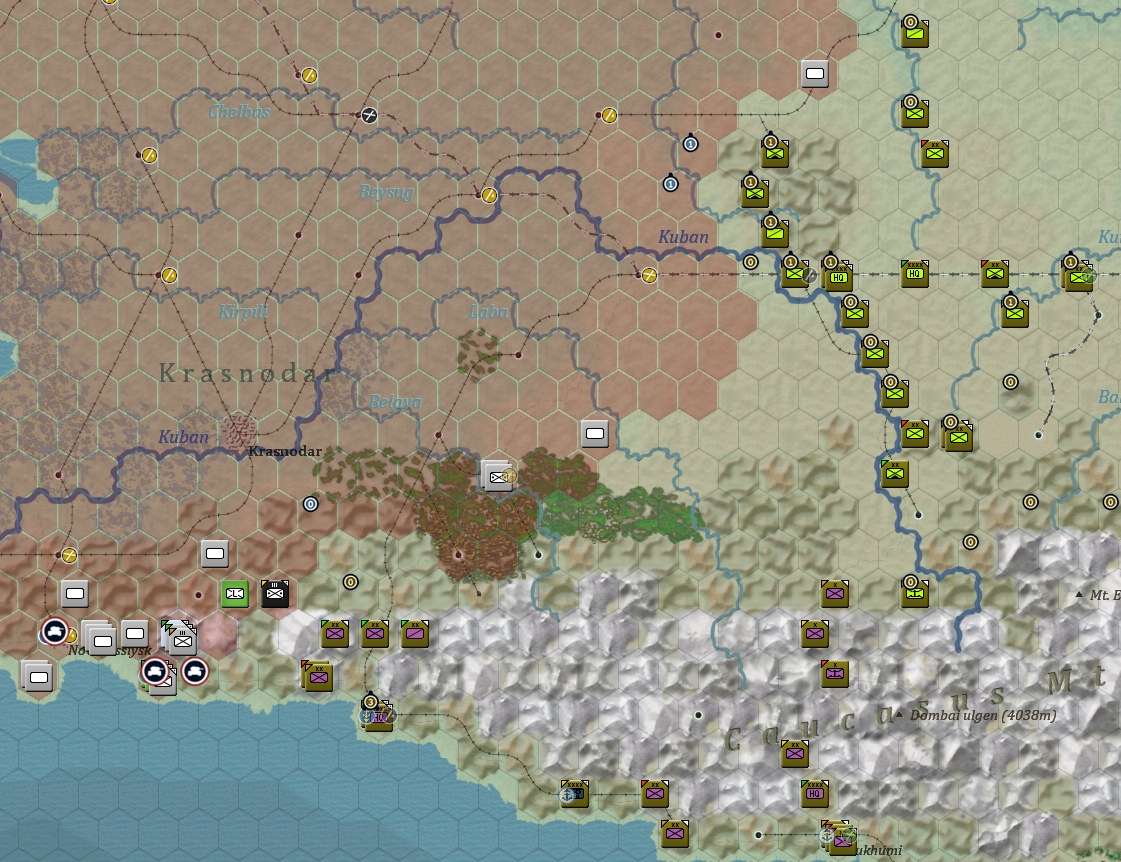
To the south, the Germans made steady gains along the Kuban and captured several Black Sea ports.
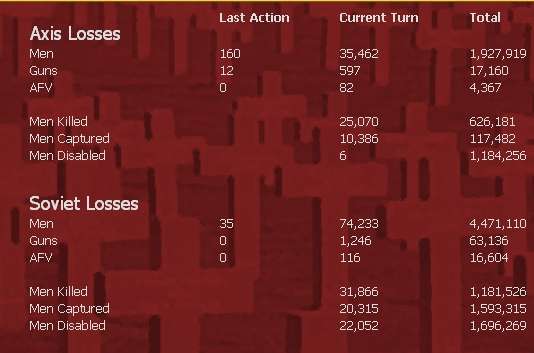
Losses for the Soviets approaching 4.5 million men and for the Axis almost 2 million.
And the OOBs. Despite the fighting both sides are strengthening. Note I have around 40% of my airforce still in the reserve. This is due to the need to train new formations and that I lack on-map command capacity. I have 1.3 million men (SW and Stalingrad Fronts), 18,000 guns, 2,500 tanks and over 1,500 planes committed to the defence of Stalingrad (which goes some way to explain why I have local supply problems). I’ve also moved the majority of my better commanders to this sector.

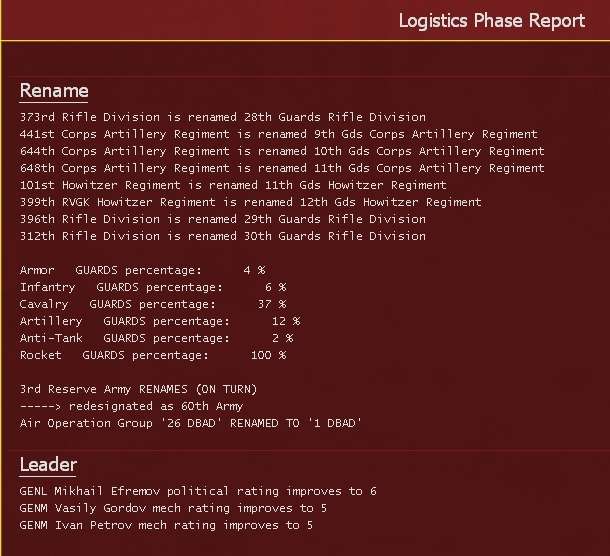
Steadily producing more Guards formations. Note the conversion of one of the Reserve Armies and my commanders are slowly gaining in competence.
[1] Early variants of the Tank Corps are just really poor when forced to defend, regardless of what SU you attach.
[2] As before, I really struggle to bring in replacements here. So the wrecked formations (and I had a lot) have to be pulled back, sent to the reserve, refitted and returned. This cycle takes around 5 turns, later on this was almost a production line so I lost a new set each turn as a previous batch returned (of course without CPP).
[3] I’ve pulled most of the strategic reserve from Moscow. This sort of attack can easily wreck the equivalent of an army but lacks real depth. At worst I can control the speed of any retreat using the poor terrain.
[4] This was a real worry, that is the equivalent of another army lost while it needs to refit, cutting the single track rail running to Stalingrad from the east will make my already poor supply situation perilous. Transport aircraft around Saratov are flying in supplies (that is a NSS so works very well) and am committing some new NKPS to create super-depots with the aim of stabilising my supply situation. The useful part is that while SW Front is taking heavy losses, I can refit relatively locally due to the depot and rail network south of Saratov.
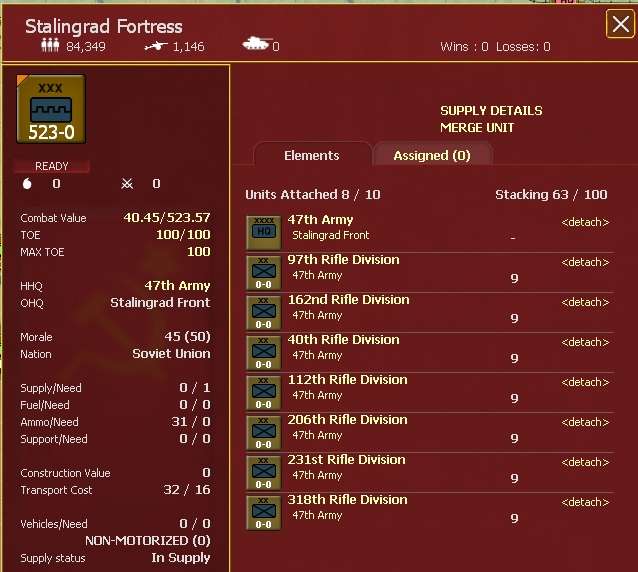
[5] If you are going to create City Forts do so with as much as you can spare. S Stalingrad is held by 2 Rifle Corps and a division, plus the brigades, so the equivalent of 9 Rifle Divisions. The city fort in Stalingrad itself allows a similar stacking despite the lack of available Corps formations. Its worth noting the City Fort brings no particular defensive benefits over those from the terrain and fortification level (which is why Sevastopol is vulnerable), it is purely a device to allow extra stacking.
This update is based on the end of T57
Background
By early June, the Soviet build up at Stalingrad had stalled the direct German attack towards the city on the line of the Don. However, Rostov fell on 6 June as the Germans breached the Soviet lines on the lower Don and the Germans started to steadily push south.
In response Stavka ordered Bryansk Front over to the offensive around Orel in an attempt to draw off the German reserves. Heavy German attacks from 14-24 June threw the Soviet forces back to their starting lines [1], while North Caucasus Front was being forced back into the Caucasus. By the 27 June the Soviets were just clinging to the line of the Kuban and in full retreat in the sector to the south of Stalingrad.
However, it was at Stalingrad their main blow fell. Heavily reinforced and rested, the Germans simply overwhelmed the Soviet line on the east bank of the Don.
[2]
By 11 July, the Germans had reached the outskirts of Stalingrad and defeated an attempted counter-attack by SW Front from the north, the following week saw a similar pattern as SW Front tried to deflect the German drive on the city but only succeeded in seeing its recent reinforcements wrecked in the subsequent German counter-attack.
T57
This turn saw action almost across the map. Kalinin Front was pushed back around Vyazma but managed to hold onto the city itself.
[3]
In turn, Western and Bryansk Fronts renewed their offensive around Orel. A lack of local reserves allowed the Soviets to break the German front and cavalry formations were able to push deep into the German rear, almost reaching Kursk.
Stalingrad itself saw mixed fortunes. The Germans overwhelmed the Soviet lines to the south of the city in hard fought battles while SW Front launched yet another attack from the north. This time the Soviets were able to hold onto their gains and make inroads to the south and east of the Don.
[4]
Stalingrad itself was well prepared for the expected assault.
[5]
To the south, the Germans made steady gains along the Kuban and captured several Black Sea ports.
Losses for the Soviets approaching 4.5 million men and for the Axis almost 2 million.
And the OOBs. Despite the fighting both sides are strengthening. Note I have around 40% of my airforce still in the reserve. This is due to the need to train new formations and that I lack on-map command capacity. I have 1.3 million men (SW and Stalingrad Fronts), 18,000 guns, 2,500 tanks and over 1,500 planes committed to the defence of Stalingrad (which goes some way to explain why I have local supply problems). I’ve also moved the majority of my better commanders to this sector.
Steadily producing more Guards formations. Note the conversion of one of the Reserve Armies and my commanders are slowly gaining in competence.
[1] Early variants of the Tank Corps are just really poor when forced to defend, regardless of what SU you attach.
[2] As before, I really struggle to bring in replacements here. So the wrecked formations (and I had a lot) have to be pulled back, sent to the reserve, refitted and returned. This cycle takes around 5 turns, later on this was almost a production line so I lost a new set each turn as a previous batch returned (of course without CPP).
[3] I’ve pulled most of the strategic reserve from Moscow. This sort of attack can easily wreck the equivalent of an army but lacks real depth. At worst I can control the speed of any retreat using the poor terrain.
[4] This was a real worry, that is the equivalent of another army lost while it needs to refit, cutting the single track rail running to Stalingrad from the east will make my already poor supply situation perilous. Transport aircraft around Saratov are flying in supplies (that is a NSS so works very well) and am committing some new NKPS to create super-depots with the aim of stabilising my supply situation. The useful part is that while SW Front is taking heavy losses, I can refit relatively locally due to the depot and rail network south of Saratov.
[5] If you are going to create City Forts do so with as much as you can spare. S Stalingrad is held by 2 Rifle Corps and a division, plus the brigades, so the equivalent of 9 Rifle Divisions. The city fort in Stalingrad itself allows a similar stacking despite the lack of available Corps formations. Its worth noting the City Fort brings no particular defensive benefits over those from the terrain and fortification level (which is why Sevastopol is vulnerable), it is purely a device to allow extra stacking.