Defending the Rodina - A Soviet WiTE2 AAR

Please post your after action reports on your battles and campaigns here.

Moderator: Joel Billings

Post Reply
User avatar
loki100
Posts: 11708
Joined: Sat Oct 20, 2012 12:38 pm
Location: Utlima Thule

T110

Post by loki100 »

31 July 1943

This takes the game up to T110.

Background

The final weeks of June saw the after-shocks of the earlier Soviet offensives. Both sides made limited attacks seeking to gain (or retake) key sectors for the next phase but there was little sustained action.

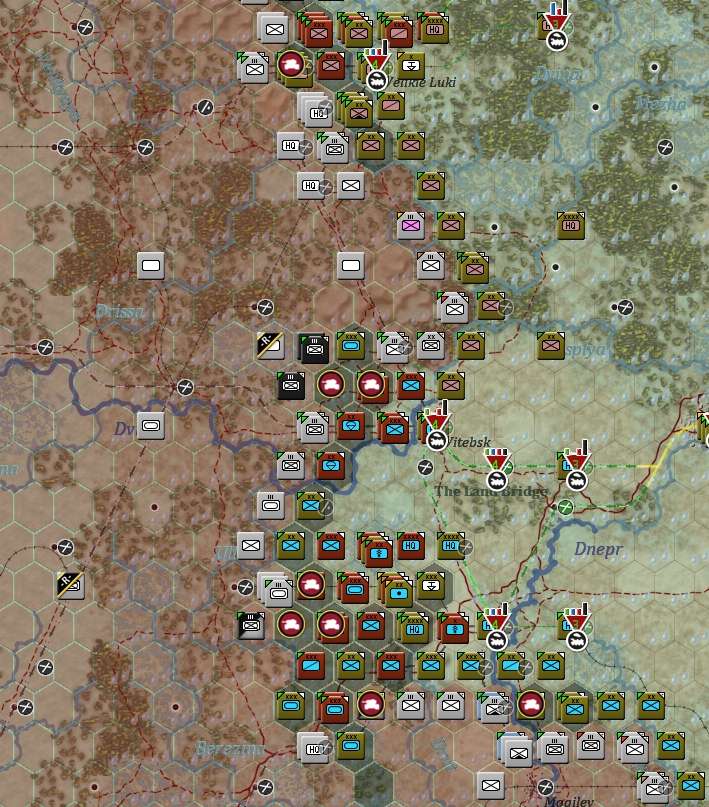
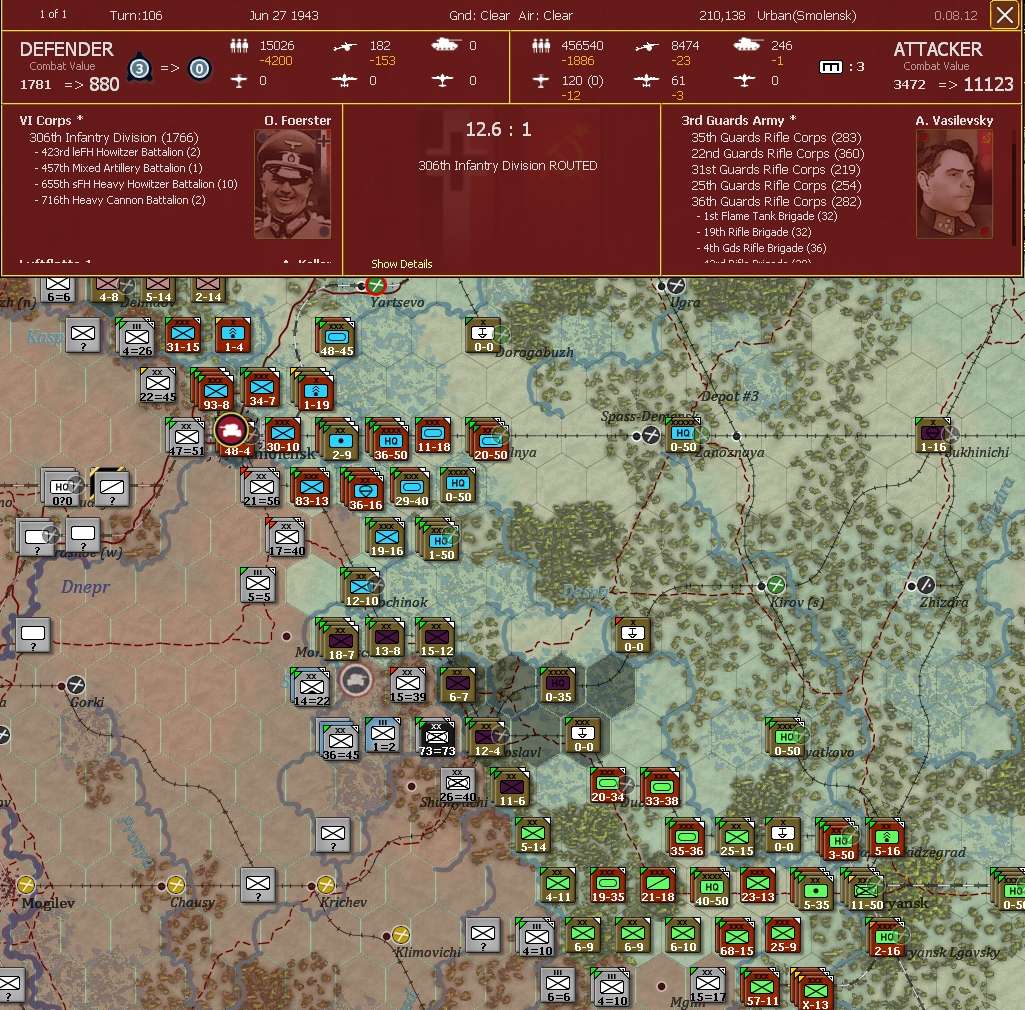
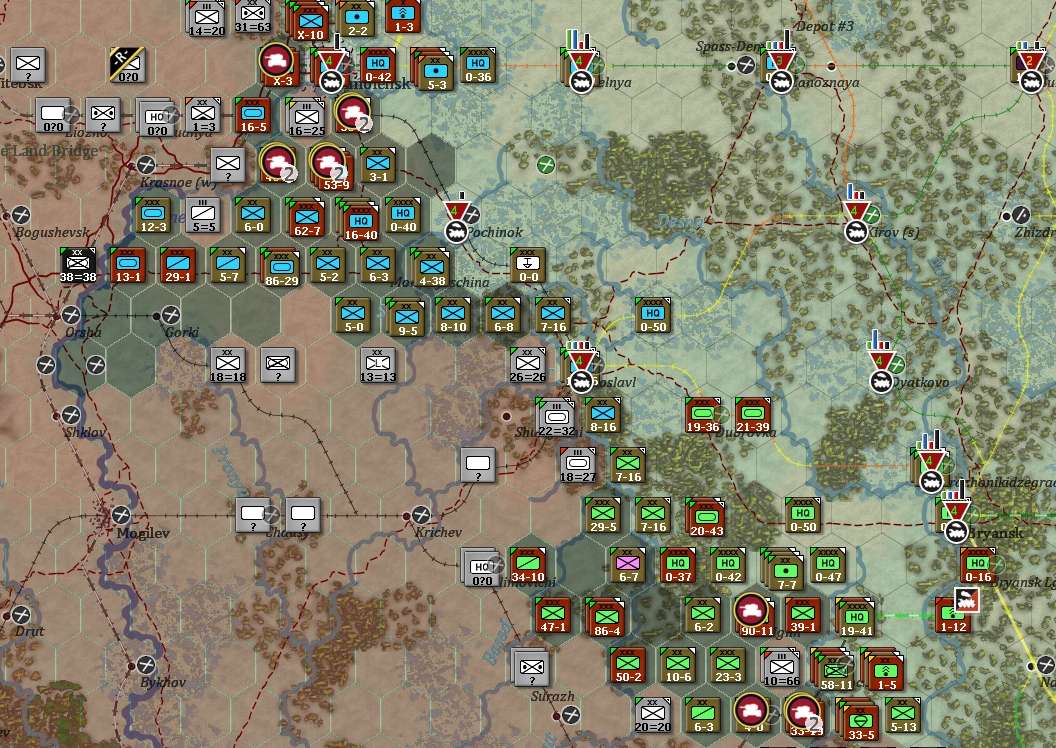
However, Smolensk was liberated on 27 June, leaving the Soviet forces well placed to push on towards Vitebsk.

Image

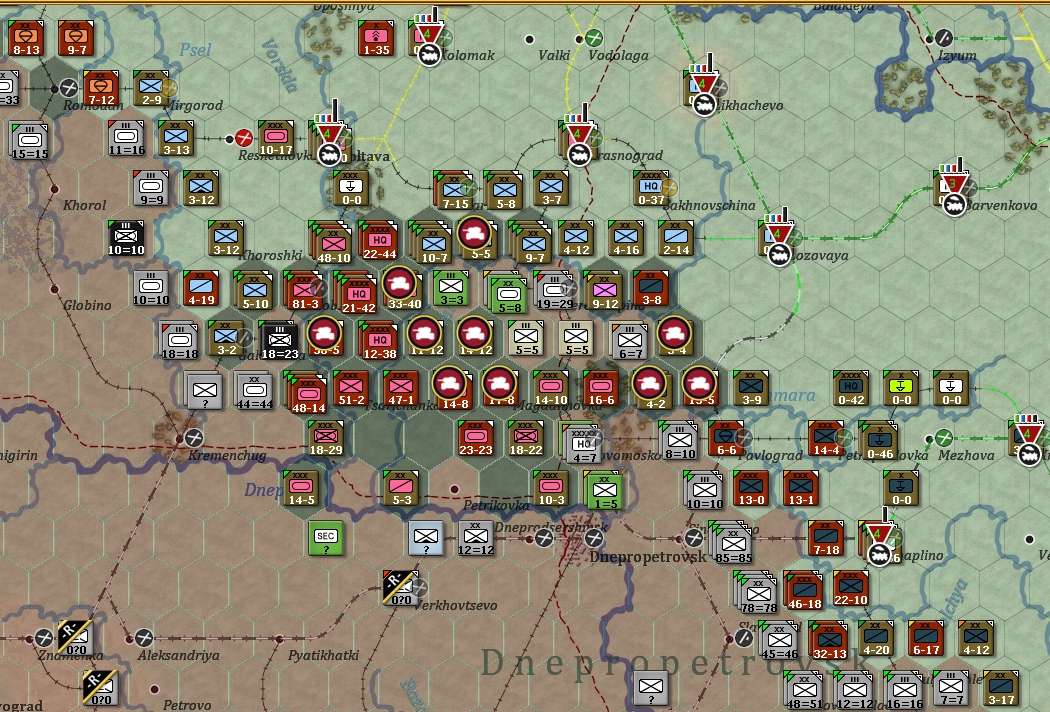
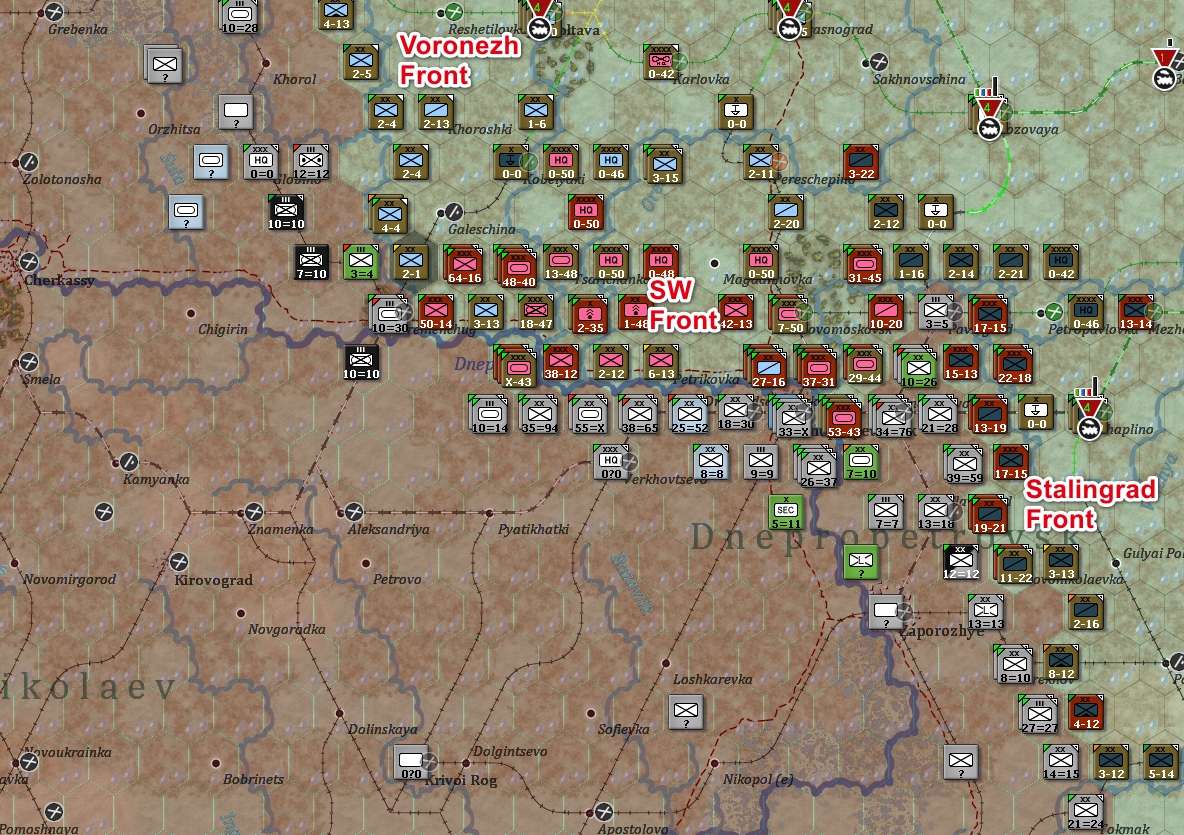
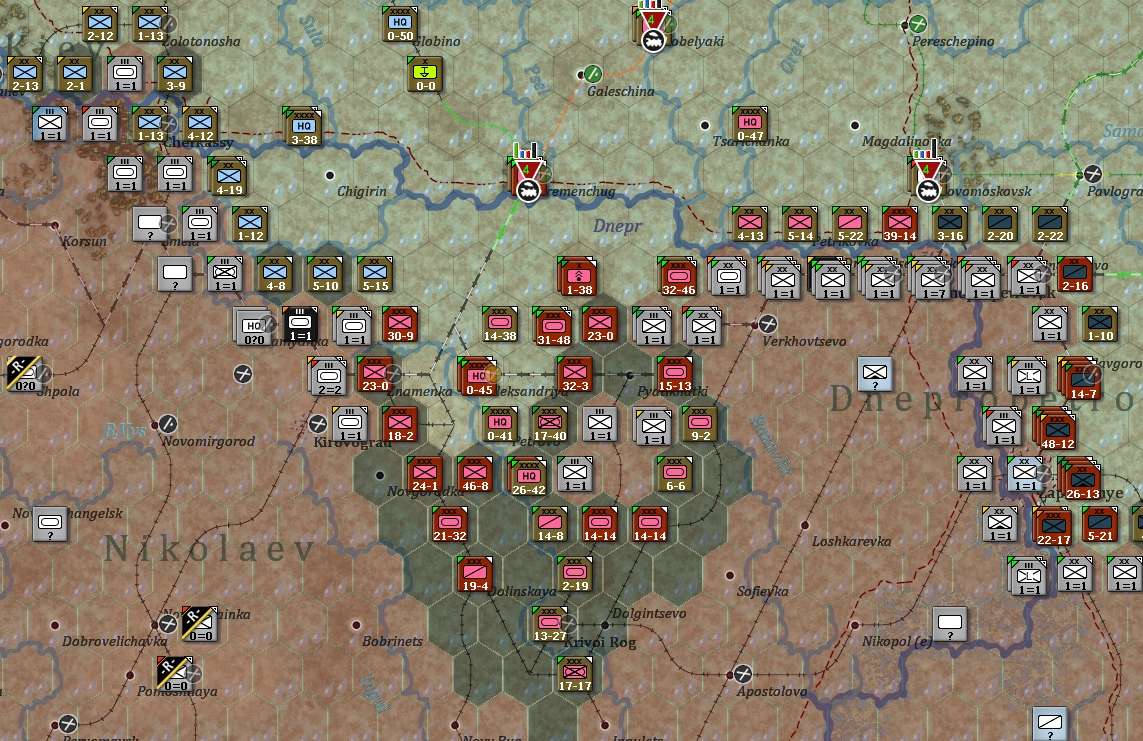
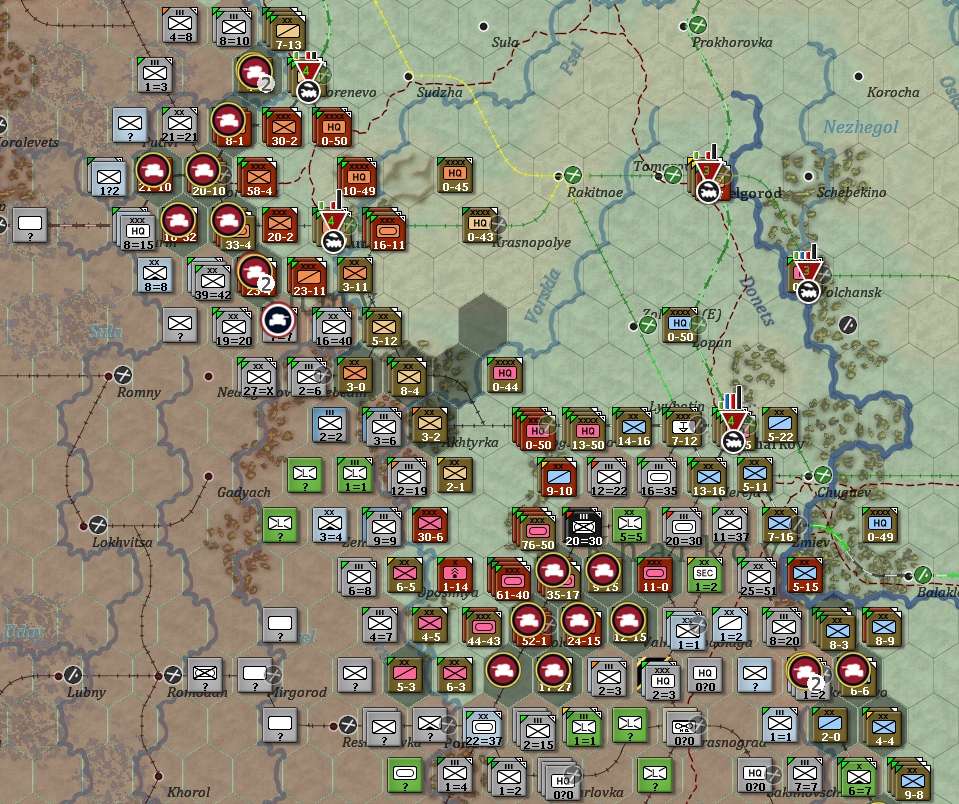
With that complete, the long awaited Soviet Ukrainian offensive opened on 4 July. As before, Bryansk Front quickly became entangled in strong German defences but SW Front broke though and exploited to a depth of 60 miles reaching the outskirts of Poltava.

Image
[1]

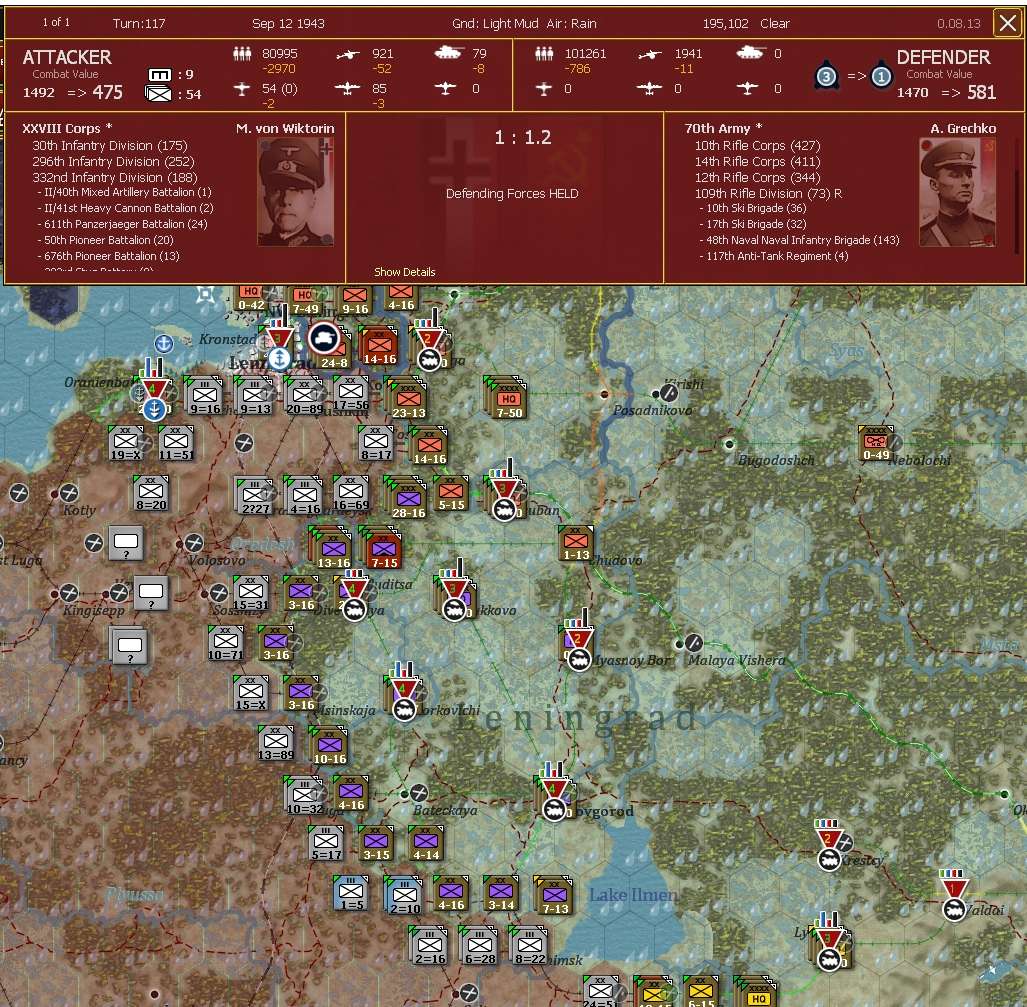
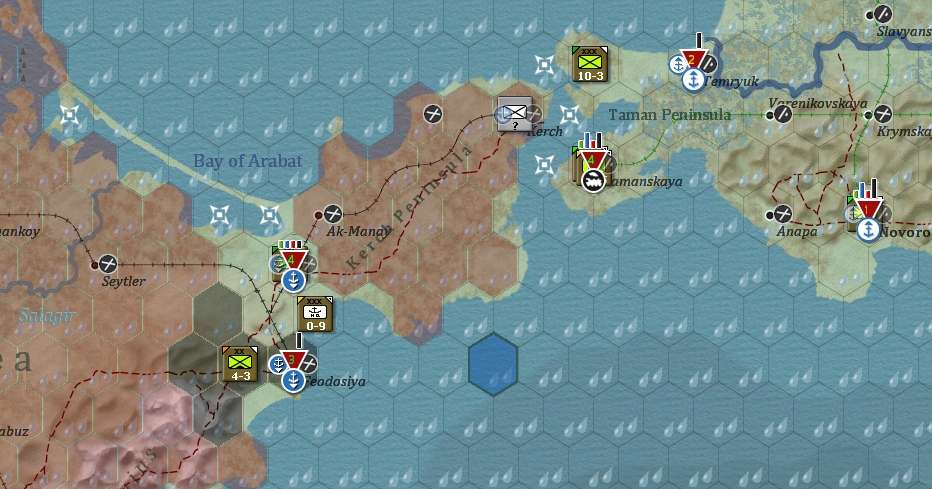
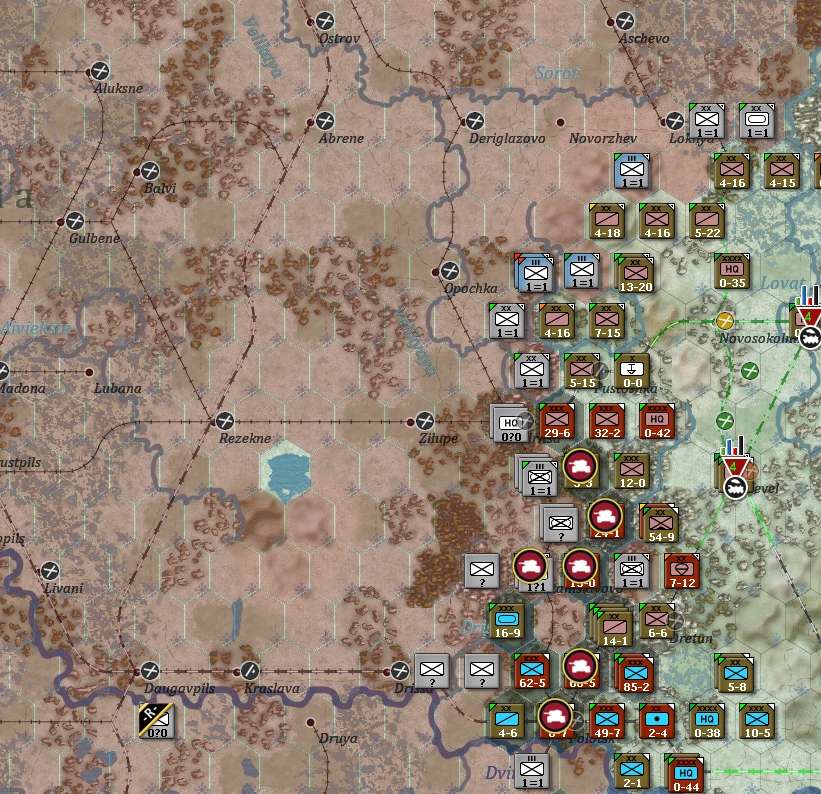
In turn, the German response was their own, clearly well prepared, offensive at Leningrad presumably designed to shore up Finland's commitment to the war.

Image
[2]

However, the Soviet offensive gained momentum as Bryansk Front managed to break out and SW Front tried to encircle the bypassed German formations west of Kharkov.

Image

By 26 July, this had become a major crisis for the Germans. Bryansk Front gained 40 miles and elements of SW and Voronezh Fronts met at the base of the German salient.
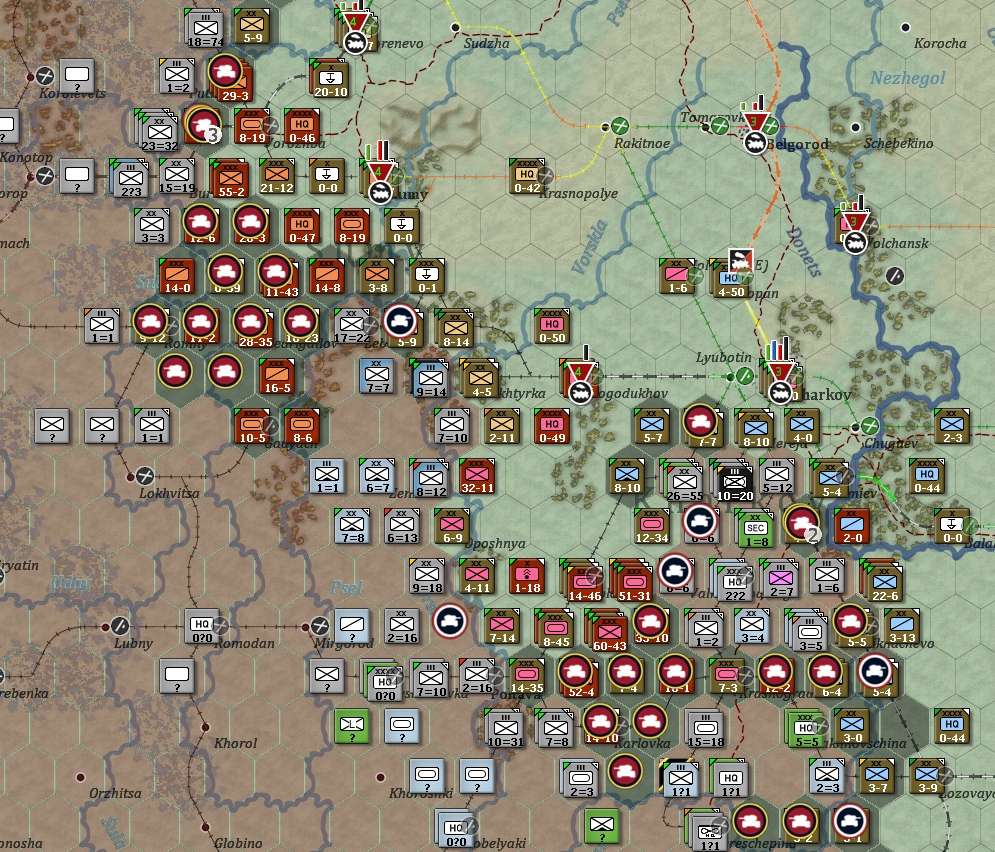
Image
[3]

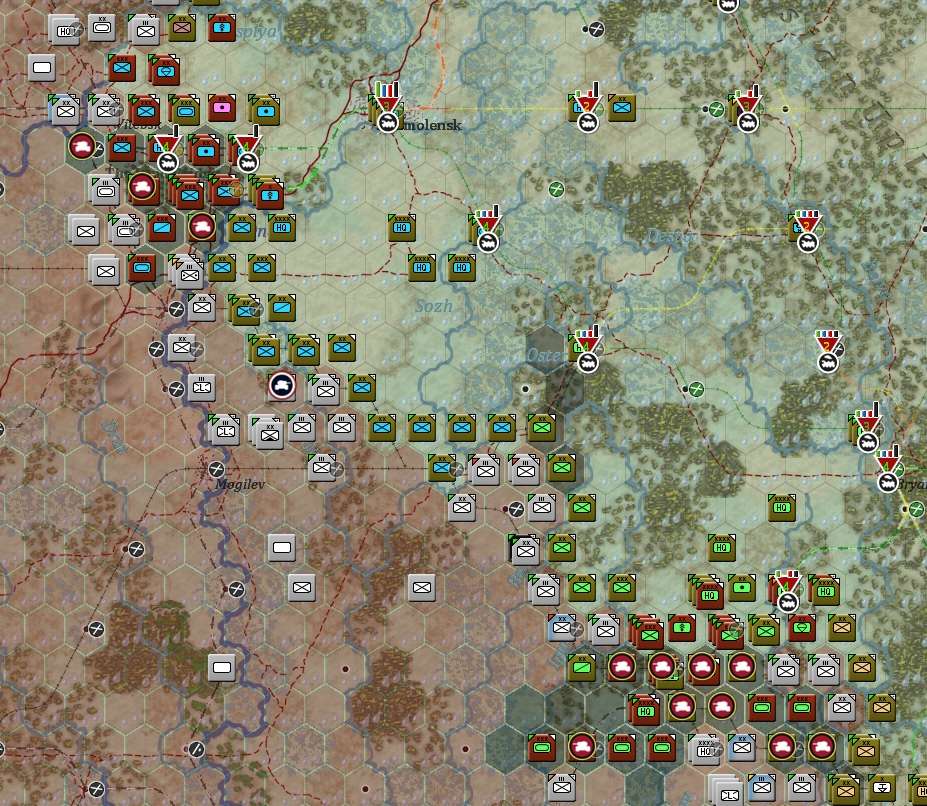
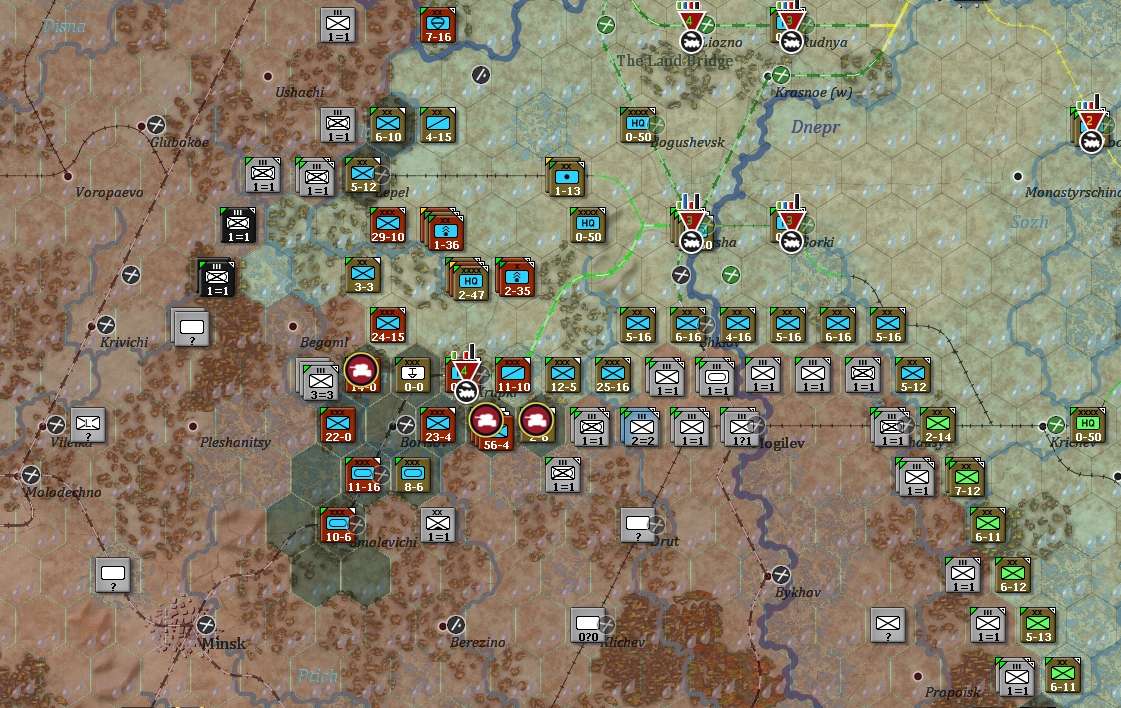
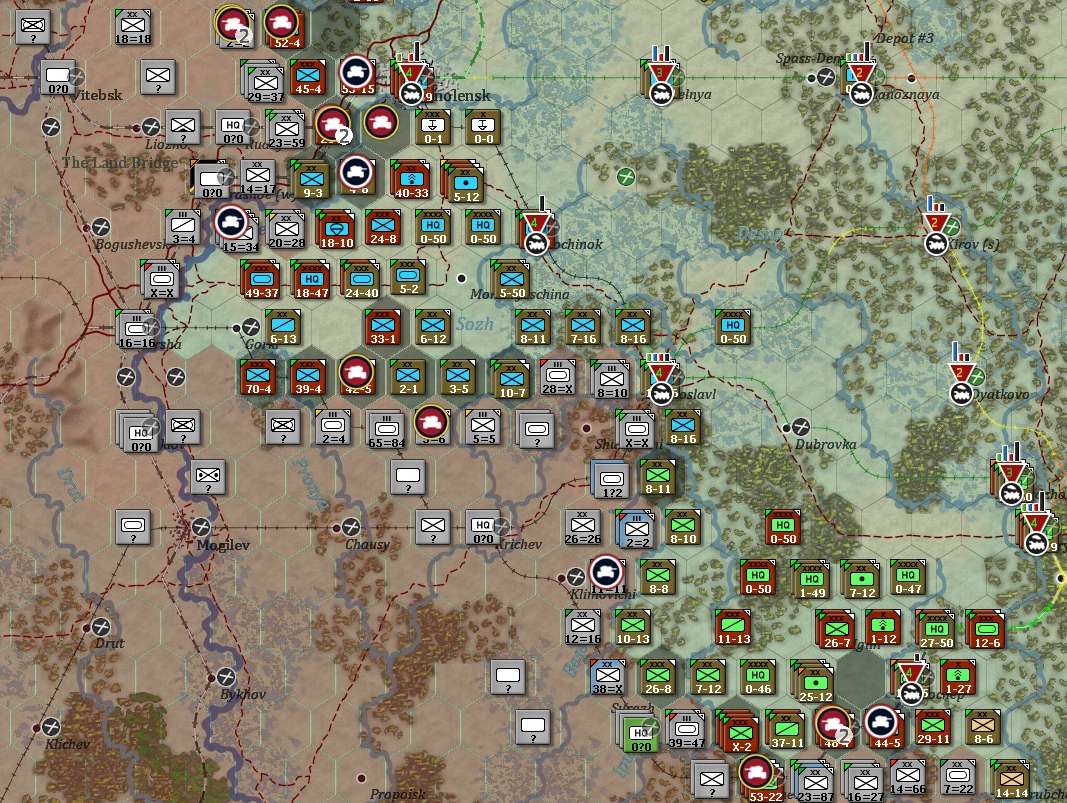
Even worse for the Germans, Western and Central Fronts renewed their offensives and almost crossed the Dnepr at Orsha.
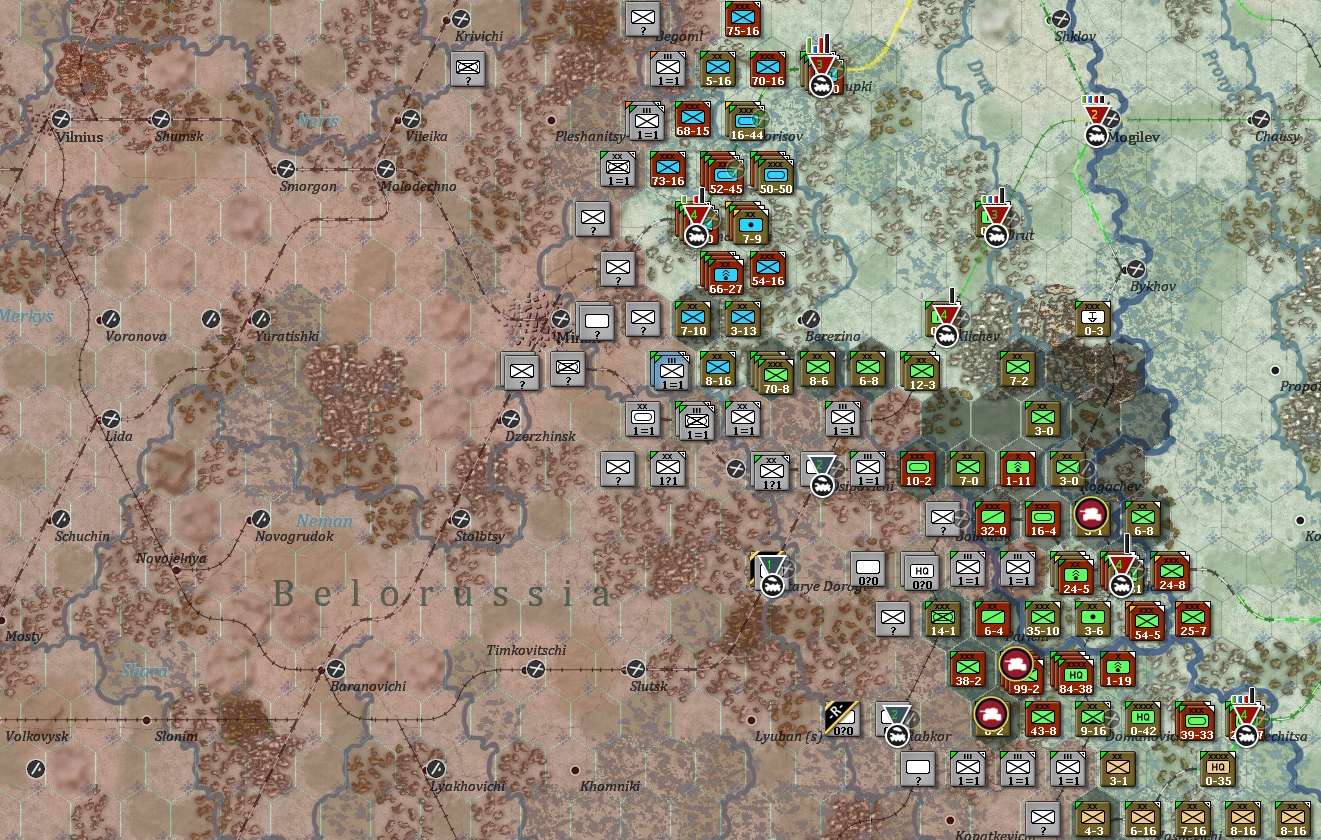
Image

T110

So to summarise. The AI is on the offensive at Leningrad. My problem is the old one here – I struggle to replace losses due to the strained supply networks here (and they have cut the rail to Leningrad again). It was at this stage I decided I had no choice but to commit my reserves to stabilise the situation.

Image

The AI has reacted decisively to my opportunistic offensive at Smolensk, and I opted to pull back a bit. I can't really sustain two major operations and there is no point in expending effort for a hex here or there. So the Dnepr remains a barrier but I am well placed to attack towards Vitebsk.

Image

In the south, the AI broke my pocket but I've managed to reseal it. For the moment this is of more interest than moving onwards. I need to have that bulge removed to free up my supply lines and there is the lure of destroying 4-6 divisions.

Bryansk Front is out of CPP but well placed to outflank all the AI's defensive lines if it can break out again.

Image

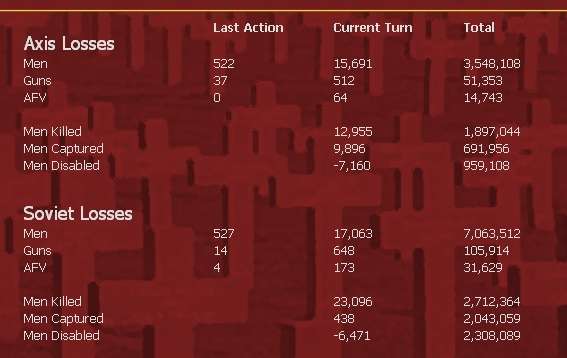
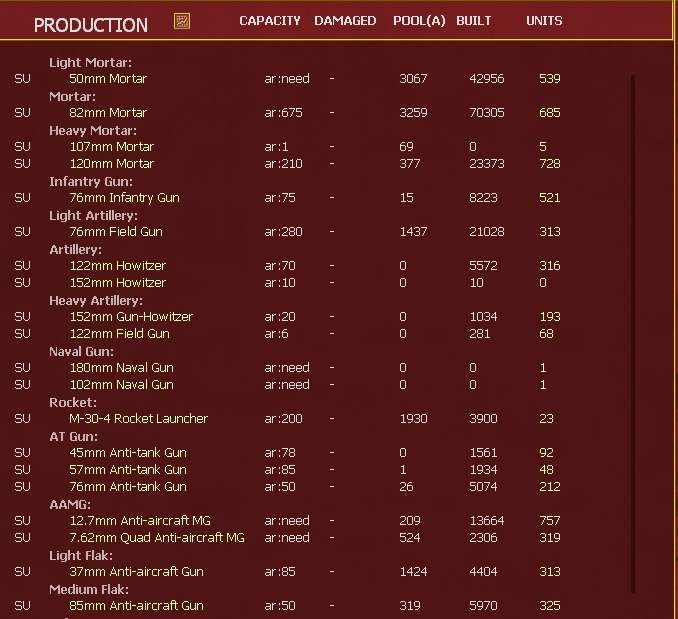
Losses on the ground. I'm at the stage where my T34s are really badly outclassed. The new SP guns make a difference but not that many actually at the front for the moment.

Image
Image

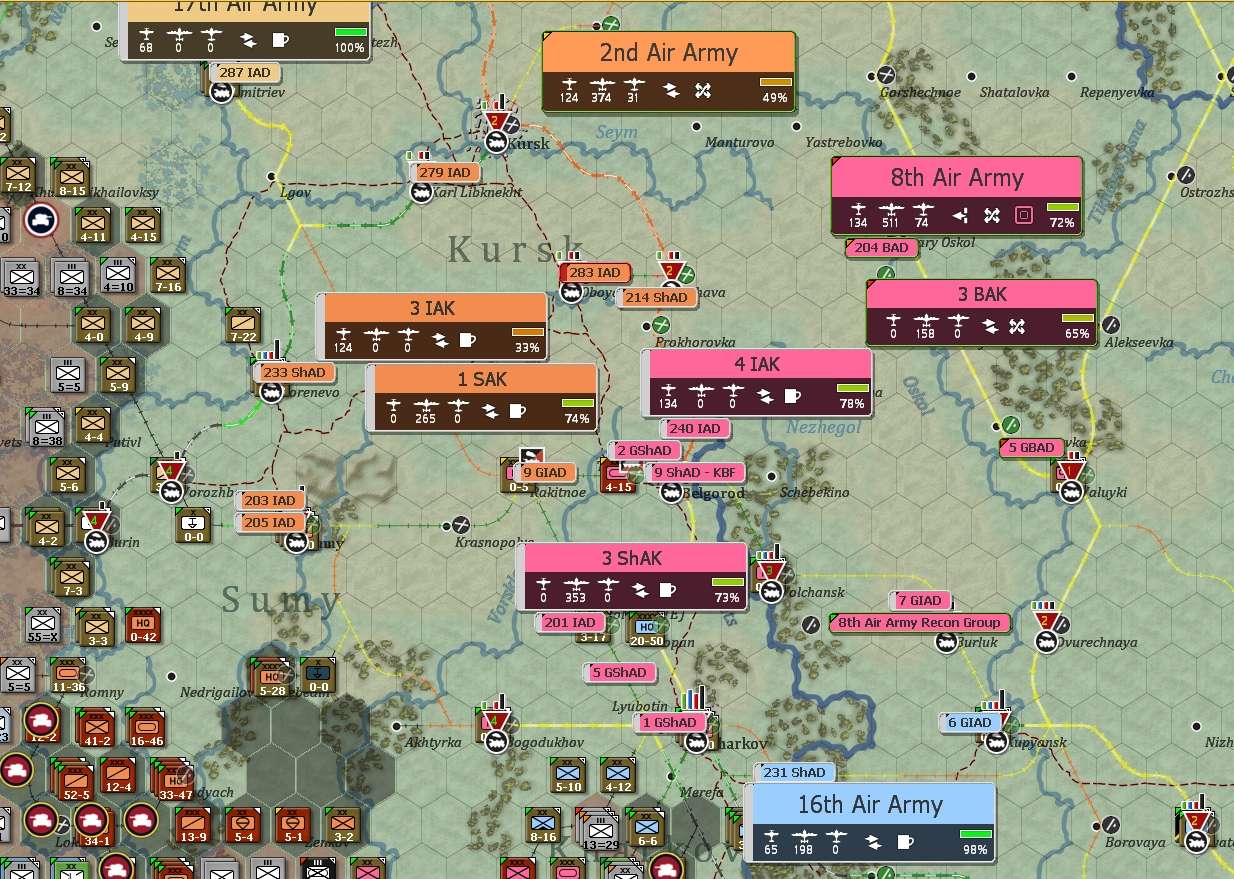
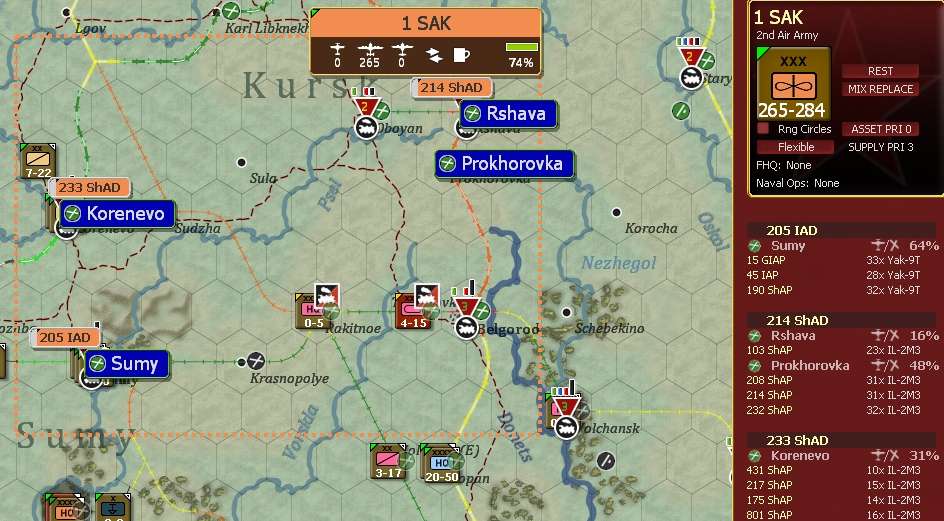
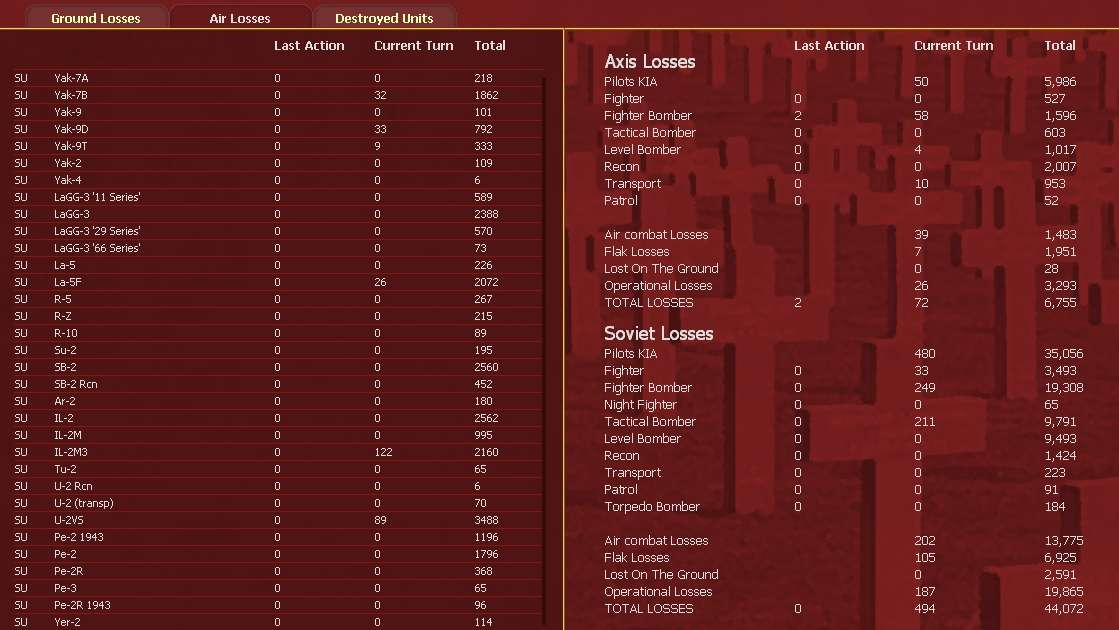
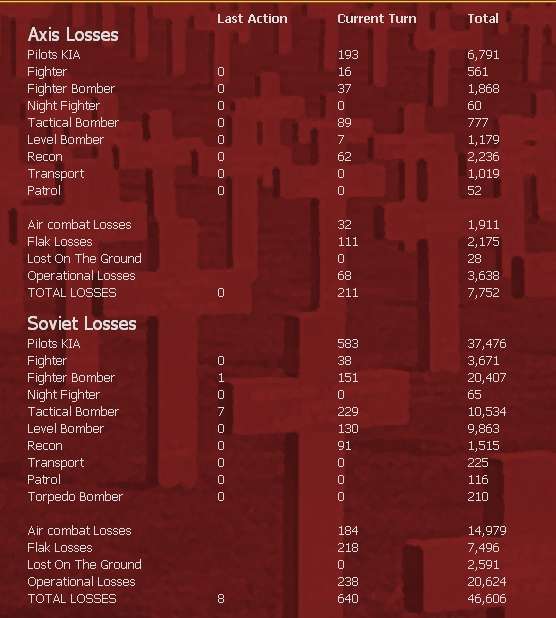
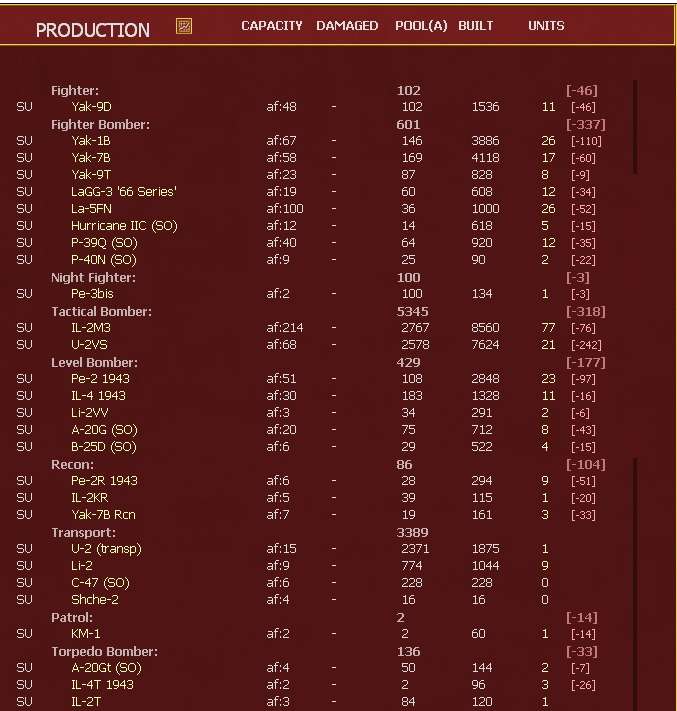
The air war carries on being a case of taking the losses for the rewards. That turn was particularly bad for the A2A aspect.

Image

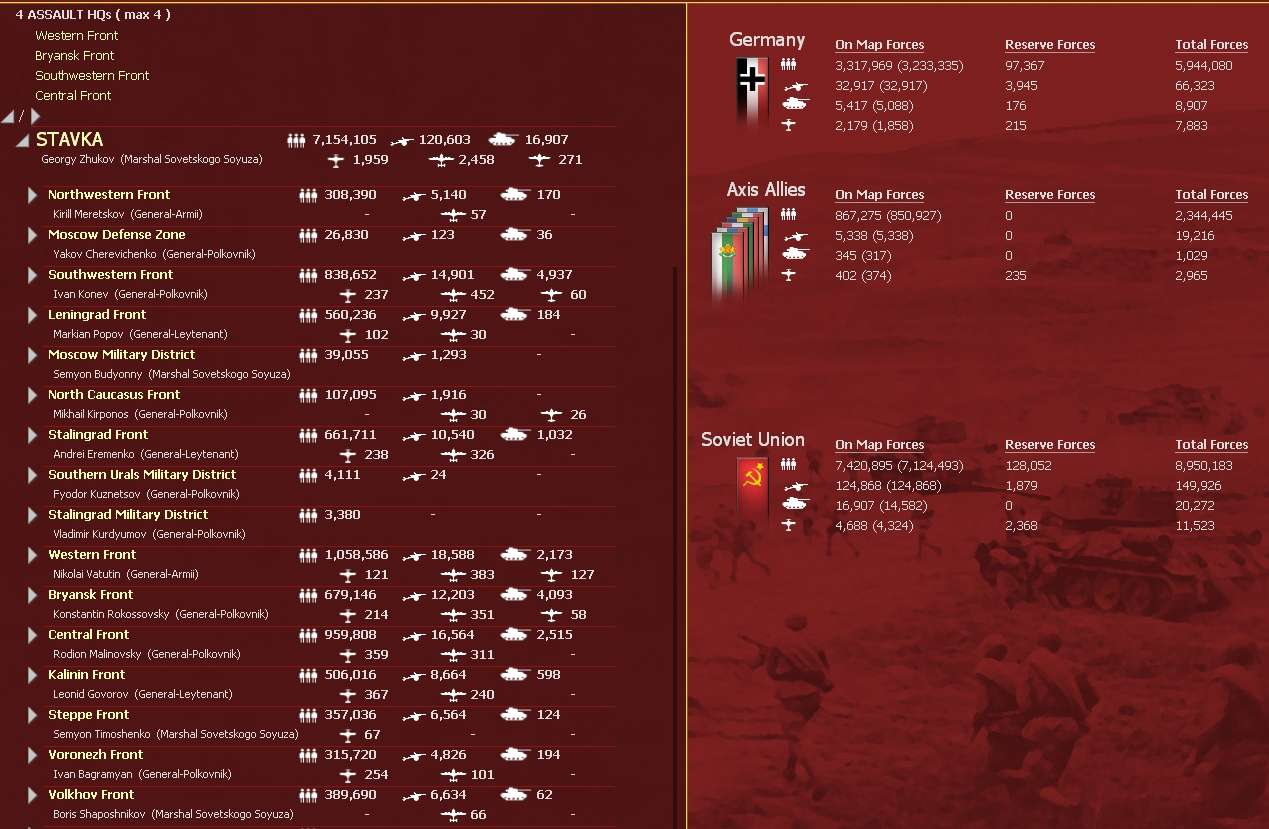
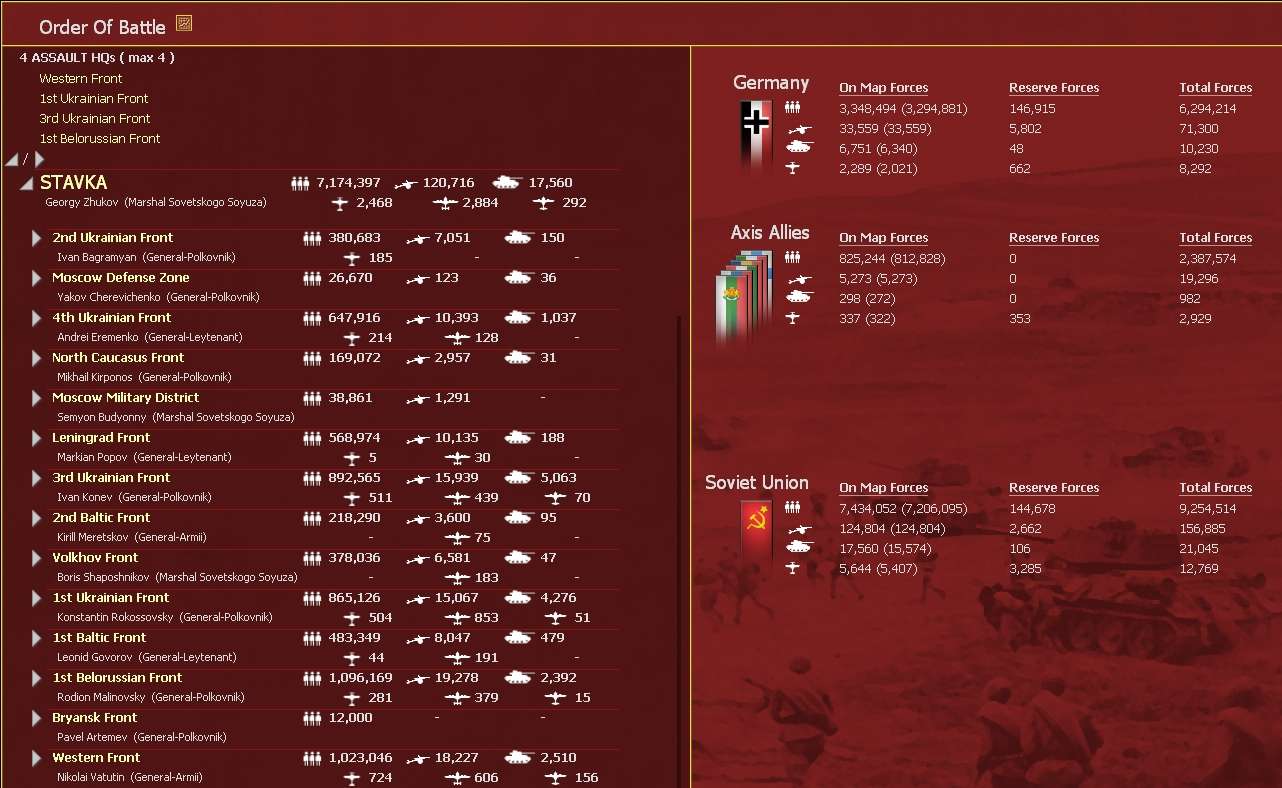
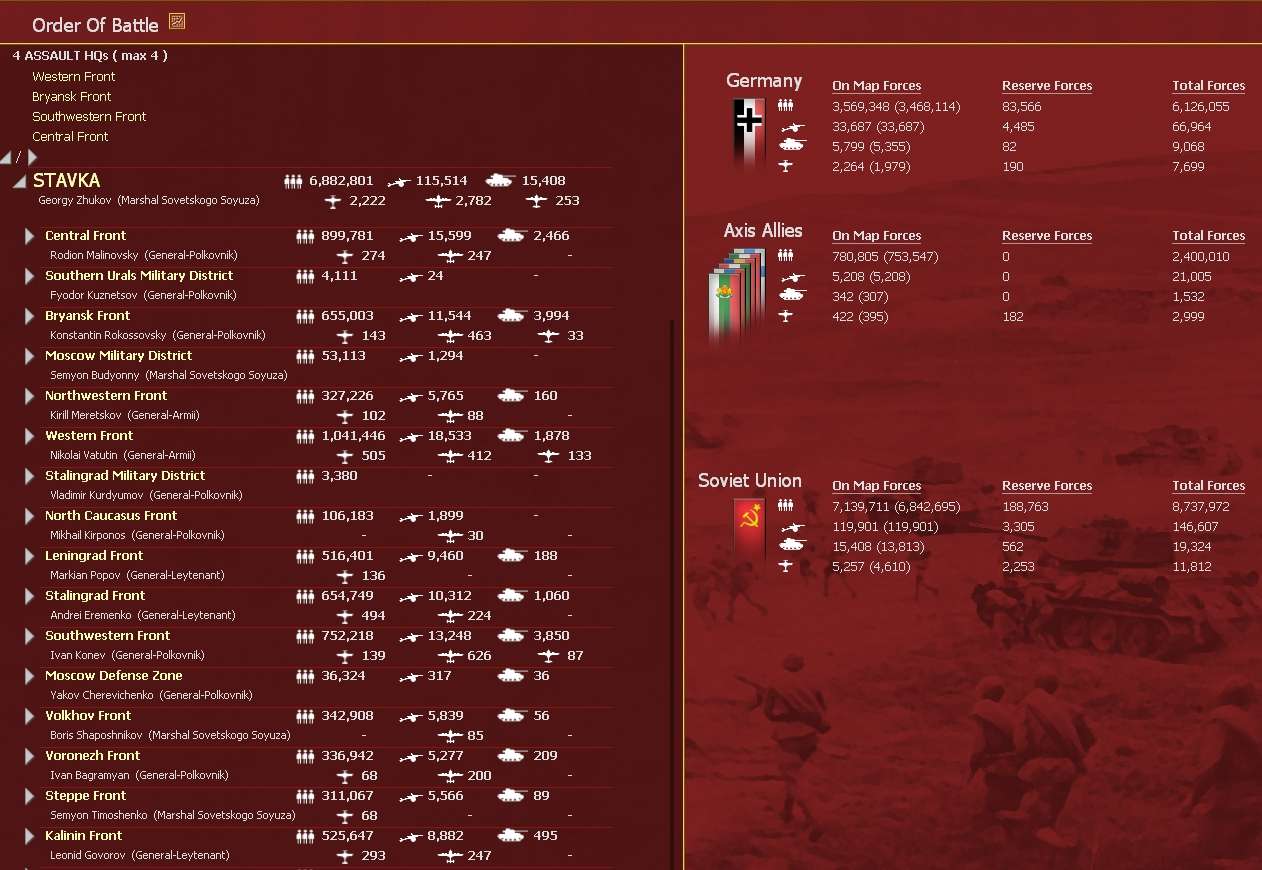
OOB – not really changing very much, if anything the Germans are strengthening (this will be the result of their post-Stalingrad short term manpower boost). I'm happy to keep my on-map army around 7.2m as that doesn't put too much stress on my supply networks.

I am having to be more disciplined about depot management now as my army grows in size and mobility and I press west.

Image


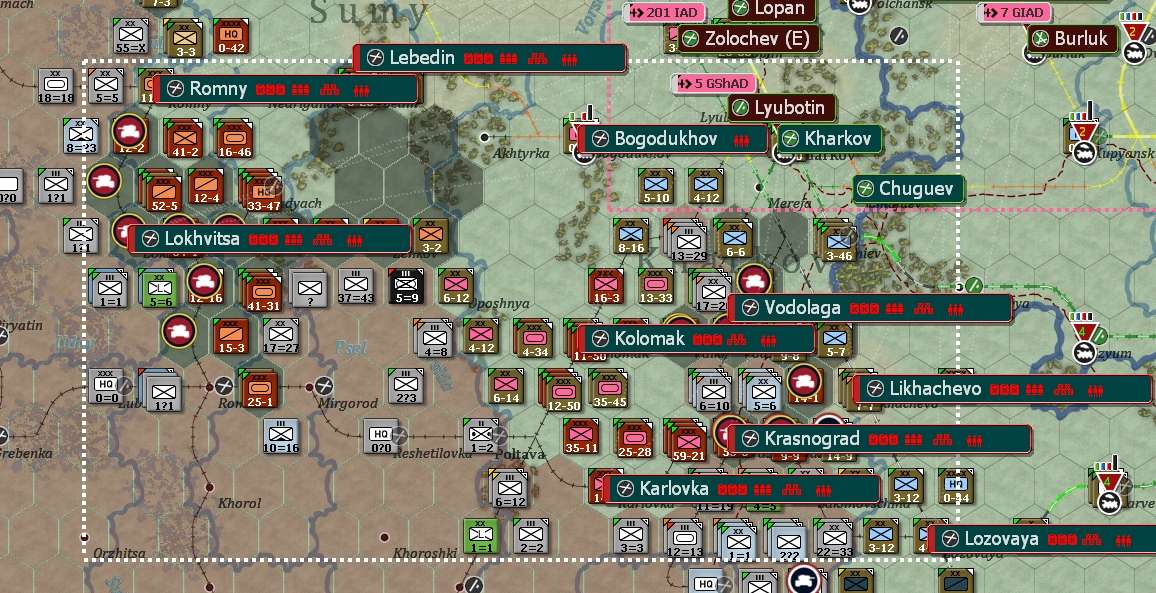
[1] Few things there, my usual 3 hex wide breakthrough to clear the path, this is increasingly easy to achieve as I have more Rifle Corps and artillery divisions. Also Kharkov has been built up as a super-depot with an NKPS formation, an army HQ and it has a large rail yard.

[2] This did surprise me, even worse in the next few weeks they sustained it and actually threatened the city, forcing the diversion of one of my reserve Armies to the sector. I've been running this sector down for over a year and it is commanded by a fairly inept bunch, I've dismantled the local supply network and have no Rifle Corps present.

Maybe not the best use of the AI's assets, but it was to be a well resourced, sustained offensive that was to prove very distracting.

[3] Note how Kharkov is performing, it is working almost at full capacity, processing supply for the front line formations as well as holding a large stock. Sumy is now also a super-depot. Thus while I am burning off my CPP, my basic supply situation is good, despite all the armoured formations I have in action.
User avatar
loki100
Posts: 11708
Joined: Sat Oct 20, 2012 12:38 pm
Location: Utlima Thule

In-game management of the air force

Post by loki100 »

Managing the Air War

Red Lancer has discussed some of the tools for this and in the last post I discussed some of the mechanics and how you can see what effect it is having.

Now this shows the situation at the end of T110 so my formations have been in action all turn.

This shows the deployment of the formations in the N Ukraine. There are 4 air armies (17, almost out of shot, 2, 8 and 16). They change colour to reflect the front they are notionally associated with (which is more critical for the AI assist) but can run missions for any Soviet front or army HQ (or sector).

Now I am (voluntarily) using an intermediate level for my stronger air commands the xxK formations – I'll come back to why below.

Image

The basic Soviet air OOB is the Air Army and then a number of AOGs. Each air army can have pretty much limitless assets but each AOG is between 1-5 individual air groups.

The AOGs are limited in the types of planes you can assign (this is all controlled by the game routines), so an IAD must have just Fighter-Bombers or Fighters.

If you left click on an AOG label, it will show you the air bases it is actually using, how many air groups are present, what air directives it is part of (here they are all supporting GS). You also see more detail on the rhs of the main screen.

If you right click on the label, you can use this to order new formations from the reserve (and this can be done at the individual AOG level or using one of the commands). I find that a quick way to replenish that turn's losses – remember I am sending weakened formations back to the reserve to train up again. You can do this either via the Commander's Report or the air group label. I mostly use the CR for these returns as I tend to start each turn in there doing my admin tasks (and can create my own criteria rather than that the air group is simply depleted. for eg, I send back low experience units and those with many missing pilots).

Now this is neat, it will assign them to local airbases and you can read across to the display to see what that AOG already has. I like to keep similar types in a given AOG, so my fighters are either the Yak-1/7B or La5 in one type or the longer ranged Yak-9D or LL stuff in others.

Image

To redeploy, click on any level and that will select all the assigned lower levels, so if I click on 8 AA then I can move everything. You can resize the target boxes as you need to control which airbases will be used.

So here, I've just clicked on 8 AA and told it to move closer to the front. Now this is not a great idea for 2 reasons. First I don't need to, even my short range formations are still in range and all that will do is compete with my spearheads for supply. Second, none of the air bases are ready – that red indicator tells me that I lack fuel, ammo and support squads and common sense tells me that to rectify that will mean my advanced ground formations will run short.

But you can move 100s of planes in a single set of mouse clicks. So even if, like me, you prefer to directly manage the air war the functionality makes this a lot easier.

Image

So final point, why am I using the xxK level?

Well its for ease of organisation. This means I can move all my Sturmovik formations as a group (and this is something I would do as they need to be close to the front). Even better I can link the I-- formations that are actually ground attack bombers to the air command so I can see them at a glance. Here 205 IAD is deploying Yak-9Ts, a useful tank buster plane that really needs to operate with the Sturmoviks.

Later on, with my larger air armies I ended up with 2 IAK formations, one holding the standard short range fighters and one with the longer ranged ones. Again it makes it easy to find them and to move them as needed as the front line shifts.

Image

The German player can make up similar packages of planes to ease the process of moving them. They need to use the Luftflotte-AOG relationship but have an intermediate Korps level. Create a grouping of say 2 fighter AOGs, one of Stukas and one with short range bi-plane recon planes. That is designed to then follow a Pzr Grp while the longer ranged bombers, recon, and fighters can sit back. Again you don't need to remember which ones you have in this role and you can move them as a package rather then one by one.

At the other end of the scale, you can still move individual air groups, but that is in Red Lancer's post and the manual.
Shiversprite
Posts: 6
Joined: Sun Dec 01, 2019 4:48 pm
Location: Denmark-Norway

RE: In-game management of the air force

Post by Shiversprite »

I look forward to trying this game once it get's released [:D]
The more difficult the scenario, the more rewarding it is to upset the inevitable assumed outcome.
User avatar
John B.
Posts: 3985
Joined: Sun Sep 25, 2011 6:45 pm
Location: Virginia
Contact:

RE: In-game management of the air force

Post by John B. »

I'm very impressed that the AI was able to pull off an offensive the regained some initiative and that it pulled back from the pocket.
John Barr
rij1298
Posts: 1
Joined: Sat Feb 13, 2021 9:08 am

RE: Defending the Rodina - A Soviet WiTE2 AAR

Post by rij1298 »

I have some of question.

In WITE 1 case, When the 3 airborn brigades units build up to divisions.
We could not divided to brigades for airborn operation.
Was this solved in WITE2?

The Luftwaffe has a command unit called by 'stab'
But in Wite 1. It was just the same as the combat air unit.
Has it changed in WITE2?

In wite1, the Luftwaffe had a unit called Geschwader.
However, in WITE1, even if they belonged to the same or different Geschwader, they did not receive bonuses or penalties.

I am not good at English, but I hope it is well communicated.
Korean players are looking forward to wite2.
Thanks You!
User avatar
loki100
Posts: 11708
Joined: Sat Oct 20, 2012 12:38 pm
Location: Utlima Thule

RE: In-game management of the air force

Post by loki100 »

ORIGINAL: Shiversprite

I look forward to trying this game once it get's released [:D]

best advice is take it slowly, there is a lot (obviously) but use the smaller scenarios and the AI support at first. We have tried to write the documentation so you can see what really matters before slowly going down into the detail.

Now of course, I'm aware that many people will set off directly into the 1941 grand campaign, but if you do, prepare to have to restart a few times
ORIGINAL: John B.

I'm very impressed that the AI was able to pull off an offensive the regained some initiative and that it pulled back from the pocket.

It will often cluster attacks so they all fall on a narrow sector - which given the way that poor quality units pick up losses is a good operational tactic. But I was impressed/swearing whne it picked a valuable but weak spot and persisted turn after turn with an offensive.

In the main it is reasonably flank aware and good at attacking in to free up units. You will encircle far more vs the AI than in HtH but its basically ok at reading those situations (in this sense 'basically ok' is high praise)
ORIGINAL: rij1298

I have some of question.

In WITE 1 case, When the 3 airborn brigades units build up to divisions.
We could not divided to brigades for airborn operation.
Was this solved in WITE2?

The Luftwaffe has a command unit called by 'stab'
But in Wite 1. It was just the same as the combat air unit.
Has it changed in WITE2?

In wite1, the Luftwaffe had a unit called Geschwader.
However, in WITE1, even if they belonged to the same or different Geschwader, they did not receive bonuses or penalties.

I am not good at English, but I hope it is well communicated.
Korean players are looking forward to wite2.
Thanks You!

With the Soviets, you can build up the airborne brigades to a division but not break down - so much the same. But ... many at-start brigades automatically disband in late 1942 and then return as divisions. So I would never build up the few that remain as brigades in WiTE2, just keep them in case you find a use for them. From late 1942 you can build completed new airborne brigades and Gds airborne divisions. I wouldn't bother, you can't really use your airborne assets and the air borne divisions tend to have lower mobility than your standard rifle formations.

Yes the Stab remain as just small air groups, at start they often have the best pilots. The key difference in WiTE2 is the air commmand system. Your air groups are put into larger air operational groups and you mostly move/issue commands at that level. So mostly much less effort for the player - once you get used to the new system

hope you enjoy the game on release
Wuffer
Posts: 402
Joined: Thu Jun 16, 2011 7:08 pm

RE: In-game management of the air force

Post by Wuffer »

Loki,

what did your guys eat? Look at Turn 110, second picture, the RifleCorps eastern Orsha.
Mushrooms? Probably nordic ancestry :-)))

Seriously, how did combat and command points scale on CV?
Nice AAR btw, us usual one might add.


User avatar
loki100
Posts: 11708
Joined: Sat Oct 20, 2012 12:38 pm
Location: Utlima Thule

RE: In-game management of the air force

Post by loki100 »

ORIGINAL: Wuffer

Loki,

what did your guys eat? Look at Turn 110, second picture, the RifleCorps eastern Orsha.
Mushrooms? Probably nordic ancestry :-)))

Seriously, how did combat and command points scale on CV?
Nice AAR btw, us usual one might add.


the 70-4? Well it has near 100 CPP (it was at 100 and moved 8 hexes), so the baseline is say 38-40. The 2 Rifle Brigades add 5 CV each, the heavy tank regiment 1.5. So the core corps CV s around 27-29.

Everything else comes from the CPP bonus.

You can see this a bit as the 39-4 to its east is down to 38 CPP with a similar set of SU attachments.

For the Soviet player, resting to let your formations rebuild their CPP - either by echelon attacks or simply stalling an offensive is so key to success. They also partly offset the dire admin/initiative values of many Soviet leaders (as the CPP is used in a test that avoids that part of the MP calculation).


Image
Attachments
20210213_173601.jpg
20210213_173601.jpg (506.32 KiB) Viewed 2934 times
Wuffer
Posts: 402
Joined: Thu Jun 16, 2011 7:08 pm

RE: In-game management of the air force

Post by Wuffer »

thx for the answer. A promising and interesting approach, overstrech yourself by moving a hex or two too far and you weaken yourself, I see.
What I like too is that the AI seemed to have quite a few units allways in deep reserve and recovering. Probably not an easy task to write this. :D
So far, so good.
dawai, dawai!
User avatar
loki100
Posts: 11708
Joined: Sat Oct 20, 2012 12:38 pm
Location: Utlima Thule

RE: In-game management of the air force

Post by loki100 »

yes, careful placement of follow on units really matters. With the Germans in 1941 as you move up your infantry keeping a few MP spare and staying in controlled (not captured that turn) territory can make such a huge difference to their combat power when they arrive at the front. If you just push them east they may arrive a turn early but will have little or no offensive value.

Of course, you may need to march them as hard as you can so the Pzrs can pull off the front lines so its one of those nice trade offs that are key to the design of WiTE2.

With the Soviets, CPP are really important both for set-piece breakouts and to keep MP up, but again, there are times when you just need to keep pushing to exploit a temporary advantage or reach a key city by a certain date.
User avatar
loki100
Posts: 11708
Joined: Sat Oct 20, 2012 12:38 pm
Location: Utlima Thule

T117

Post by loki100 »

18 September 1943

This takes the game up to the end of T117.

Background

Early August saw a brief lull in the Ukraine as the bypassed pockets were destroyed and a limited attack by Western Front towards Vitebsk. By the 21 August, Bryansk Front tried to break out towards the Desna but was slowed by strong German resistance.

At the same time Western and Central Fronts carried on with their localised offensives aiming to clear the land-bridge and secure the line of the Dnepr for future operations. Orsha and Vitebsk were taken by 28 August.

Image

To the south, Bryansk Front remained caught up in heavy fighting as it pushed towards the Desna but SW Front had more success. Elements of 7 GA managed to secure a bridgehead over the Dnepr and, in co-operation with Stalingrad Front, the rest of SW Front encircled Axis formations north of Dnepropetrovsk.

Image

The next week saw heavy fighting as the Germans freed most of the cut off formations but the Soviets managed to pocket some of the retreating units. Early September, saw these formations destroyed as Soviet forces reached the outskirts of Dnepropetrovsk, cleared the north bank of the Dnepr and built up their narrow bridgehead over the river.

Bryansk Front remained stalled by strong defences and counter-attacks east of Chernigov but Central Front broke the German lines to the north, threatening to encircle their forces holding the line of the Desna.

Image

T117

So lets start with the turn summary. The losses along the top are those from T116 – as maybe clear I am not doing a good job at minimising the losses for the VVS. I've sorted out the truck problem even though I don't have much of a reserve. This has also allowed me to bring more artillery divisions and Mechanized Corps/Brigades out of the reserve.

The VP situation is starting to worry me. I need Kiev, Dnepropetrovsk and Zaporezhe by T120 to gain the full +6 bonus (Kiev by T121 on this criteria) and for all my gains, it is not easy to see this happening.

Of a longer term concern, I need to match the Axis High Water Mark (616) by the end of 1944. While I am clearly a long way short at the moment, reaching Romania will give me the score I need to pass that test.

Image

This was pretty much the final event of the Axis offensive at Leningrad. As maybe clear, I have shifted to a Corps based defence and built up a lot here. All that has done is to secure a return to the basic stalemate here.

Image

I've not been reporting on this as it was all rather low key and opportunistic. But Kalinin Front has managed to liberate Velikie-Luki by attacking along the rail line. In combination with Western Front's gains, this leaves me well placed for an offensive towards Daugavpils and to cut the supply lines to AGN. Equally Western Front can realistically now regard Minsk as a target for the winter of 1943-44.

Image

For the moment, it is probably best to see Bryansk and Central Fronts as operating together. Steppe Front is holding the gap between the two. My view is gains by Central Front towards Gomel unhinge the German line along the Desna and also allow me to push into SE Bielorussia. Bryansk Front, in theory, is still going for Kiev, at least it has finally managed a clean break-out.

Image

Another brief pause here. I was trying to work out what was the best option with SW Front. The obvious (VP-led) was to clear the Dnepr bend but that would take all the time up to the autumn rains and no guarantees that I would secure any of the time bonuses.

The alternative was to write off the bonuses for Dnepropetrovsk and Zaporezhye and strike for the Bug and Odessa. In effect, try to get my VP collection back on track by writing off the current front line cities. That way, hopefully I could secure Odessa (and Sevastopol) early and be well placed for an attack towards Rumania in the Spring/Summer 1944.

Image

OOB. I'm no longer using the Moscow MD for defensive sectors. Western Front in particular is now safe from any sustained counter-attacks so content with level 1 fortifications (this also helps reduce secondary demands on my front line supply). Measure of the relative disaster at Leningrad, I now have 950,000 men stuck up there, simply to stabilise the front. Given that on some key sectors my flank security is very thin I have far better uses for them.

I've pushed the on-map army to 7.4m, no real change to the Axis numbers.

Image

Ground losses – fairly typical for this set of turns. The 1944 tanks can't arrive too soon.

Image

Destroyed list. Note the Western Allies have finally cleared North Africa, so the invasion of Sicily will probably not happen till October 1943. I'm still losing the occasional over-extended Cavalry division.

Image

Air losses – by my terms, that wasn't too bad.

Image
Image

I now have 115 on map Corps. 29 Tank (18 Guards), 5 Mechanized, 67 Rifle (49 Guards) and 13 Cavalry (all Guards). There are 5 Rifle Corps in the reserve – my emergency reserve. Have 13 on-map artillery or rocket divisions
MAS
Posts: 51
Joined: Fri Sep 25, 2015 6:59 pm

RE: T117

Post by MAS »

Another brief pause here. I was trying to work out what was the best option with SW Front. The obvious (VP-led) was to clear the Dnepr bend but that would take all the time up to the autumn rains and no guarantees that I would secure any of the time bonuses.

The alternative was to write off the bonuses for Dnepropetrovsk and Zaporezhye and strike for the Bug and Odessa. In effect, try to get my VP collection back on track by writing off the current front line cities. That way, hopefully I could secure Odessa (and Sevastopol) early and be well placed for an attack towards Rumania in the Spring/Summer 1944.

What decision re: drive for Bug / Odessa vs. time bonuses for Dnepropetrovsk / Zaporozhye did you make? It looks like the AI is stubbornly trying to hold east of Dnepropetrovsk and the Dnepr bend. If this is the case, would shifting SW Front's focus west to your Dnepr bridgehead and the apparently weak German line from there northwards allow you to drive south to Nikopol or SW to Odessa and compel the AI to give up those cities anyway?

Or would that even be logistically possible with only a single track line Krasnograd - Kremenchug to support that direction. Your AAR / WITE2 presentation is excellent! Thanks and keep up the great work!
User avatar
CapAndGown
Posts: 3078
Joined: Tue Mar 06, 2001 10:00 am
Location: Virginia, USA

RE: T117

Post by CapAndGown »

It is probably too late for any changes in this regard, but: it would help your's and others' AARs if the font sizes for the names of larger cities were at least double is size. The rather small font for an important city like Smolensk or Dnepropetrovsk makes the AAR harder to follow, especially when you add weather graphics which further obscure the terrain. It hard to place just where events are taking place.

Having easy to follow AARs should be a design concern for Matrix since good AARs are a good marketing tool.
User avatar
loki100
Posts: 11708
Joined: Sat Oct 20, 2012 12:38 pm
Location: Utlima Thule

RE: T117

Post by loki100 »

ORIGINAL: MAS
Another brief pause here. I was trying to work out what was the best option with SW Front. The obvious (VP-led) was to clear the Dnepr bend but that would take all the time up to the autumn rains and no guarantees that I would secure any of the time bonuses.

The alternative was to write off the bonuses for Dnepropetrovsk and Zaporezhye and strike for the Bug and Odessa. In effect, try to get my VP collection back on track by writing off the current front line cities. That way, hopefully I could secure Odessa (and Sevastopol) early and be well placed for an attack towards Rumania in the Spring/Summer 1944.

What decision re: drive for Bug / Odessa vs. time bonuses for Dnepropetrovsk / Zaporozhye did you make? It looks like the AI is stubbornly trying to hold east of Dnepropetrovsk and the Dnepr bend. If this is the case, would shifting SW Front's focus west to your Dnepr bridgehead and the apparently weak German line from there northwards allow you to drive south to Nikopol or SW to Odessa and compel the AI to give up those cities anyway?

Or would that even be logistically possible with only a single track line Krasnograd - Kremenchug to support that direction. Your AAR / WITE2 presentation is excellent! Thanks and keep up the great work!

That turn, I tried to use SW Front to dislodge the AI from Dnepropetrovsk (hence the armour to the east of the city).

Its clear I've just driven into an area with massive defensive stacks so its going to become a hex/turn to make any progress. As with the Pzrs in 1941/2, ideally my Tank and Mech Corps are not there to actually attack things but to by-pass them as they exploit gaps.

So my revised logic was I was going to miss the time bonuses for Dnepropetrovsk/Zaporozhye in any case. If I fought for them directly, then I'd probably be chasing time for Odessa too and possibly places like Lvov. A bigger issue is I really should have some of the formations in Western Front down here for this phase, but they ended up there in the earlier fighting and it was hard to release them.

So I re-organised and struck SW instead. In the end I had to stop as the AI created a long salient and Stalingrad Front was too weak to collapse their positions from the east, but the bit that mattered was in the end I came out well placed to claim Odessa ahead of time.

You're right about Kremenchug, securing that rail crossing was the basis of my next moves. In the end I needed both the railyards in Dnepropetrovsk and the dual line but I could manage quite a lot off a single line (using the super-depot concept)
ORIGINAL: CapAndGown

It is probably too late for any changes in this regard, but: it would help your's and others' AARs if the font sizes for the names of larger cities were at least double is size. The rather small font for an important city like Smolensk or Dnepropetrovsk makes the AAR harder to follow, especially when you add weather graphics which further obscure the terrain. It hard to place just where events are taking place.

Having easy to follow AARs should be a design concern for Matrix since good AARs are a good marketing tool.

Some images are deliberately zoomed out and as you know from WiTE1 the counters sit on the map, so lots of counters means the map can get obscured. Again as in WiTE1, you can alter the display to hide the counters.

I mean, realistically, the audience for this at the moment is most likely to be WiTE1 players, so I'd be genuinely surprised if any of that group weren't aware where Dnepropetrovsk is, especially in an image focussed on the Dnepr bend?

Or am I missing the question you intended to pose?

Sammy5IsAlive
Posts: 648
Joined: Sun Aug 03, 2014 11:01 pm

RE: T117

Post by Sammy5IsAlive »

ORIGINAL: CapAndGown

It is probably too late for any changes in this regard, but: it would help your's and others' AARs if the font sizes for the names of larger cities were at least double is size. The rather small font for an important city like Smolensk or Dnepropetrovsk makes the AAR harder to follow, especially when you add weather graphics which further obscure the terrain. It hard to place just where events are taking place.

Having easy to follow AARs should be a design concern for Matrix since good AARs are a good marketing tool.

Looking at the screenshots there are the bigger region names in pale grey that should help to orientate yourself. I think that once you are playing 'your' game and the map is 'in motion' it won't be such an issue knowing which city is where.

In purely aesthetic terms I would agree that I preferred the slightly larger and capitalised city names in WITE1 (including the 'original' map) and the sans-serif font that Jison's map mod used for all the names on the map (inc. towns and rivers etc). I guess that just comes down to personal preference though - I'd be interested to know how easily something like that is moddable?
User avatar
loki100
Posts: 11708
Joined: Sat Oct 20, 2012 12:38 pm
Location: Utlima Thule

RE: T117

Post by loki100 »

ORIGINAL: Sammy5IsAlive

....

Looking at the screenshots there are the bigger region names in pale grey that should help to orientate yourself. I think that once you are playing 'your' game and the map is 'in motion' it won't be such an issue knowing which city is where.

In purely aesthetic terms I would agree that I preferred the slightly larger and capitalised city names in WITE1 (including the 'original' map) and the sans-serif font that Jison's map mod used for all the names on the map (inc. towns and rivers etc). I guess that just comes down to personal preference though - I'd be interested to know how easily something like that is moddable?

Red Lancer is far better placed to answer this than I ever will be. I have no illusions about my graphical skills. More importantly, I'm not sure what is in the .exe and what is in the moddable files. Clearly you can mod the terrain effects as you wish. In the game files I can .dat files (so you could mod them) for things like the on-map text and place names. What I'm really not sure is how this would then show, whether you could expand the font size but I doubt you can change how the on-map images interact with the counters.

The painted map style as in WiTE1 (or the older AGEOD games) can be quite stunning and made into a historical document in its own right. But not only is it processore intensive, its a right royal pain to modify, so errors tend to be left alone simply as no one can justify the cost of a complete overhaul. If a given hex in WiTE2 is 'wrong' its correctable with ease.

We had a discussion over the location of Smolensk a while back. The city spans the Dnepr, the population areas are probably more to the south than the north but the civic buildings and rail and road infrastructure is to the north. Its not really large enough to justify a 2 hex city set up. Key bit was there was no feeling that the map design was a constraint, if it was better to the south, then move it. Also the rail net has had a lot of work during the testing process and again it is relatively easy to shift to fit emerging research.
User avatar
RedLancer
Posts: 4338
Joined: Wed Nov 16, 2005 9:09 am
Location: UK

RE: T117

Post by RedLancer »

The map has been designed first and foremost for those playing the game. It is very dynamic as the five zoom settings are in most regards independent of themselves. Nowhere is this more flexible than the map text. As you zoom in and out the text can be turned on and off, change size, position, orientation, font, colour and opacity. As you navigate the map then we have tried to provide the best balance of presented information.

I appreciate that for AARs this dynamism is lost as ultimately we are taking screenshots constrained by the size of the screen and the information that is imparted.

The whole setup is extremely moddable against the criteria set out above. The screenshot shows the map text editor.


Image
Attachments
MapText.jpg
MapText.jpg (191.38 KiB) Viewed 2928 times
John
WitE2 Asst Producer
WitE & WitW Dev
Sammy5IsAlive
Posts: 648
Joined: Sun Aug 03, 2014 11:01 pm

RE: T117

Post by Sammy5IsAlive »

ORIGINAL: RedLancer

The map has been designed first and foremost for those playing the game. It is very dynamic as the five zoom settings are in most regards independent of themselves. Nowhere is this more flexible than the map text. As you zoom in and out the text can be turned on and off, change size, position, font, colour and opacity. As you navigate the map then we have tried to provide the best balance of presented information.

I appreciate that for AARs this dynamism is lost as ultimately we are taking screenshots constrained by the size of the screen and the information that is imparted.

The whole setup is extremely moddable against the criteria set out above.


Sounds good :) both in terms of the dynamism and moddability.
User avatar
loki100
Posts: 11708
Joined: Sat Oct 20, 2012 12:38 pm
Location: Utlima Thule

T125

Post by loki100 »

13 November 1943

Based on T125

Just a general point], a new patch has changed how older game saves are being displayed by slightly altering the FOW rules. Since the saves I am using for the images are from the original game they are affected. The consequence is it looks like the Germans have a lot of 1-1 formations, they don't but can't get around this - so just take their apparent combat power with a very large pinch of salt.

Background

Mid-September finally saw Bryansk Front start to make significant gains [1] whileSW Front disengaged from the Dnepropetrovsk battles in preparation for an offensive further west. The rail junction at Kremenchug and a bridgehead over the Dnepr were secured by early October.

By the end of September, Western Front had recrossed the Berezina and for the first time Minsk started to appear on operational maps.

Image

Equally the lead elements of Bryansk Front were now only 20 miles from Kiev.

Image

Soviet forces entered eastern Kiev on 8 October, liberated Gomel on the 6 as SW Front established itself on the south bank of the Dnepr. Heavy rains from 10 October stopped all operations by Western and Central Fronts but Bryansk Front crossed the Dnepr south of Kiev as it prepared to regain the capital of the Ukraine

In an attempt to hasten the capture of the Dnepr bend and regain the Crimea, Soviet troops had landed near Feodosiya on 4 October and by the 16th had cut off the Kerch Peninsula.

Image

Facing encirclement, the Germans abandoned Kiev on 22 October as the autumnal rains swept across the Ukraine [2], bringing most operations to a close.

The start of November saw the renamed 3 Ukrainian Front return to the offensive breaking out of its bridgehead and reaching Krivoi Rog.

Image

T125

So start of the winter of 1943-44 is a good spot for a wider catch up. First, this winter is 'mild' (it was the warmest of the war years), the immediate impact is going to be a lack of blizzards apart from on the northern sector. That means the major rivers will not freeze and may remain with moving ice for a lot of the time (one of the reasons why I was hunting bridgeheads in the autumn battles). Even smaller rivers will often not fully freeze.

On the other hand, it is likely to have more air operations and perhaps more ground mobility (snow not heavy snow) unless it suddenly rains.

Leningrad. Well I have finally gained the initiative here. Its a long way to anything that matters but if I can push them behind the Narva and over the Luga then I set in train the sequence of events that can lead to Finland asking for an armistice.

From my perspective, I have a free choice of tempo here, in the end AGN is more threatened by my gains in Bielorussia than grinding out a hex by hex offensive on this sector.

Image

For the moment, 1 Baltic Front and the northern element of Western Front are working together along the Dvina/Dauga. The prize is Daugavipils and the dual track rail to Pskov. AGN can still be readily supplied via the Estonian rail net and ports but that cuts the main communication route in and out.

Image

Needless to say, my eyes are on Minsk. The renamed 1 Belorussian Front (henceforth 1 Blr), the old Central Front, has been involved in constant battles clearing its way into SE Belorussia but the bulk of Western Front has built up, is well supplied and well supported by the VVS. Equally what it lacks in mobile assets, it more than makes up with artillery.

Image

2 Ukrainian will hold the gap between the main offensive fronts and try to clear the Pripyet marshes.

Of more importance 1 Ukr is recovering after the Kiev battles and well placed to either attack towards Zhitomir or south. Just I need to resolve the rather chaotic situation to the south-east.

Image

3 Ukr (was SW) and 4 Ukr (Stalingrad Front) need to clear the Dnepr bend (I have long last the VP bonus there). The immediate problem is that 3 Ukr is badly stretched, I want to go SW but need to clear the salient up to Dnepropetrovsk and protect the linkage to 1 Ukr.

Not shown but Sevastopol was liberated and I am building up for a naval/paratroop invasion of Rumania.

Image

OOB.

Some changes but reflects my priority. 1 Blr + Western Fronts have over 2m men, 2,400 planes and 4,900 tanks. 1, 3 and 4 Ukr have 2.4m men, 2,800 planes and 11,000 tanks.

No real change in the big numbers.

Image

The VP chart. Targets for the next phase are Odessa and Lvov in the south, Minsk, Pskov, Talinin and Riga in the north and taking Finland out. The useful thing is apart from Odessa, I am not under any immediate time pressures.

No chance of reaching the sudden death conditions but now more optimistic about the end of 1944 test.

Small thing, but both sides are picking up regular VP bonus for having excess forces in the Theatre Boxes. That reflects the slow progress of the Western Allies (at this stage still not in mainland Italy) and the looming threat to Finland.

Image

Losses, while the OOB data suggests the Germans are keeping their strength constant I am starting to push their permanent killed + captured losses towards 2.5m. At some stage, that will start to impact on their ability to restore destroyed formations.

Image

Air losses, finally seeing a shift. The A2A ratio is improving and that turn my flak was effective – the less optimistic reading is the LW committed itself to some substantial amounts of GS.

Image

Air craft production is shifting. The La-5FN is the first really good fighter. I don't have a lot of spare modern planes so still using the obsolete ones for training purposes [3].

Image

I've mentioned the artillery situation a few times. This maybe makes it plain, I have lots of mortars, 76mm guns and rockets. For everything else, the limited production is immediately claimed.

So I am concentrating on Support Units that use what I have to spare and trying to keep the heavier guns for the artillery divisions.

Image

[1] While the usual advice is to take care of your CPP, there are times for both sides when you can keep up the pressure, if your opponent is also at the end of their combat capacity. Here I both wanted Kiev for the VP bonus (so a nice example of politics dictating operational tempo) and finally a strong group of German formations are badly worn down.

[2] So it fell on the last turn of the +6 bonus, suspect a human opponent would not have pulled back despite the flank threats as the weather changed dramatically.

[3] If you are used to WiTW, then the training system is very different. It is more or less automatic and happens in the reserve for air groups with experience < national morale. You can stop it by telling them to rest but then they never build up experience so best approach is just to let it happen.
User avatar
Elessar2
Posts: 1463
Joined: Wed Nov 30, 2016 12:35 am

RE: T125

Post by Elessar2 »

Just wondering why so many German units, including several armor units, have CV's of one. Did their supply all get porked by partisans or something?
Post Reply

Return to “After Action Reports”