The Combat Diaries of XXX Corps

Post descriptions of your brilliant victories and unfortunate defeats here.

Moderator: MOD_WarintheWest

User avatar
loki100
Posts: 11707
Joined: Sat Oct 20, 2012 12:38 pm
Location: Utlima Thule

RE: The Italian Campaign from Messina to Napoli

Post by loki100 »

ORIGINAL: warspite1

Hi loki, apologies in advance if this is a dumbarse question, but how do you get so many pictures in one post?

I use a picture hosting site (in my case imageshack) and link to that. When I first started doing AARs this was both free and pretty much essential as few sites gave you much capacity for uploads. Its now reasonably cheap (GBP 20 per year? ... and most now seem to charge) and this is the only site I know that allows you to upload directly. So its really something of habit and it has the advantage that I can have more than 3 images in a post.
User avatar
loki100
Posts: 11707
Joined: Sat Oct 20, 2012 12:38 pm
Location: Utlima Thule

The Italian Campaign: 1 – 29 January 1944

Post by loki100 »

The Italian Campaign: 1 – 29 January 1944: Battle of Gaeta

The final stage of the Corps' involvement in the Italian campaign saw it again engaged in the reduction of bypassed German positions.

By the start of 1944, the three Allied armies in the theatre each had their own zone of operations. US 7 Army was pressing along the Adriatic Coast and US 5 Army was struggling to break out of its beachhead north of Rome. In theory 8 Army was ordered to clear Naples and relieve the pressure on 5 Army.

In practice XIII Corps became bogged down in a siege of Naples that lasted to 21 January while XXX Corps had to deal with strong German units guarding the coast road while also trying to push northwards.

Image
(Indian troops in action near Naples)

However, by 8 January news was received that 5 Army had liberated Rome, meaning that 8 Army's primary task, again, was to clear the rail lines as fast as possible.

Image

The result was a series of skirmishes and short lived fierce encounters as German units tried to escape encirclement. The final stage of the battle was at Gaeta where elements of 9 SS Panzer were finally forced to surrender.

Image

Image
(Fighting near Gaeta)

This victory marked the end of XXX Corps involvement in Italy.

Image
(Elements of XXX Corps redeploying to Naples)

The attention of Allied planners was now on an invasion of France in May or June 1944. The Corps was re-assigned to 2 British Army allocated a follow up role once the initial landings were secure.

Image

By mid-February, the Corps HQ and some of the divisions from the Italian fighting had arrived in the UK.

For context, here are the losses up to the end of January 1944:

Image
User avatar
loki100
Posts: 11707
Joined: Sat Oct 20, 2012 12:38 pm
Location: Utlima Thule

In Reserve: 29 January – 2 June 1944

Post by loki100 »

In Reserve: 29 January – 2 June 1944

The Corps completed its redeployment to the UK by the end of January 1944. The make up of its attached forces varied considerably over the next months as American and British forces built up for the invasion of France. Fundamentally the Corps was designated as the armoured reserve of 2 British Army and, in this respect, was never part of the planning for the initial landings. Along with the American armoured formations, it was intended to be landed once the infantry had secured a reasonable perimeter.

Image
(British tanks in training on Salisbury Plain)

On the eve of the Allied invasion, the Corps consisted of 4 British or Canadian armoured divisions and 1 British infantry division.

Image

As part of the final preparations, just before it was sent to France additional support formations were allocated by SHAEF. This gave XXX Corps an effective strength of over 100,000 men, 1,000 guns and 1,800 tanks.

Image

Image
(For information, here's the VP chart just before the landings in France)

On 13 May, elements of 2 British and 1 American armies landed between Deippe and Etaples. Almost every bomber available hit either the German front line, their reserves, or their lines of communication.

Image

By 27 May, Allied forces had made some progress inland.

Image

The main problem was the Germans still held the coast between the smaller 'Dieppe' landing and the larger 'Etaples' group [1]. Accordingly, late on 2 June, the bulk of the Corps set sail from Southampton.

Image
(XXX Corps advanced guard moving up from the landing zones)


[1] A gamble that worked against the AI but I think would be disastrous PBEM. I tried this area as an experiment and would be very cautious of trying this against a human opponent.
User avatar
loki100
Posts: 11707
Joined: Sat Oct 20, 2012 12:38 pm
Location: Utlima Thule

The Amiens-Arras Campaign: 3 June – 23 June 1944

Post by loki100 »

The Amiens-Arras Campaign: 3 June – 23 June 1944

The Corps was first deployed to France at the start of June. Initially Guards Armoured and 11 Armoured divisions landed to the south of the Somme to assist the British attempt to capture Amiens. Since the landing zone was secured by the US 90 Infantry Division this was temporarily subordinated to the corps and the formations left in the UK allocated as the SHAEF strategic reserve.

Image

Image

The corps' first goal was to deepen the bridgehead so as to allow the deployment of additional formations.

The initial attack was launched on 10 June on a sector held by the German XXV Corps and, after fierce fighting, the German front was broken.

Image

Leaving the US infantry to secure the beach-head, the armoured formations pushed inland.

In turn, 5 Canadian and 7 British armoured were landed as a reserve.

Image

With their rear secure, 11 Armoured managed to exploit the confusion behind the German lines and made further gains

Image

By 15 June, the Corps had broken out and Guards Armoured, supported by the 51 Highland Division, overran the German airbase outside Grandvillers and then the small town of Poix-Nord

This offensive effectively broke the German defensive lines to the west of the Somme. From 17-20 June other elements of 2 British Army expanded the area under allied control and linked up with the isolated 'Dieppe' beach-head.

By the 20th, XXX Corps was introduced and the Canadians quickly cleared the last German resistance at Grandvillers.

Image

Image
Canadian armour after the fighting at Grandvillers

7 Armoured then extended the perimeter held by British forces while Guards Armoured swung west. By the 22 June they had effectively encircled the powerful group of SS Panzer divisions that had formed a barrier to Allied progress.

Image

Image
(British tanks from Guards Armoured)

By this stage the Corps had been re-organised and had regained operational control of the bulk of the British armoured forces deployed in France.

Image

However, despite the gains to the west of the Somme, the Germans still held Amiens and US 1 Army was finding it hard to break out towards the east.
User avatar
loki100
Posts: 11707
Joined: Sat Oct 20, 2012 12:38 pm
Location: Utlima Thule

The Amiens-Arras Campaign: 24 June – 21 July 1944

Post by loki100 »

The Amiens-Arras Campaign: 24 June – 21 July 1944

By 24 June SHAEF reorganised the army boundaries in France. US 1 Army was ordered to clear the channel coast and capture Antwerp. 2 British was to drive towards the Belgian border, 1 Free French Army to drive south to Paris and 1 Canadian to capture key ports to the west.

However, while the German lines remained formidable on the coastal sector to the east, to the south and west of the Allied armies they were in full retreat. The next week saw XXX Corps leading the allied drive towards the Franco-Belgian border.

On the way, the fast moving British armour overwhelmed a number of German units already shattered in the earlier battles.

Image

By the end of June 7 British Armoured had captured St Quentin.

Image

By 1 July, the already buoyant British morale was increased by reports that French armoured divisions had liberated Paris. Not only did this indicate that the Germans were in retreat but also that the exposed southern flank of the Corps was less exposed than feared.

Image

Image
(aftermath of the liberation of Paris)

Recognising the potential for a substantial encirclement of the German forces still defending Arras, SHAEF over-ruled the earlier orders for XXX Corps. For several days the result was a degree of chaos as the advance was switched from east to north. Taking advantage, the German resistance intensified.

Image

However, by 8 July, the armoured spearheads of XXX Corps and the US 1 Army were only 20 miles apart.

Image

A German counterattack forced the allied pincers apart

Image

However, it was not enough and by 12 July, XXX Corps had captured Kortrijk and a few days later US tanks reached the British positions, sealing the fate of 7 German divisions (including 2 SS Pzr and 1 PzGr) trapped around Arras.

Image

Image
(British tanks in action in Lille)

The task of actually reducing the pocket fell to the American 1 Army. XXX Corps rested and refitted on the Franco-Belgian border while the infantry of 2 British army moved up to support the planned drive into Belgium.
User avatar
loki100
Posts: 11707
Joined: Sat Oct 20, 2012 12:38 pm
Location: Utlima Thule

The Brussels campaign: 22 July - 18 August 1944

Post by loki100 »

From Arras to Aachen: The Brussels campaign: 22 July - 18 August 1944

The initial allied plan had been for the US 1 Army to capture Antwerp while 2 British advanced to the south of Brussels with the goal of capturing Aachen. Unfortunately sustained German resistance along the Channel ports disrupted the advance of US 1 Army meaning 2 British had to swing north and try to capture Brussels so as to ease the pressure on the Americans.

After the success of the Arras offensive the Corps was allocated fresh artillery formations but continued to command a mixed group of British and Canadian armoured divisions.

Image

XXX Corps opened the renewed offensive by 2 British Army by breaking the sector of the German front held by 10 SS Panzer. Aided by massive air support, Guards Armoured and 5 Canadian Armoured broke through after a day of hard fighting.

Image
(Typhoon operating in support of XXX Corps)

Image

Image
(Churchill damaged in the fighting on the Franco-Belgian border)

In a way after the border battles, XXX Corps was more involved in minor skirmishes and trying to out-flank German defensive positions rather than in pitched battles as the Allies moved east.

With the German front line broken, 11 Armoured was able make significant gains undermining the German defensive positions anchored on Ghent.

Image

By the 29th, British armour had reached the outskirts of Brussels. XXX Corps was ordered to leave the direct attack on the city to 1 Corps and push east. However, 1 Corps lacked the armour needed to exploit its early gains and Gds Armoured was detached to help.

Despite this diversion, by 5 August, the Corps had broken the German front and had almost surrounded the German formations in Namur.

Image

Brussels itself was captured by a force made up of I and XXX Corps on 12 August.

Image

The rest of the Corps was only able to make minimal gains as German resistance stiffened and the British started to outrun their supply lines. Even large scale airdrops of fuel and supplies was insufficient to maintain the momentum of recent weeks.

Image

Image
(part of the attempt to resupply 2 British Army before the start of the Maas battles)

However, even as the Allied offensive in northern France stalled, and the Germans launched their counter-attack in Burgundy, news came in of the Allied landings in the south of France.

Image
User avatar
loki100
Posts: 11707
Joined: Sat Oct 20, 2012 12:38 pm
Location: Utlima Thule

Crossing the Maas: 19 August 1944 – 22 September 1944

Post by loki100 »

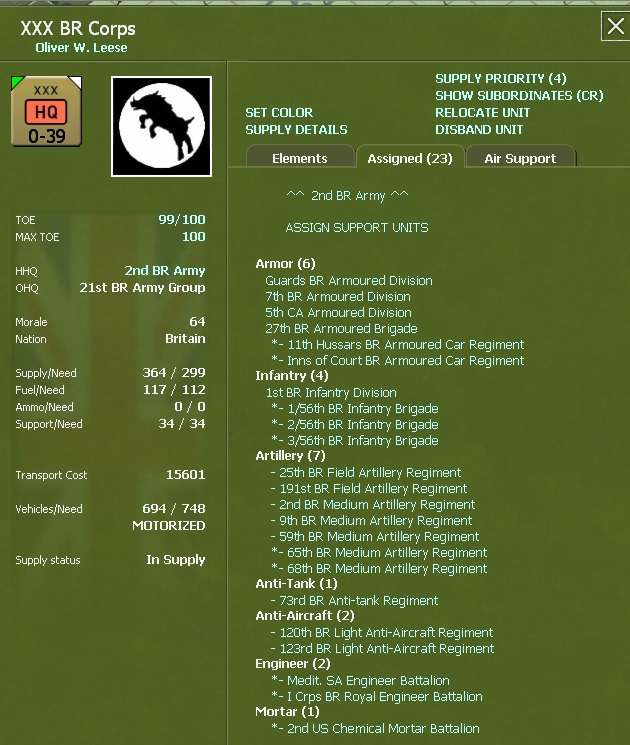
From Arras to Aachen: Crossing the Maas: 19 August 1944 – 22 September 1944

Under heavy pressure from 1 US and 2 British Armies, and having sent a number of armoured formations to support their offensive in Burgundy, the German front came under increasing pressure in Belgium.

By 23 August, 4 Canadian Armoured had captured Liege and established a small bridgehead over the Maas.

XXX Corps reinforced this unexpected gain by drawing on its last reserves. 7 British Armoured exploited the Canadian victory and established firm control over the rail crossings. In turn, under pressure from SHAEF, the British tanks swung north and captured the pivotal Dutch city of Maastricht. This left them potentially isolated but the benefits of such a firm base for future operations over the Maas was obvious.

Image

By the 26th, 11 British Armoured was also firmly over the Maas east of Liege as the Germans made major efforts to try to block the offensive by 1 US at Antwerp.

Image

For these two weeks, actual fighting by the corps was limited but that changed dramatically in early September. The entire corps was now deployed on the Liege-Maastricht sector but the Germans had had time to reinforce their defensive line protecting Aachen.

Supported by I Corps' 51 Division, Guards Armoured, 7 and 11 British Armoured and 4 Canadian armoured clashed with 21 Panzer on the north-western approaches to Aachen on 4 September.

Image

Unfortunately the Germans had used the delay imposed while SHAEF and 21 Army Group focussed on the capture of Antwerp. Despite constant air interdiction, and Bomber Command hitting its communications hub at Aachen, 21 Panzer had managed to split the British bridgehead into two separate sectors and to secure the east bank of the Maas between them. Worse Guards Armoured had been delayed by the fighting at Antwerp and arrived too late to take part in the battle.

Image

As a result, the small town of Vise on the Maas became the focal point of the initial phase. Both sides realised that capturing this would allow the British to bring their superior numbers to bear.

The opening British plan was for 51 Division to force a crossing to the north of the town while 7 and 11 Armoured attacked the flanks of the German positions. To increase the pressure on the defenders, 11 Armoured was also ordered to capture the small town of Herve.

However, the plan fell apart almost immediately. 51 Division managed to force a small crossing but this was under constant German mortar and shellfire and it proved impossible to construct an emergency bridge strong enough to support a tank.

Image
(evacuating wounded near Vise)

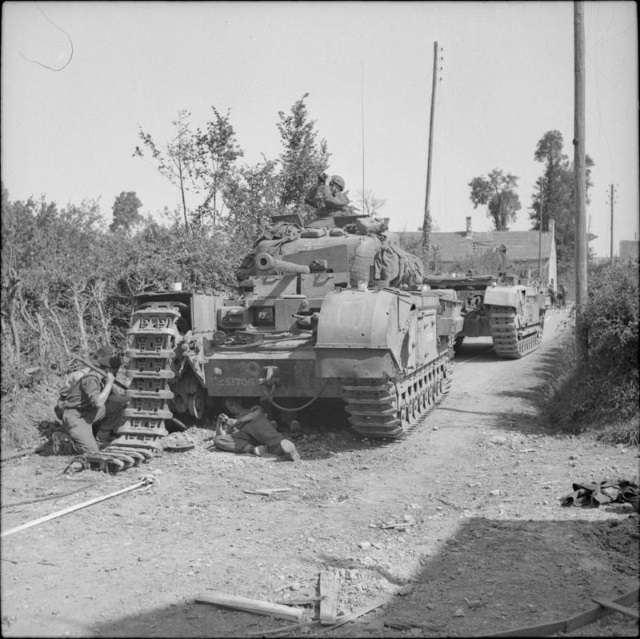
This would have been less of a problem if 7 Armoured had been able to make progress but it needed to force its way through the low wooded hills on the Dutch-Belgian border and became entangled with German strongpoints.

Image
(tanks from 7 Armoured on the narrow roads between Maastricht and Vise)

The situation worsened when the commander of 21 Panzer realised that 11 Armoured was not pressing the southern defences of Vise with its full strength and was able to send reinforcements north.

In contrast to the claustrophobic fighting along the Maas, 11 Armoured faced a different problem at Herve. Sitting in the midst of open farmland the defenders had excellent visibility. Despite constant bombing, 11 Armoured could not suppress the defenders long enough to even reach the outskirts of the town.

By nightfall, the British formations had mostly fallen back to their start lines. A limited attempt was made on the 5th by 7 Armoured and 51 Highland to take Vise from the north but losses from the first day were too heavy and neither formation was strong enough to overcome the German resistance.

Image

Badly beaten, the Corps handed over most of the defensive perimeter to I British Corps and pulled back over the Maas to rest and re-equip.

However, by 17 September, the Corps was back in action and by 22 September became the first allied formation to actually cross the German border.

Image


Note: Since actually capturing a hex in Germany seems to mark the end of one phase of the game thought it might be useful to provide overall losses and the VP situation. I've marked up the data with the losses etc on 12 May 1944 (ie the turn before I invaded N France).

Image

I think the Luftwaffe has been more robust in this game than it normally is. In particular I am not noticing that many more operational losses and that is a good proxy for when the axis need to shift away from relying on properly trained pilots. On my side, note the jump in losses of transport planes. I have done no paradrops since I did one at St Quentin (really to reinforce the spearhead) on 7 June. But I have been doing massive air re-supply of the Allied advance and XXX Corps has been a major beneficiary. A combination of being priority #4 for resupply, the others at this status are I British and one US corps (that has the bulk of their armour), plus being the focus for air re-supply has really kept their combat effectiveness relatively high.

Image

Again I've added the pre-invasion figures for comparison. I've kept the bombing VP more or less the same (it shows as 3 due to the change in divisor in late 1944), Bomber Command is hitting manpower with a side order of rail junctions. 8 US is going for fuel, rail junctions and HI. 15 Air is performing well as I use it for raids on single hexes rather than wider areas – this seems to play to its strengths (or more strictly avoid its weaknesses).

I'm hoping to force the Rhine in the winter and at that stage to start picking up both City VP and bombing VP (as captured factories/manpower counts as destroyed).
User avatar
KWG
Posts: 1249
Joined: Sat Sep 29, 2012 4:45 pm

RE: Crossing the Maas: 19 August 1944 – 22 September 1944

Post by KWG »

(Churchill damaged in the fighting on the Franco-Belgian border


What is that behind the Churchill ? Looks like the same Churchill chassis. A ammunitions carrier? Repair tank?

The one crewman is using a "Breaker Bar" (US Army), dont know what the British may have called it.
"A word was said - a mare is standing by the fence."
User avatar
JeffroK
Posts: 6417
Joined: Wed Jan 26, 2005 4:05 am

RE: Crossing the Maas: 19 August 1944 – 22 September 1944

Post by JeffroK »

Churchill ARV?

Probably a "Crow Bar" in Brit lingo,
Interdum feror cupidine partium magnarum Europae vincendarum
User avatar
loki100
Posts: 11707
Joined: Sat Oct 20, 2012 12:38 pm
Location: Utlima Thule

RE: Crossing the Maas: 19 August 1944 – 22 September 1944

Post by loki100 »

ORIGINAL: JeffK

Churchill ARV?

Probably a "Crow Bar" in Brit lingo,

aye its an ARV
User avatar
KWG
Posts: 1249
Joined: Sat Sep 29, 2012 4:45 pm

RE: Crossing the Maas: 19 August 1944 – 22 September 1944

Post by KWG »

ORIGINAL: JeffK

Churchill ARV?

Probably a "Crow Bar" in Brit lingo,


Thats why I asked. I always called it a Crowbar, then in the army was told NO, its a Breaker Bar [&:] LOL
"A word was said - a mare is standing by the fence."
User avatar
loki100
Posts: 11707
Joined: Sat Oct 20, 2012 12:38 pm
Location: Utlima Thule

Crossing the Rhine: 23 September 1944 – 3 November 1944

Post by loki100 »

From Arras to Aachen: Crossing the Rhine: 23 September 1944 – 3 November 1944

After the heavy fighting on the east bank of the Maas, XXX Corps was able to push into western Germany even its primary objective, Aachen, proved hard to take.

To the north, US 1 Army was making progress on the Dutch-Belgian border while to the south a combination of US 3 Army, 1 Canadian and 1 Free French not only decisively defeated the Burgundy Offensive but went over to the offensive themselves.

Whereas the previous week had only seen Canadian reconnaissance patrols enter Germany, by the 23 September Allied armour was firmly lodged on German soil. By the end of September, 5 Canadian Armoured had broken the weakly held centre of the German line and its advanced elements reported reaching the west bank of the Rhine.

Image

By October, XXX Corps had pushed up to 30 km into Germany in the face of limited German resistance. However, Aachen was proving to be a major problem.

Image

SHAEF and 21 Army Group ordered the city be cleared to ease resupply and allow 2 British Army to push onto the Rhine. Bomber Command, unwillingly, diverted substantial numbers of bombers to try and weaken the defenders and on 8 October XXX and I British Corps attacked north of the city.

Image

Image
(British artillery supporting the Aachen operation)

The German defenders were overwhelmed and quickly fell back and the British tanks were able to exploit their victory and cut the rail lines from Aachen back into the Reich.

In consequence, the Germans pulled out and XXX Corps was able to resume its offensive to the Rhine.

Image

By the 23 October, 4 Canadian signalled Corps and Army HQ with the dramatic news. Their advance guard had not just reached the Rhine but briefly occupied Monheim.

11 British Armour was hastily drawn from reserve and ordered to capture Dusseldorf, giving the Allies a firm grip on the east bank of the last major obstacle on the road to Berlin.

Image

Image
Image

(images of the British crossing of the Rhine)
[1]

By 3 November, British and American troops had secured a bridgehead 30 km long on the east bank, a weak lodgement at Hangelar and had occupied Bonn.

Image


[1] These are not official War Office photographs but taken by members of 51 Division during the (real) crossing in March 1945 – hence the much lower quality.
User avatar
loki100
Posts: 11707
Joined: Sat Oct 20, 2012 12:38 pm
Location: Utlima Thule

The Rhine Battles: 4 November 1944 – 29 December 1944

Post by loki100 »

The Rhine Battles: 4 November 1944 – 29 December 1944

By early November, Allied pressure along the Rhine meant the Germans abandoned Aachen as they tried to strengthen their defensive line on the south edge of the salient carved out by 2 British Army. The next two weeks saw the Allies content to secure their bridgeheads and XXX Corps fought a series of minor actions around Euskirchen to improve the flow of supply to the Rhine crossings.

Image

Once the southern flank was secure, Guards and 7 Armoured were briefly pulled back into reserve in order to rest and refit.

Image

Early December saw these divisions committed in an attempt to push east from Cologne.

Image

Despite this setback, by 9 December, the Corps was properly concentrated and supported by infantry from XII Corps.

Image

Image
(infantry supporting the armoured break out from Cologne)

This time the German defenders were quickly overwhelmed. With the centre of the German line broken, their position at Wuppertal was almost encircled as 5 Canadian armour reached the outskirts of the Ruhr.

Image


The following week, the Corps kept up the pressure on the Germans. Wuppertal was cut off and as the Allies pushed up to 30 miles east of the Rhine.

Image

Image
(British tanks in action near the Ruhr)
-------------------------------------------------------------------------------
For information, here's the wider data up the end of 1944:

Image

Image
User avatar
loki100
Posts: 11707
Joined: Sat Oct 20, 2012 12:38 pm
Location: Utlima Thule

Clearing the Ardennes: 30 December 1944 – 23 February 1945

Post by loki100 »

Clearing the Ardennes: 30 December 1944 – 23 February 1945

{I'm aware I've not updated this for a while. In part I've not had much chance to play due to taking on too many PBEM commitments ... anyway}


By the end of 1944, the British 2 Army occupied a salient over the Rhine some 50 miles to the east and 90 miles north-south. However, tenacious German resistance on the flanks were making it increasingly hard to concentrate for further breakouts.

Accordingly SHAEF ordered the destruction of the German bulge in the Ardennes. This would hopefully destroy the bulk of at least one German army, shorten the front and allow 2 British to attack towards Berlin.

By 6 January, the bulk of XXX Corps had redeployed to the northern side of the bulge and had broken the German front line.

Image

In turn, 7 British armoured was able to exploit the gap and reached the outskirts of Koblenz.

Image

Image
(British infantry west of Koblenz)

The shift in focus caught the Germans off balance and by 13 January, 7 Armoured had entered Koblenz cutting the main supply line to the German units in the Bulge.

Image

By the 20th, the Germans had started to react but British tanks were pushing along the east bank of the Moselle in an effort to join up with 1 French Army.

Image

Increasingly for the British tankers, this was not a campaign of fighting but movement. Within a week, XXX Corps had made tentative contact with the Franco-American units on the north side of the Bulge. An estimated 12-15 German divisions were cut off.

Image

By 17 February, XXX Corps was pulled back to refit and reorganise. The fighting in the Ardennes was to last well into March but the primary goal of freeing up the flanks of 2 British Army had been achieved. The next stage would be the drive to Berlin.

Image

Image
(Elements of XXX Corps pulling back into reserve)

[1] Just for fun, here's the win/loss record of all the Allied Corps Commands:

Image
User avatar
Mamluke
Posts: 193
Joined: Wed Nov 11, 2015 4:20 pm

RE: Clearing the Ardennes: 30 December 1944 – 23 February 1945

Post by Mamluke »

you don't mention it, but how many divisions were actually captured in that big ass pocktet? I mean it was not fully secure so I imagine the armored and some inf at the edge escaped.

BTW very awesome ARR! I don't have WITW but Im liking this,

would you say that the front line is about to calapse? what is the front line along all of Germany? I know the focus is on the XXX corps but I think even those men would like to talk about the overall situation.
User avatar
loki100
Posts: 11707
Joined: Sat Oct 20, 2012 12:38 pm
Location: Utlima Thule

RE: Clearing the Ardennes: 30 December 1944 – 23 February 1945

Post by loki100 »

ORIGINAL: Mamluke

you don't mention it, but how many divisions were actually captured in that big ass pocktet? I mean it was not fully secure so I imagine the armored and some inf at the edge escaped.

BTW very awesome ARR! I don't have WITW but Im liking this,

would you say that the front line is about to calapse? what is the front line along all of Germany? I know the focus is on the XXX corps but I think even those men would like to talk about the overall situation.

I think I got about 15 divisions in the end but it took an age to finish off bypassed SS and FJ divisions. Playing the Allies in WITW, the only thing worse than encountering a FJ division in the front line is if you cut one off. They are tough.

I've managed to play about 12 turns from where this post leaves off and its become the usual WiTW end game of a tussle between two weakened armies. The Germans are out of resources and I'm struggling to deliver resources as the front line moves into Germany (you have to be prepared to send units back to around Antwerp to recover).

At the moment its the mostly US forces in N Germany that are making the most progress, if I recall, I've just taken Bremen and am reaching Hamburg, the centre is caught up on the last collection of decent German units. Need to find the time to play out the last 12 or so turns and then write it up ... just got obsessed with playtesting WiTE2.

I really like WiTW, its elegant, plays well. It is one sided but the German AI does a decent job and in PBEM I find the best solution is to be prepared to swap sides so you both get a chance to be on the offensive etc.
User avatar
loki100
Posts: 11707
Joined: Sat Oct 20, 2012 12:38 pm
Location: Utlima Thule

Stuck on the Rhine: 24 February - 27 April 1945

Post by loki100 »

Stuck on the Rhine: 24 February - 27 April 1945

{finally managed to find the time to finish the game so will complete this – hate leaving AARs unfinished}

By late February the allies were firmly across the Rhine around the Ruhr and to the south. German resistance in the Ardennes was continuing and tied up substantial Allied formations badly needed to renew the main offensive as well as interdicting allied efforts to resupply the front line.

Accepting these constraints, SHAEF opted for a series of localised offensives designed to break the German line at weak spots and exploit behind the lines. The hope was for further pockets and to force the Germans to pull back. The risk was that German resistance would tie down most of the available infantry formations simply holding the flanks of the breakthroughs.

In reality both outcomes occured as the allies struggled to press eastwards but were able to destroy the last organised German resistance west of the Elbe.

The opening blows saw 3 thrusts, two north and south of Frankfurt and, in the north, to capture Bremen.

Image

Image
(Corps OOB at the end of April 1945)

As part of this wider offensive XXX Corps breached the German lines east of Cologne and 7 Armoured made substantial gains along the Eder.

Image

The need to press ahead with too few troops allowed the Germans to recover. The result was that by 2 March, the Germans had cut off 7 Armoured at Saarburg and it took the full commitment of the corps to re-open a line of communication.

Image

By 10 March, the gap in the German front was widened and sufficient infantry was available to pull the corps off the line to refit. After a short rest, the Corps renewed its offensive capturing Fritzlar on 4 April.

Image

However, strong German resistance meant that the advance was interupted as most of the infantry were needed to cover the flanks. Given the strength of the German resistance, Allied commanders started to regard the central offensive as secondary as 1 US Army broke out in the north. The fall of Hannover on 10 April appeared to confirm this strategy especially as Bremen was expected to fall in a matter of days. The steady occupation of major ports was to do much to help keep the allied armies properly supplied.

Image

XXX Corps had again been pulled back to refit but received fresh orders. It was to abandon the offensive eastwards and swing north to link up 1 US.

Image
(Canadian armour just north of Hannover)

In pouring rain, the result was a 90 km offensive to link up with the Americans and isolate an estimated 15 German divisions around Bielefeld-Paderborn.

Image

The result was another major victory but as with the Ardennes,the trapped German formations took time to eliminate and seriously hampered attempts to resupply the Allied armoured spearheads. Equally spring rains and muds made off-road movements difficult. It was not till 27 April that the bulk of the German formations had surrendered and XXX Corps had managed limited gains around Goettingen.

Image
(elements of Gds Armoured division moving up to Goettingen)

Two months of fighting had seen the main front advance some 100 miles eastwards but by late April there were signs that the German resistance was crumbling. For the first time the Allies had forced the upper Rhine, encircling the Germans at Freiburg while US 1 Army continued to capture the main ports in NW Germany. With the fall of Goettingen on 25 April the corps was again pulled into reserve to refit.

Image

With fresh units now available after eliminating all the bypassed German strongpoints, the Allied command was considering how best to push on to Berlin.

User avatar
comte
Posts: 2389
Joined: Wed Feb 04, 2009 2:12 am
Location: Be'eri, Hadarom, Israel

RE: Stuck on the Rhine: 24 February - 27 April 1945

Post by comte »

Welcome Back [:)]
User avatar
loki100
Posts: 11707
Joined: Sat Oct 20, 2012 12:38 pm
Location: Utlima Thule

RE: Stuck on the Rhine: 24 February - 27 April 1945

Post by loki100 »

ORIGINAL: Aces8

Welcome Back [:)]

thank you - always reasurring that at least one person is still reading ... especially when I don't post for 3 months [:)]
User avatar
loki100
Posts: 11707
Joined: Sat Oct 20, 2012 12:38 pm
Location: Utlima Thule

The Road to Berlin: 28 April - 18 May 1945

Post by loki100 »

The Road to Berlin: 28 April - 18 May 1945

Elements of XXX Corps had first crossed the Rhine on 3 November 1944. In almost 6 months of subsequent fighting, the Corps had pushed around 120 km into Western Germany having to fight all the way.

However, late April saw the dynamics of the war in Germany start to shift. Allied control over most of the main North Sea ports eased supply problems at the same time as strategic bombing and physical occupation of major industrial centres combined to weaken German resistance.

The first indication of this happened on 1 May when 5 Canadian clashed with elements of 15 Panzer only for the Germans to pull back in panic due to a lack of ammunition.

Image

In turn, 4 Canadian was able to exploit the gap torn in the German lines – almost capturing the V2 weapons plants at Nordhausen.

Image

By 10 May, it was reported that US 2 Army had surrounded Hannover. For the first time, Allied armour was able to exploit any breach in the German lines and adequate infantry was available to secure the flanks as the tanks pushed east.

Image

The result was a stunning coup-de-main as lead tanks of the US 20 Armoured Division captured Magdeburg off the march.

Image
(Elements of 20 Armoured in action at Magdeburg)

Suddenly the focus was not on clearing Western Germany but how to cross the Elbe. With Soviet formations still well to the east of Berlin the ultimate prize seemed to be at hand.

Image

It was not just in the centre that allied units made substantial gains. In the south, Allied tanks were now racing for Munich while the German units at Frankfurt were almost encircled.

Image

To the north, US 2 Army was the first across the Elbe and by 8 May had a substantial bridgehead.

Image

In the meantime, under clear skies, XXX Corps faced what appeared to be substantial German resistance. However, the Axis units had been pounded by Allied airpower and were lacking ammunition and fuel. As a result, US 20 Armoured was ordered to cross the Elbe without waiting for infantry or specialist engineers.

Image
To the south, 7 British widened the bridgehead as it became clear that any German resistance was limited.

Image

With the river crossings secured, Allied armour drove east.

Potsdam fell to Canadian tanks on the night of 15 May. By the evening of 18 May, Guards Armoured and 4 Canadian Armoured had reached the outskirts of Berlin.

Image
(Elements of Guards Armoured approaching Berlin)

The Canadians had made some progress to the south of the city cutting almost the last rail line connecting northern and southern Germany.

To the east, the Red Army was still bogged down and had just taken Neusalz.

Image
Post Reply

Return to “After Action Reports”