Hurt, But Not Beaten! - An Allied '44 Counter-Offensive AAR - SolInvictus202 vs jdsrae - concluded

Post descriptions of your brilliant victories and unfortunate defeats here.

Moderators: wdolson, MOD_War-in-the-Pacific-Admirals-Edition

SolInvictus202
Posts: 75
Joined: Thu May 27, 2010 1:10 pm

Re: Hurt, But Not Beaten! - An Allied '44 Counter-Offensive AAR - SolInvictus202 vs jdsrae

Post by SolInvictus202 »

The Aftermath of the Suprise Port Attack at Hiroshima:

Screenshot - 20.03.2022 , 15_13_14.png
Screenshot - 20.03.2022 , 15_13_14.png (1.04 MiB) Viewed 940 times
A lot of things changed in my approach to the game after the CVs had been located and hit in Hiroshima. Of course I knew that the Japanese still had a lot of CVLs, CVEs and most likely a few more "newer" CVs by now as well. Furthermore, these would now be issued the best of the best of the best Fighter pilots etc available.
However, the superiority in CVs following the early disaster in 42 had been neutralized or at least neutralized for a time (the CVs were still afloat at that time).

I therefore set in motion a number of invasions to clear our the remaining Japaneses bases in the Kuriles and also to intensify strat bombing of Japan earlier than initially antipicated - since I had expected the battle for ownership of Shikuka to take a while - yet it was not contested even once - not a single bombardment TF ever made it close.
only twice would japanese combat ships appear in the area until now - both will be reported on later on - one ended in a draw, with high allied casualties (however not painful ones) and the second ended in a swift victory of Mr. Arleigh Burke and subsequent naval strikes on the retreating Japanese by our Naval Air arm!


First and foremost I would ensure that Toyohara would be shut down and under constant supply drain through easy bombardments based out of Shikuka - I would not use airplanes yet - but rather rely on the two battleships present for defensive purposes and whenever they needed rest I would send in a CA TF
Planning ahead I had brought along 10 fully stocked AEs and some 10 ADs just to be on the safe side, should the port ever be damaged etc. Thus my battleships rearmed daily during the day and were ready for a bombardment run in the morning... the 1200 Naval Support may or may not have helped in this case too :D

the reports below are examples of those daily runs:

Night Naval bombardment of Toyohara at 124,46

Allied Ships
CA Wichita
CL Helena
DD Schroeder
DD Rowe
DD Ross
DD John Rodgers
DD Robinson
DD Ringgold
DD Renshaw
DD Leutze
DD Anthony
DD Fletcher

Japanese ground losses:
87 casualties reported
Squads: 0 destroyed, 2 disabled
Non Combat: 0 destroyed, 9 disabled
Engineers: 1 destroyed, 2 disabled

Light Industry hits 1
Resources hits 1
Fires 636
Runway hits 24
Port hits 2

OS2U-3 Kingfisher acting as spotter for CA Wichita
CA Wichita firing at Toyohara
SOC-1 Seagull acting as spotter for CL Helena
CL Helena firing at 89th Division
DD Schroeder firing at Toyohara
DD Rowe firing at Toyohara
DD Ross firing at Karafuto Mixed Brigade
DD John Rodgers firing at Karafuto Mixed Brigade
DD Robinson firing at Karafuto Mixed Brigade
DD Ringgold firing at Toyohara
DD Renshaw firing at 89th Division
DD Leutze firing at Karafuto Mixed Brigade
DD Anthony firing at Karafuto Mixed Brigade
DD Fletcher firing at 89th Division


---------------------------

Night Naval bombardment of Toyohara at 124,46

Japanese Ships
AGP Ujigawa Maru, Shell hits 1, on fire, heavy damage

Allied Ships
BB California
BB Nevada
CL Santa Fe

Japanese ground losses:
197 casualties reported
Squads: 0 destroyed, 2 disabled
Non Combat: 12 destroyed, 15 disabled
Engineers: 1 destroyed, 1 disabled
Guns lost 6 (1 destroyed, 5 disabled)
Vehicles lost 3 (2 destroyed, 1 disabled)

Manpower hits 4
Light Industry hits 1
Fires 1810
Airbase hits 7
Runway hits 14
Port hits 1

OS2U-3 Kingfisher acting as spotter for BB California
BB California firing at Toyohara
BB Nevada firing at Toyohara
CL Santa Fe firing at Karafuto Mixed Brigade

-------


our Black Widows providing Night time CAP over the target:

Night Air attack on TF, near Toyohara at 124,46

Weather in hex: Light cloud

Raid spotted at 45 NM, estimated altitude 7,000 feet.
Estimated time to target is 13 minutes

Japanese aircraft
P1Y2 Frances x 6

Allied aircraft
P-61A Black Widow x 3

Japanese aircraft losses
P1Y2 Frances: 3 damaged

No Allied losses

Allied Ships
DD Taylor
DD Sigsbee

Aircraft Attacking:
6 x P1Y2 Frances launching torpedoes at 200 feet
Naval Attack: 1 x 18in Type 91 Torpedo

CAP engaged:
426th NFS with P-61A Black Widow (3 airborne, 0 on standby, 0 scrambling)
3 plane(s) intercepting now.
Group patrol altitude is 1000 , scrambling fighters to 5000.
Raid is overhead

Some CAP have air radar


-----------

I will report on the "usual" day to day routine over Japan in the next post - as mentioned above: the strat bombing campaign had been launched.
"parcere subiectis et debellare superbos", Vergil
User avatar
BBfanboy
Posts: 20314
Joined: Wed Aug 04, 2010 5:36 pm
Location: Winnipeg, MB
Contact:

Re: Hurt, But Not Beaten! - An Allied '44 Counter-Offensive AAR - SolInvictus202 vs jdsrae

Post by BBfanboy »

From his lack of activity it seems he may have fallen for your diversion invasions and sent a good part of his navy to the IO area. And putting a lot of ships in upgrade at the same time is also a risky move on his part. Great work on identifying his vulnerability in the Kuriles-Sakhalin area. The follow-up invasions of the Kuriles show excellent planning to clear that flank. Looking forward to the clashes you mentioned ... :)
No matter how bad a situation is, you can always make it worse. - Chris Hadfield : An Astronaut's Guide To Life On Earth
SolInvictus202
Posts: 75
Joined: Thu May 27, 2010 1:10 pm

Re: Hurt, But Not Beaten! - An Allied '44 Counter-Offensive AAR - SolInvictus202 vs jdsrae

Post by SolInvictus202 »

Thanks BBfanboy - Indeed it appears that the Kuriles were defended only by a token force. It has to be mentioned however that this "weakness" most likely finds its origin within the change of command. Had the previous player continued I guess it would have been a slaughter since jdsrae has correctly deducted that the Marianas would have been attacked next - and these were manned to the teeth!
Should he and I ever start a new game it will be determined if I can catch him off guard in the same way I did through taking over someone else's game!

The strat bombing campaign thus far:


I will post some examples for the targets I have been identifying as priorities thus far:

Morning Air attack on Hachinohe , at 118,55

Weather in hex: Thunderstorms

Raid spotted at 8 NM, estimated altitude 9,000 feet.
Estimated time to target is 2 minutes

Japanese aircraft
A6M8 Zero x 10

Allied aircraft
PB4Y-1 Liberator x 6

No Japanese losses

Allied aircraft losses
PB4Y-1 Liberator: 3 damaged

Ki-115a Tsurugi factory hits 2

Aircraft Attacking:
6 x PB4Y-1 Liberator bombing from 8000 feet
City Attack: 10 x 500 lb GP Bomb

CAP engaged:
302 Ku S-1 with A6M8 Zero (0 airborne, 0 on standby, 7 scrambling)
3 plane(s) not yet engaged, 0 being recalled, 0 out of immediate contact.
Group patrol altitude is 11000 , scrambling fighters between 7000 and 9000.
Time for all group planes to reach interception is 48 minutes


--------

Morning Air attack on Nagaoka , at 114,58

Weather in hex: Heavy rain

Raid spotted at 18 NM, estimated altitude 10,000 feet.
Estimated time to target is 5 minutes

Japanese aircraft
N1K5-J George x 3

Allied aircraft
B-29-1 Superfort x 33

No Japanese losses

Allied aircraft losses
B-29-1 Superfort: 1 destroyed, 2 damaged

Ki-109-I Peggy factory hits 9
Kikka factory hits 12
Ki-201 Karyu factory hits 11

Aircraft Attacking:
3 x B-29-1 Superfort bombing from 8000 feet
City Attack: 20 x 500 lb GP Bomb
2 x B-29-1 Superfort bombing from 8000 feet
City Attack: 20 x 500 lb GP Bomb
2 x B-29-1 Superfort bombing from 8000 feet
City Attack: 20 x 500 lb GP Bomb
2 x B-29-1 Superfort bombing from 8000 feet
City Attack: 20 x 500 lb GP Bomb
3 x B-29-1 Superfort bombing from 8000 feet
City Attack: 20 x 500 lb GP Bomb
3 x B-29-1 Superfort bombing from 8000 feet
City Attack: 20 x 500 lb GP Bomb
3 x B-29-1 Superfort bombing from 8000 feet
City Attack: 20 x 500 lb GP Bomb
3 x B-29-1 Superfort bombing from 8000 feet
City Attack: 20 x 500 lb GP Bomb
2 x B-29-1 Superfort bombing from 8000 feet
City Attack: 20 x 500 lb GP Bomb
3 x B-29-1 Superfort bombing from 8000 feet
City Attack: 20 x 500 lb GP Bomb
3 x B-29-1 Superfort bombing from 8000 feet
City Attack: 20 x 500 lb GP Bomb
3 x B-29-1 Superfort bombing from 8000 feet
City Attack: 20 x 500 lb GP Bomb

CAP engaged:
S-401 Hikotai with N1K5-J George (3 airborne, 0 on standby, 0 scrambling)
(3 plane(s) diverted to support CAP in hex.)
3 plane(s) intercepting now.
Group patrol altitude is 11000 , scrambling fighters between 0 and 11000.
Raid is overhead


-----------------------

Morning Air attack on Utsonomiya , at 115,60

Weather in hex: Moderate rain

Raid detected at 75 NM, estimated altitude 11,000 feet.
Estimated time to target is 25 minutes

Japanese aircraft
N1K5-J George x 35

Allied aircraft
B-29-1 Superfort x 16
PB4Y-1 Liberator x 39

No Japanese losses

Allied aircraft losses
B-29-1 Superfort: 3 damaged
PB4Y-1 Liberator: 5 damaged

Ki-94-II factory hits 6
Ki-94-II factory hits 8

Aircraft Attacking:
9 x PB4Y-1 Liberator bombing from 8000 feet *
City Attack: 5 x 500 lb GP Bomb
12 x PB4Y-1 Liberator bombing from 8000 feet *
City Attack: 5 x 500 lb GP Bomb
12 x PB4Y-1 Liberator bombing from 8000 feet *
City Attack: 5 x 500 lb GP Bomb
6 x PB4Y-1 Liberator bombing from 8000 feet *
City Attack: 5 x 500 lb GP Bomb
3 x B-29-1 Superfort bombing from 8000 feet
City Attack: 20 x 500 lb GP Bomb
3 x B-29-1 Superfort bombing from 8000 feet
City Attack: 20 x 500 lb GP Bomb
3 x B-29-1 Superfort bombing from 8000 feet
City Attack: 20 x 500 lb GP Bomb
3 x B-29-1 Superfort bombing from 8000 feet
City Attack: 20 x 500 lb GP Bomb
2 x B-29-1 Superfort bombing from 8000 feet
City Attack: 20 x 500 lb GP Bomb
2 x B-29-1 Superfort bombing from 8000 feet
City Attack: 20 x 500 lb GP Bomb

CAP engaged:
S-401 Hikotai with N1K5-J George (0 airborne, 12 on standby, 17 scrambling)
0 plane(s) not yet engaged, 6 being recalled, 0 out of immediate contact.
Group patrol altitude is 11000 , scrambling fighters between 6000 and 13000.
Time for all group planes to reach interception is 29 minutes


--------------

Morning Air attack on Matsuyama , at 105,59

Weather in hex: Heavy cloud

Raid spotted at 31 NM, estimated altitude 11,000 feet.
Estimated time to target is 9 minutes

Japanese aircraft
A6M8 Zero x 3

Allied aircraft
B-29-1 Superfort x 15

No Japanese losses

No Allied losses

Mitsubishi Ha-43 hits 31

Aircraft Attacking:
3 x B-29-1 Superfort bombing from 8000 feet *
City Attack: 10 x 500 lb GP Bomb
2 x B-29-1 Superfort bombing from 8000 feet *
City Attack: 10 x 500 lb GP Bomb
3 x B-29-1 Superfort bombing from 8000 feet *
City Attack: 10 x 500 lb GP Bomb
2 x B-29-1 Superfort bombing from 8000 feet *
City Attack: 10 x 500 lb GP Bomb
3 x B-29-1 Superfort bombing from 8000 feet *
City Attack: 10 x 500 lb GP Bomb
2 x B-29-1 Superfort bombing from 8000 feet *
City Attack: 10 x 500 lb GP Bomb

CAP engaged:
Unryu-1 with A6M8 Zero (3 airborne, 0 on standby, 0 scrambling)
(3 plane(s) diverted to support CAP in hex.)
3 plane(s) intercepting now.
Group patrol altitude is 15000 , scrambling fighters between 0 and 15000.
Raid is overhead

Kaneko B. in a A6M8 Zero makes head on attack ... forces B-29-1 Superfort out of formation
Doikawa R. in a A6M8 Zero makes head on attack ... forces B-29-1 Superfort out of formation


------------------
There are quite a few more like it: I obviously focused on R&D and next gen fighters first (the attacks on Shinden factories will be posted later on - took me a while to find all of them - but by now not a single one should be researching)
Fortunately I believe I got most of the my highest priority targets before I ran out of enough B-29s to actually form up a raid...
There are a number of reasons why my losses were relatively "low" - in comparison that is and thus giving me the chance to actually work through most of the desired targets.

By mid-september we actually took a break from strat bombing for a bit in daylight and decided to set Tokyo and Osaka ablaze a few times - I will show this as well later on....

August 17th however is worthy of reporting smth else... another visit to Hiroshima :D
"parcere subiectis et debellare superbos", Vergil
SolInvictus202
Posts: 75
Joined: Thu May 27, 2010 1:10 pm

Re: Hurt, But Not Beaten! - An Allied '44 Counter-Offensive AAR - SolInvictus202 vs jdsrae

Post by SolInvictus202 »

August 17th: The day we visited Hiroshima again...

As mentioned earlier my honour did not extend as far as "letting the identified juicy targets live". So I opted to pay the port another visit.
I knew losses would be high - and it would require a lot of good pilots to even make it to the drop point for the bombing runs... Thus I could not send in expendable pilots either...
Furthermore the replacement rate for B-29s is rather slow - making the predicted losses even worse.

I decided to go about it the following way:

1) I transferred all B-29 units from India to Shakalin - those were unharmed and fully operational as they had been kept in reserve to bomb the DEI Oilfields - but once the CVs had been found I decided these made for a more suitable mission target short term. The oilfields would have to be bombed by around 6 Squadrons of USAAF B-24s and a larger number of British ones.

2) I decided to bomb most of the priority aircraft factory targets before I went after the carriers again - ensuring that R&D would be slowed down even if I lost most of the B-29s in the raid over Hiroshima:

3) Recon would be reinforced over other targets as to make the appearance of no longer being interested, since without a doubt the CVs were fixed to Hiroshima for a few months anyway.


Clear skies were predicted and I opted to have a go at it! Let us start off with the losses:
Screenshot - 25.03.2022 , 15_20_05.png
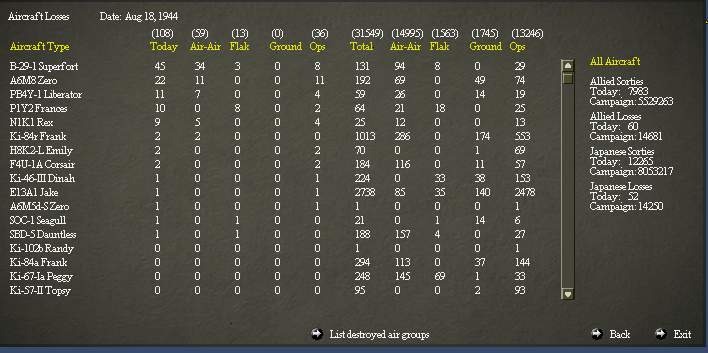
Screenshot - 25.03.2022 , 15_20_05.png (283.11 KiB) Viewed 838 times

YES: We lost a grand total of 45 B-29s in the raid... what a massacre.. those B-29 squadrons would have to be grounded for a while - I would even have to go as far as replacing some squadrons with B-24s instead - to bring up the remaining squads to full strength...

Conclusio: the losses were very significant and would give the Japanese significant respite over their home islands!


Now for the bombing results:

Morning Air attack on Hiroshima/Kure , at 106,58

Weather in hex: Severe storms

Raid detected at 80 NM, estimated altitude 11,000 feet.
Estimated time to target is 25 minutes

Japanese aircraft
A6M8 Zero x 230
N1K1 Rex x 55

Allied aircraft
B-29-1 Superfort x 53

Japanese aircraft losses
A6M8 Zero: 4 destroyed
N1K1 Rex: 2 destroyed

Allied aircraft losses
B-29-1 Superfort: 9 destroyed, 44 damaged

Japanese Ships
CV Hiryu, Bomb hits 6, heavy fires, heavy damage
CV Kaga, Bomb hits 10, heavy fires, heavy damage
CV Zuikaku, Bomb hits 17, heavy fires, heavy damage
CV Shokaku, Bomb hits 19, heavy fires
CV Soryu, Bomb hits 6, heavy fires, heavy damage
AV Kansai Maru, Bomb hits 1

Repair Shipyard hits 9
Port hits 18
Port fuel hits 4

Aircraft Attacking:
2 x B-29-1 Superfort bombing from 8000 feet
Port Attack: 20 x 500 lb GP Bomb
3 x B-29-1 Superfort bombing from 8000 feet
Port Attack: 20 x 500 lb GP Bomb
3 x B-29-1 Superfort bombing from 8000 feet
Port Attack: 20 x 500 lb GP Bomb
1 x B-29-1 Superfort bombing from 8000 feet
Port Attack: 20 x 500 lb GP Bomb
3 x B-29-1 Superfort bombing from 8000 feet
Port Attack: 20 x 500 lb GP Bomb
2 x B-29-1 Superfort bombing from 8000 feet
Port Attack: 20 x 500 lb GP Bomb
2 x B-29-1 Superfort bombing from 8000 feet
Port Attack: 20 x 500 lb GP Bomb
5 x B-29-1 Superfort bombing from 8000 feet
Port Attack: 20 x 500 lb GP Bomb
3 x B-29-1 Superfort bombing from 8000 feet
City Attack: 20 x 500 lb GP Bomb
3 x B-29-1 Superfort bombing from 8000 feet
Port Attack: 20 x 500 lb GP Bomb
6 x B-29-1 Superfort bombing from 8000 feet
Port Attack: 20 x 500 lb GP Bomb
2 x B-29-1 Superfort bombing from 8000 feet
Port Attack: 20 x 500 lb GP Bomb
3 x B-29-1 Superfort bombing from 8000 feet
City Attack: 20 x 500 lb GP Bomb
2 x B-29-1 Superfort bombing from 8000 feet
Port Attack: 20 x 500 lb GP Bomb
3 x B-29-1 Superfort bombing from 8000 feet
Port Attack: 20 x 500 lb GP Bomb
2 x B-29-1 Superfort bombing from 8000 feet
Port Attack: 20 x 500 lb GP Bomb

CAP engaged:
801 Ku S-1 with N1K1 Rex (0 airborne, 10 on standby, 0 scrambling)
0 plane(s) not yet engaged, 4 being recalled, 0 out of immediate contact.
Group patrol altitude is 9000 , scrambling fighters between 1000 and 14000.
Time for all group planes to reach interception is 31 minutes
452 Ku S-1 with N1K1 Rex (3 airborne, 9 on standby, 0 scrambling)
3 plane(s) intercepting now.
0 plane(s) not yet engaged, 0 being recalled, 1 out of immediate contact.
Group patrol altitude is 9000 , scrambling fighters between 8000 and 14000.
Time for all group planes to reach interception is 32 minutes
331 Ku S-1 with A6M8 Zero (0 airborne, 6 on standby, 9 scrambling)
0 plane(s) not yet engaged, 3 being recalled, 0 out of immediate contact.
Group patrol altitude is 11000 , scrambling fighters between 4000 and 11000.
Time for all group planes to reach interception is 32 minutes
332 Ku S-1 with A6M8 Zero (0 airborne, 12 on standby, 18 scrambling)
0 plane(s) not yet engaged, 6 being recalled, 0 out of immediate contact.
Group patrol altitude is 9000 , scrambling fighters between 5000 and 13000.
Time for all group planes to reach interception is 35 minutes
6th Ku S-1/B with A6M8 Zero (0 airborne, 10 on standby, 0 scrambling)
0 plane(s) not yet engaged, 2 being recalled, 0 out of immediate contact.
Group patrol altitude is 15000 , scrambling fighters between 7000 and 15000.
Time for all group planes to reach interception is 34 minutes
6th Ku S-1/C with A6M8 Zero (0 airborne, 10 on standby, 0 scrambling)
0 plane(s) not yet engaged, 2 being recalled, 0 out of immediate contact.
Group patrol altitude is 15000 , scrambling fighters between 3000 and 10000.
Time for all group planes to reach interception is 33 minutes
Ryujo-1 with A6M8 Zero (1 airborne, 18 on standby, 0 scrambling)
1 plane(s) intercepting now.
0 plane(s) not yet engaged, 3 being recalled, 0 out of immediate contact.
Group patrol altitude is 15000 , scrambling fighters between 5000 and 15000.
Time for all group planes to reach interception is 32 minutes
Junyo-1 with A6M8 Zero (0 airborne, 11 on standby, 0 scrambling)
0 plane(s) not yet engaged, 2 being recalled, 0 out of immediate contact.
Group patrol altitude is 15000 , scrambling fighters between 6000 and 15000.
Time for all group planes to reach interception is 37 minutes
Zuiho-1 with A6M8 Zero (6 airborne, 14 on standby, 0 scrambling)
6 plane(s) intercepting now.
Group patrol altitude is 5000 , scrambling fighters between 5000 and 13000.
Time for all group planes to reach interception is 18 minutes
Ryuho-1 with A6M8 Zero (0 airborne, 12 on standby, 0 scrambling)
0 plane(s) not yet engaged, 2 being recalled, 0 out of immediate contact.
Group patrol altitude is 15000 , scrambling fighters between 2000 and 15000.
Time for all group planes to reach interception is 28 minutes
Hosho-1 with A6M8 Zero (0 airborne, 7 on standby, 0 scrambling)
0 plane(s) not yet engaged, 1 being recalled, 0 out of immediate contact.
Group patrol altitude is 15000 , scrambling fighters between 10000 and 15000.
Time for all group planes to reach interception is 29 minutes
Taiho-1 with A6M8 Zero (0 airborne, 15 on standby, 0 scrambling)
0 plane(s) not yet engaged, 3 being recalled, 0 out of immediate contact.
Group patrol altitude is 15000 , scrambling fighters between 6000 and 15000.
Time for all group planes to reach interception is 34 minutes
Unryu-1 with A6M8 Zero (0 airborne, 12 on standby, 0 scrambling)
0 plane(s) not yet engaged, 3 being recalled, 0 out of immediate contact.
Group patrol altitude is 15000 , scrambling fighters between 7000 and 15000.
Time for all group planes to reach interception is 33 minutes
Amagi-1 with A6M8 Zero (0 airborne, 12 on standby, 0 scrambling)
0 plane(s) not yet engaged, 2 being recalled, 0 out of immediate contact.
Group patrol altitude is 15000 , scrambling fighters between 9000 and 15000.
Time for all group planes to reach interception is 35 minutes
958 Ku T-1 with N1K1 Rex (0 airborne, 10 on standby, 0 scrambling)
0 plane(s) not yet engaged, 4 being recalled, 0 out of immediate contact.
Group patrol altitude is 9000 , scrambling fighters between 6000 and 11000.
Time for all group planes to reach interception is 37 minutes
958 Ku T-2 with N1K1 Rex (3 airborne, 10 on standby, 0 scrambling)
3 plane(s) intercepting now.
0 plane(s) not yet engaged, 0 being recalled, 1 out of immediate contact.
Group patrol altitude is 9000 , scrambling fighters between 7000 and 14000.
Time for all group planes to reach interception is 35 minutes
Chitose-1 with A6M8 Zero (0 airborne, 12 on standby, 0 scrambling)
0 plane(s) not yet engaged, 2 being recalled, 0 out of immediate contact.
Group patrol altitude is 15000 , scrambling fighters between 10000 and 15000.
Time for all group planes to reach interception is 32 minutes
Chiyoda-1 with A6M8 Zero (0 airborne, 12 on standby, 0 scrambling)
0 plane(s) not yet engaged, 2 being recalled, 0 out of immediate contact.
Group patrol altitude is 15000 , scrambling fighters between 10000 and 15000.
Time for all group planes to reach interception is 28 minutes

Ammo storage explosion on CV Hiryu
Ammo storage explosion on CV Soryu

---------------------------------------------------------------------

Morning Air attack on Hiroshima/Kure , at 106,58

Weather in hex: Severe storms

Raid detected at 80 NM, estimated altitude 9,000 feet.
Estimated time to target is 25 minutes

Japanese aircraft
A6M8 Zero x 145
N1K1 Rex x 32

Allied aircraft
B-29-1 Superfort x 17

No Japanese losses

Allied aircraft losses
B-29-1 Superfort: 3 destroyed, 12 damaged
B-29-1 Superfort: 1 destroyed by flak

Japanese Ships
CV Shokaku, Bomb hits 2, heavy fires, heavy damage

Japanese ground losses:
6 casualties reported
Squads: 0 destroyed, 0 disabled
Non Combat: 0 destroyed, 1 disabled
Engineers: 0 destroyed, 0 disabled

Repair Shipyard hits 2
Port hits 1

Aircraft Attacking:
2 x B-29-1 Superfort bombing from 8000 feet
Port Attack: 20 x 500 lb GP Bomb
3 x B-29-1 Superfort bombing from 8000 feet
Port Attack: 20 x 500 lb GP Bomb
3 x B-29-1 Superfort bombing from 8000 feet
Port Attack: 20 x 500 lb GP Bomb
1 x B-29-1 Superfort bombing from 8000 feet
Port Attack: 20 x 500 lb GP Bomb
2 x B-29-1 Superfort bombing from 8000 feet
City Attack: 20 x 500 lb GP Bomb
1 x B-29-1 Superfort bombing from 8000 feet
Port Attack: 20 x 500 lb GP Bomb


-----------------------------

I can confirm that I heard the sinking sound at least once - so I am fairly sure I am up to 2 CVs sunk - the rest is "wishful" thinking and is unconfirmed.

Personally I would rate my decision as "costly" and not entirely justified - however it also paid off and took away 50% of the Japanese CVs for at least 6 months - if not more.

How would my dear readers rate the attack? was it worth it? would you have decided against it?
I'd be interested to hear your thoughts on that.
"parcere subiectis et debellare superbos", Vergil
deaniks
Posts: 1166
Joined: Sun May 12, 2019 7:11 pm

Re: Hurt, But Not Beaten! - An Allied '44 Counter-Offensive AAR - SolInvictus202 vs jdsrae

Post by deaniks »

At this point, you are against time. so taking any necessary action to ensure victory is well suitable lessening his carrier force is good. But probably won't affect the outcome much as he has LBA. But it gives him the power to chase your fleet or do raids on your supply routes so in general, any loss for sinking any carrier I feel is worth it.

Also with Hokkaido insight B-17s and other bombers will be in range of the HI. Hence B-29s will not be as necessary expect for their bomb loads.
SolInvictus202
Posts: 75
Joined: Thu May 27, 2010 1:10 pm

Re: Hurt, But Not Beaten! - An Allied '44 Counter-Offensive AAR - SolInvictus202 vs jdsrae

Post by SolInvictus202 »

Thanks for your thoughts on this topic, deaniks.
I quite agree on most of the points you made, except the one about time. I am not in a great rush to be honest - at least I don't feel like I am.

Why?

1) I took the game over after auto-victory - so any kind of Allied victory through points I would personally consider a great success

2) if I do not win through points but rather achieve smth like landing in Japan proper with an intact army and navy I would also see myself as victor - not sure if my opponent would agree on that - but I suppose that is more of a personal target I set myself.

3) The ratio in which points are being equalized is quite astonishing - as of today it is 77000 vs 40000 (in favour of the Japanese) - with already well over 5000 points made through strategic bombing...
If this ratio can be sustained after less than 1 month of bombing I will have achieved a minor victory well before the game ends. question is rather whether enough points are on the map to do this - but that is another matter entirely :mrgreen:
I will have to acquire points elsewhere on the map as well - which is rather ridiculous -- but oh well.


The next real thing I am worried about are the Kamikazes - I never actually dealt with them as most of my games ended way before that with Japanese surrenders - and the few I played where I got this far my opponent never really trained for these..
let us see what this one has in store for me when my APAs breach Tokoy Bay and set up the first US Hotdog stand right next to the Mikasa (is that one even in Tokyo?) :twisted:

Another interesting turn today, but due to OPSEC I need to keep the 1 month delay on reports - although it is quite frustrating to do so, the war is not won by a mile so I need to stay vigilant!
"parcere subiectis et debellare superbos", Vergil
deaniks
Posts: 1166
Joined: Sun May 12, 2019 7:11 pm

Re: Hurt, But Not Beaten! - An Allied '44 Counter-Offensive AAR - SolInvictus202 vs jdsrae

Post by deaniks »

You might be right but that gives you about 18 months left in-game and anything can happen. Also how intact is your opponent's land army by chance? if landing in Japan itself will you be able to go anywhere or be overwhelmed by numerous veteran divs?
SolInvictus202
Posts: 75
Joined: Thu May 27, 2010 1:10 pm

Re: Hurt, But Not Beaten! - An Allied '44 Counter-Offensive AAR - SolInvictus202 vs jdsrae

Post by SolInvictus202 »

You pinpointed one of the most difficult and frequently asked questions of mine. How will I fair if I actually land in Japan proper? I have been planning units ahead for at least 6 months time - does this include a landing on Honshu? we shall find out :twisted: :ugeek:

I am quite convinced that by now he withdrew most of his elite forces to Japan - there was no way of keeping that from happening. It opens up avenues of advance in other areas of the map. Also cutting off Japan from its ressources was not possible, given the staunch defence he had planned for the Marianas and without a doubt the Phillippines. This means I opted to destroy those ressources rather than cut him off. This process has already started and I would say that his Oil generation capability in the DEI has been halfed by now - if not more. Only the Burma Oil Fields are sending back oil via land unhampered. all others have been at least damaged by now.

will I be able to make progress in Japan itself following a successful landing? I am not sure and it might as well be possible that I cannot. I have never tried it -so I have no idea.

All I know at the moment is that my 44 Rifle Squad Divisions are literally chewing through any of his divisions with minimal losses...
I am expecting to make a successful landing using the 45/46 reinforcements with those "uber-divisions" that arrive towards the end.
By this time his economy should have been slowed down significantly and hopefully all those factors together will mean that I can make SOME progress.
Will I be able to make any advances through those mountain hexes near Tokyo? will I have to?
Interesting questions I have been pondering over for a few weeks now :D

cheers
"parcere subiectis et debellare superbos", Vergil
deaniks
Posts: 1166
Joined: Sun May 12, 2019 7:11 pm

Re: Hurt, But Not Beaten! - An Allied '44 Counter-Offensive AAR - SolInvictus202 vs jdsrae

Post by deaniks »

you could do a pincer move on Ominnato landing at Akita/Hachinohe and with I assume Hokkaido being owned by that point bomb the hell out of ground troops with light, medium, heavy, dive, fighters pretty much the whole kitchen sink to drive up disruption and destroy troops.
deaniks
Posts: 1166
Joined: Sun May 12, 2019 7:11 pm

Re: Hurt, But Not Beaten! - An Allied '44 Counter-Offensive AAR - SolInvictus202 vs jdsrae

Post by deaniks »

Would work for most clear terrain hexs north of Tokyo but hey there's an idea
SolInvictus202
Posts: 75
Joined: Thu May 27, 2010 1:10 pm

Re: Hurt, But Not Beaten! - An Allied '44 Counter-Offensive AAR - SolInvictus202 vs jdsrae

Post by SolInvictus202 »

that is definitely a possibilty - but I would never discuss any of my options in an open AAR :D
"parcere subiectis et debellare superbos", Vergil
SolInvictus202
Posts: 75
Joined: Thu May 27, 2010 1:10 pm

Re: Hurt, But Not Beaten! - An Allied '44 Counter-Offensive AAR - SolInvictus202 vs jdsrae

Post by SolInvictus202 »

Ketoi-jima:

I am trying to keep at least one month between what is currently happening and what I am reporting here - so sometimes posts will see a week betwen them etc.

Today I'd like to follow up on the initial phase - with the first landing in the rest of the Kuriles.
As mentioned before I had units planning at least 5-6 months ahead - this included all bases in the Kuriles to various degrees. However due to availability this only ment around 2-3 Sep Inf Regiments per base.

Therefore, it wasn't just a matter of landing prepared units but first ensuring that their AV would be enough to actually do the job.
Intensive recon and daily bombardments would set the stage for a follow up amphib invasion including bombardment runs from retreating BBs from the Shakalin invasion.

One of those looked like this - they had not been used, as there had been no need - so their magazines were full:

Night Naval bombardment of Ketoi-jima at 134,50

Allied Ships
BB Mississippi
BB New Mexico
DD Young
DD Yarnall
DD Wickes
DD Wedderburn
DD Walker
DD Wadsworth

Japanese ground losses:
75 casualties reported
Squads: 0 destroyed, 0 disabled
Non Combat: 8 destroyed, 17 disabled
Engineers: 1 destroyed, 1 disabled

Airbase hits 10
Airbase supply hits 2
Runway hits 23
Port hits 22
Port supply hits 2

OS2U-3 Kingfisher acting as spotter for BB Mississippi
BB Mississippi firing at Ketoi-jima
BB New Mexico firing at Ketoi-jima
DD Young firing at Ketoi-jima
DD Yarnall firing at Ketoi-jima
DD Wickes firing at Ketoi-jima
DD Wedderburn firing at 55th Naval Guard Unit
DD Walker firing at Ketoi-jima
DD Wadsworth firing at Ketoi-jima


---------------

Then came the invasion force with units already back at Adak to take on new troops and ammo:

Pre-Invasion action off Ketoi-jima (134,50)

3 Coastal gun shots fired in defense.

Allied Ships
BB Massachusetts
DD Blue
DD Stockham
DD Sigourney
DD Radford
LCI(G)-401
LCI(G)-398
LCI(G)-397
LCI(G)-396
LCI-635
DD Benham
LCI-637

Japanese ground losses:
79 casualties reported
Squads: 0 destroyed, 4 disabled
Non Combat: 1 destroyed, 30 disabled
Engineers: 0 destroyed, 1 disabled

BB Massachusetts firing at 55th Naval Guard Unit
DD Blue firing at 55th Naval Guard Unit
DD Stockham firing at 55th JNAF AF Unit
DD Sigourney firing at 55th JNAF AF Unit
DD Radford firing at 55th Naval Guard Unit
LCI(G)-401 fired at enemy troops
LCI(G)-398 fired at enemy troops
LCI(G)-397 fired at enemy troops
LCI(G)-396 fired at enemy troops
DD Blue fired at enemy troops
DD Stockham fired at enemy troops
DD Radford fired at enemy troops
Defensive Guns fire at approaching troops in landing craft at 6,000 yards
Defensive Guns fire at approaching troops in landing craft at 2,000 yards

------------------

All the while our mine sweepers were still in active mode and had plenty to do - although I only have a limited number of DMS available (and sunk a few myself due to silly mistakes) I still have enough and plenty AMs to keep my bases both on offensive and defensive operations free of those omni-present Jap gift baskets.

TF 329 encounters mine field at Onnekotan-jima (136,48)

Allied Ships
DMS Howard
DMS Palmer
DMS Long
DMS Trevor

3 mines cleared

------------------------

a day later, on August 22nd, we then captured the base - good recon and intel on what you encounter often means that you can retask more than half the planned force to another objective long before you actually land there.


Ground combat at Ketoi-jima (134,50)

Allied Deliberate attack

Attacking force 4581 troops, 50 guns, 38 vehicles, Assault Value = 126

Defending force 340 troops, 0 guns, 0 vehicles, Assault Value = 2

Allied adjusted assault: 53

Japanese adjusted defense: 1

Allied assault odds: 53 to 1 (fort level 3)

Allied forces CAPTURE Ketoi-jima !!!

Combat modifiers
Defender: terrain(+), forts(+), disruption(-), experience(-)
Attacker:

Japanese ground losses:
153 casualties reported
Squads: 0 destroyed, 0 disabled
Non Combat: 26 destroyed, 0 disabled
Engineers: 0 destroyed, 0 disabled

Assaulting units:
1st Filipino Inf Regiment
810th Engineer Aviation Battalion
177th Construction Regiment
162nd USA Base Force

Defending units:
55th Naval Guard Unit
55th JNAF AF Unit
"parcere subiectis et debellare superbos", Vergil
SolInvictus202
Posts: 75
Joined: Thu May 27, 2010 1:10 pm

Re: Hurt, But Not Beaten! - An Allied '44 Counter-Offensive AAR - SolInvictus202 vs jdsrae

Post by SolInvictus202 »

August 26th:


Today I would like to talk about the CAP trap set up by the Japanese that ended up being the only attempt to make a move on Shikuka - but before that a quick report on my attempts to at least "hurt" the undoubtedly numerous troop convoys shipping back troops from the "conquered" lands back to mainland Japan.

I ordered about 50 subs to "blockade" the western and southern appraoches to Honshu - with the result of a grand total of 2 ships hit I believe... quite astonishing really.. I spotted loads of convoys - and got engaged by tons of aircraft and ships, losing some 10 subs in the process so far I believe...
so not really the best result. Those two attacks, both of which happened on August 25th I would like to share however:

Sub attack near Davao at 80,93

Japanese Ships
xAK Unkai Maru #6, Torpedo hits 1, heavy damage
xAK Tempei Maru
PB Santos Maru

Allied Ships
SS Parche

Japanese ground losses:
20 casualties reported
Squads: 0 destroyed, 0 disabled
Non Combat: 0 destroyed, 3 disabled
Engineers: 1 destroyed, 0 disabled

SS Parche launches 2 torpedoes at xAK Unkai Maru #6
PB Santos Maru fails to find sub, continues to search...
PB Santos Maru attacking submerged sub ....
PB Santos Maru fails to find sub, continues to search...
Escort abandons search for sub


--------------------------------------------------------------------------------
Sub attack near Hachijo-jima at 114,64

Japanese Ships
xAP Miike Maru, Torpedo hits 1, heavy damage
SC Ch 15

Allied Ships
SS Hardhead, hits 4

SS Hardhead launches 2 torpedoes at xAP Miike Maru
SC Ch 15 fails to find sub, continues to search...
SC Ch 15 attacking submerged sub ....
SC Ch 15 fails to find sub, continues to search...
Escort abandons search for sub

----------------------

Now for the main event: my air search picked up what remains of KB on August 25th a few hexes west of Sapporo. I took immediate action to repell what could have been the first actual move to shut down Shikuka before Toyohara could be secured. the Emperor's window was closing fast - too fast actually as Shikuka turned lvl 9 the day before the attack - so basically the window as already gone.

1) I ordered the formation of around 20 PT TFs to spam the harbor - no PT boats had been used so a healthy stockpile was rdy for action.

2) All available combat ships would form up to protect the harbor in about 5 SCTFs - 1 BBTF, 2 CA TFs, 1 CL TF and 2 DD TFs - one of which was commanded by Mr. Burke - the others by leaders such as Norman, Merryl and Ching.

3) All Airplanes were put on alert and all available air craft would be flown in to bring Shikuka to about 1500 planes rdy for action. I know - IF the Japanese made it to shore bombardment it would have been a massacre - but I had to gamble and opted to believe in my ability to keep them from achieving this goal!

4) I divided my fighters up into two sections - one would fly CAP with my best pilots - and the other half would be manned by average - low experience pilots to fly escort mission for my attempt at the enemy carriers with LBA only!
For this I had trained around 100 LowNav Army Air pilots in attack B-25s - some B-24s etc with LowNav from the Navy and a few - but not many DBs - these would be restricted to actually attack bombardment TFs as those, flying at 10000 feet would be slaughtered the easiest.


-------------

The Japanese claimed a victory of epic proportions - or so my opponent would make me believe in his emails. However, I would have to disagree. His CV force was most likely meant as bait for my planes to die - well within range of LBA CAP (from Hokkaido - which is now no longer possible a month later ^^) - and this part of the plan also worked like a charm - but I expected it to and opted to go for it anyway - not sure if everyone would have made the same choice...

Yes - without a doubt I lost 400 planes to his 150 (IIRC) - it was close but not quite 3:1 - painful - for sure.
Most of these planes however were older models and most importantly of all - they were manned with bad pilots.

on the other hand however I did score a number of hits on his carriers... I doubt I sank any - yes - but they would have to repair as well - with all repairyards in range of my B-29s...

here some of the reports:

The attack happened at range 8 south of Shikuka - so I had to fly with drop tanks for most escorts - making it even worse for me.

Morning Air attack on TF, near Wakkanai at 123,48

Weather in hex: Partial cloud

Raid detected at 80 NM, estimated altitude 4,000 feet.
Estimated time to target is 23 minutes

Japanese aircraft
A6M8 Zero x 452
A7M2 Sam x 112
N1K1 Rex x 90
N1K5-J George x 1
Ki-84r Frank x 4

Allied aircraft
B-25D Mitchell x 7
B-25D1 Mitchell x 8
B-25H Mitchell x 11
P-38J Lightning x 32
P-38L Lightning x 16
P-51B Mustang x 26
F4U-1A Corsair x 20
PB4Y-1 Liberator x 4
PBJ-1D Mitchell x 4

Japanese aircraft losses
A6M8 Zero: 3 destroyed
Ki-84r Frank: 1 destroyed

Allied aircraft losses
B-25D Mitchell: 1 destroyed, 3 damaged
B-25D Mitchell: 2 destroyed by flak
B-25D1 Mitchell: 2 destroyed, 4 damaged
B-25D1 Mitchell: 1 destroyed by flak
B-25H Mitchell: 4 destroyed
B-25H Mitchell: 2 destroyed by flak
P-38J Lightning: 4 destroyed
P-38L Lightning: 5 destroyed
P-51B Mustang: 12 destroyed
F4U-1A Corsair: 9 destroyed
PB4Y-1 Liberator: 4 damaged
PBJ-1D Mitchell: 2 destroyed
PBJ-1D Mitchell: 1 destroyed by flak

Japanese Ships
CLAA Natori
BB Hyuga
CVE Kaiyo, Bomb hits 3, on fire, heavy damage
CVE Taiyo, Bomb hits 2
CVE Hosho, Bomb hits 1, on fire

Aircraft Attacking:
4 x B-25D Mitchell bombing from 1000 feet
Naval Attack: 3 x 500 lb SAP Bomb
1 x PBJ-1D Mitchell bombing from 1000 feet
Naval Attack: 3 x 500 lb SAP Bomb
4 x PB4Y-1 Liberator bombing from 1000 feet
Naval Attack: 5 x 500 lb SAP Bomb
1 x B-25D1 Mitchell bombing and strafing from low level
Naval Attack: 1 plane(s) with no ordnance
3 x B-25D1 Mitchell bombing and strafing from low level
Naval Attack: 6 x 500 lb SAP Bomb


-----------------
Japanese Ships
BB Kongo, Bomb hits 1
CLAA Nagara

----------------

Afternoon Air attack on TF, near Wakkanai at 123,48

Weather in hex: Light cloud

Raid detected at 80 NM, estimated altitude 4,000 feet.
Estimated time to target is 23 minutes

Japanese aircraft
A6M8 Zero x 269
A7M2 Sam x 45
N1K1 Rex x 50
N1K5-J George x 1
Ki-84r Frank x 4

Allied aircraft
B-25D1 Mitchell x 4
B-25H Mitchell x 3
P-38J Lightning x 32
F4U-1A Corsair x 12
PBJ-1D Mitchell x 9

Japanese aircraft losses
A6M8 Zero: 1 destroyed

Allied aircraft losses
B-25D1 Mitchell: 2 destroyed
B-25D1 Mitchell: 1 destroyed by flak
B-25H Mitchell: 2 damaged
B-25H Mitchell: 1 destroyed by flak
P-38J Lightning: 11 destroyed
PBJ-1D Mitchell: 1 destroyed, 8 damaged
PBJ-1D Mitchell: 1 destroyed by flak

Japanese Ships
CVL Ryujo, Bomb hits 1, on fire
BB Fuso
DD Susuzuki
CVL Chiyoda
CVL Chitose, Bomb hits 1, on fire
CVL Nisshin, Bomb hits 2, on fire
DD Teruzuki

Aircraft Attacking:
6 x PBJ-1D Mitchell bombing from 1000 feet
Naval Attack: 3 x 500 lb SAP Bomb
3 x B-25H Mitchell bombing and strafing from low level
Naval Attack: 6 x 500 lb GP Bomb

--------------------

Japanese Ships
BB Yamashiro, Bomb hits 1

-------------------
Japanese Ships
CVL Zuiho, Bomb hits 1
CVL Nisshin, heavy fires

--------------------

Now I did not post every combat report and many of my strikes would never reach the target and be chewed up terribly... So yes - of course it hurt to watch...
but we did score a number of hits and most importantly:

This was the last time the Japanese made any attempt to attack me or keep the Allies from expanding ever closer to Honshu proper. So it may have been a minor tactical victory for the Japanese (if at all - as the next day all my squads were at full strength rdy to repell the Japs should they keep advancing forward) but it most definitely was a decisive operational victory for the Allies.
Shakalin would now be secured pretty much uncontested - the Kuriles would fall one by one - uncontested from air and sea. and soon the bombing campaign would reach Hokkaido and Honshu.
"parcere subiectis et debellare superbos", Vergil
User avatar
CaptBeefheart
Posts: 2594
Joined: Fri Jul 04, 2003 2:42 am
Location: Seoul, Korea

Re: Hurt, But Not Beaten! - An Allied '44 Counter-Offensive AAR - SolInvictus202 vs jdsrae

Post by CaptBeefheart »

Nice catch of the KB at Hiroshima. Usually you see JFBs upgrading two CVs at a time max. That's a good lesson learned.

Although I play against the AI, I've landed on the Home Islands a few times and can give some advice on that. You might want to either close this AAR to your opponent or start a new closed thread to discuss invasion options. I'm sure other readers would offer advice just as good or better than mine.

Cheers,
CB
Beer, because barley makes lousy bread.
SolInvictus202
Posts: 75
Joined: Thu May 27, 2010 1:10 pm

Re: Hurt, But Not Beaten! - An Allied '44 Counter-Offensive AAR - SolInvictus202 vs jdsrae

Post by SolInvictus202 »

Thanks CB - I holeheartedly agree with you. However, both jdsrae and I agreed on a "joint" AAR at first - ensuring we could swap back and forth a few comments on the situation. I am not a big fan of "closed" AARs as the temptation of reading the other side or other readers sharing information, even unintentionally is omni present.
Unfortunately this did not happen as of yet - while I made clear that this AAR is also open to him - I have a feeling that my opponent - as is completely understandable - is more focused on actually playing on in the game in this difficult situation rather than even entering in an "open" discours on it.

I once again have to commend my opponent - considering this is his first game - that he is continuing to play turns on a far more regular basis than I can (I had to pass on one or the other day in recent weeks due to RL) despite most of these turns not being very entertaining for him to watch :ugeek:

Today - if we skip a month ahead- USS Lexington II (unfortunately it was not renamed at all - I should have liked to see a "Viribus Unitis" CV in my line up :D ) was hit with a torp today... I actually told my opponent that he deserved a few hits, considering that most of the turns are rather one-sided otherwise :)

I am well aware that many of my posts my appear cocky or even arrogant - as things are running well and I managed to gain quite a bit of ground since I took over - but none of those assumptions are correct - I am rather stunned that so many things worked out this nicely and am even more stunned that my opponent chooses to play on - so cudos to him - I definitely am having a lot of fun at this stage :)

The discontiuation of the game has been offered multiple times from my side - and refused in favour of being interested in gathering data for late game Japan!
We are in active, if someone slow and uncertain negotiations of starting a new game of our own from the beginning and both sides are currently considering the options we have.
Personally I would be in favour of the complete opposite of our current game and go full "restrictive" on R&D, get DBB and stacking limits involved and go as far as PDU OFF etc etc...

Let us see if this game ever comes to life and until then I continue to wish both of us a very happy turn-swapping with more "big bangs" happening soonish - the Jap Navy has to come out some day.. maybe they'll all go for a "Yamato" in front of Yokohama with all active BBs acting as unsinkable fortresses while I attempt to move past them with LCIs :D
"parcere subiectis et debellare superbos", Vergil
User avatar
BBfanboy
Posts: 20314
Joined: Wed Aug 04, 2010 5:36 pm
Location: Winnipeg, MB
Contact:

Re: Hurt, But Not Beaten! - An Allied '44 Counter-Offensive AAR - SolInvictus202 vs jdsrae

Post by BBfanboy »

About the renaming of ships - you have to do that while they are in the reinforcement queue. Once they arrive the name is locked in.
No matter how bad a situation is, you can always make it worse. - Chris Hadfield : An Astronaut's Guide To Life On Earth
User avatar
CaptBeefheart
Posts: 2594
Joined: Fri Jul 04, 2003 2:42 am
Location: Seoul, Korea

Re: Hurt, But Not Beaten! - An Allied '44 Counter-Offensive AAR - SolInvictus202 vs jdsrae

Post by CaptBeefheart »

I understand your reasoning. Your opponent is a good sport.

What with some of the Kuriles and Sakhalin taken, you have a lot of options. You could hit the north coast of Japan. Against the AI, at least, that tends to work pretty well. Also, you could do a close-in feint and then land big in western Honshu and/or Kyushu. Either way you should consider a few blocking invasions and paradrops to keep rail reinforcements away from the main landings.

Hokkaido is also a worthy stepping stone, although taking it could slow down the timetable. Assuming the big ports are well garrisoned, you could take one of the smaller ports and flood it with naval support.

Regardless, I'm sure you'll figure out something good and, most importantly, entertaining to us ;-).

Cheers,
CB
Beer, because barley makes lousy bread.
User avatar
Yaab
Posts: 5447
Joined: Tue Nov 08, 2011 2:09 pm
Location: Poland

Re: Hurt, But Not Beaten! - An Allied '44 Counter-Offensive AAR - SolInvictus202 vs jdsrae

Post by Yaab »

SolInvictus202, congrats on your impressive military operation.

However, this made me think, that players can do things not possible in RL. In WITP AE there is no supply consumption for units loaded on ships. Thus, you could theoretically load your invasion forces on ships in San Diego and sail all the way to Japan provided you have fuel for your task TFs. In RL, the Japs at least had a general sense of direction of incoming US invasion fleets, as US needed staging bases hence the US island-hopping campaign. With the operation like yours, Japs can only rely on vague Heavy Radio Transmissions signals.

What was the longest time in RL which Allied units spent on ships in comabt load?
Evoken
Posts: 496
Joined: Wed Oct 23, 2019 1:51 pm

Re: Hurt, But Not Beaten! - An Allied '44 Counter-Offensive AAR - SolInvictus202 vs jdsrae

Post by Evoken »

Impressive comeback from a trainwreck , congratz!
Evoken
Posts: 496
Joined: Wed Oct 23, 2019 1:51 pm

Re: Hurt, But Not Beaten! - An Allied '44 Counter-Offensive AAR - SolInvictus202 vs jdsrae

Post by Evoken »

Yaab wrote: Wed May 18, 2022 4:31 am SolInvictus202, congrats on your impressive military operation.

However, this made me think, that players can do things not possible in RL. In WITP AE there is no supply consumption for units loaded on ships. Thus, you could theoretically load your invasion forces on ships in San Diego and sail all the way to Japan provided you have fuel for your task TFs. In RL, the Japs at least had a general sense of direction of incoming US invasion fleets, as US needed staging bases hence the US island-hopping campaign. With the operation like yours, Japs can only rely on vague Heavy Radio Transmissions signals.

What was the longest time in RL which Allied units spent on ships in comabt load?
Units build up fatigue and disruption every day they are loaded on a ship. If you go for super long distance invasions you gonna suffer super high casualties on landing

Longest time RL might be Operation Torch , if i am not mistaken American units loaded up from New York for invasion
Post Reply

Return to “After Action Reports”