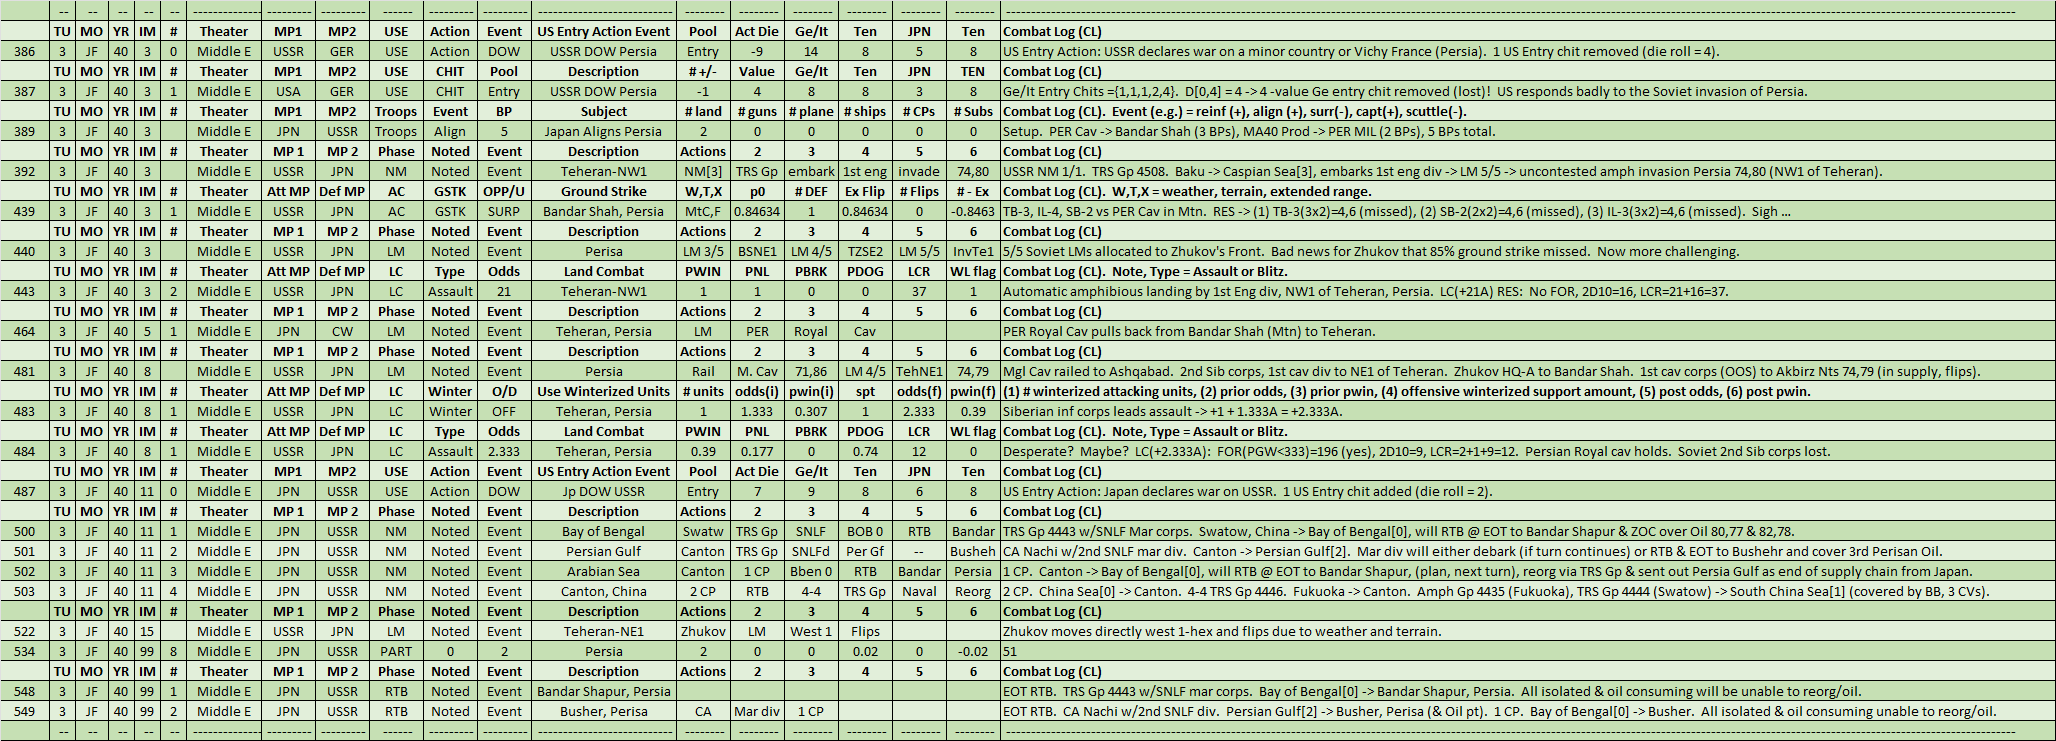
Turn 3. Jan/Feb 1940. Middle East.
Narrative.
Allied #3.
With fine weather in the Middle East, the USSR decides it’s time to launch Operation Countenance, which is the allied invasion of Persia. However; unlike history, this invasion does not include the British, is made 18-months earlier and at a time with Anglo-Soviet relations and war objectives are far from solidified. One might say at this point in history the relationship between Britan and the USSR was bit frosty.
[Historical=ChatGPT]
The Allied invasion of Persia (modern-day Iran) took place from August 25 to September 17, 1941, during World War II. The invasion was carried out by British and Soviet forces, with the goal of securing Iranian oil fields and establishing a supply route to the Soviet Union through the Persian Corridor. The operation was codenamed Operation Countenance.
Background
Iran, under Reza Shah Pahlavi, declared neutrality in World War II but had strong economic and political ties with Nazi Germany. The British and Soviets were concerned about German influence in Iran, especially because of the country's strategic location and oil resources. The Anglo-Soviet Treaty of 1921 allowed Soviet intervention if foreign threats were present, but Iran refused British and Soviet demands to expel German nationals.
The Invasion
• August 25, 1941: British and Soviet forces launched a coordinated attack.
• British forces entered Iran from Iraq in the west and from the Persian Gulf in the south.
• Soviet forces invaded from the north, advancing from the Caucasus.
• The Iranian military, poorly equipped and unprepared, offered resistance but was quickly overwhelmed.
• September 17, 1941: Reza Shah abdicated in favor of his son, Mohammad Reza Pahlavi, under British pressure.
Consequences
1. Iranian oil fields were secured by the Allies.
2. The Persian Corridor became a major supply route for Lend-Lease aid to the Soviet Union.
3. Mohammad Reza Pahlavi replaced his father as Shah of Iran, aligning more closely with the Allies.
4. British and Soviet forces occupied Iran until 1946.
5. The invasion fueled Iranian resentment toward Western powers, influencing future Iranian nationalism and political developments.
[end ChatGPT]
Objectives are to ensure the capture of Tehran and best effort to control and rail out the two Persian oil at 80, 77 and 82, 79, both by the end of this turn.
Still being neutral the Soviets only get five land moves, which must share with the CCP. For this impulse, the Soviets are given all five land moves and the CCP none.
The US reacted badly to the Soviet invasion of Persia, losing a 4-value chit from the Ge/It entry pool. While the expected chance of losing a chip was 90%, it was only 20% that they would lose the most valuable chit. However; that’s how the cookie crumbles sometimes.
Persia was aligned to Japan. Japan set up the only Persian unit (3-5 cav coprs) in the mountains of Bandar Shah, 2-hexes east, northeast of Teheran. This setup blocked direct access of the Soviet to attack/take Tehran this impulse. There were two options considered by the Soviet against this setup. The first was a direct attack by Zhukov, Siberian corps army, cav div and amphibiously attacking eng div. With maximum ground support, this attack gave 13.167, which ensure 100% PWIN. However; the issue was that Zhukov was the armor/mot unit in the attack, and if Japan, which they were likely to do, elected to fight a blitz, the odds of losing Zhukov HQ-A was 13.3%. Honestly; this first option was considered a no-go by Zhukov (not necessarily Stalin who wasn’t informed either of the option or the decision).
The second option was to ground strike the PER cav corps, flip it, land the 1st eng div 1-hex northwest of Teheran (automatic on surprise impulse), and walk into and capture Tehran the next allied impulse. The advantage of this approach, if successful was a bloodless conquest, from the Soviet perspective, of Persian. However; the risk was that the 3 available Soviet bomber wings would miss even during the surprise impulse. The 3 bomber wings had a cumulative 84.6% of flipping the cav corps; which, meant a 15.4% chance of not flipping it. Which at the very least would create a major headache for Zhukov. However; Zhukov consider this risk the least of two evils (with the other being his HQ-A elimination).
As the dice gods would have it, the ground strike failed, immediately after which, Zhukov considered an assault, or blitz, without the benefit of air ground support. However, without the surprised air ground support, the best odds that Zhukov could muster was 7.833 attack, which dependent of CRT would give a 89.2% to 93.3% PWIN. Most more worrisome, again was blitz, which had 93.3% PWIN; but carried with it a 44.8% of losing Zhukov HQ-A. Zhukov in looking out for his own preservation (again) elected not to attack. His reasons for Moscow (and Stalin) was the failure of the Red Air Force and not his fear of his own destruction.
In retrospect, Zhukov probably should have gone with option 1 and accepted the 13.3% risk of losing his HQ-A.
MAJOR LESSON LEARNED. Zhukov needs a mot div in this operation. What a major strategic oversight this was! Chalk this one up to live and learn.
Axis #5.
Japan moves the Persian cav corps from Bandar Shah to Teheran. This move puts the cav corps out of 1-impulse move range of Zhukov HQ-A. This means only the sib corps, cav div and eng div can reach and assault Tehran next allied impulse. Estimated odds for such assuming snow, is 2.33 A 39% PWIN). It’s reasonably expected that the Soviets will not take the risk, however, this is not assured 100%. However; it appears that Tehran, and hence Persia have a very real chance of surviving into next turn.
While the decision to execute Operation Scowl hasn’t been made by Imperial Japanese HQ in Tokyo, the expectation is that Japan is likely to intervene directly and will send troops in to guard the 3e Persian oil points. The world waits to see if this was is escalated.
Allied #8.
Zhukov must decide whether to attack Tehran now at +2.333A (39% PWIN) or wait for a potential attack at 11.167B (100% PWIN, 35% Zhukov HQ-A lost). Waiting carries the unknowns of getting another impulse (40%) and weather. Zhukov decide to literally roll the dice now and not wait. The absolute best would be if the assault succeeds (39%), takes Teheran, and the turn ends (20%) and locks out any potential Japanese intervention. Zhukov is not too proud to take the 7.8% chance of finishing all this off without war with Japan.
The assault was made. When the fractional row was made, hope abound; however, that hope was dashed with 2D10=9, which produced an overall 12. The Persian Royal Calvary Corps held, the Soviets lost their 2nd Sib corps (winterized & used, and the surviving two attacking divs flipped.
War between the USSR and Japan looks inevitable now. Well, this is definitely a deviation from the historical, but I do believe that it’s a realistic counterfactually. In fact, historically the Soviets got themselves embroiled in the winter war with Finland and almost found themselves at war with Great Britain and France.
From a game perspective the Soviet invasion of Persia was sanctioned by the CW. However; from a counterfactual perspective and at this point in the war, it would have been more than frowned upon by the Western Allies. In fact, Churchill as he was with the Soviet war in Finland, would likely be looking for allied intervention on the behalf of Persia against the USSR. Specifically, to “secure” their oil. Now, in (M)WIF universe this is not a possibility because the CW and the USSR are on the same side even at this point in the war.
Axis #11.
Imperial Japanese HQ in Tokyo ordered the immediate execution of Operation Scowl. In pursuant to this order to Japanese worldwide combat commands, Japanese ambassador to the Soviet Union in Moscow hand delivered Japan’s Declaration of war on the USSR to Kremlin. Fortunately for the Japanese ambassador, he and his staff were able to fly out of Moscow before Stalin could react and order his arrest.
The US did react negatively to this development (2-value chit added to Jp entry pool).
Japan’s initial combat contribution to the conflict in the Middle East included the SNLF corps in Swatow, which was moved by TRS Gp 4443 to the Bay of Bengal [0]. This corps and TRS Gp will be returned to base during the end of turn to Bandar Shapur, Persia in order to control that port and the two adjacent il pts. Also, the 2nd SNLF div in Canton was loaded aboard the CA Nachi and moved to the Persian Gulf [2]. This marine division will either debark, if the turn continues, or return to base at the end of turn to Bushehr in order to cover the 3rd Persian oil pt.
Getting supply to these isolated forces is an involved process, which will not be accomplished until next turn. As part of that process, two CPs in the China Sea were return to base to Canton and a 4-4 transport group was moved directly from Fukoku, Japan to Canton. The 2 CPS and TRS Gp 4446 were reorg by TRS Gp 4444 and Amph Gp 4434 moved into the South China Sea [1] this impulse. The resupplying TRS & Amph Gps were escorted by 3 KB CVs (w/3 CAGs) & 1 BB, which have been at sea since the start of the game, moving down 1-box per turn. The threat, are 2 Soviet Sub Gps in Vladivostok, 1 of which has the range to reach the South China Sea.
Allied #15.
The only action in the Middle East; specifically in Persia was that the Zhukov HQ-A moving 1-hex directly west, flipping because of the weather.
Next turn build priorities for the Soviets include Yeremenko HQ-I, naval capable bomber(s) to attack Japanese supply flowing through the Persian Gulf, and fighters to cover the naval bombers against anticipated Japanese carrier fighter planes.
Combat Logs.
- 99-Middle-East-CL.png (155.52 KiB) Viewed 816 times
Attack Planning Logs.

- 99-Middle-East-AP.png (54.55 KiB) Viewed 816 times