Ray of Hope (Allies)

Post descriptions and reports of your brilliant successes and unfortunate defeats here.

Moderator: Arjuna

shang
Posts: 33
Joined: Wed Aug 06, 2008 7:12 pm

Ray of Hope (Allies)

Post by shang »

Repost of the AAR I wrote for the Quartertothree.com forums. Most readers there aren't very familiar with the game, so the first few posts explain some of basic game mechanics.
------
I've been playing Conquest of Aegean again lately, and doing pretty good, so I'd thought I'd try another AAR. I've been playing defensive missions mostly, but those don't make as exciting AARs as offensive ones, so for this AAR I'm going to try a mission I haven't played before: Malta - Ray of Hope.

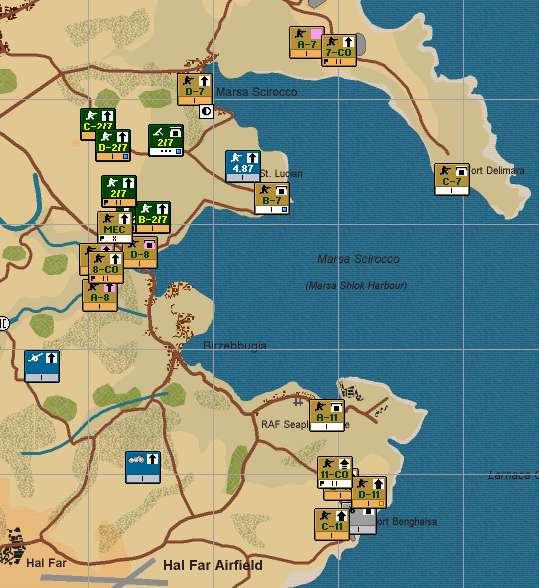
Ray of Hope is a fictional/hypothetical scenario where the Allies try to recapture the Axis occupied Malta in December 1941. We start of with a small brigade of commandos with a total of 1352 personnel. Their job is to secure the Marsaxlook Bay after which we can land more reinforcements (and supplies) on the island. Our commando troops are very well trained and equipped, so we have an edge there, but the enemy has had a lot of time to fortify their position (not to mention that intelligence estimates the number of enemy personnel to be around 14,000 or more).

Image

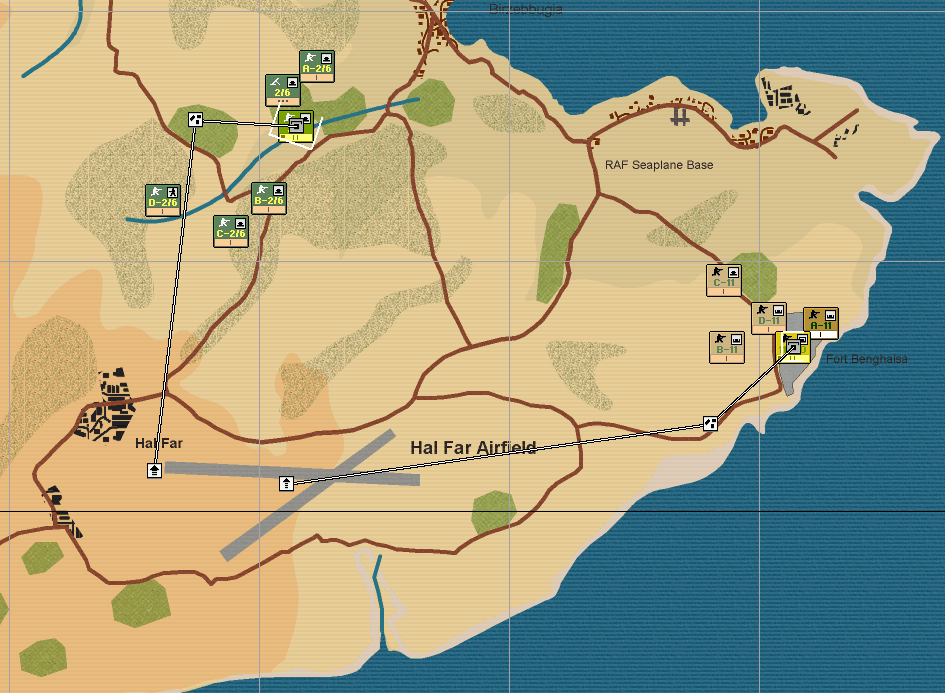
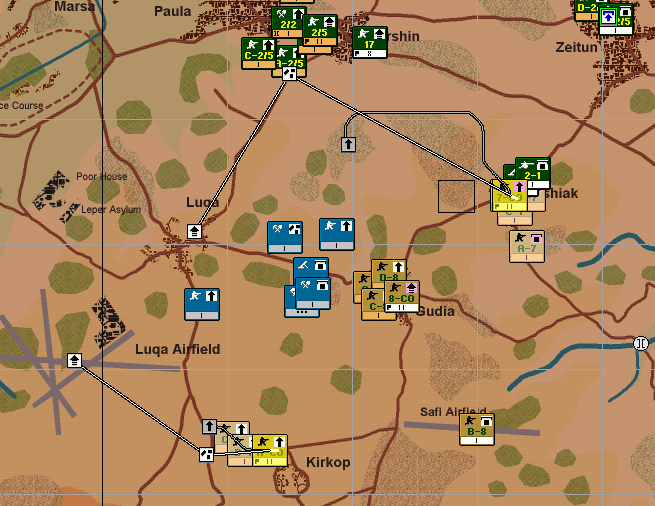
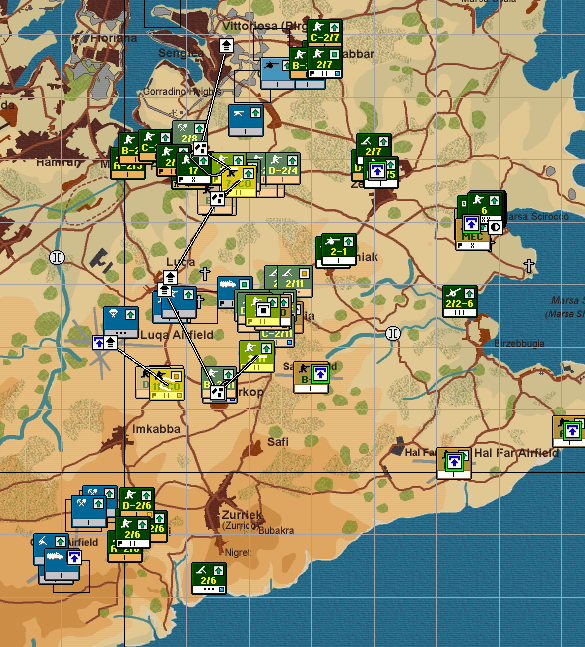
Note for scale: one grid is 1km x 1km

Our main objective is to capture Valletta, the capital city of Malta. Other major objectives are to keep the landing bay secured and occupying the city of Birgu (aka Vittoriosa) for its navy base. The Luqa Airfield and the town of Sliema will also be rather important for the operation to be considered successful, and there are several secondary airfields that I should try to capture if at all possible (Safi, Qrendi, Hal Far and Ta Kali).

The target times are as these:
Day 1, 07:20 - Marsa Scirocco (the landing bay)
Day 2, 06:50 - Luqa, Safi and Qrendi airfields
Day 2, 12:00 - Vittoriosa
Day 4, 06:00 - Ta Kali airfield
Day 4, 12:00 - Valletta

For a perfect success, I should capture all objectives before their target time and hold them till the operation ends in Day 6 at 16:00, but I can afford some slippage from the schedule and still end up victorious. The amount of casualties on both sides will also somewhat affect whether the scenario is won or lost.

The forces I have are trained for night operations, so I should try to push hard during the night and rest/hide during the day to avoid air strikes and artillery. Taking territory from entrenched troops is generally very difficult, especially since I have just infantry without any artillery or armor support (not even mortars) to begin with. I need to push hard and aggressively with the initial squads, and then let them rest when the reinforcements land.
shang
Posts: 33
Joined: Wed Aug 06, 2008 7:12 pm

RE: Ray of Hope (Allies)

Post by shang »

Day 1, 04:00The first commando squads have landed in the cover of darkness and we have 3 hours until sun rise. I order the squads to form up and assault the spotted artillery positions and infantry. Note that the enemy information we have is based on preliminary intelligence and has not yet been visually confirmed by the commandos. However, there's not much else we can do at the moment.

Image

The white boxes denote unit facing and approximate footprint. The assault commands have a line drawn from the assault leader to the form up point (FUP) and from there to the assault target.Usually it's very risky to form up so close to enemy position, but I'm counting on the cover of darkness as well as the small size of the units, which makes the form up phase a lot shorter. The alternative option would have been to simply give the units a defend order. That way they would have attacked any enemy units on the defended area immediately without requiring a form-up phase, but an organized assault is a lot more efficient. I must admit I'm not yet familiar enough with the underlying mechanics to know which would have been the better order to give when we start so near the enemy troops. I guess we could also fall back inland a bit, organize in relative safety and then assault, but a) that would take significantly more time (which we don't have) and b) we don't know the exact enemy positions inland, so we might end up running into enemies anyway.
---
ImageThe

A-8 squadron immediately comes under heavy fire from the entrenched artillery and is suppressed. The blue line connects the selected squad and its current commanding officer and the gray line plots the planned route the unit is going to take. The red square at the bottom right corner of the unit means that the unit has just taken casualties (in the left panel, the darker areas in Personnel and Equipment have been lost to enemy fire). The icons in the upper right corner can be toggled to show various information about units. They currently show their cover status. The selected unit is "Taking Cover", the rest of the friendly units are "Deployed" and the enemy is "Entrenched".
---
Image

In this image, the unit info has been toggled to show "Rout Status". The green up arrow means everything is going OK, green square means the unit is temporarily halted and the orange arrow down means the unit is retreating to safety because of enemy fire. The blue square at the bottom right corner of D-8 and B-8 mean the units are currently firing at enemies.As we can see, C-8 and D-8 have forced the enemy artillery (I-M) to shift position. This alone is very good in this situation, because that means the unit will lose all the entrenchment benefits it had.
shang
Posts: 33
Joined: Wed Aug 06, 2008 7:12 pm

RE: Ray of Hope (Allies)

Post by shang »

Image

It's 05:03 and everything is going reasonably good so far. The 11-CO is securing the RAF Seaplane Base in the south (a very minor victory objective, which will help us a bit if we can hold it until Day 1, 12:00). The red arrows and squares over enemy units mean they are routing, so the beach should be ours soon.
---

Image

05:22. Both the coastal artillery batteries surrendered, and the troops have been set on a probing assault mission on the Marsa Scirocco harbor. A probing mission is basically almost the same as an assault, but the units will be a bit more careful, and are allowed to fall back to their original position if meeting too much resistance. The troops on the middle have been given a withdraw order so we can regroup them and move them closer to the harbor in order to help secure the surrounding area. There's currently a 30 minute order delay for the troops fighting the two remaining artillery units, so they will actually keep fighting for another half an hour before getting and executing the withdrawal command.

A 700 man strong infantry battalion consisting 6 units of lands west of Fort St. Lucian at 07:16 and brings with them a much awaited mortar platoon. This should be plenty of force to lock down the Marsa Scirocco harbor and its surroundings. The initial commando squads did a very good job. We've suffered hardly any casualties so far, morale is high and the units are hardly fatigued at all yet.

Image

I combine all the forces in the north to a single combat group, and order them to take "All Round" defensive positions at Marsa Scirocco. Note that the units with a darker bottom bar work under the command of another unit, and units with a lighter/white bottom bar command other units or work independently. Here I've left two independent units to secure the coastal forts while the rest work under the HQ unit (the one marked with an "x" at the bottom border of the defensive perimeter). Meanwhile the units south at the RAF Seaplane Base prepare to secure Fort Benghaisa, so we can use that position to assault the Hal Far Airfield later on. I've set the mortar platoon as an independent unit too, so I can manually position it.

BTW the black rectangle outlines in the images (like the ones at Fort Benghaisa) mark recent enemy sightings that are not currently visible (and therefore not necessarily up-to-date).
---

Image

08:32. Here's another unit info view. This time the info box is showing the current task the unit is performing. The arrow icon is a movement task and the box-with-a-roof is a defense icon. The pink background means the unit is making plans or processing orders it is receiving from a commanding unit.

shang
Posts: 33
Joined: Wed Aug 06, 2008 7:12 pm

RE: Ray of Hope (Allies)

Post by shang »

09:06. Here's a wider overview of the current situation.

Image

The defenders of Fort Benghaisa surrendered, and the 11-CO is preparing a defensive position there. Rest of the initial commando team will stay and defend the Marsa Scirocco area, while the reinforcement battalion will head out to secure the town of Zeitun. We'll fortify Zeitun and wait for further reinforcements. The plan is to wait until nightfall, and then assault Tarshin/Paula and Zabbar, and use these towns as launching points for a pincer attack on Vittoriosa.
---

The 17th Australian Infantry Brigade HQ lands next, bringing a total of 1226 troops including combat engineers and a machine gun company. They'll form-up and assist in the assault to Zeitun and then fortify the northern part of the town.

11:11. The lone enemy infantry unit that attempted to retake Fort St. Lucian hasn't been much of a thread in itself and has taken heavy casualties, but unfortunately he's working as a spotter for enemy mortars which are now pounding the Marsa Scirocco defenders. Fortunately the unit surrenders at 11:14, and the mortars go silent for now.

Meanwhile the 2nd/7th Inf Bn has taken Zeitun without any resistance and the whole town seems deserted. All in all, the enemy presence so far has been much less than what was expected. I can't help but think they are amassing for a counter-attack somewhere out of our sight radius. But no worries for now, as the 2nd/6th Infantry Battalion HQ arrives with 688 fresh troops. They will take position north of the Hal Far Airfield and work as the main assault force on all the airfields when the time comes.
---

Image

13:59. The east end of the island is well secured and we also have long range artillery in place (2/2-6). Zeitun has 15 units with 1880 troops, so we're well in our way to taking Birgu. In southeast, 2/6 and 11-CO are in position to begin assaulting the Hal Far Airfield. I was going to wait until the night to begin assaulting the airfields, but I was so much time left and so many fresh troops, that I think I'll secure at least Hal Far during the day (especially since I'm not seeing any enemies there either). I'm also thinking of leaving only a token defense at Marsa Sirocco and repositioning 7-CO and 8-CO to Ashiak and Gudia to watch the roads, but that at least should wait until it's dark.
shang
Posts: 33
Joined: Wed Aug 06, 2008 7:12 pm

RE: Ray of Hope (Allies)

Post by shang »

Image

The Hal Far operation will use CO-11 as a distraction. They will charge forward as quickly as they can, but with low aggressiveness settings, so they will only skirmish any enemies they encounter, and fall back if things look bad. Meanwhile, 2/6 will take a little longer to form up and move more carefully towards Hal Far from the south. If there are any hidden defenders, 2/6 should be able to flank them very effectively.
---

Image

15:14. More good fortune, as I just spotted the enemy mortar team that was shelling my troops earlier. Some mortar and artillery fire should force them to abandon their position in Ashiak. I also got a supply base now (the MEC unit with the three bars icon), which I'm positioning to the Marsa Scirocco harbor. It will send out supply trucks to the 7-CO, 8-CO and 11-CO to replenish their ammunition and food supplies.
---
Image

Hal Far Airfield seems eerily empty, just like Zeitun, but A-2/6 is taking casualties from mortar fire coming from the hills somewhere near Safi or Zurriek. I might have to push the assault all the way to Zurriek so that I won't be a sitting duck downhill from the enemy.
shang
Posts: 33
Joined: Wed Aug 06, 2008 7:12 pm

RE: Ray of Hope (Allies)

Post by shang »

Image

16:32. Waiting for the nightfall is for cowards! I spot some more enemy movement near Ashiak, and decide it's better to advance right away, before they have the time to dig in around Ashiak. The hills also block my LOS so I can't plan my advance inland before I take that higher ground. So, it's time for CO-8 and CO-7 to form up and move out.

I also order 2/6 to prepare for an assault towards Zurriek. I'm hoping the ridge will offer some cover for the troops to form up.
---
18:11. I had forgotten that it's December. That means it's already getting dark, which is perfect for my commando units that are advancing to Ashiak.

19:11. The commando units have taken Ashiak without much resistance (once again). The enemy fired a few shots and then fell back. I really have no clue what the opposing commander is doing. The AI in CotA is quite proficient, so I'm sure it's up to something bad with all this avoidance. Of course, I don't know what the enemy objectives are. Maybe they've got everything depending on keeping the capital, and the vast forces are fortifying Valletta while I carefully creep forward.

The 2/5 start preparing for an advance towards Tarshin. They will scout ahead a bit, so I'm better prepared when the time comes to start a major offensive against Birgu.

Image
shang
Posts: 33
Joined: Wed Aug 06, 2008 7:12 pm

RE: Ray of Hope (Allies)

Post by shang »

Here's something that I really like about CotA

Image

The battle group in the screen shot has been given an assault order to Zurriek. For this you just lasso all the unit you wish to include in the attack, click Attack and choose a form-up point and a target. The unit with the highest rank automatically becomes the commander for that battle group, and will position the other units under his command as he sees fit. In this image for example, B-2/6, C-11 and D-11 lead the attack, D-2/6 and A-2/6 cover the flanks, and the mortar stays behind to offer fire support.

If you want, you split the attack into smaller parts and manually order them around, but the AI commanders usually do a good job. Order delay is also a factor. If you give any new commands to the units participating in the attack, you need to transmit the commands to the units which then need to process the commands plan their actions accordingly. When the assault proceeds under the AI commander, he can react to changing situations much more quickly. For example, if the assaulting force is flanked from the right, the AI commander can reposition his units accordingly with little delay.
shang
Posts: 33
Joined: Wed Aug 06, 2008 7:12 pm

RE: Ray of Hope (Allies)

Post by shang »

21:20. Oh hell. The enemy has armor in Ashiak. The commandos, while well equipped against infantry, do not have any anti-tank weapons. As a panic response, I quickly order the AT-battery (2-1) from Zeitun to assist the commandos. The 8-CO is going to circle around the tank and secure Gudia. In worst case, I'll have to pull some of my forces back to defend the field artillery and supply bases back at the beach.

Image
---
23:56. Bringing in the AT guns made the armor retreat and the commandos quickly routed the rest of the enemies assisted by heavy artillery barrage.

Safi Airfield seemed empty, so I detached B-8 in order to secure it. The rest of 8-CO managed to avoid the tank and are taking Gudia as planned.

Image
shang
Posts: 33
Joined: Wed Aug 06, 2008 7:12 pm

RE: Ray of Hope (Allies)

Post by shang »

Day 2, 00:27. The southern team has reached Zurriek, again, without resistance. The mortars will take position at the hilltop in Bubakra, 2/6 will fortify Zurriek and CO-11 will advance to Kirkop while we still have the advantage of darkness. From Kirkop, the CO-11 will be able to assist B-8 or advance to Luqa Airfield.

Image
---
Day 2, 00:59. The enemy is finally mustering at least some resemblance of defense. The commandos at Ashiak and Gudia are engaged with a few infantry companies. Neither side is taking losses at the moment, maybe because it's too dark to aim, so they are just slowing the commandos' advance. In order to help the commandos push forward a bit more efficiently, I've detached the 2/5 mortar platoon from Zeitun and will reposition them to Ashiak.

Image
shang
Posts: 33
Joined: Wed Aug 06, 2008 7:12 pm

RE: Ray of Hope (Allies)

Post by shang »

03:02. I'm expanding my front to all directions to take maximum advantage of the night's cover. In the south, my troops press on towards the Qrendi Airfield and on the north, I prepare to secure Zabbar. 8-CO and 7-CO are pushing the enemy back, and might manage to press on all the way to Luqa. I'm a bit worried that I'm spreading myself too thin, but I should be getting more reinforcements in 3-4 hours, so I'm willing to take some risks at this point. The commandos in the middle are a good response group that can move north or south to assist should any company end up in trouble.

Image
---
05:16. 2/7 has met some resistance in Zabbar and an enemy HMG squad forced one of companies to retreat. I think I have a larger force however, and will be able to take positions within the town before daybreak.

2/5 hasn't met any enemies on the road and will take Paula within an hour, while the commandos will push their luck and try to take Luqa and its Airfield.

2/6 in the south has moved from Zurriek to Qrendi, but the troops are getting so tired, that they are going to take defensive positions within the town of Qrendi instead of pushing all the way to the Qrendi Airfield.

Image
shang
Posts: 33
Joined: Wed Aug 06, 2008 7:12 pm

RE: Ray of Hope (Allies)

Post by shang »

6:01. It's getting lighter, so I can finally see what the commandos are up against.

Image

This calls for slight changes in my plans, so order 8-CO to stop and stay in Gudia, where they can effectively defend from the cover of the buildings. I also shift the form up point for 7-CO closer to the friendly troops near Paula, so they won't get attacked in the middle of preparations. They can hopefully advance to Luqa, and then I can squeeze the enemy forces between 7-CO and 8-CO.
---
6:02. 6th Infantry Division HQ arrives with a total of 28 new units (5117 personnel)! This is way more than I expected., and now we can start talking about a real invasion force. The majority of the new arrivals are part of the 19th Australian Infantry Brigade, which consists of three battalions, each of which have four infantry companies and a mortar platoon.

Image

These new units will be enough to secure the lines from Paula to Luqa to Qrendi, allowing the rest of my force to concentrate on Birgu.
shang
Posts: 33
Joined: Wed Aug 06, 2008 7:12 pm

RE: Ray of Hope (Allies)

Post by shang »

08:29. There's a lot happening at once at the moment. 11-CO is advancing towards the Luqa Airfield, but under heavy fire. 2/7 is preparing defensive positions inside Zabbar, because they are taking too much fire to advance to Birgu. 2/11 and 7-CO will take Luqa, while receiving covering fire from 8-CO and 2/8 who are in position in Gudia. 2/6 is meeting large enemy forces in the south, but their defensive position should be good enough to hold them back for now.

Image
---
09:34. A closer look at Luqa.

Image

7-CO and 11-CO are both getting shelled with mortars, but making some progress nevertheless. 2/11 is forming up, and once they get moving, Luqa should be ours in a flash.

Meanwhile around Birgu:

Image

2/4 is starting its assault on Birgu, so I've set 2/7 to prepare a quick feint to the flank.
shang
Posts: 33
Joined: Wed Aug 06, 2008 7:12 pm

RE: Ray of Hope (Allies)

Post by shang »

10:18. 7-CO is taking such heavy casualties from the enemy mortars and artillery, that I give them the order to withdraw for now. There are enough troops heading for Luqa even without them.

10:34. Counter-attack incoming. The enemy has mobilized a sizable force that's heading towards us along the road. If only my field artillery wasn't out of ammo, I could inflict decent damage on the transport column..

Image
---
11:11. Back south at Qrendi, the 2/6 didn't have enough firepower to attempt storming the airfield, but they were dug in well enough that they kept the enemy from our flanks and didn't suffer any casualties. Now it seems most of the enemy forces are abandoning their position at the airfield (as you can see from the enemy unit facings). I suspect they are pulling them north and try to stop the assault on Luqa. If that's the case, they won't make it in time.

Image

Around Luqa, 11-CO has reached the airfield, but they are wounded and tired and there's too much enemy presence nearby to allow them to secure the airfield for our use. The assault from 2/11 and 2/8 will soon tip the scales, however.

Image
shang
Posts: 33
Joined: Wed Aug 06, 2008 7:12 pm

RE: Ray of Hope (Allies)

Post by shang »

11:28. The assault on Birga is advancing slowly. The enemy artillery is doing a bang up job suppressing the 2/4, so they have hardly moved from Paula yet. Speaking of Paula, the town will be under heavy attack soon, so I'm bringing in the AT-guns and some additional troops from the landing area.

Image
---
11:38. Since the enemy is so nice that he's apparently drawing everyone out of the Qrendi Airport, the 2/6 makes preparations to capture the airfield for the Allies. Sorry guys, you can rest later. The enemy column that's leaving Qrendi seems to be heading to either Luqa or maybe joining the huge offensive force gathering outside Paula.

Image

Here's an overview picture from around Paula. Things are going to get really rough here, as the defenders in Paula haven't had the time to dig in properly. 2/11 and 2/8 are in a good position to assist the Paula defenders, but they are also making very slow progress towards Luqa. The enemy seems to have a lot of artillery support, and they are also being supported by German bombers, so most of my assaulting units are suppressed and constantly halting to seek cover.

Image
---
13:47. The 2/4 troops who were supposed to lead the attack on Birgu are still suppressed in Paula after several hours after the operation begun. Meanwhile, the 2/7 units that were supposed to be the flank diversion have actually made a very good assault from Zabbar and are at the gates of Birgu. I'm hoping that 2/7 will be able to use the fortifications around Birgu to dig in and hold their ground until 2/4 can finally storm the city.

Image

Further south, 2/6 has taken the Qrendi Airfield and is proceeding to Sijuwi, as that will be safer place to rest compared to the wide open airfield. After they have recuperated, they are in a good position to harass the enemy forces attacking Luqa and Paula.

All of the original commando units are still in action. 11-CO has taken defensive positions inside a bunch of industrial buildings near the Luqa Airfield, 7-CO is resting and regrouping in Ashiak and 8-CO is on its way from Gudia to Imkabba. From there, they will be able to better assist in securing the Luqa Airfield.

I'm also bringing in my supply bases from the harbor to the airfields. The supply bases are not just a bunch of trucks, but have their own armed guards and thus can act as a defensive force in securing the Safi and Hal Far airfields. This lets me relieve the combat troops that were left behind to defend the airfields and let them rejoin their original groups, giving me some additional firepower on the frontlines.

Image
shang
Posts: 33
Joined: Wed Aug 06, 2008 7:12 pm

RE: Ray of Hope (Allies)

Post by shang »

16:29. The enemy forces are trying to surround Paula, but the defenders are doing a good job so far. I'm not too worried, as we have a lot of soldiers there now, and 2/8 has just started an assault on the attackers' flank. 2/4 is finally making progress towards Birgu, and we should be able to secure the city in 2-3 hours. Luqa Airfield is also officially ours now, with the combined forces of 11-CO and 2/11 keeping it secure.

Image

Just as a precaution, 8-CO is doing a flank attack on the enemy units moving towards Luqa so that 2/11 get more time to get in position. 2/6 is nearing Sijuwi and will soon get some well deserved R&R time in the cover of the buildings.


Image

We also got a new batch of reinforcements. 2/6th Australian Cavalry Reqt. brings with it Vickers Mk VI light tanks and Daimler Dingo armored scout cars. The light vehicles are an excellent addition to our current situation, since we haven't encountered many enemy tanks yet. The light tanks can move at decent speed and they are brutally efficient against enemy infantry squads that don't have AT support.
---
17:24. I spot an enemy supply base near Curmi. Taking that out would disrupt the supply lines that the enemy is using to attack Paula, so I order the CO-7 commandos to move out. The sun is starting to set, so it should be completely dark when they are in position to begin assaulting the base. The light tanks and armored cars are heading north so that we could take Birgu sooner. After that, they will be positioned in Luqa, from where they can perform attacks along the road towards Curmi and Hamrun.

Image
shang
Posts: 33
Joined: Wed Aug 06, 2008 7:12 pm

RE: Ray of Hope (Allies)

Post by shang »

20:05. The enemy has managed to sneak a small group past my main force and is threatening Zeitun. The two base units in Zeitun have moderate firepower, but they are not really combat troops, so I'm pulling a couple of squads from Paula to intercept. It will take a good while for them to get there, however. 7-CO is moving at good pace, and they should be able to attack the enemy supply lines around midnight.

Image
---
Day 3, 04:04. The enemies approaching Zeitun didn't get anywhere as the fire from the supply bases was enough to make them retreat. My own supply raiding doesn't go much better, because by the time CO-7 reaches Curmi, the enemy supply base has apparently relocated.

Image

The battle in Birgu stretches on and on. Our forces are making progress, but very very slowly. Casualty counts are rising high on both sides and both keep reinforcing the battle with additional troops. I have more troops in the city and in the surrounding area, so I will win eventually, but taking this city will end up being very costly, and might seriously hamper our advance to the capital city of Valletta.

Image
shang
Posts: 33
Joined: Wed Aug 06, 2008 7:12 pm

RE: Ray of Hope (Allies)

Post by shang »

Day 3, 06:27. Sun rises on the third day of the operation and more Allied reinforcements land on Malta. The 16th Australian Infantry Brigade HQ brings 24 new units with a total of 3825 personnel. I'll send one battalion to Birgu, and the rest will station between Curmi and Paula as an additional defense force and to prepare on the assault on Valletta.

Image
shang
Posts: 33
Joined: Wed Aug 06, 2008 7:12 pm

RE: Ray of Hope (Allies)

Post by shang »

Day 3, 11:48. Birgu has been liberated, and the Allied forces are mopping up the surviving enemy units. Here's an overview map from both the north and south.

Image

Defenders in Paula did an admirable job, and the town was never in any danger. I've been slowly pushing the defensive lines forward, so our perimeter now encompasses the small town of Marsa west from Paula. 7-CO is holding Curmi, covering our main forces from flankers and 11-CO is hunting the stragglers around Luqa. The 16th is on its way to Hamrun and just passing the village of Gudia.

Image

Things are rather quiet down south. 2/6 is resting in Sijuwi and 8-CO has secured Zebbugi. Their current task is simply to keep watch, so we won't get surprised from that direction.
shang
Posts: 33
Joined: Wed Aug 06, 2008 7:12 pm

RE: Ray of Hope (Allies)

Post by shang »

17:30. There hasn't been much to report during this day. Fighting continues in Birgu, but the city is firmly in our hands. The battle lines for the major assault are forming south from Valletta and a heavy armor brigade lands just in time to participate. 1st UK Armor Brigade has a total of 175 armored vehicles plus AA guns, AT guns and field artillery and they will be the main muscle when pushing into Valletta, with infantry support from the 16th.

Image
shang
Posts: 33
Joined: Wed Aug 06, 2008 7:12 pm

RE: Ray of Hope (Allies)

Post by shang »

18:23. The forces occupying Birgu are still being rather heavily shelled, but all of them are so tired that they are practically falling in asleep in the middle of mortar fire. A major mobilization operation will see 2/2, 2/3 and a few companies from 2/1 move into the urban parts of Hamrun, while the 1st UK Armor Brigade that doesn't work as efficiently inside the town will form up in Curmi and secure the fields east and northeast of Hamrun. At this point, I have such an overwhelming majority of force that I won't bother to micromanage the troops all that much. After Hamrun has been taken, I'll separate the brigades into smaller combat troops and give more detailed orders.

I've also reattached 2/11 to its original HQ (19th Australian Infantry Brigade) and the 19th will also move closer to Hamrun. 11-CO will replace 2/11 in guarding the Luqa Airfield.

Image


Meanwhile, 8-CO is fully rested in Zebbuj and hasn't spotted any enemy activity in a long time, so I set them to move towards Ta Kali Airfield. It's going to be fully dark before they receive the orders and move out, which should favor the commando troops.

Image
Post Reply

Return to “After Action Reports”