

Battlefront Designer Notes Part 1
This is the first in a series of designer notes about the new Battlefront game. It gives an overview of the changes and new features in the Battlefront engine. Future articles will explore these changes in detail and will also include info about the four exciting battles that make up the Battlefront game.
Battlefront - Designer Notes
Now that our new Battlefront game has been announced, it's time to let you know something about it. Let's start by answering a few questions. One question, is Battlefront a new game? Well, if it wasn't a new game, it would have been out a long, long time ago! In addition to the ton of new features in the game, Battlefront embodies some important philosophical changes in how we simulate warfare. We'll go through them all, so you'll have a good idea of what to expect when Battlefront is released.
Game Overview
Battlefront will ship with four complete battles: Saipan, Market Garden, Gazala and Novorossik. These battles, which take place in wildly different environments illustrate the inherent flexibility of the Battlefront system. The ground scale is 1 km per hex and there are 2 turns per day. Most combat units are battalions, with some more specialized units being companies. At this scale there are literally hundreds of battles that can be simulated, and this, along with the fact that all major WWII combatants are represented in the first game will help the scenario making community whose free scenarios do so much to help create and extend interest in our games.
There are a number of issues that we wanted to address in making this new game. One was to give more emphasis to issues of command and control. It’s easy, from the godlike perspective that games to give, to overlook just how important hierarchies and procedures are to all armies, although the incessant saluting and continual references to orders are a bit of a giveaway. We also wanted to recreate a more realistic tempo for the battles. Although Spike Milligan famously offered ‘to fight nights as well’ to make up for his late arrival after being conscripted, no formation could fight all day, every day, for extended periods of time, and new structures in the game will make this obvious.
We’ve also introduced structures to increase the decision making options available to players and decrease the certainty with which you can contemplate your opponent’s options. This, coupled with a significantly improved AI system will guarantee a great game no matter who you play.
There are now three deliciously different ways to deal damage to your opponents: Close Combat, Direct Fire and Indirect Fire. Close Combat involves an attack by units adjacent to an enemy unit. Direct Fire is an attack by armored units against other armored units or suitable targets, from a distance of one hex. Indirect Fire is a ranged attack by artillery, naval or air units, any of which can cause losses to enemy units.
An important innovation with Battlefront is the introduction of the Off Map Areas, or OMAs. Each side can have up to twelve of these special holding areas, which are connected to map hexes and/or other holding areas. The scenario creator can designate units to arrive in an OMA, from which the player can choose whether to move those units to up to three on-map hexes, or another OMA. This creates more control for the player and less certainty for their opponent. For example, in Saipan, the US player must make his initial invasion on the historical beaches, but all units after that arrive in the OMAs, and from there the US player can land them at three separate locations, including some on the other side of the island from the initial landings. This means that the Japanese player can never be sure of which beaches he has to defend, and must dispose his forces accordingly. Sooner or later, a Japanese player who doesn’t maintain a reserve will come spectacularly unstuck.
Combat has some important changes from the Decisive Battles system, and will be treated in more detail in later articles. Retreat is decided by a separate dice roll from casualties instead of being part of a single combat result. A unit which has taken casualties from artillery fire is more likely to retreat. Units flushed out of their entrenchments and retreating to unprepared positions are very vulnerable to artillery fire. On the other hand, advancing into an enemy controlled hex that has just been vacated makes you equally vulnerable, so each side has opportunities in attack and counter attack.
Headquarters now appear on the map as real units. HQs provide major combat bonuses, and supply for attacks, so the long suffering staff wallahs will now feel appreciated. Any unit not in command range will suffer a noticeable loss in combat efficiency. Even if a unit is in command range, there’s no guarantee that it will be able to attack. The supply system has been changed so as to recreate a more realistic tempo for battles. Supply units provide defensive supply, but only HQs can hand out attack supply. For some units, an attack will use more supply in a turn than their HQ can resupply, meaning that these units simply cannot attack every turn. It’s most likely that artillery units will be restricted in this fashion, making it imperative that players build up supplies and conduct planned offensives if they wish to avoid operations grinding to a premature halt.
Our next article will give a quick overview of the Market Garden scenario, as seen from the Allied viewpoint.
By Gregor Whiley
Battlefront Designer Notes Part 1 thur 7
Moderators: Gregor_SSG, alexs
-
David Heath

- Posts: 2529
- Joined: Wed Mar 29, 2000 5:00 pm
-
David Heath
- Posts: 2529
- Joined: Wed Mar 29, 2000 5:00 pm
RE: Battlefront Designer Notes Part 1
Battlefront Designer Notes Part 2
This article gives a quick overview of the herculean tasks facing the Allied player on Turn 1 of the Market Garden Scenario.
Scenario: Market Garden
Here at SSG we take great pride in recreating history, but with the Market Garden scenario we can go one vital step further, and recreate some history that never happened. Here’s how you do it. Open the Market Garden scenario for the very first time as the Allied player. Look at the map, look at your available forces and look at the map again noting the single road along which you must attack, and its seemingly innumerable bridges and choke points. At this point the bleeding obvious will leap out of the screen and grab you by the throat, forcing you to the inescapable conclusion that Market Garden is an awful plan.
This is the bit of history that was missing, at least amongst those with enough authority to call the whole show off. You’re not one of those people, and orders are orders, so you’ll just have to do your best. Here’s what you have to do, but let’s start with the easy bit.
XXX Corps Turn 1
The task for XXX Corps on the first turn is to get to Valkenswaard. Its easy to do, as you have lots of men and overwhelming combat power. Even on this first day, you’ll have to start thinking about flank security. There are German formations on both flanks that need to be rolled up or chased away, but you shouldn’t be using your main strike formations for this job.
Click here to view image
101st Airborne Turn 1
This is where it starts to get interesting, or if you prefer honesty, difficult. The 101st must first secure the bridge over the Wilhemina canal at Zon. In our example the boys have done this, but the cowardly Germans have blown up the bridge just as they got there. In Battlefront, while most units can still blow bridges, bridges can also be designated to have a chance to blow up on the first approach of enemy units. This represents acts of initiative by small local garrisons. Unfortunately for the Allies, there are lots of bridges and a fair amount of initiative, so the XXX Corps Bridging units will never be short of work.
Click here to view image
Of course, it doesn’t stop there. As well as the Zon crossing, there are two other bridges over the Wilhelmina Canal, southwest of Best. The defenders of St Odenrode, further up the main road, must be ejected and bridges further north near Veghel secured. Too far north to be shown on this screen are the towns of Uden and Zeeland which, if occupied by German units, could block the road. The 101st must also defend the road from German attacks, initially from the west but potentially from the east as well, protect its own drop zone and HQ and be ready to help with attacks on Eindhoven to the south if the Germans defend it strongly against XXX Corps.
82nd Airborne Turn 1
The task of the 82nd Airborne is at least as difficult as that of the 101st. The paras must deal with the outer strongpoints and at least lay siege to the bridge defences in Nijmegen. If this doesn’t happen then XXX Corps will have an almost impossible job when it does arrive. The airborne also have to secure important bridges over the Maas like that at Grave and defend their drop zone on the Groesbeek Heights. They can do all these things, with relative ease, so long as they are prepared to conceded all the ground south of the Maas to the Germans. Since this is a bad idea, they, like the 101st will be forced to stretch themselves very thin indeed to try to accomplish all of their objectives.
Click here to view image
1st Airborne Turn 1
Well, everybody knows that it’s the job of 1st Airborne to secure the river crossings at Arnhem and Heavedorp. You will find that, just as happened historically, that Frost’s battalion can reach the Arnhem bridge, but that the rest of the division, dropped too far away, has no chance. The best that they can do is attempt to create a perimeter and make ready to deal with the inevitable counter-attacks. In this sense, the first turn is the easiest for 1st Airborne, but it gets harder and harder with every passing hour. German forces attacking from the west are not strong, and may sometimes be vulnerable to counter-attacks, but the Germans attacking from the east are much tougher to deal with.
Click here to view image
The only saving grace is that the Germans also have some hard decisions to make. For as long as Frost holds the bridge, the Germans can only use ferries at Huisson and Pannerden to get their units across the river to reinforce Nijmegen. This is a slow and tedious procedure. If they elect not to do it, and to make a maximum effort against 1st Airborne, then it will be easier for XXX Corps and 82nd Airborne to take Nijmegen. If they reinforce Nijmegen then they have less force to apply against 1st Airborne.
So its time to hang on grimly for 1st Airborne. Only XXX Corps, and possibly the gallant Poles, represent salvation in any form.
Our next article will examine the HQ units and their vital role in your battleplans.
[/align] [/align][/align]
This article gives a quick overview of the herculean tasks facing the Allied player on Turn 1 of the Market Garden Scenario.
Scenario: Market Garden
Here at SSG we take great pride in recreating history, but with the Market Garden scenario we can go one vital step further, and recreate some history that never happened. Here’s how you do it. Open the Market Garden scenario for the very first time as the Allied player. Look at the map, look at your available forces and look at the map again noting the single road along which you must attack, and its seemingly innumerable bridges and choke points. At this point the bleeding obvious will leap out of the screen and grab you by the throat, forcing you to the inescapable conclusion that Market Garden is an awful plan.
This is the bit of history that was missing, at least amongst those with enough authority to call the whole show off. You’re not one of those people, and orders are orders, so you’ll just have to do your best. Here’s what you have to do, but let’s start with the easy bit.
XXX Corps Turn 1
The task for XXX Corps on the first turn is to get to Valkenswaard. Its easy to do, as you have lots of men and overwhelming combat power. Even on this first day, you’ll have to start thinking about flank security. There are German formations on both flanks that need to be rolled up or chased away, but you shouldn’t be using your main strike formations for this job.
Click here to view image
101st Airborne Turn 1
This is where it starts to get interesting, or if you prefer honesty, difficult. The 101st must first secure the bridge over the Wilhemina canal at Zon. In our example the boys have done this, but the cowardly Germans have blown up the bridge just as they got there. In Battlefront, while most units can still blow bridges, bridges can also be designated to have a chance to blow up on the first approach of enemy units. This represents acts of initiative by small local garrisons. Unfortunately for the Allies, there are lots of bridges and a fair amount of initiative, so the XXX Corps Bridging units will never be short of work.
Click here to view image
Of course, it doesn’t stop there. As well as the Zon crossing, there are two other bridges over the Wilhelmina Canal, southwest of Best. The defenders of St Odenrode, further up the main road, must be ejected and bridges further north near Veghel secured. Too far north to be shown on this screen are the towns of Uden and Zeeland which, if occupied by German units, could block the road. The 101st must also defend the road from German attacks, initially from the west but potentially from the east as well, protect its own drop zone and HQ and be ready to help with attacks on Eindhoven to the south if the Germans defend it strongly against XXX Corps.
82nd Airborne Turn 1
The task of the 82nd Airborne is at least as difficult as that of the 101st. The paras must deal with the outer strongpoints and at least lay siege to the bridge defences in Nijmegen. If this doesn’t happen then XXX Corps will have an almost impossible job when it does arrive. The airborne also have to secure important bridges over the Maas like that at Grave and defend their drop zone on the Groesbeek Heights. They can do all these things, with relative ease, so long as they are prepared to conceded all the ground south of the Maas to the Germans. Since this is a bad idea, they, like the 101st will be forced to stretch themselves very thin indeed to try to accomplish all of their objectives.
Click here to view image
1st Airborne Turn 1
Well, everybody knows that it’s the job of 1st Airborne to secure the river crossings at Arnhem and Heavedorp. You will find that, just as happened historically, that Frost’s battalion can reach the Arnhem bridge, but that the rest of the division, dropped too far away, has no chance. The best that they can do is attempt to create a perimeter and make ready to deal with the inevitable counter-attacks. In this sense, the first turn is the easiest for 1st Airborne, but it gets harder and harder with every passing hour. German forces attacking from the west are not strong, and may sometimes be vulnerable to counter-attacks, but the Germans attacking from the east are much tougher to deal with.
Click here to view image
The only saving grace is that the Germans also have some hard decisions to make. For as long as Frost holds the bridge, the Germans can only use ferries at Huisson and Pannerden to get their units across the river to reinforce Nijmegen. This is a slow and tedious procedure. If they elect not to do it, and to make a maximum effort against 1st Airborne, then it will be easier for XXX Corps and 82nd Airborne to take Nijmegen. If they reinforce Nijmegen then they have less force to apply against 1st Airborne.
So its time to hang on grimly for 1st Airborne. Only XXX Corps, and possibly the gallant Poles, represent salvation in any form.
Our next article will examine the HQ units and their vital role in your battleplans.
[/align] [/align][/align]

RE: Battlefront Designer Notes Part 1
David,
These screenshots really look awesome. How big can the maps be?
These screenshots really look awesome. How big can the maps be?
JUST SAY NO... To Hideous Graphics.
-
Rob Gjessing

- Posts: 525
- Joined: Mon Jan 27, 2003 5:09 am
- Location: Sydney Australia
- Contact:
RE: Battlefront Designer Notes Part 1
250 hexes by 250 hexes.. so if you wanted to created a scenario at the same scale (1km per hex), then you could design a scenario with a map that is 250 Kms by 250kms.. thats one heck of a map 
Isn't that bizarre?
-
David Heath
- Posts: 2529
- Joined: Wed Mar 29, 2000 5:00 pm
RE: Battlefront Designer Notes Part 1, 2 & 3
Battlefront Designer Notes Part 3
A first look at the new HQ units and the vital role they play in Battlefront.
Headquarters
So, the staff wallahs, the paper shufflers, the brass hats, what are they really good for? Well, maybe nothing, apart from planning battles and reporting same, collecting and sending intelligence, organising the myriad of logistical tasks necessary to keep combat units supplied and accounting for them all and arranging everying else from mail delivery to dentistry. Regardless, we at SSG can make a solemn pledge. Even though there are now plenty of HQ units in the game, you will never have to fill in a single form, and can blithely assume that it’s someone else’s job to look after their teeth.
So, in Battlefront terms, what do the new HQ units do? They are at the heart of the game’s design changes. HQs authorise your supply trucks to hand out Attack Bullets and without Attack Bullets your combat units can’t attack and your artillery units can’t fire, so they’re vital to the war effort. Lets have a look at the new HQ units.
Click Here to view image
The top part of the display tells you that this is the HQ for the 9th SS Panzer Division from the Market Garden scenario. The middle part of the unit’s display is where the action is. The gun symbol with two bullets shows that the HQ hands out two bullets each turn to all its artillery units within its command radius and in supply. Likewise the two bullets next to the combat symbol show what those combat units in command can expect to receive. The blue bar at the bottom shows the unit’s defence strength and the gold portions shows that it has 60 OPs for movement.
Now let’s look at the opposition, the XXX Corps HQ.
Click Here to view image
Two aspects deserve further explanation. Note that the XXX Corps HQ has only 30 OPs and crucially has a no-go symbol next to its OP rating. This doesn’t mean that the HQ can’t move, but that it is rated as a Static HQ. This means that in the turn after it moves, it hands out no attack bullets. This screen shot was taken on Turn 2, so above the HQ there are buttons to show the HQ’s command area in various turns. The button for the next turn, Turn 3, is red showing that there will be no command area that turn, because the HQ moved this turn.
So HQs have a number of important characteristics. The more bullets they hand out, the quicker their combat units can replenish reserves and keep attacking. The larger the HQs command radius, the greater the area in which its units can usefully operate. And Mobile HQs will clearly be better at sustaining fast moving operations, either in attack or defence.
Apart from their role in co-ordinating logistics, HQs have an equally important command function. To see this in action, we need to look at a combat unit. Let’s take the chaps from the Kings Royal Hussars who are subordinate to the XXX Corps HQ pictured above.
Click Here to view image
On the attack bar, just to the right of their attack strength of 17, we see the patch for the XXX Corps HQ and 5 roundels. This indicates that this unit will contribute +5 shifts to a combat, if it is within the command area of the HQ. Naturally, this shift can only apply once in a combat, and if there are units belonging to two or more HQs then the highest shift is applied. A shift of this level represents a substantial reward for keeping your units within command range.
Also worth noting is the fact that the unit can have a maximum of four attack bullets stored up. The fact that two of these bullets are colored green indicates that two bullets will be consumed in an ordinary attack. So this unit can do a maximum of two normal attacks before running out of attack bullets, unless its getting resupplied.
Just to emphasize the point, lets look at the penalties you incur if you choose to operate a unit too far away from its HQ. No attack bullets, no guarantee of defensive bullets and no combat shifts. Plus you may well miss out on the Regimental Integrity bonus, something we’ll cover when we look at combat units.
[/align]by Gregor Whiley[/align] [/align][/align]
A first look at the new HQ units and the vital role they play in Battlefront.
Headquarters
So, the staff wallahs, the paper shufflers, the brass hats, what are they really good for? Well, maybe nothing, apart from planning battles and reporting same, collecting and sending intelligence, organising the myriad of logistical tasks necessary to keep combat units supplied and accounting for them all and arranging everying else from mail delivery to dentistry. Regardless, we at SSG can make a solemn pledge. Even though there are now plenty of HQ units in the game, you will never have to fill in a single form, and can blithely assume that it’s someone else’s job to look after their teeth.
So, in Battlefront terms, what do the new HQ units do? They are at the heart of the game’s design changes. HQs authorise your supply trucks to hand out Attack Bullets and without Attack Bullets your combat units can’t attack and your artillery units can’t fire, so they’re vital to the war effort. Lets have a look at the new HQ units.
Click Here to view image
The top part of the display tells you that this is the HQ for the 9th SS Panzer Division from the Market Garden scenario. The middle part of the unit’s display is where the action is. The gun symbol with two bullets shows that the HQ hands out two bullets each turn to all its artillery units within its command radius and in supply. Likewise the two bullets next to the combat symbol show what those combat units in command can expect to receive. The blue bar at the bottom shows the unit’s defence strength and the gold portions shows that it has 60 OPs for movement.
Now let’s look at the opposition, the XXX Corps HQ.
Click Here to view image
Two aspects deserve further explanation. Note that the XXX Corps HQ has only 30 OPs and crucially has a no-go symbol next to its OP rating. This doesn’t mean that the HQ can’t move, but that it is rated as a Static HQ. This means that in the turn after it moves, it hands out no attack bullets. This screen shot was taken on Turn 2, so above the HQ there are buttons to show the HQ’s command area in various turns. The button for the next turn, Turn 3, is red showing that there will be no command area that turn, because the HQ moved this turn.
So HQs have a number of important characteristics. The more bullets they hand out, the quicker their combat units can replenish reserves and keep attacking. The larger the HQs command radius, the greater the area in which its units can usefully operate. And Mobile HQs will clearly be better at sustaining fast moving operations, either in attack or defence.
Apart from their role in co-ordinating logistics, HQs have an equally important command function. To see this in action, we need to look at a combat unit. Let’s take the chaps from the Kings Royal Hussars who are subordinate to the XXX Corps HQ pictured above.
Click Here to view image
On the attack bar, just to the right of their attack strength of 17, we see the patch for the XXX Corps HQ and 5 roundels. This indicates that this unit will contribute +5 shifts to a combat, if it is within the command area of the HQ. Naturally, this shift can only apply once in a combat, and if there are units belonging to two or more HQs then the highest shift is applied. A shift of this level represents a substantial reward for keeping your units within command range.
Also worth noting is the fact that the unit can have a maximum of four attack bullets stored up. The fact that two of these bullets are colored green indicates that two bullets will be consumed in an ordinary attack. So this unit can do a maximum of two normal attacks before running out of attack bullets, unless its getting resupplied.
Just to emphasize the point, lets look at the penalties you incur if you choose to operate a unit too far away from its HQ. No attack bullets, no guarantee of defensive bullets and no combat shifts. Plus you may well miss out on the Regimental Integrity bonus, something we’ll cover when we look at combat units.
[/align]by Gregor Whiley[/align] [/align][/align]
-
pvthudson01

- Posts: 457
- Joined: Tue Oct 07, 2003 8:33 pm
- Location: Chicago
- Contact:
RE: Battlefront Designer Notes Part 1, 2 & 3
I love these previews ... great work. Much like the excellent articles on the RUN5 site it is almost like learning the game before it comes out. If taken as a whole it is a great way to get started on the game so that when it goes live, we can almost jump right in [:D]
Ahh also I like the more colorfull and vibrant unit interface!
Ahh also I like the more colorfull and vibrant unit interface!
Matrix Member since 2003!
-
mariovalleemtl

- Posts: 361
- Joined: Wed Aug 09, 2000 8:00 am
- Location: Montreal
- Contact:
RE: Battlefront Designer Notes Part 1, 2 & 3
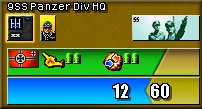
Very nice. Do you plan to change the little soldier at the top left near the counter by a officer ? That will be to cool. [:)]


-
sol_invictus

- Posts: 1962
- Joined: Tue Oct 02, 2001 8:00 am
- Location: Kentucky
RE: Battlefront Designer Notes Part 1, 2 & 3
I really look forward to these articles. I think I will really like the new engine.
"The fruit of too much liberty is slavery", Cicero
-
David Heath
- Posts: 2529
- Joined: Wed Mar 29, 2000 5:00 pm
RE: Battlefront Designer Notes Part 1, 2, 3 & 4
Battlefront Designer Notes Part 4
A first look at the Saipan scenario, and the impact of the Special Attack function.
Scenario Saipan:
Saipan is an exciting smaller scenario that will test the judgement of both players. The Japanese have no answer to the overwhelming US naval and air bombardment that accompanies the landing and cannot prevent the landings, but its after the landing that the fun really starts.
The first screen shot shows the US forces safely ashore on Turn 1.
Click here to view image
It’s one thing to pound a few forts and land an overwhelming force in a small area. It’s another thing to safely expand those bridgeheads and occupy the entire island. While the Japanese player can’t really hope to drive the US back into the sea, they can inflict long delays and disproportionate casualties, and doing so will win them the scenario.
Saipan will introduce the US player to the full fury of the new Special Attack function. The Japanese player gets a number of Banzai attacks each turn, and these can cause real damage to US units that would be otherwise hard to assault.
The second screen shot shows an attack on a US position. Chasing early territorial gains, a careless US player has left a stack with only four steps, after Japanese artillery attacks scored hits while the unit had just landed and was unable to dig in. However, the 7:1 attack in wooded terrain will not cause major problems for the US player.
Click here to view image
The third screen shows the same attack after the Japanese player has declared a Banzai attack. Certainly, Japanese casulaties are massively increased, (A4 = ouch), but so are the US defender’s losses. This stack is now in very serious trouble.
Click here to view image
That’s not to say that the Japanese have all the fun. All US units, (after the first few turns), arrive in an OMA which is linked to the main invasion beaches and three beachheads around the island. So if the Japanese player commits all his forces against the main invasion, he could easily find a reinforced regiment landing unopposed behind the lines.
The fourth screen shot shows the OMA system in operation, with US units being ordered to one of the backup invasion areas. This is, of course, completely invisible to the Japanese player.
Click here to view image
This illustrates the flexibility of the OMA system. The Japanese player will not know where the US follow up forces are landing until they hit the beach. So, no matter how many trimes he plays the scenario, he can’t predict where they will arrive, and must hold forces in reserve until the US player has revealed his hand.
Our last shot shows US forces arriving unopposed behind the Japanese lines, a development that will the Japanese player some nasty moments.
Click here to view image
[/align]Gregor Whiley[/align] [/align] [/align][/align]
A first look at the Saipan scenario, and the impact of the Special Attack function.
Scenario Saipan:
Saipan is an exciting smaller scenario that will test the judgement of both players. The Japanese have no answer to the overwhelming US naval and air bombardment that accompanies the landing and cannot prevent the landings, but its after the landing that the fun really starts.
The first screen shot shows the US forces safely ashore on Turn 1.
Click here to view image
It’s one thing to pound a few forts and land an overwhelming force in a small area. It’s another thing to safely expand those bridgeheads and occupy the entire island. While the Japanese player can’t really hope to drive the US back into the sea, they can inflict long delays and disproportionate casualties, and doing so will win them the scenario.
Saipan will introduce the US player to the full fury of the new Special Attack function. The Japanese player gets a number of Banzai attacks each turn, and these can cause real damage to US units that would be otherwise hard to assault.
The second screen shot shows an attack on a US position. Chasing early territorial gains, a careless US player has left a stack with only four steps, after Japanese artillery attacks scored hits while the unit had just landed and was unable to dig in. However, the 7:1 attack in wooded terrain will not cause major problems for the US player.
Click here to view image
The third screen shows the same attack after the Japanese player has declared a Banzai attack. Certainly, Japanese casulaties are massively increased, (A4 = ouch), but so are the US defender’s losses. This stack is now in very serious trouble.
Click here to view image
That’s not to say that the Japanese have all the fun. All US units, (after the first few turns), arrive in an OMA which is linked to the main invasion beaches and three beachheads around the island. So if the Japanese player commits all his forces against the main invasion, he could easily find a reinforced regiment landing unopposed behind the lines.
The fourth screen shot shows the OMA system in operation, with US units being ordered to one of the backup invasion areas. This is, of course, completely invisible to the Japanese player.
Click here to view image
This illustrates the flexibility of the OMA system. The Japanese player will not know where the US follow up forces are landing until they hit the beach. So, no matter how many trimes he plays the scenario, he can’t predict where they will arrive, and must hold forces in reserve until the US player has revealed his hand.
Our last shot shows US forces arriving unopposed behind the Japanese lines, a development that will the Japanese player some nasty moments.
Click here to view image
[/align]Gregor Whiley[/align] [/align] [/align][/align]
-
pvthudson01
- Posts: 457
- Joined: Tue Oct 07, 2003 8:33 pm
- Location: Chicago
- Contact:
RE: Battlefront Designer Notes Part 1, 2, 3 & 4
Are airstrikes still just interdiction or are they single hex airstrikes that can actually hit a hex?
Matrix Member since 2003!
RE: Battlefront Designer Notes Part 1, 2, 3 & 4
ORIGINAL: pvthudson01
Are airstrikes still just interdiction or are they single hex airstrikes that can actually hit a hex?
If you look in the last screenshot in the Part 4 Notes you can see that there are both visible. Look directly above the 4/1 Marines... you can see an indicator that shows a dive bomber (looks like it cleared all resistance in the hex[X(]). You should recognize the air interdiction indicators as their look is similar to DB (two indicators visible, effects of a third visible at top of screenshot).
The airstrike feature can also be a multi-hex indirect fire event (target hex and 1 hex radius around it)[:D].
-
pvthudson01
- Posts: 457
- Joined: Tue Oct 07, 2003 8:33 pm
- Location: Chicago
- Contact:
RE: Battlefront Designer Notes Part 1, 2, 3 & 4
Got ya now I see it! That is great news!
What is the "31" on that unit to the NE of the airstrike
What is the "31" on that unit to the NE of the airstrike
Matrix Member since 2003!
RE: Battlefront Designer Notes Part 1, 2, 3 & 4
ORIGINAL: pvthudson01
What is the "31" on that unit to the NE of the airstrike
That is the unit symbol for 31st Japanase Army (you're seeing the Army Supply Unit).
-
pvthudson01
- Posts: 457
- Joined: Tue Oct 07, 2003 8:33 pm
- Location: Chicago
- Contact:
RE: Battlefront Designer Notes Part 1, 2, 3 & 4
Thanks for the answers
What is the scale for the units? As in each unit equals a Platoon? Wasnt able to find it in the announcement, but I am assuming this game plays kinda like Panzer Grenadier board game? Something along that scale?
What is the scale for the units? As in each unit equals a Platoon? Wasnt able to find it in the announcement, but I am assuming this game plays kinda like Panzer Grenadier board game? Something along that scale?
Matrix Member since 2003!
RE: Battlefront Designer Notes Part 1, 2, 3 & 4
Sir,
stands all in Designer notes part 1: Most combat units are battalions, with some more specialized units
beeing companies.
My favourit scale [:D]
stands all in Designer notes part 1: Most combat units are battalions, with some more specialized units
beeing companies.
My favourit scale [:D]
War does not determine who is right - only who is left.
-
David Heath
- Posts: 2529
- Joined: Wed Mar 29, 2000 5:00 pm
RE: Battlefront Designer Notes Part 1, 2, 3 & 4
Battlefront Designer Notes Part 5
If you like the concept of causing casualties at long range, then these Designer Notes are meant for you.
Indirect Fire
At the Battlefront scale, artillery units can now cause step losses on enemy units. Of course, it's not quite as simple as just yelling 'Fire!'. To be a valid target, the enemy unit must be within range, properly spotted, there must be no friendly units within the danger range of the firing unit and the artillery unit must have enough bullets to fire.
Counter-battery fire brings a realistic risk of retribution to artillery units. Firing your guns runs the risk that they will be spotted, and become a valid target for enemy guns or air attacks, even though they may be well behind the front line. When that happens, gunners will quickly realize just how unpopular they have become with the recipients of the HE that they have been distributing.
The Danger Zone is also an important concept at the Battlefront scale. Bigger guns, especially those of naval units, may be restricted in how closely they can fire to friendly units. Finally, the guns all need bullets. As gamers, we’ve always known this on a theoretical basis, but now it’s become a much more practical consideration. As mentioned before, units need attack bullets to take part in attacks, and these are authorized by the unit’s HQ. A unit not in command range will only be able to conduct a limited number of attacks before it runs out of bullets.
Let’s consider a typical Soviet heavy artillery unit. The yellow dice shows that its guns cause a step loss on a dice roll of 3 or better. That’s pretty good odds. Guns can accumulate a maximum of six attack bullets but our gun has only managed 5 bullets so far. As shown by the green shading on those bullets, an attack consumes 3 bullets. The HQ controlling this gun only hands out one bullet per turn, so you simply can’t fire the gun every turn. If you’ve been shooting the gun at every possible opportunity, and the temptation to do so will be immense, then your gun will not be able to properly support a big push. Now, more than ever, you will have to plan and co-ordinate your offensives between the ground units and the supporting arms.
Click here to view image
So that’s how you shoot at something, but is there anything that the target can do to avoid being shot? Absolutely! Each artillery unit has a chance to hit, shown as a dice roll. This can be modified by terrain, so one possibility is to sit in a swamp. More usefully though, if any unit in a hex is entrenched, then it takes two dice rather than one to hit the hex.
Entrenchment here represents more than just the undoubted value of trenches in avoiding casualties from artillery fire. It also represents that you have controlled the area long enough to have located yourself to proper military advantage, sent out patrols, put shells through church steeples to discourage enemy artillery observers and generally got command issues sorted out.
You can’t fire at a hex that’s already been the subject of a Close Combat, so you need to fire your guns before conducting an assault. Each step loss caused by Indirect Fire in a hex increases by one the chance that the defending units will retreat if assaulted. On the other hand, units forced to retreat will lose their entrenchment status, which will make them much easier to hit. So perhaps you will be better off not firing before the combat, when the mean are entrenched and prepared, but save the shells for firing at a retreating unit which have a much higher chance of taking losses. So many choices! Now in order to prevent a complete turkey shoot, the scenario designer can limit the number of artillery attacks per hex to between one and four. Since this is a limit per hex, an unfortunate unit could be subjected to multiple maximum bombardments if it were bombarded, then assaulted, then retreated and then bombarded again.
Air power can now cause casualties as well, but be warned, it can have a scatter factor which can see bombs landing on your own guys. Still, most of the time, it will do damage where its needed. There is a limit of one air strike per hex, but this is in addition to any artillery attacks. Air interdiction remains as a separate effect.
[/align]Gregor Whiley[/align] [/align] [/align] [/align][/align]
If you like the concept of causing casualties at long range, then these Designer Notes are meant for you.
Indirect Fire
At the Battlefront scale, artillery units can now cause step losses on enemy units. Of course, it's not quite as simple as just yelling 'Fire!'. To be a valid target, the enemy unit must be within range, properly spotted, there must be no friendly units within the danger range of the firing unit and the artillery unit must have enough bullets to fire.
Counter-battery fire brings a realistic risk of retribution to artillery units. Firing your guns runs the risk that they will be spotted, and become a valid target for enemy guns or air attacks, even though they may be well behind the front line. When that happens, gunners will quickly realize just how unpopular they have become with the recipients of the HE that they have been distributing.
The Danger Zone is also an important concept at the Battlefront scale. Bigger guns, especially those of naval units, may be restricted in how closely they can fire to friendly units. Finally, the guns all need bullets. As gamers, we’ve always known this on a theoretical basis, but now it’s become a much more practical consideration. As mentioned before, units need attack bullets to take part in attacks, and these are authorized by the unit’s HQ. A unit not in command range will only be able to conduct a limited number of attacks before it runs out of bullets.
Let’s consider a typical Soviet heavy artillery unit. The yellow dice shows that its guns cause a step loss on a dice roll of 3 or better. That’s pretty good odds. Guns can accumulate a maximum of six attack bullets but our gun has only managed 5 bullets so far. As shown by the green shading on those bullets, an attack consumes 3 bullets. The HQ controlling this gun only hands out one bullet per turn, so you simply can’t fire the gun every turn. If you’ve been shooting the gun at every possible opportunity, and the temptation to do so will be immense, then your gun will not be able to properly support a big push. Now, more than ever, you will have to plan and co-ordinate your offensives between the ground units and the supporting arms.
Click here to view image
So that’s how you shoot at something, but is there anything that the target can do to avoid being shot? Absolutely! Each artillery unit has a chance to hit, shown as a dice roll. This can be modified by terrain, so one possibility is to sit in a swamp. More usefully though, if any unit in a hex is entrenched, then it takes two dice rather than one to hit the hex.
Entrenchment here represents more than just the undoubted value of trenches in avoiding casualties from artillery fire. It also represents that you have controlled the area long enough to have located yourself to proper military advantage, sent out patrols, put shells through church steeples to discourage enemy artillery observers and generally got command issues sorted out.
You can’t fire at a hex that’s already been the subject of a Close Combat, so you need to fire your guns before conducting an assault. Each step loss caused by Indirect Fire in a hex increases by one the chance that the defending units will retreat if assaulted. On the other hand, units forced to retreat will lose their entrenchment status, which will make them much easier to hit. So perhaps you will be better off not firing before the combat, when the mean are entrenched and prepared, but save the shells for firing at a retreating unit which have a much higher chance of taking losses. So many choices! Now in order to prevent a complete turkey shoot, the scenario designer can limit the number of artillery attacks per hex to between one and four. Since this is a limit per hex, an unfortunate unit could be subjected to multiple maximum bombardments if it were bombarded, then assaulted, then retreated and then bombarded again.
Air power can now cause casualties as well, but be warned, it can have a scatter factor which can see bombs landing on your own guys. Still, most of the time, it will do damage where its needed. There is a limit of one air strike per hex, but this is in addition to any artillery attacks. Air interdiction remains as a separate effect.
[/align]Gregor Whiley[/align] [/align] [/align] [/align][/align]
-
David Heath
- Posts: 2529
- Joined: Wed Mar 29, 2000 5:00 pm
RE: Battlefront Designer Notes Part 1, 2, 3 & 4
Battlefront Designer Notes Part 6
A quick look at the Novorossisk scenario and the reasons for including it in the Battlefront game.
One of the reasons why many of us play wargames is to gain a better appreciation of the historical aspects of warfare. It’s one thing to read about a battle, but it’s much more illuminating to see the forces arrayed upon the map and to put yourself in the shoes of the opposing commanders.
In the case of Novorossisk, the game is supplying much of the illumination, as this is not a historically famous battle. There are no Guards Tank Armies or SS Panzer Divisions and there is no overwhelming strategic objective whose fate hangs in the balance. Instead you battle for possession of the prosaic sounding Fish Cannery and Cement Works. Novorossisk was part of a larger battle, but much of the pivotal strategic elements were to be found further north, off the map.
So why recreate the battle? Firstly, it was the first Russian amphibious operation of the war, so it deserves at least a historical footnote. Secondly, we should avoid the CNN view of history which would condense all of the Eastern Front into a series of highlights. The fighting in Novorossisk was much more typical of warfare in the East than the big set piece battles. Stalin, flushed with success after the Stalingrad encirclement, wanted to bag all of the Germans south of the Don, and he pushed his commanders and his men mercilessly to achieve this, despite the fact that almost all his formations were ground down by previous offensives. German forces, now on the defensive, were in no better shape. Both sides had to make do with what the resources that they had to hand.
Cutting off the Germans required the capture of Rostov and the sealing off of the Tamar peninsular to prevent the Germans from slipping away across the Kerch Straits. The amphibious landings behind the German lines were an ambitious attempt to unhinge the German defenses and allow a drive north along the coast. The capture of Novorossisk would also regain a proper naval base for the Russian Black Sea Fleet, currently eking out a precarious existence with no proper port facilities left in friendly hands.
So despite the lack of glamour, there’s plenty to fight for and plenty of excitement. Both sides have inadequate forces and face a tough situation. The Germans should, as they did historically, be able to contain the amphibious landings. The first screen shot shows the situation and the end of the second Russian turn. The real question for the Germans is whether they can continue to contain the landings without fatally weakening their defensive line to the east, where a determined Russian offensive could well break though.
Click here to view image
While the German player has the benefit of interior lines, he also has somewhat mixed forces with which to hold back the Russian offensive. The elements of the 10th Rumanian Infantry division or the Cossak regiment will not inspire great confidence. On the other hand, Kampfgruppe von Hake and Kampfgruppe Busche will make a big impact, if they are committed in the right sector.
As for the Russian player, be aware that this is not Normandy. Your parachute assault is guaranteed to land somewhere on the map, but wherever it lands it faces a very short future. Your amphibious assault is improvised and hazardous, and the naval bombardment will usually not achieve anything like the desired result. Expect heavy casualties for your landing forces. And the good news? Well, as Russians you are used to heavy casualties, you do have some very good heavy artillery with which to reply and the men of 8th Guards Brigade are an elite force. So while the German player can make life difficult for your amphibious forces, you in your turn can make life difficult for him. The second screen shot shows Russian forces breaking through and heading for Neberjayevskaya. This will certainly force a German response, and should make life easier for the men trapped in the beachhead.
Click here to view image
The Russian forces operated under severe logistical constraints, and this is reflected in the relative immobility of their HQs and supply trucks and the cost in attack bullets for each offensive action. Once the Russian player has chosen an axis of attack, it will be very difficult and slow to redeploy the units so committed, so the Russian player must choose well.
Finally, for a look at how Novorossisk finally fell, many months after the initial attack, check out the following newsreel footage.
Google Video
[/align] [/align]by Gregor Whiley[/align][/align]
A quick look at the Novorossisk scenario and the reasons for including it in the Battlefront game.
One of the reasons why many of us play wargames is to gain a better appreciation of the historical aspects of warfare. It’s one thing to read about a battle, but it’s much more illuminating to see the forces arrayed upon the map and to put yourself in the shoes of the opposing commanders.
In the case of Novorossisk, the game is supplying much of the illumination, as this is not a historically famous battle. There are no Guards Tank Armies or SS Panzer Divisions and there is no overwhelming strategic objective whose fate hangs in the balance. Instead you battle for possession of the prosaic sounding Fish Cannery and Cement Works. Novorossisk was part of a larger battle, but much of the pivotal strategic elements were to be found further north, off the map.
So why recreate the battle? Firstly, it was the first Russian amphibious operation of the war, so it deserves at least a historical footnote. Secondly, we should avoid the CNN view of history which would condense all of the Eastern Front into a series of highlights. The fighting in Novorossisk was much more typical of warfare in the East than the big set piece battles. Stalin, flushed with success after the Stalingrad encirclement, wanted to bag all of the Germans south of the Don, and he pushed his commanders and his men mercilessly to achieve this, despite the fact that almost all his formations were ground down by previous offensives. German forces, now on the defensive, were in no better shape. Both sides had to make do with what the resources that they had to hand.
Cutting off the Germans required the capture of Rostov and the sealing off of the Tamar peninsular to prevent the Germans from slipping away across the Kerch Straits. The amphibious landings behind the German lines were an ambitious attempt to unhinge the German defenses and allow a drive north along the coast. The capture of Novorossisk would also regain a proper naval base for the Russian Black Sea Fleet, currently eking out a precarious existence with no proper port facilities left in friendly hands.
So despite the lack of glamour, there’s plenty to fight for and plenty of excitement. Both sides have inadequate forces and face a tough situation. The Germans should, as they did historically, be able to contain the amphibious landings. The first screen shot shows the situation and the end of the second Russian turn. The real question for the Germans is whether they can continue to contain the landings without fatally weakening their defensive line to the east, where a determined Russian offensive could well break though.
Click here to view image
While the German player has the benefit of interior lines, he also has somewhat mixed forces with which to hold back the Russian offensive. The elements of the 10th Rumanian Infantry division or the Cossak regiment will not inspire great confidence. On the other hand, Kampfgruppe von Hake and Kampfgruppe Busche will make a big impact, if they are committed in the right sector.
As for the Russian player, be aware that this is not Normandy. Your parachute assault is guaranteed to land somewhere on the map, but wherever it lands it faces a very short future. Your amphibious assault is improvised and hazardous, and the naval bombardment will usually not achieve anything like the desired result. Expect heavy casualties for your landing forces. And the good news? Well, as Russians you are used to heavy casualties, you do have some very good heavy artillery with which to reply and the men of 8th Guards Brigade are an elite force. So while the German player can make life difficult for your amphibious forces, you in your turn can make life difficult for him. The second screen shot shows Russian forces breaking through and heading for Neberjayevskaya. This will certainly force a German response, and should make life easier for the men trapped in the beachhead.
Click here to view image
The Russian forces operated under severe logistical constraints, and this is reflected in the relative immobility of their HQs and supply trucks and the cost in attack bullets for each offensive action. Once the Russian player has chosen an axis of attack, it will be very difficult and slow to redeploy the units so committed, so the Russian player must choose well.
Finally, for a look at how Novorossisk finally fell, many months after the initial attack, check out the following newsreel footage.
Google Video
[/align] [/align]by Gregor Whiley[/align][/align]
-
jungelsj_slith
- Posts: 254
- Joined: Mon Feb 16, 2004 9:51 am
RE: Battlefront Designer Notes Part 1 thur 6
The art for this looks identical to the decisive battles engine. Will these be redone for the new game? It doesnt seem to have a new, distinct feel to it yet.
-
Gregor_SSG

- Posts: 681
- Joined: Thu Mar 06, 2003 9:22 am
- Contact:
RE: Battlefront Designer Notes Part 1 thur 6
The game will definitely have a new and distinctive feel once you play it. The unit icons have to display a lot of information so there's not a lot of scope for innovation there.
Gregor
Gregor
Vice President, Strategic Studies Group
See http://www.ssg.com.au and http://www.ssg.com.au/forums/
for info and free scenarios.
See http://www.ssg.com.au and http://www.ssg.com.au/forums/
for info and free scenarios.
-
David Heath
- Posts: 2529
- Joined: Wed Mar 29, 2000 5:00 pm
RE: Battlefront Designer Notes Part 1 thur 6
BATTLEFRONT DESIGNER NOTES PART 7
A quick look at the Gazala scenario, outlining some of the military questions that the scenario poses for generals on either side.
We sometimes see comments about certain battles, deriding them as ‘slugfests’. The people making these comments apparently yearn for complete freedom of movement and battles won just through manouver where a single stroke of generalship decides the day. As far as manouver goes, then Gazala is the scenario for them. The battlefield is huge, a continuous front is impossible and there is hardly any terrain that even slightly slows your movement. However, war being war, one should offer a cautionary note. Be careful of where you might move to, because you might get there.
To illustrate, lets examine the example of elements of the 3rd Indian Motorised Brigade. They have occupied Point 171, an otherwise undistinguished piece of desert, at the far south of the battlefield and await orders to start the British offensive, due very soon. Unfortunately for them, Rommel’s offensive is starting now and their position is unprotected by any forts or minefields. Troops from the 15th Panzer Division can sweep to the south of the British minefield line and surround the British on the first turn, and overrun them on the second. Click here to view image
Just north of Point 171 is the fortified box occupied by the Free French at Bir Hacheim. This is well protected by forts and minefields and though the Free French cannot avoid being surrounded, they have their own supply sources and easily sustain a siege while they wait for relief. Unfortunately for the Free French, most of the Allied forces are surprised on the first turn, and therefore not available to counterattack when the Axis will be most vulnerable.
The Axis general will have to decide on the right balance between forces allocated to the reduction of the forts and those dedicated to finding and destroying the main Allied armored formations, currently deployed somewhere behind the lines.
So the situation, as you would expect, is not completely clear. Almost all of the British line is protected by minefields, and the Axis player will wish to clear them as quickly as possible. On the other hand, an unit is never more vulnerable than when it is unentrenched, having just advanced into a minefield, so some caution is required. This is especially true of the Italians, who are very vulnerable to British counter-attacks. The Italians will need to proceed carefully, applying pressure without taking too many risks. Click here to view image
The Germans need to (eventually) take Bir Hachiem and Rotunda Ualeb and to find and destroy the mobile British forces. The fortified boxes aren’t going to move, but the British armor has vast scope for movement and may not be where they’re supposed to be.
Sadly for the British, they cannot just abandon the fortified boxes ands skulk back to Tobruk while blaming everything on the Free French. They will have to do something by way of a relief effort, and this will mean dealing with the Panzers sooner or later. They can concentrate quickly and smack any Italians that get too adventurous. Click here to view image
With almost all the German forces in the south and the Italians mostly occupying the middle and northern parts of the battlefield, there tends to be less action on the Italian front. You can see that their advance is necessarily cautious. On this part of the battlefield they have advanced all of one hex, but they have done so safely and are solidly dug in their new positions. Click here to view image
The British meanwhile, buoyed by their success against the Italians, have decided to protect their minefields at Rotunda Ualeb by digging in just behind them. Minefields that aren’t defended are quickly and easily overrun by enemy units. The British are hoping that another incautious foray will result in enemy units stranded in the minefields and vulnerable to counter-attack. This is their position at the end of Turn 4. View image
Sadly for the British, the Germans, as was so often the case, have decided to come to the rescue of the Italians and at the end of Turn 5 the British are confronted with elements of two German divisions lining up to their south. Click here to view image
At this stage, the sensible course of action for the British might be to withdraw somewhat. This would expose the fortified box to siege, but would facilitate a British counter-attack against Axis forces caught unentrenched and in minefields. But the British are feeling bold and they tough it out. The next turns sees the almost total disappearance of the Axis forces. They haven’t run away, just dug in. This illustrates the huge difference in visibility between a force moving and in enemy territory and one stationary, entrenched and in its own ground. Click here to view image
Now might be a good time to talk about the vital importance of your recon units in Gazala. The first shot shows what the British player can see at the start of his turn in southern sector of the map. Click here to view image
The second shots shows how much more is revealed by judicious use of recon units. You must look after your recon units. Do not leave them stranded in no mans land, they will evaporate like…water in the desert! Click here to view image
There’s so much to explore in the Gazala scenario, it’s a very different battle to any of the others included in Battlefront and I’m sure that you’re all going have a great time blasting your way across the desert.
Oh, and what happened to those brave Brits who decided to tough it out at Rotunda Ualeb? This happened. Click here to view image
Perhaps discretion was the better part of valor in this case.
Lastly, here is a shot of the whole map, somewhat clumsily notated by yours truly. This is only a JPEG but I hope it gives some idea of the vast scope of the battlefield.
Click here to view image
A quick look at the Gazala scenario, outlining some of the military questions that the scenario poses for generals on either side.
We sometimes see comments about certain battles, deriding them as ‘slugfests’. The people making these comments apparently yearn for complete freedom of movement and battles won just through manouver where a single stroke of generalship decides the day. As far as manouver goes, then Gazala is the scenario for them. The battlefield is huge, a continuous front is impossible and there is hardly any terrain that even slightly slows your movement. However, war being war, one should offer a cautionary note. Be careful of where you might move to, because you might get there.
To illustrate, lets examine the example of elements of the 3rd Indian Motorised Brigade. They have occupied Point 171, an otherwise undistinguished piece of desert, at the far south of the battlefield and await orders to start the British offensive, due very soon. Unfortunately for them, Rommel’s offensive is starting now and their position is unprotected by any forts or minefields. Troops from the 15th Panzer Division can sweep to the south of the British minefield line and surround the British on the first turn, and overrun them on the second. Click here to view image
Just north of Point 171 is the fortified box occupied by the Free French at Bir Hacheim. This is well protected by forts and minefields and though the Free French cannot avoid being surrounded, they have their own supply sources and easily sustain a siege while they wait for relief. Unfortunately for the Free French, most of the Allied forces are surprised on the first turn, and therefore not available to counterattack when the Axis will be most vulnerable.
The Axis general will have to decide on the right balance between forces allocated to the reduction of the forts and those dedicated to finding and destroying the main Allied armored formations, currently deployed somewhere behind the lines.
So the situation, as you would expect, is not completely clear. Almost all of the British line is protected by minefields, and the Axis player will wish to clear them as quickly as possible. On the other hand, an unit is never more vulnerable than when it is unentrenched, having just advanced into a minefield, so some caution is required. This is especially true of the Italians, who are very vulnerable to British counter-attacks. The Italians will need to proceed carefully, applying pressure without taking too many risks. Click here to view image
The Germans need to (eventually) take Bir Hachiem and Rotunda Ualeb and to find and destroy the mobile British forces. The fortified boxes aren’t going to move, but the British armor has vast scope for movement and may not be where they’re supposed to be.
Sadly for the British, they cannot just abandon the fortified boxes ands skulk back to Tobruk while blaming everything on the Free French. They will have to do something by way of a relief effort, and this will mean dealing with the Panzers sooner or later. They can concentrate quickly and smack any Italians that get too adventurous. Click here to view image
With almost all the German forces in the south and the Italians mostly occupying the middle and northern parts of the battlefield, there tends to be less action on the Italian front. You can see that their advance is necessarily cautious. On this part of the battlefield they have advanced all of one hex, but they have done so safely and are solidly dug in their new positions. Click here to view image
The British meanwhile, buoyed by their success against the Italians, have decided to protect their minefields at Rotunda Ualeb by digging in just behind them. Minefields that aren’t defended are quickly and easily overrun by enemy units. The British are hoping that another incautious foray will result in enemy units stranded in the minefields and vulnerable to counter-attack. This is their position at the end of Turn 4. View image
Sadly for the British, the Germans, as was so often the case, have decided to come to the rescue of the Italians and at the end of Turn 5 the British are confronted with elements of two German divisions lining up to their south. Click here to view image
At this stage, the sensible course of action for the British might be to withdraw somewhat. This would expose the fortified box to siege, but would facilitate a British counter-attack against Axis forces caught unentrenched and in minefields. But the British are feeling bold and they tough it out. The next turns sees the almost total disappearance of the Axis forces. They haven’t run away, just dug in. This illustrates the huge difference in visibility between a force moving and in enemy territory and one stationary, entrenched and in its own ground. Click here to view image
Now might be a good time to talk about the vital importance of your recon units in Gazala. The first shot shows what the British player can see at the start of his turn in southern sector of the map. Click here to view image
The second shots shows how much more is revealed by judicious use of recon units. You must look after your recon units. Do not leave them stranded in no mans land, they will evaporate like…water in the desert! Click here to view image
There’s so much to explore in the Gazala scenario, it’s a very different battle to any of the others included in Battlefront and I’m sure that you’re all going have a great time blasting your way across the desert.
Oh, and what happened to those brave Brits who decided to tough it out at Rotunda Ualeb? This happened. Click here to view image
Perhaps discretion was the better part of valor in this case.
Lastly, here is a shot of the whole map, somewhat clumsily notated by yours truly. This is only a JPEG but I hope it gives some idea of the vast scope of the battlefield.
Click here to view image