Fall Grau 2.28 Jeremy (Axis) vs. Ben (Allies)
-
Jeremy Mac Donald
- Posts: 355
- Joined: Tue Nov 07, 2000 10:00 am
- Location: Toronto, Ontario, Canada
Re: Fall Grau 2.28 Jeremy (Axis) vs. Ben (Allies)
Turn 9
As we approach the stage of the game where Allied rail transport starts to allow the Allies to really rapidly send reinforcements to all fronts I am becoming increasingly concerned with situation. Ben’s tough defence has definitely slowed the invasion down. While Charlotte did fall this turn San Antonio lost all its defenders but has held on. This means it won’t actually be considered to have fallen until turn 11. As it stands the Allies will go for a turn with more then 100% replacements before finally falling back down to near 100%. I’ve got to start making dents in this number faster or destroy lots of Allied units. Hopefully both. The problem is I can’t, at this stage, be attacking everywhere, and get particularly decisive results.
The West has this problem but it is not as bad as the other two fronts. I want to get to the Mississippi and that is drawing in the odd infantry Division and the Western flank needs to be covered (primarily by Axis minors) but here at least there is a reasonable focus on going to Dallas and fighting a battle there.
The South East has this problem in that, as the front expands the need for ever more flank guards increases. I was also about to make a drive north to take Greensboro and then try and roll up Ben’s flank but in thinking about this issue I think I won’t do that. It does waste about half a turns move from some Panzertruppen but I kind of don’t really see getting more then Norfolk unless Ben is weak in the north. Attack this way with armour and then I’ll have to send them all the way back south and it is into the south that I think I need to attack. There are lots of Industrial cities this way as well as all these rail repair units that can be captured. I really want them. So the new plan here will be to send infantry and artillery north and slowly work my way forward while the Panzertruppen strike into the south toward Atlanta. Even that will be partially delayed as I already have a bunch of Panzertruppen here that really need to refit at Charlotte.
Quebec is the worst culprit with major offencives both east and west of the St. Lawrence and never enough reinforcements for either. Here I think I might have opened enough of a flank on the East side to accomplish something mostly by just shifting light forces to the east as well as clearing out the Maritimes with Italians, meanwhile I’ll try and focus most of the pressure on the western side where I think I can fight my way forward and ultimately outflank the defences down toward Montreal.
As we approach the stage of the game where Allied rail transport starts to allow the Allies to really rapidly send reinforcements to all fronts I am becoming increasingly concerned with situation. Ben’s tough defence has definitely slowed the invasion down. While Charlotte did fall this turn San Antonio lost all its defenders but has held on. This means it won’t actually be considered to have fallen until turn 11. As it stands the Allies will go for a turn with more then 100% replacements before finally falling back down to near 100%. I’ve got to start making dents in this number faster or destroy lots of Allied units. Hopefully both. The problem is I can’t, at this stage, be attacking everywhere, and get particularly decisive results.
The West has this problem but it is not as bad as the other two fronts. I want to get to the Mississippi and that is drawing in the odd infantry Division and the Western flank needs to be covered (primarily by Axis minors) but here at least there is a reasonable focus on going to Dallas and fighting a battle there.
The South East has this problem in that, as the front expands the need for ever more flank guards increases. I was also about to make a drive north to take Greensboro and then try and roll up Ben’s flank but in thinking about this issue I think I won’t do that. It does waste about half a turns move from some Panzertruppen but I kind of don’t really see getting more then Norfolk unless Ben is weak in the north. Attack this way with armour and then I’ll have to send them all the way back south and it is into the south that I think I need to attack. There are lots of Industrial cities this way as well as all these rail repair units that can be captured. I really want them. So the new plan here will be to send infantry and artillery north and slowly work my way forward while the Panzertruppen strike into the south toward Atlanta. Even that will be partially delayed as I already have a bunch of Panzertruppen here that really need to refit at Charlotte.
Quebec is the worst culprit with major offencives both east and west of the St. Lawrence and never enough reinforcements for either. Here I think I might have opened enough of a flank on the East side to accomplish something mostly by just shifting light forces to the east as well as clearing out the Maritimes with Italians, meanwhile I’ll try and focus most of the pressure on the western side where I think I can fight my way forward and ultimately outflank the defences down toward Montreal.
Necesse est multos timeat quem multi timent
"He whom many fear, fears many"
- golden delicious
- Posts: 4168
- Joined: Tue Sep 05, 2000 8:00 am
- Location: London, Surrey, United Kingdom
Re: Fall Grau 2.28 Jeremy (Axis) vs. Ben (Allies)
Turn 9:
Still no drastic moves from Jeremy- he's mostly following up. He even left my poor Commonwealth HQ alone, so it creeps back to reserve at Malartic. He is slowing bending back the flanks of my position in front of Montreal, such that this position now looks like a rather unpleasant arc with Axis troops coming around both flanks- albeit not at a great pace. I contemplate pulling back immediately to the next defensible line, but I have three good divisions and some smaller units in reorganisation and I don't think this position is going to collapse right away, so I'll hold off on this for now. I do note that one of the Fallschirmjaeger divisions is finally off the line and back at Quebec City, but they're not exactly fighting fit, not yet. I use the two fresh divisions I brought up to cover the extreme right flank here, and release the one Canadian division that's been here forever for the Canadian side of the river.
In western NC, I find one German brigade which has gotten just that too far forward and I pounce on it with my fresh troops off the rail and what I have locally. This direction- vaguely northwest- seems to be Jeremy's focus, as two mechanised divisions have shown up here, but in general I don't get a feeling of overwhelming power from the Axis here and so I'm more comfortable making these kinds of grabs than after the debacle in Texas, but I don't see any other German units crying out to be annihilated so mostly everyone just digs in.
Texas was Jeremy's biggest event, as here he's rushed up to my line along its length while trying the flanks and attempting to break through the cavalry division in the centre of the line. I count nine divisions here plus two heavy tank brigades which is much, much more than my strength so I need to pull out, the question is where do I fall back next. The key thing I think is now going to be keeping Jeremy moving north and west rather than east so, for now, I shift this force as a body to the northeast to cover the Red River, with the cavalry division unfortunately getting stuck a bit behind (though this might slow Jeremy down a bit). With six divisions now west of the Mississippi this really is totally inadequate for the task at hand and will need to be reinforced- I add two armoured divisions and two infantry divisions here this turn, giving me a bit more of a sting in case Jeremy lets his panzers off the leash. I note that the rail repair, though, is actually heading the other way- towards Mexico. This will take a while to develop, but I decide to start marching 3 more Mexican divisions towards Monterrey (the ones in good enough condition to fight). The Mexicans on their own, though, are little more than a delaying force.
Axis offensive bend back both flanks in the northeast Another quiet one- which is nice. I've just fed Dallas to Jeremy which he will duly invest and then attack on turn 11, so that puts me on 88% replacements for turn 12, which I'm quite comfortable with. We'll see how things develop.
Still no drastic moves from Jeremy- he's mostly following up. He even left my poor Commonwealth HQ alone, so it creeps back to reserve at Malartic. He is slowing bending back the flanks of my position in front of Montreal, such that this position now looks like a rather unpleasant arc with Axis troops coming around both flanks- albeit not at a great pace. I contemplate pulling back immediately to the next defensible line, but I have three good divisions and some smaller units in reorganisation and I don't think this position is going to collapse right away, so I'll hold off on this for now. I do note that one of the Fallschirmjaeger divisions is finally off the line and back at Quebec City, but they're not exactly fighting fit, not yet. I use the two fresh divisions I brought up to cover the extreme right flank here, and release the one Canadian division that's been here forever for the Canadian side of the river.
In western NC, I find one German brigade which has gotten just that too far forward and I pounce on it with my fresh troops off the rail and what I have locally. This direction- vaguely northwest- seems to be Jeremy's focus, as two mechanised divisions have shown up here, but in general I don't get a feeling of overwhelming power from the Axis here and so I'm more comfortable making these kinds of grabs than after the debacle in Texas, but I don't see any other German units crying out to be annihilated so mostly everyone just digs in.
Texas was Jeremy's biggest event, as here he's rushed up to my line along its length while trying the flanks and attempting to break through the cavalry division in the centre of the line. I count nine divisions here plus two heavy tank brigades which is much, much more than my strength so I need to pull out, the question is where do I fall back next. The key thing I think is now going to be keeping Jeremy moving north and west rather than east so, for now, I shift this force as a body to the northeast to cover the Red River, with the cavalry division unfortunately getting stuck a bit behind (though this might slow Jeremy down a bit). With six divisions now west of the Mississippi this really is totally inadequate for the task at hand and will need to be reinforced- I add two armoured divisions and two infantry divisions here this turn, giving me a bit more of a sting in case Jeremy lets his panzers off the leash. I note that the rail repair, though, is actually heading the other way- towards Mexico. This will take a while to develop, but I decide to start marching 3 more Mexican divisions towards Monterrey (the ones in good enough condition to fight). The Mexicans on their own, though, are little more than a delaying force.
Axis offensive bend back both flanks in the northeast Another quiet one- which is nice. I've just fed Dallas to Jeremy which he will duly invest and then attack on turn 11, so that puts me on 88% replacements for turn 12, which I'm quite comfortable with. We'll see how things develop.
"What did you read at university?"
"War Studies"
"War? Huh. What is it good for?"
"Absolutely nothing."
"War Studies"
"War? Huh. What is it good for?"
"Absolutely nothing."
-
Jeremy Mac Donald
- Posts: 355
- Joined: Tue Nov 07, 2000 10:00 am
- Location: Toronto, Ontario, Canada
Re: Fall Grau 2.28 Jeremy (Axis) vs. Ben (Allies)
Turn 10
Mixed messages coming in this turn as the Allied loss rate starts dropping quickly with the lighter fighting and the higher Allied replacement rate. On the other hand I feel like I more clearly can see the situation and can begin to actively address it.
The North East sees only minor action this turn but the Falchijagers are off the front line and back into reserve. Meanwhile the other Light Infantry Divisions shift to flanking positions in the east and the Italians continue what is a long term flanking move as they continue to secure the Maritimes. Attempt west of the St. Lawrence to shift the Allies fail but more units and lots more artillery is being moved that way and this will hopefully help things. I need to make this area of the map more of a priority for artillery as it is the most static by a significant margin. I’ve also finally captured enough airbases up here to comfortably go head to head with Allied airpower in the region.
The Southeast is the most strained front with Ben leaping forward to destroy an Axis Infantry Brigade this turn. The front just continues to expand and as it does so reinforcements sent into the area are easily absorbed into this even while there is need for more reinforcements to continue advancing to the north, now a predominantly infantry operation, and in the south I have encountered what might be Ben’s next line of defense in front of Atlanta. Not dug in or anything so I think Ben swung his forces north just as I started swinging mine south. For the moment the south is going to get almost everything I can dig up as I press to capture Atlanta. I’m also being slowed by the fact that many Axis Panzertruppen in the area are pretty worn out and Charlotte presents an opportunity to try and quickly resupply a bunch of Divisions.
Southwest remains the most promising advance if comparatively quite. Ben chooses not to defend Dallas once I make contact and withdraws north. I encircle Dallas and manage to find and kill a Cavalry Division. Here again the size of the flanks are an issue, especially because I want to make at least some progress to capturing the area up to the Mississippi in the east even while I plan to swing wider for the main attack. I also won’t leap forward without at least 8 Divisions. I don’t think there are all that many Allies out there at the moment but at this stage in the game that can change quickly.
Finally, it dawns on me that I have once again forgotten to start sending units to hold the rail links open. Much as I want Italians to conquer the Maritimes for the moment I also really only have them around to hold the rail lines with maybe Argentinians to do so in the West.
Allied Production Boost 122%
Charlotte 109%
Mixed messages coming in this turn as the Allied loss rate starts dropping quickly with the lighter fighting and the higher Allied replacement rate. On the other hand I feel like I more clearly can see the situation and can begin to actively address it.
The North East sees only minor action this turn but the Falchijagers are off the front line and back into reserve. Meanwhile the other Light Infantry Divisions shift to flanking positions in the east and the Italians continue what is a long term flanking move as they continue to secure the Maritimes. Attempt west of the St. Lawrence to shift the Allies fail but more units and lots more artillery is being moved that way and this will hopefully help things. I need to make this area of the map more of a priority for artillery as it is the most static by a significant margin. I’ve also finally captured enough airbases up here to comfortably go head to head with Allied airpower in the region.
The Southeast is the most strained front with Ben leaping forward to destroy an Axis Infantry Brigade this turn. The front just continues to expand and as it does so reinforcements sent into the area are easily absorbed into this even while there is need for more reinforcements to continue advancing to the north, now a predominantly infantry operation, and in the south I have encountered what might be Ben’s next line of defense in front of Atlanta. Not dug in or anything so I think Ben swung his forces north just as I started swinging mine south. For the moment the south is going to get almost everything I can dig up as I press to capture Atlanta. I’m also being slowed by the fact that many Axis Panzertruppen in the area are pretty worn out and Charlotte presents an opportunity to try and quickly resupply a bunch of Divisions.
Southwest remains the most promising advance if comparatively quite. Ben chooses not to defend Dallas once I make contact and withdraws north. I encircle Dallas and manage to find and kill a Cavalry Division. Here again the size of the flanks are an issue, especially because I want to make at least some progress to capturing the area up to the Mississippi in the east even while I plan to swing wider for the main attack. I also won’t leap forward without at least 8 Divisions. I don’t think there are all that many Allies out there at the moment but at this stage in the game that can change quickly.
Finally, it dawns on me that I have once again forgotten to start sending units to hold the rail links open. Much as I want Italians to conquer the Maritimes for the moment I also really only have them around to hold the rail lines with maybe Argentinians to do so in the West.
Allied Production Boost 122%
Charlotte 109%
Necesse est multos timeat quem multi timent
"He whom many fear, fears many"
- golden delicious
- Posts: 4168
- Joined: Tue Sep 05, 2000 8:00 am
- Location: London, Surrey, United Kingdom
Re: Fall Grau 2.28 Jeremy (Axis) vs. Ben (Allies)
Turn 10:
The Axis are coming around my long right flank through Maine now, which is essentially unprotected. I don't think he has much here, but if he did it could get all the way around my right flank in one turn unless I can find a unit to block the road (I have an armoured regiment here at the moment but that's it). Actually that's not so much of a problem as the main line wasn't harassed this turn- not at all. Two divisions that were previously broken regroup and shift around to screen the approaches to Portland, and the Polish airborne division I had on my flank here pulls back in the same direction to avoid being isolated. I'd need at least two more pieces to make this a continuous line to the coast- we'll see if I can make this happen, perhaps by breaking down the divisions in the rough ground once they're secure. Jeremy is definitely planning something as he now has a total of four airborne divisions sat behind the lines ready to jump: the Canadians are much more vulnerable here as their supply condition is quite poor still. I add one more US infantry division from reserve to Maine to help close the gap here.
In the southeast, the Axis have followed up across the front, evidently trying to find the gaps in my line (there aren't any big ones north of Macon). The mechanised divisions that were in western NC last turn have fallen back to resupply but fresh ones showed up east of Atlanta and it's here I feel most threatened; I only have five divisions in Georgia and I drove my best armoured division up north last turn so it's well out of range. I pull back from my Macon position to set up southeast of Atlanta, which is the logical space for that Axis mobile force to move to next. Then I pull that fresh armoured division back down to just north of Atlanta, plus an infantry division and artillery. This should stop Jeremy if he tries the other flank of this force through the rough ground north of Gainesville. I also rail up two infantry divisions behind the city
Jeremy lunges across the Red River at Alexandria, putting my division on the destroyed crossing out of supply. He's not here in much strength, however and I'm able to RBC his unsupported engineers leaving the German cavalry division isolated. I surround it with the three divisions I had to hand in Louisiana and hope to destroy it. While this plays out I'm cautious in the west, drawing up my infantry (4 divisions) behind Texarkana while my armour (three divisions) moves to reserve at Muskogee to give some protection to Oklahoma City. I add two more infantry divisions here by rail. The Germans prove tougher than expected and survive two rounds of pasting supported by heavy bombers, albeit in a rather worse condition than they started the turn.
Italian armour is spotted moving south past Corpus Christi. This confirms that Jeremy plans an early move into Mexico, in which case the five Mexican divisions (plus three coming up next turn) I have here are really not going to be enough to hold Monterrey, although I can live with it. From Monterrey it's a long road to Tampico, where the battleground is a lot less open. Key thing will be not to lose all eight divisions in the coming battle, but anyway the threat is at least two more turns off at the moment. I have 2/3s of a US cavalry division reconstituted here and just enough spare rail lift for the missing 1/3 so I'll add this as cavalry are good for these wide open spaces, but also expendable.
Getting towards the end of my reserves- I'd guess I have two more turns of good stuff coming up, then a couple of turns of bringing up new and reconstituted units and trying to reassemble fragments- then it'll be time to grit my teeth and get through the worst of the Axis offensive.
The wide open spaces of the southwest easily swallow up all but the largest forces. Here eleven regular and three garrison divisions struggle to cover the 700km between the Mississippi and Oklahoma City- with nothing to the west.
The Axis are coming around my long right flank through Maine now, which is essentially unprotected. I don't think he has much here, but if he did it could get all the way around my right flank in one turn unless I can find a unit to block the road (I have an armoured regiment here at the moment but that's it). Actually that's not so much of a problem as the main line wasn't harassed this turn- not at all. Two divisions that were previously broken regroup and shift around to screen the approaches to Portland, and the Polish airborne division I had on my flank here pulls back in the same direction to avoid being isolated. I'd need at least two more pieces to make this a continuous line to the coast- we'll see if I can make this happen, perhaps by breaking down the divisions in the rough ground once they're secure. Jeremy is definitely planning something as he now has a total of four airborne divisions sat behind the lines ready to jump: the Canadians are much more vulnerable here as their supply condition is quite poor still. I add one more US infantry division from reserve to Maine to help close the gap here.
In the southeast, the Axis have followed up across the front, evidently trying to find the gaps in my line (there aren't any big ones north of Macon). The mechanised divisions that were in western NC last turn have fallen back to resupply but fresh ones showed up east of Atlanta and it's here I feel most threatened; I only have five divisions in Georgia and I drove my best armoured division up north last turn so it's well out of range. I pull back from my Macon position to set up southeast of Atlanta, which is the logical space for that Axis mobile force to move to next. Then I pull that fresh armoured division back down to just north of Atlanta, plus an infantry division and artillery. This should stop Jeremy if he tries the other flank of this force through the rough ground north of Gainesville. I also rail up two infantry divisions behind the city
Jeremy lunges across the Red River at Alexandria, putting my division on the destroyed crossing out of supply. He's not here in much strength, however and I'm able to RBC his unsupported engineers leaving the German cavalry division isolated. I surround it with the three divisions I had to hand in Louisiana and hope to destroy it. While this plays out I'm cautious in the west, drawing up my infantry (4 divisions) behind Texarkana while my armour (three divisions) moves to reserve at Muskogee to give some protection to Oklahoma City. I add two more infantry divisions here by rail. The Germans prove tougher than expected and survive two rounds of pasting supported by heavy bombers, albeit in a rather worse condition than they started the turn.
Italian armour is spotted moving south past Corpus Christi. This confirms that Jeremy plans an early move into Mexico, in which case the five Mexican divisions (plus three coming up next turn) I have here are really not going to be enough to hold Monterrey, although I can live with it. From Monterrey it's a long road to Tampico, where the battleground is a lot less open. Key thing will be not to lose all eight divisions in the coming battle, but anyway the threat is at least two more turns off at the moment. I have 2/3s of a US cavalry division reconstituted here and just enough spare rail lift for the missing 1/3 so I'll add this as cavalry are good for these wide open spaces, but also expendable.
Getting towards the end of my reserves- I'd guess I have two more turns of good stuff coming up, then a couple of turns of bringing up new and reconstituted units and trying to reassemble fragments- then it'll be time to grit my teeth and get through the worst of the Axis offensive.
The wide open spaces of the southwest easily swallow up all but the largest forces. Here eleven regular and three garrison divisions struggle to cover the 700km between the Mississippi and Oklahoma City- with nothing to the west.
- Attachments
-
- FG10a.png (1.45 MiB) Viewed 1977 times
"What did you read at university?"
"War Studies"
"War? Huh. What is it good for?"
"Absolutely nothing."
"War Studies"
"War? Huh. What is it good for?"
"Absolutely nothing."
-
Jeremy Mac Donald
- Posts: 355
- Joined: Tue Nov 07, 2000 10:00 am
- Location: Toronto, Ontario, Canada
Re: Fall Grau 2.28 Jeremy (Axis) vs. Ben (Allies)
Turn 11
I like this turn a fair bit more as things appear to start happening again on all fronts. In the North East, east of the St. Lawrence it continues to be about movement as Ben starts pulling back to refuse the flank. West of the St. Lawrence I finally manage to advance a little but that is getting me close to the better terrain and a situation where I either cut Ben off or he pulls back toward Montreal.
In the Southeast I shove the forces in front of Atlanta back and even begin shallow envelopments. Ben sent a fair bit this way last turn but I think I have him in what amounts to a meeting engagements and I don’t mind that.
In the South West Dallas and Fort Worth fall and I jump over the Red River in the West heading for Oklahoma. I had wanted to advance up to the Mississippi, but Ben is defending the Red River heavily and I am not willing to invest the kind of resources needed to break the line here. Ben can’t stay here long term and I’m fine to keep demonstrating against this line while the main drive keeps up the pace to the West.
I do manage, this turn, to start landing Italian rail guards.
San Antonio: 98%
I like this turn a fair bit more as things appear to start happening again on all fronts. In the North East, east of the St. Lawrence it continues to be about movement as Ben starts pulling back to refuse the flank. West of the St. Lawrence I finally manage to advance a little but that is getting me close to the better terrain and a situation where I either cut Ben off or he pulls back toward Montreal.
In the Southeast I shove the forces in front of Atlanta back and even begin shallow envelopments. Ben sent a fair bit this way last turn but I think I have him in what amounts to a meeting engagements and I don’t mind that.
In the South West Dallas and Fort Worth fall and I jump over the Red River in the West heading for Oklahoma. I had wanted to advance up to the Mississippi, but Ben is defending the Red River heavily and I am not willing to invest the kind of resources needed to break the line here. Ben can’t stay here long term and I’m fine to keep demonstrating against this line while the main drive keeps up the pace to the West.
I do manage, this turn, to start landing Italian rail guards.
San Antonio: 98%
Necesse est multos timeat quem multi timent
"He whom many fear, fears many"
- golden delicious
- Posts: 4168
- Joined: Tue Sep 05, 2000 8:00 am
- Location: London, Surrey, United Kingdom
Re: Fall Grau 2.28 Jeremy (Axis) vs. Ben (Allies)
Turn 11:
No airdrop- not yet. Instead Jeremy's mechanised forces in Canada are slogging through the rough country here, trying and failing to isolated one division on the line, though it's in a pretty precarious position now and I have to respond. I don't think it can withdraw cleanly from this position directly so instead I'll use the reserves I have locally to hammer the western of the two German prongs here, which is in really bad shape. I'm tempted to hit the other, too, but this contains a full-strength panzer division and so instead I just fill in the hex in front of it. East of the St. Lawrence all is quiet and I use the forces I have already in place here to extend the line to the sea between Bangor and Augusta. I pull most of my US armour back to reserve along the southern border of Quebec where it can rapidly be deployed west to support Canada if needed- or rail off to a crisis somewhere else on the front. This feels locked down and I suspect Jeremy has withdrawn most of his strength from this side of the river to focus on the Canadians. I rail one more Commonwealth armoured division up to Malartic; two strong divisions here could potentially fall on the rear of Jeremy's western flank later on, but this would be a risky move
The southeast is good. Jeremy's mechanised divisions outside Atlanta elected not to test the flanks of the two good infantry divisions in front of them and instead barged through them, disrupting both but also exhausting their initial strength- and here's me with a fair bit of armour behind the line. I set up powerful attacks on two rather battered panzergrenadier divisions, and a third on an infantry brigade which is exposed off to the south of the city. If this is going to develop into a serious engagement I'll need more here, so I strip two divisions off the line to the north (which is largely static) and send one armoured division down to Chattanooga. I also rail up four National Guard divisions behind Atlanta. In previous matches, these units have been sort of the Allied player's cannon fodder. With the changes to the replacement system for squads, I wonder if these units (which are much less powerful than the regular army divisions) might be better used in static positions where their limited cooperation with regulars and low mobility is less of a problem. For now, I'll use them in the mobile battle developing in Georgia and we'll see how we get on.
The Axis are testing the Red River along its length. The cavalry division I failed to destroy last turn is still in place so I'll hit it again, but now there are also German troops in contact with my line at Texarkana and crossing over into Oklahoma just north of Sherman, Texas. I decide to flex my muscles here, too, as Jeremy is well ahead of his supply line and is spread thin, with forces advancing in every direction from his original base at Galveston, almost to Odessa in the west and past Corpus Christi in the south. I set up a local attack on an exposed brigade but may develop this further if it goes well- I have scope to pin another two brigades against the Red River and my positions at Texarkana, and I bring engineers around to cross behind them at the end of the turn if needed. My three armoured divisions south of Tulsa stay put for now, and if Jeremy tries to flank my infantry line to the west I can fall into his rear, or I can swing west if he continues his drive directly to Oklahoma City. I add a fourth division by rail so this is starting to look like a serious force.
My reinforcements (three Mexican infantry and one US cavalry division) arrive at Monterrey this turn, and I reconfigure the position a bit in response. I now have a shield of six infantry divisions immediately in front of the city with refused flanks, then two cavalry divisions in a screen between here and the coast to prevent rapid infiltration toward Tampico. In reserve to the west is my one motorised division, to which I add another Mexican cavalry division by rail. This is fine if all Jeremy does is probe, but if he hits hard I'll need a striking force, which I'll add in the coming turns in the form of reconstituted US armour currently scattered around the map.
Another failed force proficiency check- third early turn ending in a row. I did a fair bit of damage (three panzergrenadier divisions and the German cavalry are all going to need to pull off the line to rebuild) but my positions are a bit dislocated in Quebec, Georgia and at Arkansas. If Jeremy is poised with a lot of fresh troops east of Dallas then I could get hit pretty bad here as I'm in an offensive posture, though I didn't fully commit and most of my force is still behind the Red River. The other areas are not too bad: at Quebec I may well lose 6th Infantry and be forced to pull this flank back even further, but overall the position is strong. In Atlanta the unmolested German troops may push through my centre but if they do I should be able to hit them pretty hard with the National Guard.
Both sides pour forces into Georgia as the Axis try to break into the Lower South
No airdrop- not yet. Instead Jeremy's mechanised forces in Canada are slogging through the rough country here, trying and failing to isolated one division on the line, though it's in a pretty precarious position now and I have to respond. I don't think it can withdraw cleanly from this position directly so instead I'll use the reserves I have locally to hammer the western of the two German prongs here, which is in really bad shape. I'm tempted to hit the other, too, but this contains a full-strength panzer division and so instead I just fill in the hex in front of it. East of the St. Lawrence all is quiet and I use the forces I have already in place here to extend the line to the sea between Bangor and Augusta. I pull most of my US armour back to reserve along the southern border of Quebec where it can rapidly be deployed west to support Canada if needed- or rail off to a crisis somewhere else on the front. This feels locked down and I suspect Jeremy has withdrawn most of his strength from this side of the river to focus on the Canadians. I rail one more Commonwealth armoured division up to Malartic; two strong divisions here could potentially fall on the rear of Jeremy's western flank later on, but this would be a risky move
The southeast is good. Jeremy's mechanised divisions outside Atlanta elected not to test the flanks of the two good infantry divisions in front of them and instead barged through them, disrupting both but also exhausting their initial strength- and here's me with a fair bit of armour behind the line. I set up powerful attacks on two rather battered panzergrenadier divisions, and a third on an infantry brigade which is exposed off to the south of the city. If this is going to develop into a serious engagement I'll need more here, so I strip two divisions off the line to the north (which is largely static) and send one armoured division down to Chattanooga. I also rail up four National Guard divisions behind Atlanta. In previous matches, these units have been sort of the Allied player's cannon fodder. With the changes to the replacement system for squads, I wonder if these units (which are much less powerful than the regular army divisions) might be better used in static positions where their limited cooperation with regulars and low mobility is less of a problem. For now, I'll use them in the mobile battle developing in Georgia and we'll see how we get on.
The Axis are testing the Red River along its length. The cavalry division I failed to destroy last turn is still in place so I'll hit it again, but now there are also German troops in contact with my line at Texarkana and crossing over into Oklahoma just north of Sherman, Texas. I decide to flex my muscles here, too, as Jeremy is well ahead of his supply line and is spread thin, with forces advancing in every direction from his original base at Galveston, almost to Odessa in the west and past Corpus Christi in the south. I set up a local attack on an exposed brigade but may develop this further if it goes well- I have scope to pin another two brigades against the Red River and my positions at Texarkana, and I bring engineers around to cross behind them at the end of the turn if needed. My three armoured divisions south of Tulsa stay put for now, and if Jeremy tries to flank my infantry line to the west I can fall into his rear, or I can swing west if he continues his drive directly to Oklahoma City. I add a fourth division by rail so this is starting to look like a serious force.
My reinforcements (three Mexican infantry and one US cavalry division) arrive at Monterrey this turn, and I reconfigure the position a bit in response. I now have a shield of six infantry divisions immediately in front of the city with refused flanks, then two cavalry divisions in a screen between here and the coast to prevent rapid infiltration toward Tampico. In reserve to the west is my one motorised division, to which I add another Mexican cavalry division by rail. This is fine if all Jeremy does is probe, but if he hits hard I'll need a striking force, which I'll add in the coming turns in the form of reconstituted US armour currently scattered around the map.
Another failed force proficiency check- third early turn ending in a row. I did a fair bit of damage (three panzergrenadier divisions and the German cavalry are all going to need to pull off the line to rebuild) but my positions are a bit dislocated in Quebec, Georgia and at Arkansas. If Jeremy is poised with a lot of fresh troops east of Dallas then I could get hit pretty bad here as I'm in an offensive posture, though I didn't fully commit and most of my force is still behind the Red River. The other areas are not too bad: at Quebec I may well lose 6th Infantry and be forced to pull this flank back even further, but overall the position is strong. In Atlanta the unmolested German troops may push through my centre but if they do I should be able to hit them pretty hard with the National Guard.
Both sides pour forces into Georgia as the Axis try to break into the Lower South
"What did you read at university?"
"War Studies"
"War? Huh. What is it good for?"
"Absolutely nothing."
"War Studies"
"War? Huh. What is it good for?"
"Absolutely nothing."
-
Jeremy Mac Donald
- Posts: 355
- Joined: Tue Nov 07, 2000 10:00 am
- Location: Toronto, Ontario, Canada
Re: Fall Grau 2.28 Jeremy (Axis) vs. Ben (Allies)
Turn 12
The last few turns should be labeled “Where is the artillery”? It really is king. I bludgeon my way one hex forward in the forests of Canada, finally pushing back the 6th British Division, after 5 or so attacks taking up basically the entire turn using by various combinations of an SS Panzer Division, a Panzer Division and 3 Panzergrenadier Divisions. It is an insane amount of work and exhausts these fine Divisions in the process. The problem, in my opinion, is that I don’t have artillery in this battle and that is greatly compounded by the fact that Ben does. Bottom Line – bring the fucking artillery if you want to advance. This is not really such a big deal if the terrain is open and the enemy is not entrenched or fortified but otherwise it is a problem.
This is the situation in Canada, on the upside it did finally work and a Canadian Division was destroyed. Almost reached the open ground and artillery is near the front. It is to late now but in retrospect this flank move through rough terrain was a bad idea and I should have just fought my way south through the clearer terrain on the east side of the St. Lawrence. The lesson is don’t fight significant resistance through rough terrain.
This has me looking at Virginia. I’ll want to modify this attack a bit to try and move more through the light woods but it is not so bad here as there is no significant resistance. If some appears I probably just shut the whole thing down until it leaves.
Georgia is becoming a much bigger deal as Ben appears determined to put up a real fight here. 5 Divisions of National Guard have shown up as well as some other units mainly from Ben beginning to strip other parts of the line in the area.
Hmm… I finally crack the manual again to familiarize myself with the terrain modifiers. OK interesting – light woods have no modifiers. The American south is almost all light woods. The woods slow movement off road but should not provide the defenders defensive bonuses.
This is good because a major fight is going to erupt here but I think this meeting engagement is still broadly favourable to me. The southern Flank should still be vulnerable to turning. In any case I drive a broad wedge into the Allied line north of Atlanta. Loads of artillery support help a lot with that.
The West is interesting with Ben continuing to defend the Red River line even as I surround Oklahoma this turn. Ben even goes on the offensive bashing back a screening brigade. One of the Divisions I have in the area moves up to support that area if Ben continues but I don’t want to be overreacting here. I don’t think Ben is planning an offensive this way except of the opportunistic kind. I even cross over again at another part of the line – which shows that the whole line is not actually defended but also will hopefully help to keep Ben interested in the area. He wants me to fight him here and I want to leverage him out without having to send to many resources this way – The Panzers have Oklahoma surrounded the Infantry comes up next turn and the Panzers spring forward again to Wichita. I am racing forward fast and I need everything coming ashore to support the ever expanding thrust toward the Missouri River.
On this topic there is still very little in terms of forces I have seen from Ben in the West. Those National Guard Divisions are ones I usually send near the end of my transport. Ben marches a lot more forces so I am actually wondering if Ben is beginning to run short of transport or if he is just saving the Armour for last? Also what is he going to use to defend the West? He eventually will need to send some forces. Though with the distances involved the Axis player can easily get over extended here.
Dallas: 89%
Loss Rate: Axis: 22 / Allies: 42 / Spread: 20
The last few turns should be labeled “Where is the artillery”? It really is king. I bludgeon my way one hex forward in the forests of Canada, finally pushing back the 6th British Division, after 5 or so attacks taking up basically the entire turn using by various combinations of an SS Panzer Division, a Panzer Division and 3 Panzergrenadier Divisions. It is an insane amount of work and exhausts these fine Divisions in the process. The problem, in my opinion, is that I don’t have artillery in this battle and that is greatly compounded by the fact that Ben does. Bottom Line – bring the fucking artillery if you want to advance. This is not really such a big deal if the terrain is open and the enemy is not entrenched or fortified but otherwise it is a problem.
This is the situation in Canada, on the upside it did finally work and a Canadian Division was destroyed. Almost reached the open ground and artillery is near the front. It is to late now but in retrospect this flank move through rough terrain was a bad idea and I should have just fought my way south through the clearer terrain on the east side of the St. Lawrence. The lesson is don’t fight significant resistance through rough terrain.
This has me looking at Virginia. I’ll want to modify this attack a bit to try and move more through the light woods but it is not so bad here as there is no significant resistance. If some appears I probably just shut the whole thing down until it leaves.
Georgia is becoming a much bigger deal as Ben appears determined to put up a real fight here. 5 Divisions of National Guard have shown up as well as some other units mainly from Ben beginning to strip other parts of the line in the area.
Hmm… I finally crack the manual again to familiarize myself with the terrain modifiers. OK interesting – light woods have no modifiers. The American south is almost all light woods. The woods slow movement off road but should not provide the defenders defensive bonuses.
This is good because a major fight is going to erupt here but I think this meeting engagement is still broadly favourable to me. The southern Flank should still be vulnerable to turning. In any case I drive a broad wedge into the Allied line north of Atlanta. Loads of artillery support help a lot with that.
The West is interesting with Ben continuing to defend the Red River line even as I surround Oklahoma this turn. Ben even goes on the offensive bashing back a screening brigade. One of the Divisions I have in the area moves up to support that area if Ben continues but I don’t want to be overreacting here. I don’t think Ben is planning an offensive this way except of the opportunistic kind. I even cross over again at another part of the line – which shows that the whole line is not actually defended but also will hopefully help to keep Ben interested in the area. He wants me to fight him here and I want to leverage him out without having to send to many resources this way – The Panzers have Oklahoma surrounded the Infantry comes up next turn and the Panzers spring forward again to Wichita. I am racing forward fast and I need everything coming ashore to support the ever expanding thrust toward the Missouri River.
On this topic there is still very little in terms of forces I have seen from Ben in the West. Those National Guard Divisions are ones I usually send near the end of my transport. Ben marches a lot more forces so I am actually wondering if Ben is beginning to run short of transport or if he is just saving the Armour for last? Also what is he going to use to defend the West? He eventually will need to send some forces. Though with the distances involved the Axis player can easily get over extended here.
Dallas: 89%
Loss Rate: Axis: 22 / Allies: 42 / Spread: 20
Necesse est multos timeat quem multi timent
"He whom many fear, fears many"
- golden delicious
- Posts: 4168
- Joined: Tue Sep 05, 2000 8:00 am
- Location: London, Surrey, United Kingdom
Re: Fall Grau 2.28 Jeremy (Axis) vs. Ben (Allies)
Turn 12:
The most dramatic thing from Jeremy this turn was that four mechanised divisions swung in a tight ring around Oklahoma City. Two of these are SS Panzers in good condition but the other two are battered panzergrenadiers. With my infantry over at Texarkana and largely pinned, they can do little immediately, so it's a question of whether I risk my armoured force largely unsupported to respond here. I don't think he can have much of a follow on force so this makes this a pretty even fight at the moment, though I see the SS cavalry division coming up through Texas. I send an engineer brigade on a probe around the western flank hoping to put the whole force out of supply, but I find another heavy armoured brigade here which makes this a non starter. I could try to cut off one panzergrendier division and destroy it but this is a risky operation so instead I will just hit him with a direct assault- in fact when I move to do this I see another two divisions off on the eastern flank and suddenly I feel Not Good about this whole operation: my four armoured divisions are now looking at six or more German divisions with some unknown quantity coming up the track. However with the German armour committed here I think I can pull my infantry up to stop this force floating in air, and I really don't want to let Jeremy get ahead too fast on the plain. Right about now I wish I had those three armoured divisions I lost at Austin. I wind up with my infantry seriously strung out between Oklahoma City and the Mississippi, but it should be enough to keep Jeremy from swing around both flanks of my armour. I add two divisions here by rail, one of which is an armoured division removed from the northeast; this is all I have that's really combat ready but more will be forthcoming. Really I need higher rail lift to swap fresh armour out of reserve for battered reconstitutes.
Atlanta looks OK at a glance, but the German attacks managed to disrupt a total of four divisions I had in the centre here, leaving one regiment of each in "reorganisation" preventing recombination. Well, I'm going to take a shot at the big prize here; I throw the National Guard in on one flank and my fresh troops in on the other in the hopes of trapping his armour in the centre. I send four of my broken down regiments off to the south flank, putting two German brigades out of supply. The rest of the southeast is largely solid; Jeremy shoved back two hexes which were not quite ready but didn't advance and I walk back in; this is where my reserves are if I do need to counterattack.
The German attack in Quebec went as expected and I lost the exposed division, but Jeremy is totally exhausted here and I decide to jump him. Two armoured divisions charge forward from Malartic and will collide with an Italian division guarding the route here (he's fixing the rail behind this so if I get through this could be messy) whilst I simultaneously make a two pronged attack in the hill country against the battered mechanised divisions which have borne the brunt of this effort for Jeremy so far.
Three separate offensives and all of them are sort of disappointing. At Oklahoma City, I hammer two of Jeremy's mechanised divisions and this will set him back, but I'm not sure I won't get worse on his turn. At Atlanta, I batter away at the salient but fail to pinch it off. In Quebec, I nibble the flanks but end up having to hit him in the centre as there's no prospect of cutting him off in this rough ground. About the biggest success was my two Commonwealth armoured divisions blasting through the Italians guarding the rail north of here, but this happened so late in the turn that I wasn't able to capitalise on this. Jeremy now has time to reorient his position and there's no real prospect of seriously compromising it: it looks bad on the map with about ten German divisions apparently about to be forced against the St. Maurice river but this is easily recoverable.
Hopefully this flurry of activity will give Jeremy another pause. Quebec will be fine as the rough ground there makes a serious advance very bloody. Georgia is OK for now but I will shortly find myself outgunned Jeremy's strength builds, and anyway he is already extending my flank out to the Gulf. At some point in the next ten turns this whole line will need to pivot back on the Tennessee river, giving the Germans access to Birmingham, Mobile and New Orleans as well as Atlanta. If that's all I lose by turn 20 that's fine as it gives me about 87% replacements, but I stand to lose Oklahoma City and possibly more besides.
I'm actually more confident in Oklahoma: Jeremy is quite strong here, but his railhead is at Houston. Once the Dallas supply point is gone that means he'll be on trace supply if he can't secure the city itself, and this turn he will have to choose between attacking it and dealing with my own concentrated armour. Looking at the map, I need to drop the Red River line as it's dragging my force out over too long a frontage; if I can extract the units here cleanly then I should be able to hold the Mississippi crossings with two or three divisions and then rest my flank on the Arkansas instead, giving Jeremy another set of bridges to fix.
The US armoured reserve comes to the aid of Oklahoma City
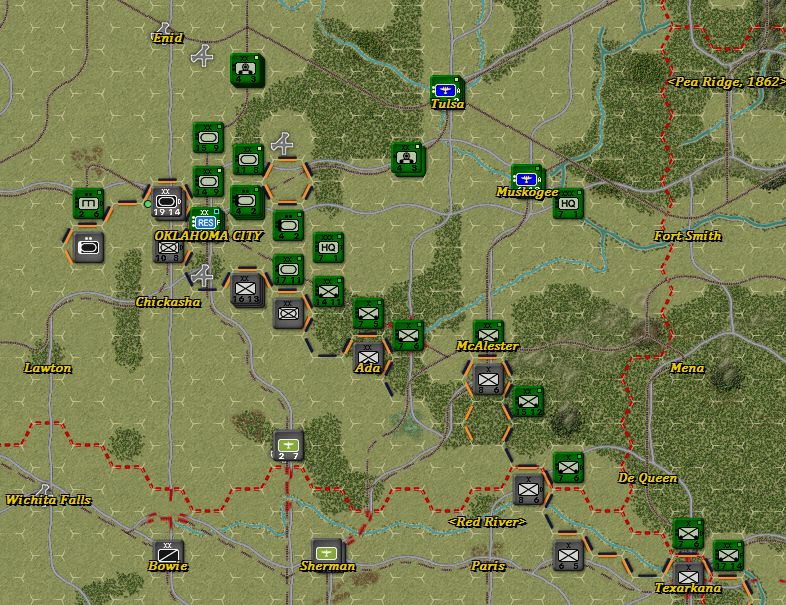
The most dramatic thing from Jeremy this turn was that four mechanised divisions swung in a tight ring around Oklahoma City. Two of these are SS Panzers in good condition but the other two are battered panzergrenadiers. With my infantry over at Texarkana and largely pinned, they can do little immediately, so it's a question of whether I risk my armoured force largely unsupported to respond here. I don't think he can have much of a follow on force so this makes this a pretty even fight at the moment, though I see the SS cavalry division coming up through Texas. I send an engineer brigade on a probe around the western flank hoping to put the whole force out of supply, but I find another heavy armoured brigade here which makes this a non starter. I could try to cut off one panzergrendier division and destroy it but this is a risky operation so instead I will just hit him with a direct assault- in fact when I move to do this I see another two divisions off on the eastern flank and suddenly I feel Not Good about this whole operation: my four armoured divisions are now looking at six or more German divisions with some unknown quantity coming up the track. However with the German armour committed here I think I can pull my infantry up to stop this force floating in air, and I really don't want to let Jeremy get ahead too fast on the plain. Right about now I wish I had those three armoured divisions I lost at Austin. I wind up with my infantry seriously strung out between Oklahoma City and the Mississippi, but it should be enough to keep Jeremy from swing around both flanks of my armour. I add two divisions here by rail, one of which is an armoured division removed from the northeast; this is all I have that's really combat ready but more will be forthcoming. Really I need higher rail lift to swap fresh armour out of reserve for battered reconstitutes.
Atlanta looks OK at a glance, but the German attacks managed to disrupt a total of four divisions I had in the centre here, leaving one regiment of each in "reorganisation" preventing recombination. Well, I'm going to take a shot at the big prize here; I throw the National Guard in on one flank and my fresh troops in on the other in the hopes of trapping his armour in the centre. I send four of my broken down regiments off to the south flank, putting two German brigades out of supply. The rest of the southeast is largely solid; Jeremy shoved back two hexes which were not quite ready but didn't advance and I walk back in; this is where my reserves are if I do need to counterattack.
The German attack in Quebec went as expected and I lost the exposed division, but Jeremy is totally exhausted here and I decide to jump him. Two armoured divisions charge forward from Malartic and will collide with an Italian division guarding the route here (he's fixing the rail behind this so if I get through this could be messy) whilst I simultaneously make a two pronged attack in the hill country against the battered mechanised divisions which have borne the brunt of this effort for Jeremy so far.
Three separate offensives and all of them are sort of disappointing. At Oklahoma City, I hammer two of Jeremy's mechanised divisions and this will set him back, but I'm not sure I won't get worse on his turn. At Atlanta, I batter away at the salient but fail to pinch it off. In Quebec, I nibble the flanks but end up having to hit him in the centre as there's no prospect of cutting him off in this rough ground. About the biggest success was my two Commonwealth armoured divisions blasting through the Italians guarding the rail north of here, but this happened so late in the turn that I wasn't able to capitalise on this. Jeremy now has time to reorient his position and there's no real prospect of seriously compromising it: it looks bad on the map with about ten German divisions apparently about to be forced against the St. Maurice river but this is easily recoverable.
Hopefully this flurry of activity will give Jeremy another pause. Quebec will be fine as the rough ground there makes a serious advance very bloody. Georgia is OK for now but I will shortly find myself outgunned Jeremy's strength builds, and anyway he is already extending my flank out to the Gulf. At some point in the next ten turns this whole line will need to pivot back on the Tennessee river, giving the Germans access to Birmingham, Mobile and New Orleans as well as Atlanta. If that's all I lose by turn 20 that's fine as it gives me about 87% replacements, but I stand to lose Oklahoma City and possibly more besides.
I'm actually more confident in Oklahoma: Jeremy is quite strong here, but his railhead is at Houston. Once the Dallas supply point is gone that means he'll be on trace supply if he can't secure the city itself, and this turn he will have to choose between attacking it and dealing with my own concentrated armour. Looking at the map, I need to drop the Red River line as it's dragging my force out over too long a frontage; if I can extract the units here cleanly then I should be able to hold the Mississippi crossings with two or three divisions and then rest my flank on the Arkansas instead, giving Jeremy another set of bridges to fix.
The US armoured reserve comes to the aid of Oklahoma City
"What did you read at university?"
"War Studies"
"War? Huh. What is it good for?"
"Absolutely nothing."
"War Studies"
"War? Huh. What is it good for?"
"Absolutely nothing."
-
Jeremy Mac Donald
- Posts: 355
- Joined: Tue Nov 07, 2000 10:00 am
- Location: Toronto, Ontario, Canada
Re: Fall Grau 2.28 Jeremy (Axis) vs. Ben (Allies)
Turn 13
Well things get much more exciting. In Canada Ben pushes back some of my advances but the more exciting event is an armoured attack on my western rear. I move some units up here to block. If Ben is still here next turn I will look to airdrop to cut these guys off and destroy them.
In the South East, around Atlanta, Ben tries to bust his way into cutting me off in a number of places but none of it actually works. However, I am very aggressive on my turn and have some units kind of hanging. I’ll need to throw the resting forces back into the fray. They where only going to rest for around one more turn in any case. Ben has heavily reinforced this front with yet more National Guard showing up.
he even launches his counterattack at Oklahoma. Here again my aggressiveness leaves a unit hanging. Here I am less concerned. I can’t really see Ben getting to the unit without me being able to get to him on the next turn so this might just become a nasty little bloodbath.
Speaking of bloodbaths I finally get the Allied Loss Rate going up this turn.
[Edit: Ben is mistaken about the supply line. The RR unit from Dallas is already working the line south and the line from Houston went West first before heading north from around San Antonio. The whole line will be just north of Fort Worth (bottom of the image here) in two turns.]
Well things get much more exciting. In Canada Ben pushes back some of my advances but the more exciting event is an armoured attack on my western rear. I move some units up here to block. If Ben is still here next turn I will look to airdrop to cut these guys off and destroy them.
In the South East, around Atlanta, Ben tries to bust his way into cutting me off in a number of places but none of it actually works. However, I am very aggressive on my turn and have some units kind of hanging. I’ll need to throw the resting forces back into the fray. They where only going to rest for around one more turn in any case. Ben has heavily reinforced this front with yet more National Guard showing up.
he even launches his counterattack at Oklahoma. Here again my aggressiveness leaves a unit hanging. Here I am less concerned. I can’t really see Ben getting to the unit without me being able to get to him on the next turn so this might just become a nasty little bloodbath.
Speaking of bloodbaths I finally get the Allied Loss Rate going up this turn.
[Edit: Ben is mistaken about the supply line. The RR unit from Dallas is already working the line south and the line from Houston went West first before heading north from around San Antonio. The whole line will be just north of Fort Worth (bottom of the image here) in two turns.]
Necesse est multos timeat quem multi timent
"He whom many fear, fears many"
- golden delicious
- Posts: 4168
- Joined: Tue Sep 05, 2000 8:00 am
- Location: London, Surrey, United Kingdom
Re: Fall Grau 2.28 Jeremy (Axis) vs. Ben (Allies)
Turn 13:
Lots of messes to clean up. First, I was a bit late about the Red River line as Jeremy has already compromised this and withdrawal is looking like it will be messy. I'm forced to leave behind significant forces, some of which may escape later and others which definitely won't. Fortunately, Jeremy has no mobile forces here so his follow up will be sluggish and the terrain worsens as we move north. Further north, Jeremy counterattacked my armour but neither significantly damaged this force nor took Oklahoma City, and so I will hit back with my enlarged force here, again focusing (at least initially) on hitting German divisions at an advantage to sap Jeremy's strength rather than on elaborate encircling operations which could backfire. I concentrate my reinforcements here this turn; two armoured and two infantry divisions.
Atlanta is chaos too. My shenanigans with odd broken down bits last turn has those bits now in trouble and prevents me consolidating into divisions. He's pushed his armour deep past Atlanta connected only by an HQ but for some reason it fails to RBC- which is absurd. I'll hit this and then hit the trapped troops, which have bumped into my three additional National Guard divisions. I'm also counterattacking to the north where another panzer division is badly exposed. We'll see how this plays out. I add an armoured division here to keep this front alive a bit longer
Quebec is as usual the calmest front, with Jeremy counterattacking toward Montreal but otherwise just moving to block his exposed northwest flank. I'm outnumbered here so these two Commonwealth divisions pull back to Malartic without difficulty. I tidy up the front and then dig in.
Some cheering results. Jeremy's units are definitely being pushed to their limit and several units evaporate on the line, including a heavy tank brigade, and a full panzergrenadier division RBCs when poked. I get yet another early turn ending (fourth in five turns) but I feel like I'm making my point; two German mechanised divisions are out of supply southwest of Atlanta and I've seriously roughed up Jeremy's forces at Oklahoma City. I still have about five divisions in reserve, and I can probably strip another armoured division from the northeast. Jeremy may be under the impression I have an armour shortage after my losses earlier in the scenario but my high replacement rate means I have six hundred Shermans on hand. I also note with satisfaction that I have MORE squads on hand in every major category than at the start of the scenario (ableit only by a margin of 8 in Rifle AT- squads). That means I have enough equipment to reconstitute 39 US regular divisions, 25 Canadian divisions and 43 National Guard divisions. Of course they'd have to make do without their heavy equipment, of which I have much less.
Complex fighting around Atlanta where early turn ending doesn't help
Lots of messes to clean up. First, I was a bit late about the Red River line as Jeremy has already compromised this and withdrawal is looking like it will be messy. I'm forced to leave behind significant forces, some of which may escape later and others which definitely won't. Fortunately, Jeremy has no mobile forces here so his follow up will be sluggish and the terrain worsens as we move north. Further north, Jeremy counterattacked my armour but neither significantly damaged this force nor took Oklahoma City, and so I will hit back with my enlarged force here, again focusing (at least initially) on hitting German divisions at an advantage to sap Jeremy's strength rather than on elaborate encircling operations which could backfire. I concentrate my reinforcements here this turn; two armoured and two infantry divisions.
Atlanta is chaos too. My shenanigans with odd broken down bits last turn has those bits now in trouble and prevents me consolidating into divisions. He's pushed his armour deep past Atlanta connected only by an HQ but for some reason it fails to RBC- which is absurd. I'll hit this and then hit the trapped troops, which have bumped into my three additional National Guard divisions. I'm also counterattacking to the north where another panzer division is badly exposed. We'll see how this plays out. I add an armoured division here to keep this front alive a bit longer
Quebec is as usual the calmest front, with Jeremy counterattacking toward Montreal but otherwise just moving to block his exposed northwest flank. I'm outnumbered here so these two Commonwealth divisions pull back to Malartic without difficulty. I tidy up the front and then dig in.
Some cheering results. Jeremy's units are definitely being pushed to their limit and several units evaporate on the line, including a heavy tank brigade, and a full panzergrenadier division RBCs when poked. I get yet another early turn ending (fourth in five turns) but I feel like I'm making my point; two German mechanised divisions are out of supply southwest of Atlanta and I've seriously roughed up Jeremy's forces at Oklahoma City. I still have about five divisions in reserve, and I can probably strip another armoured division from the northeast. Jeremy may be under the impression I have an armour shortage after my losses earlier in the scenario but my high replacement rate means I have six hundred Shermans on hand. I also note with satisfaction that I have MORE squads on hand in every major category than at the start of the scenario (ableit only by a margin of 8 in Rifle AT- squads). That means I have enough equipment to reconstitute 39 US regular divisions, 25 Canadian divisions and 43 National Guard divisions. Of course they'd have to make do without their heavy equipment, of which I have much less.
Complex fighting around Atlanta where early turn ending doesn't help
"What did you read at university?"
"War Studies"
"War? Huh. What is it good for?"
"Absolutely nothing."
"War Studies"
"War? Huh. What is it good for?"
"Absolutely nothing."
-
Jeremy Mac Donald
- Posts: 355
- Joined: Tue Nov 07, 2000 10:00 am
- Location: Toronto, Ontario, Canada
Re: Fall Grau 2.28 Jeremy (Axis) vs. Ben (Allies)
Chance the Allies fail a proficiency check:golden delicious wrote: Sun Aug 28, 2022 8:50 am I get yet another early turn ending (fourth in five turns)
after 1 round = 30%
after 2 rounds = 51%
after 3 rounds = 66%
after 4 rounds = 76%
after 5 rounds = 83%
The real shocking number is that you should fail after round 2 more then 50% of the time.
Chance the Axis fail a proficiency check:
after 1 round = 10%
after 2 rounds = 19%
after 3 rounds = 27%
after 4 rounds = 34%
after 5 rounds = 41%
after 6 rounds = 47%
after 7 rounds = 52%
after 8 rounds = 57%
Needless to say the Axis failing a proficiency check is something to write home about. Its pretty rare - usually you just run out of rounds.
Necesse est multos timeat quem multi timent
"He whom many fear, fears many"
-
Jeremy Mac Donald
- Posts: 355
- Joined: Tue Nov 07, 2000 10:00 am
- Location: Toronto, Ontario, Canada
Re: Fall Grau 2.28 Jeremy (Axis) vs. Ben (Allies)
Turn 14
I was nervous about Ben’s counterattack surrounding and destroying some units that got a little to far out on a limb but that does not happen. What does happen is a couple of units simply evaporate when attacked which is not much better.
Up in Canada I skip the airdrop as Ben’s armoured counter move has withdrawn. Ben pushes me back some but I break forward enough here to have potentially cut Ben’s forces off, unless he has a well positioned engineer I cannot see. I could see Ben pushing me back yet again but I think I am finally about to fight my way out of this thick forest over the next few turns.
I think I will cease to reinforce this front with German’s and concentrate non mobile Italians up here. It is a waste not to be using the Italian artillery and this front looks like it could benefit from a lot of German Divisions being released and also benefits most from a hex by hex advance. I also already have loads of Germans here and am concerned that I could end up with to many of them trying to fight through to tight a space. Though for some time to come it will have to be Italians that guard the rails on other fronts as well.
In Georgia Ben pushes me back somewhat and then I do the same. We are engaged in something of a shoving match at the moment but I think I should soon begin to get the upper hand here as the southern flank of this fight is very much going my way. I suddenly realize that some Italians to help clear out Florida would also be most welcome here. Seems like there are a lot of jobs for Italians.
In the Southwest Ben has pretty much abandoned the Red River line this turn. Some of those forces are falling back to defend the next line of rivers (Mississippi & the Arkansas River) but a lot of this seems to be a desire to reinforce the line in Oklahoma. My attack here is weak as a lot of the Panzertruppen are reorganizing but I cut the supply lines for Ben’s northern flank and lots of excellent Infantry is just about to arrive on the front.
The situation in the match is making me increasingly nervous with Ben remaining at 89% replacement rate I need to bring that number down and the time I have to do so is getting uncomfortably short. On the upside I note that Ben has started to shift some units from front to front as opposed to from the West so I suspect that he is essentially out of reserves.
I also not that he does not seem to have much defending the West Coast – my issue here is he is still at a stage in the match where he could easily rectify that. One of the difficulties with the Japanese is that they can only firmly land if the Allies are desperate on other fronts. If the Allies are not doing to badly it is really hard to get them ashore. At this moment I don’t think it would be that devastating for Ben to simply transfer a bunch of Armoured Divisions to the West and blast the Japanese back off the continent. He would lose the ability to counter attack (probably in the north) but that would be survivable for him.
I was nervous about Ben’s counterattack surrounding and destroying some units that got a little to far out on a limb but that does not happen. What does happen is a couple of units simply evaporate when attacked which is not much better.
Up in Canada I skip the airdrop as Ben’s armoured counter move has withdrawn. Ben pushes me back some but I break forward enough here to have potentially cut Ben’s forces off, unless he has a well positioned engineer I cannot see. I could see Ben pushing me back yet again but I think I am finally about to fight my way out of this thick forest over the next few turns.
I think I will cease to reinforce this front with German’s and concentrate non mobile Italians up here. It is a waste not to be using the Italian artillery and this front looks like it could benefit from a lot of German Divisions being released and also benefits most from a hex by hex advance. I also already have loads of Germans here and am concerned that I could end up with to many of them trying to fight through to tight a space. Though for some time to come it will have to be Italians that guard the rails on other fronts as well.
In Georgia Ben pushes me back somewhat and then I do the same. We are engaged in something of a shoving match at the moment but I think I should soon begin to get the upper hand here as the southern flank of this fight is very much going my way. I suddenly realize that some Italians to help clear out Florida would also be most welcome here. Seems like there are a lot of jobs for Italians.
In the Southwest Ben has pretty much abandoned the Red River line this turn. Some of those forces are falling back to defend the next line of rivers (Mississippi & the Arkansas River) but a lot of this seems to be a desire to reinforce the line in Oklahoma. My attack here is weak as a lot of the Panzertruppen are reorganizing but I cut the supply lines for Ben’s northern flank and lots of excellent Infantry is just about to arrive on the front.
The situation in the match is making me increasingly nervous with Ben remaining at 89% replacement rate I need to bring that number down and the time I have to do so is getting uncomfortably short. On the upside I note that Ben has started to shift some units from front to front as opposed to from the West so I suspect that he is essentially out of reserves.
I also not that he does not seem to have much defending the West Coast – my issue here is he is still at a stage in the match where he could easily rectify that. One of the difficulties with the Japanese is that they can only firmly land if the Allies are desperate on other fronts. If the Allies are not doing to badly it is really hard to get them ashore. At this moment I don’t think it would be that devastating for Ben to simply transfer a bunch of Armoured Divisions to the West and blast the Japanese back off the continent. He would lose the ability to counter attack (probably in the north) but that would be survivable for him.
Necesse est multos timeat quem multi timent
"He whom many fear, fears many"
- golden delicious
- Posts: 4168
- Joined: Tue Sep 05, 2000 8:00 am
- Location: London, Surrey, United Kingdom
Re: Fall Grau 2.28 Jeremy (Axis) vs. Ben (Allies)
As I recall, the chance of a failed proficiency check depends on both the force proficiency and the % of the turn remaining- irrespective of the number of actual rounds that have occurred.Jeremy Mac Donald wrote: Mon Aug 29, 2022 3:50 pmChance the Allies fail a proficiency check:golden delicious wrote: Sun Aug 28, 2022 8:50 am I get yet another early turn ending (fourth in five turns)
after 1 round = 30%
after 2 rounds = 51%
after 3 rounds = 66%
after 4 rounds = 76%
after 5 rounds = 83%
The real shocking number is that you should fail after round 2 more then 50% of the time.
Chance the Axis fail a proficiency check:
after 1 round = 10%
after 2 rounds = 19%
after 3 rounds = 27%
after 4 rounds = 34%
after 5 rounds = 41%
after 6 rounds = 47%
after 7 rounds = 52%
after 8 rounds = 57%
Needless to say the Axis failing a proficiency check is something to write home about. Its pretty rare - usually you just run out of rounds.
"What did you read at university?"
"War Studies"
"War? Huh. What is it good for?"
"Absolutely nothing."
"War Studies"
"War? Huh. What is it good for?"
"Absolutely nothing."
- golden delicious
- Posts: 4168
- Joined: Tue Sep 05, 2000 8:00 am
- Location: London, Surrey, United Kingdom
Re: Fall Grau 2.28 Jeremy (Axis) vs. Ben (Allies)
He's there alright. You caught me with this move once before in this match and I was quite sure it wasn't going to happen a second time.Jeremy Mac Donald wrote: Mon Aug 29, 2022 4:00 pmBen pushes me back some but I break forward enough here to have potentially cut Ben’s forces off, unless he has a well positioned engineer I cannot see.
"What did you read at university?"
"War Studies"
"War? Huh. What is it good for?"
"Absolutely nothing."
"War Studies"
"War? Huh. What is it good for?"
"Absolutely nothing."
- golden delicious
- Posts: 4168
- Joined: Tue Sep 05, 2000 8:00 am
- Location: London, Surrey, United Kingdom
Re: Fall Grau 2.28 Jeremy (Axis) vs. Ben (Allies)
Turn 14:
Lots more excitement across the front. In Quebec, Jeremy's exhausted panzers have drawn themselves up for another attempt to breakthrough toward the St. Lawrence, but I feel fairly comfortable here and will counterattack again. One more Canadian division is ready for transport so is added here this turn.
Atlanta is this turn at the bottom of a fairly deep salient. Perhaps more to the point, Jeremy's strength is coming through my ill-conceived screen of odd regiments further south and the city and indeed the whole lower South is quite untenable. I make a counterattack north of the city but evacuate from the salient itself as much as possible this turn, with more to be extracted later. The whole southern flank is quite mobile and I pull out five divisions which mostly begin preparing positions on the north bank of the Tennessee.
I'm wrapping up the withdrawal from the Red River line; I think I lost about two divisions here, though more annoyingly the losses were spread amongst divisions so leave my force quite disrupted. The main thing is that I have enough back at the Mississippi-Arkansas to block the crossings and Jeremy's mobile forces are concentrated to the northwest at Oklahoma City, so there's not much danger of a rapid pursuit here. Speaking of Oklahoma, the Germans continue to press my western flank here but with the city still in my hands Axis supply is abominable. His lead division- SS Florian Geyer- is also badly exposed, and I intend to isolate it this turn and destroy if possible, while also maintaining pressure on lead Axis units to the east and west. As I'm backing off in Georgia this front continues to receive the lion's share of reinforcements: two each of armoured divisions, tank brigades and infantry divisions. This is starting to look like the bottom of the barrel and from here on out I'll be rearranging things and recombining units that were part reconstituted in different places.
The Italians are still not lunging for Monterrey and so I pull the US cavalry division off the line here. Next turn, it'll rail up to Oklahoma along with whatever else I can scrape together.
The attack on Florian Geyer goes off swimmingly, with the division isolated in a quick early attack and the annihilated by concentric attacks from multiple armoured divisions, leaving one round left to tidy up and hit SS Liebstandarte too. I'm sure Jeremy has more coming up behind the line but I think I can keep this up for one or two more turns, until either my reinforcements dry up or Jeremy gets his hands on the supply point at Oklahoma City. At the moment I'm riding pretty high and wide but I do need to keep my eye on the ball here as ultimately I'll be overwhelmed if I stay in one place like this. I also note I'm down by six hundred Rifle AT- squads versus last turn; at that rate I run out by turn 30, which is not pretty.
Allied troops pull back from Atlanta and begin preparing the Tennessee River line
Lots more excitement across the front. In Quebec, Jeremy's exhausted panzers have drawn themselves up for another attempt to breakthrough toward the St. Lawrence, but I feel fairly comfortable here and will counterattack again. One more Canadian division is ready for transport so is added here this turn.
Atlanta is this turn at the bottom of a fairly deep salient. Perhaps more to the point, Jeremy's strength is coming through my ill-conceived screen of odd regiments further south and the city and indeed the whole lower South is quite untenable. I make a counterattack north of the city but evacuate from the salient itself as much as possible this turn, with more to be extracted later. The whole southern flank is quite mobile and I pull out five divisions which mostly begin preparing positions on the north bank of the Tennessee.
I'm wrapping up the withdrawal from the Red River line; I think I lost about two divisions here, though more annoyingly the losses were spread amongst divisions so leave my force quite disrupted. The main thing is that I have enough back at the Mississippi-Arkansas to block the crossings and Jeremy's mobile forces are concentrated to the northwest at Oklahoma City, so there's not much danger of a rapid pursuit here. Speaking of Oklahoma, the Germans continue to press my western flank here but with the city still in my hands Axis supply is abominable. His lead division- SS Florian Geyer- is also badly exposed, and I intend to isolate it this turn and destroy if possible, while also maintaining pressure on lead Axis units to the east and west. As I'm backing off in Georgia this front continues to receive the lion's share of reinforcements: two each of armoured divisions, tank brigades and infantry divisions. This is starting to look like the bottom of the barrel and from here on out I'll be rearranging things and recombining units that were part reconstituted in different places.
The Italians are still not lunging for Monterrey and so I pull the US cavalry division off the line here. Next turn, it'll rail up to Oklahoma along with whatever else I can scrape together.
The attack on Florian Geyer goes off swimmingly, with the division isolated in a quick early attack and the annihilated by concentric attacks from multiple armoured divisions, leaving one round left to tidy up and hit SS Liebstandarte too. I'm sure Jeremy has more coming up behind the line but I think I can keep this up for one or two more turns, until either my reinforcements dry up or Jeremy gets his hands on the supply point at Oklahoma City. At the moment I'm riding pretty high and wide but I do need to keep my eye on the ball here as ultimately I'll be overwhelmed if I stay in one place like this. I also note I'm down by six hundred Rifle AT- squads versus last turn; at that rate I run out by turn 30, which is not pretty.
Allied troops pull back from Atlanta and begin preparing the Tennessee River line
"What did you read at university?"
"War Studies"
"War? Huh. What is it good for?"
"Absolutely nothing."
"War Studies"
"War? Huh. What is it good for?"
"Absolutely nothing."
-
Jeremy Mac Donald
- Posts: 355
- Joined: Tue Nov 07, 2000 10:00 am
- Location: Toronto, Ontario, Canada
Re: Fall Grau 2.28 Jeremy (Axis) vs. Ben (Allies)
Looked this up and you are correct - there is an amount of the turn used element though what that percentage check actually is remains a mystery. I vaguely recall some one once claiming that it was just the percentage of the turn used up but who knows if that is true or not.golden delicious wrote: Tue Aug 30, 2022 5:22 pmAs I recall, the chance of a failed proficiency check depends on both the force proficiency and the % of the turn remaining- irrespective of the number of actual rounds that have occurred.Jeremy Mac Donald wrote: Mon Aug 29, 2022 3:50 pmChance the Allies fail a proficiency check:golden delicious wrote: Sun Aug 28, 2022 8:50 am I get yet another early turn ending (fourth in five turns)
after 1 round = 30%
after 2 rounds = 51%
after 3 rounds = 66%
after 4 rounds = 76%
after 5 rounds = 83%
The real shocking number is that you should fail after round 2 more then 50% of the time.
Chance the Axis fail a proficiency check:
after 1 round = 10%
after 2 rounds = 19%
after 3 rounds = 27%
after 4 rounds = 34%
after 5 rounds = 41%
after 6 rounds = 47%
after 7 rounds = 52%
after 8 rounds = 57%
Needless to say the Axis failing a proficiency check is something to write home about. Its pretty rare - usually you just run out of rounds.
Necesse est multos timeat quem multi timent
"He whom many fear, fears many"
-
Jeremy Mac Donald
- Posts: 355
- Joined: Tue Nov 07, 2000 10:00 am
- Location: Toronto, Ontario, Canada
Re: Fall Grau 2.28 Jeremy (Axis) vs. Ben (Allies)
Turn 15
Not to bad a turn I think. Ben counter attacks in Quebec and pushes me back but this turn my artillery is finally really in place and I blast my way forward cutting off and destroying the Commonwealth Armoured Division he had holding the other side of the St. Maurice River. I’m pretty much on the plains now and should be able to continue pushing south.
In the South East I just kind of blast the Allied line back leaving Atlanta cut off in the rear. Though I think Ben was already preparing for a withdrawal in the area.
The American South has what might be the most interesting event as on a whim I sent an Italian Division to land at Gulfport between Mobile and New Orleans and to my surprise it was undefended. I’d already gathered what I was planning on landing on the main fronts so could not change the composition but here I changed my landing points and some Italian Fast units, a bunch of Italian Infantry and a Panzer Division and Mechanized Division all land here. Ben might be able to cut me off from supplies but I think he will have to strain to do it and I am not that far from being relieved from both the east and the west. If I am blitzing forward from the south here that could unhinge the defensive lines Ben has been throwing up in the south and allow me to start taking Industrial Cities and putting pressure on Ben’s line quickly. It also might convince him that he has to cover his beaches lest I take advantage of them.
Only the South Western Front is a disappointment. A bunch of good units where reorganizing this turn and Ben has been feeding a fair amount into this fight so the front pretty much stalls. I do have some solid reinforcements arriving here over the next few turns so hopefully I can get this going again. Pretty sure Ben is basically out of reinforcements at this point as well as what he moved appeared to be primarily reconstituting forces and the odd reinforcement.
As is always the case the scenario really show cases how much better the Germans are, quality wise, then the Allies. Ben get’s 3 rounds on an average turn and my Germans are getting 6. If you can get in position for a fight you can really beat the crap out of the Allies though I note that the Loss rating only shifted very slightly in my favour this turn. Hopefully I can soon start to push that number up more impressively. Right now losses are jumping but they are jumping for both of us. I will say that I think that favours me in the early stages of the scenario.
Not to bad a turn I think. Ben counter attacks in Quebec and pushes me back but this turn my artillery is finally really in place and I blast my way forward cutting off and destroying the Commonwealth Armoured Division he had holding the other side of the St. Maurice River. I’m pretty much on the plains now and should be able to continue pushing south.
In the South East I just kind of blast the Allied line back leaving Atlanta cut off in the rear. Though I think Ben was already preparing for a withdrawal in the area.
The American South has what might be the most interesting event as on a whim I sent an Italian Division to land at Gulfport between Mobile and New Orleans and to my surprise it was undefended. I’d already gathered what I was planning on landing on the main fronts so could not change the composition but here I changed my landing points and some Italian Fast units, a bunch of Italian Infantry and a Panzer Division and Mechanized Division all land here. Ben might be able to cut me off from supplies but I think he will have to strain to do it and I am not that far from being relieved from both the east and the west. If I am blitzing forward from the south here that could unhinge the defensive lines Ben has been throwing up in the south and allow me to start taking Industrial Cities and putting pressure on Ben’s line quickly. It also might convince him that he has to cover his beaches lest I take advantage of them.
Only the South Western Front is a disappointment. A bunch of good units where reorganizing this turn and Ben has been feeding a fair amount into this fight so the front pretty much stalls. I do have some solid reinforcements arriving here over the next few turns so hopefully I can get this going again. Pretty sure Ben is basically out of reinforcements at this point as well as what he moved appeared to be primarily reconstituting forces and the odd reinforcement.
As is always the case the scenario really show cases how much better the Germans are, quality wise, then the Allies. Ben get’s 3 rounds on an average turn and my Germans are getting 6. If you can get in position for a fight you can really beat the crap out of the Allies though I note that the Loss rating only shifted very slightly in my favour this turn. Hopefully I can soon start to push that number up more impressively. Right now losses are jumping but they are jumping for both of us. I will say that I think that favours me in the early stages of the scenario.
Necesse est multos timeat quem multi timent
"He whom many fear, fears many"
- golden delicious
- Posts: 4168
- Joined: Tue Sep 05, 2000 8:00 am
- Location: London, Surrey, United Kingdom
Re: Fall Grau 2.28 Jeremy (Axis) vs. Ben (Allies)
Turn 15:
Looks like Jeremy landed some units on the unprotected anchorages west of Mobile. While this is hardly ideal, I had pretty much resolved to abandon the area south of the Tennessee anyway so this merely accelerates matters slightly. I have a fair number of units still sitting on the east bank of the Mississippi so these trundle off to have a look see if I can make a nuisance of myself, but it looks like Jeremy has set a fairly consistent perimeter here and there's no room to get behind him [ I realise later that of course he has no supply point here and just by chance my little perimeter cuts his supply]. As such, two and a half divisions screen this advance to stop Jeremy getting too far ahead of himself. I had been toying with a serious defence of Birmingham, at least for a few turns, but these developments among other things make this too much for my rather overstretched forces. Along with everything else, I have one of my higher formations in reorganisation this turn which leaves two big HQs exposed west of Atlanta and so I decide to keep holding a forward line here for them to retreat back to on Jeremy's turn. Having said that I demur for now and leave my armoured reserve here- three divisions in excellent condition.
It takes me a moment to realise it- but Jeremy was also able to gobble up my Commonwealth force on the west bank of the St. Lawrence. This is bad in itself- a first rate armoured division, fortified, destroyed in one turn along with some other bits- but with the Trois Rivieres position gone the whole west flank of the American position on the other bank is compromised. I manage to screw up pretty badly and dig a couple of units in forward before I realise I need to pull back, hopefully I can fix this in coming turns. The good news is that the US line is otherwise rock solid and backed by significant reserves and I will for now just bend back where I'm in touch with the St. Lawrence. The bad news is that the Canadians now have their backs against the wall, with the St. Lawrence and Ottawa rivers dangerously close in the rear and Montreal not far behind. Next turn I'll contemplate pulling back the whole position behind Montreal but for now I'm stuck forward due to my careless clicking with the US troops, and anyway this position still has a fair amount to recommend it, backed as it is by a rail line while most of the Axis troops must still drag their supplies over the rough country to the northwest. I rail the last Commonwealth armoured division out from the Pacific to here this turn, leaving me with essentially no reserve in the Pacific. This is not a good position to be in the long run so probably next turn I'll rail a tired armoured division back (I have plenty of those at this point).
Jeremy didn't try to outflank me or breach my line in Oklahoma this turn, instead opting for a frontal attack, putting the city itself in a dangerous salient. A lot of the German units here are in really bad shape, and I'm tempted to test Jeremy's own flank. Actually I see a broken rail hex here which I need to check. It turns out this is just a screen of South American cavalry which I smash by RBC, but I don't have the MPs to get further around the flank this turn, so I will hit him in a number of places he's weak or exposed, starting with SS Wiking which is coming around the north flank of Oklahoma City. I'm able to add three cavalry divisions and an infantry division here this turn plus some engineers, but this is the last of my reserve save 2nd National Guard Army, so this may be my last turn of active fighting in Oklahoma.
Good results in Oklahoma. I hammer the tattered German line here and a couple of units actually evaporate, punching his left flank full of holes and leaving several more units out of supply. Of course it's worth noting that in our last match, around turn 15, the position was reversed and Jeremy's Allies had me pinned with units out of supply in Oklahoma, and then I proceeded to win that battle decisively a couple of turns later. My Germans, however, had a supply line. Still: I can't keep this up forever; at some point I'll need a continuous line further east- at the moment between Oklahoma and Decatur is just a screen with a few divisions.
The bungled, dislocated Allied line in the northeast
Looks like Jeremy landed some units on the unprotected anchorages west of Mobile. While this is hardly ideal, I had pretty much resolved to abandon the area south of the Tennessee anyway so this merely accelerates matters slightly. I have a fair number of units still sitting on the east bank of the Mississippi so these trundle off to have a look see if I can make a nuisance of myself, but it looks like Jeremy has set a fairly consistent perimeter here and there's no room to get behind him [ I realise later that of course he has no supply point here and just by chance my little perimeter cuts his supply]. As such, two and a half divisions screen this advance to stop Jeremy getting too far ahead of himself. I had been toying with a serious defence of Birmingham, at least for a few turns, but these developments among other things make this too much for my rather overstretched forces. Along with everything else, I have one of my higher formations in reorganisation this turn which leaves two big HQs exposed west of Atlanta and so I decide to keep holding a forward line here for them to retreat back to on Jeremy's turn. Having said that I demur for now and leave my armoured reserve here- three divisions in excellent condition.
It takes me a moment to realise it- but Jeremy was also able to gobble up my Commonwealth force on the west bank of the St. Lawrence. This is bad in itself- a first rate armoured division, fortified, destroyed in one turn along with some other bits- but with the Trois Rivieres position gone the whole west flank of the American position on the other bank is compromised. I manage to screw up pretty badly and dig a couple of units in forward before I realise I need to pull back, hopefully I can fix this in coming turns. The good news is that the US line is otherwise rock solid and backed by significant reserves and I will for now just bend back where I'm in touch with the St. Lawrence. The bad news is that the Canadians now have their backs against the wall, with the St. Lawrence and Ottawa rivers dangerously close in the rear and Montreal not far behind. Next turn I'll contemplate pulling back the whole position behind Montreal but for now I'm stuck forward due to my careless clicking with the US troops, and anyway this position still has a fair amount to recommend it, backed as it is by a rail line while most of the Axis troops must still drag their supplies over the rough country to the northwest. I rail the last Commonwealth armoured division out from the Pacific to here this turn, leaving me with essentially no reserve in the Pacific. This is not a good position to be in the long run so probably next turn I'll rail a tired armoured division back (I have plenty of those at this point).
Jeremy didn't try to outflank me or breach my line in Oklahoma this turn, instead opting for a frontal attack, putting the city itself in a dangerous salient. A lot of the German units here are in really bad shape, and I'm tempted to test Jeremy's own flank. Actually I see a broken rail hex here which I need to check. It turns out this is just a screen of South American cavalry which I smash by RBC, but I don't have the MPs to get further around the flank this turn, so I will hit him in a number of places he's weak or exposed, starting with SS Wiking which is coming around the north flank of Oklahoma City. I'm able to add three cavalry divisions and an infantry division here this turn plus some engineers, but this is the last of my reserve save 2nd National Guard Army, so this may be my last turn of active fighting in Oklahoma.
Good results in Oklahoma. I hammer the tattered German line here and a couple of units actually evaporate, punching his left flank full of holes and leaving several more units out of supply. Of course it's worth noting that in our last match, around turn 15, the position was reversed and Jeremy's Allies had me pinned with units out of supply in Oklahoma, and then I proceeded to win that battle decisively a couple of turns later. My Germans, however, had a supply line. Still: I can't keep this up forever; at some point I'll need a continuous line further east- at the moment between Oklahoma and Decatur is just a screen with a few divisions.
The bungled, dislocated Allied line in the northeast
"What did you read at university?"
"War Studies"
"War? Huh. What is it good for?"
"Absolutely nothing."
"War Studies"
"War? Huh. What is it good for?"
"Absolutely nothing."
-
Jeremy Mac Donald
- Posts: 355
- Joined: Tue Nov 07, 2000 10:00 am
- Location: Toronto, Ontario, Canada
Re: Fall Grau 2.28 Jeremy (Axis) vs. Ben (Allies)
Turn 16
This, again, looks pretty positive. Ben counter attacks in parts of Canada but can’t recover all that he has lost. A sizable part of the American line nearest Quebec City starts falling back. I follow the turn up bashing forward to the gates of Montreal as well as making smaller pushes against the American held eastern sector. I’ve sent a German Infantry out on a limb to cut some of Ben’s units off. Not sure the Division will survive but hope that it will help complicate and disorganize the Allied defense in the area.
The South East sees a small Allied Army bottled up and a continuation of the sweeping move through the south. Now becoming more critical since I want to link up with my forces breaking out of the beaches to the West of Mobile. Ben does cut the break out here off but even so Axis forces are pushing forward vigorously. I also start landing some Italians in Florida to occupy that state and a few units land East of Mobile to make sure that city is shortly cut off. Oh and Atlanta falls this turn.
The West is the most problematic area. Here Ben counter attacks on the Western Flank. Beats up a Columbian Cavalry Division and somewhat caves in the flank. A bunch of my German Brigades also just evaporate while defending on ignore losses. My own attacks in the area are not particularly impressive out here either and the threat to the flank remains substantial. I have a few reinforcements coming up in the area but not much as everything has been landing on the southern beaches for the last two turns.
Loss Rate: Axis: 42 / Allies: 73 / Spread: 31
This, again, looks pretty positive. Ben counter attacks in parts of Canada but can’t recover all that he has lost. A sizable part of the American line nearest Quebec City starts falling back. I follow the turn up bashing forward to the gates of Montreal as well as making smaller pushes against the American held eastern sector. I’ve sent a German Infantry out on a limb to cut some of Ben’s units off. Not sure the Division will survive but hope that it will help complicate and disorganize the Allied defense in the area.
The South East sees a small Allied Army bottled up and a continuation of the sweeping move through the south. Now becoming more critical since I want to link up with my forces breaking out of the beaches to the West of Mobile. Ben does cut the break out here off but even so Axis forces are pushing forward vigorously. I also start landing some Italians in Florida to occupy that state and a few units land East of Mobile to make sure that city is shortly cut off. Oh and Atlanta falls this turn.
The West is the most problematic area. Here Ben counter attacks on the Western Flank. Beats up a Columbian Cavalry Division and somewhat caves in the flank. A bunch of my German Brigades also just evaporate while defending on ignore losses. My own attacks in the area are not particularly impressive out here either and the threat to the flank remains substantial. I have a few reinforcements coming up in the area but not much as everything has been landing on the southern beaches for the last two turns.
Loss Rate: Axis: 42 / Allies: 73 / Spread: 31
Necesse est multos timeat quem multi timent
"He whom many fear, fears many"
- golden delicious
- Posts: 4168
- Joined: Tue Sep 05, 2000 8:00 am
- Location: London, Surrey, United Kingdom
Re: Fall Grau 2.28 Jeremy (Axis) vs. Ben (Allies)
Turn 16:
Jeremy making a nuisance of himself in the northeast. My bungle last turn has hurt me further as now I have more Canadian troops pushed against the St. Lawrence and a German infantry division in my rear. Now is the time to pull back the American line. A couple of divisions refuse to get with the program and leave me faced with the choice of losing them or temporarily holding forward in the west. I guess I can combine this with killing the rogue German division in my rear, and with giving the rest of the line more time to dig in on its new positions, so I opt for this.
Things are worse in the southeast. The remnant of my old line, in place to help the escape of a couple of reorganising HQs, is fully enveloped this turn. Most of these units were already sort of stuck, but now they're all doomed- the best I can do is extract one engineer brigade while one division hobbles too slowly toward the Tennessee, leaving both HQs and two divisions completely trapped. On the plus side, this seems to have been Jeremy's absolute priority, and this move has stopped him driving directly on Birmingham or the Tennessee crossings, which are now pretty well foritified. I move my armoured reserve south from Birmingham to be ready to strike at the lead units coming north from the Axis landing near Biloxi as it moves north; again I throw a loose bag around this body to cut supply. I drop 2nd National Guard army into the gap in front of Memphis which should take my continuous line all the way to the Mississippi from the sea.
Oklahoma remains hot, with Jeremy pushing through just east of Oklahoma City. One option is to abandon this front entirely in favour of reinforcing the other threatened sectors. The Axis railhead is finally coming up and is now only a couple of hexes south of the Texas border. The question is: what's my opportunity if I keep pushing? I send a cavalry division to test the western flank: it's blocked by Colombian infantry. I could go either way on this but a few too many divisions are in reorganisation so I opt to redouble my counteroffensive in this area. I still have a division around the western flank of Jeremy's line, and in front of it is the routed cavalry. Let's see how far in the rear we can get here. I shove forward, and follow up with cavalry. Suddenly, I'm behind about six German divisions- on the other side is my concentrated armour. I hit the unsupplied units I cut off last turn immediately, and otherwise concentrate my firepower on the intervening units.
This winds up being good- but not as good as I hoped because of the way units retreat. Two and a half divisions are cut off, a brigade of Tigers evaporates, but everyone else is just mauled. Still- Jeremy's flank here is totally compromised. I may be in for it next turn if he has good troops coming up, but I think he's poured all his sealift into the southeast for the last two turns and that this is his whole force.
Jeremy making a nuisance of himself in the northeast. My bungle last turn has hurt me further as now I have more Canadian troops pushed against the St. Lawrence and a German infantry division in my rear. Now is the time to pull back the American line. A couple of divisions refuse to get with the program and leave me faced with the choice of losing them or temporarily holding forward in the west. I guess I can combine this with killing the rogue German division in my rear, and with giving the rest of the line more time to dig in on its new positions, so I opt for this.
Things are worse in the southeast. The remnant of my old line, in place to help the escape of a couple of reorganising HQs, is fully enveloped this turn. Most of these units were already sort of stuck, but now they're all doomed- the best I can do is extract one engineer brigade while one division hobbles too slowly toward the Tennessee, leaving both HQs and two divisions completely trapped. On the plus side, this seems to have been Jeremy's absolute priority, and this move has stopped him driving directly on Birmingham or the Tennessee crossings, which are now pretty well foritified. I move my armoured reserve south from Birmingham to be ready to strike at the lead units coming north from the Axis landing near Biloxi as it moves north; again I throw a loose bag around this body to cut supply. I drop 2nd National Guard army into the gap in front of Memphis which should take my continuous line all the way to the Mississippi from the sea.
Oklahoma remains hot, with Jeremy pushing through just east of Oklahoma City. One option is to abandon this front entirely in favour of reinforcing the other threatened sectors. The Axis railhead is finally coming up and is now only a couple of hexes south of the Texas border. The question is: what's my opportunity if I keep pushing? I send a cavalry division to test the western flank: it's blocked by Colombian infantry. I could go either way on this but a few too many divisions are in reorganisation so I opt to redouble my counteroffensive in this area. I still have a division around the western flank of Jeremy's line, and in front of it is the routed cavalry. Let's see how far in the rear we can get here. I shove forward, and follow up with cavalry. Suddenly, I'm behind about six German divisions- on the other side is my concentrated armour. I hit the unsupplied units I cut off last turn immediately, and otherwise concentrate my firepower on the intervening units.
This winds up being good- but not as good as I hoped because of the way units retreat. Two and a half divisions are cut off, a brigade of Tigers evaporates, but everyone else is just mauled. Still- Jeremy's flank here is totally compromised. I may be in for it next turn if he has good troops coming up, but I think he's poured all his sealift into the southeast for the last two turns and that this is his whole force.
"What did you read at university?"
"War Studies"
"War? Huh. What is it good for?"
"Absolutely nothing."
"War Studies"
"War? Huh. What is it good for?"
"Absolutely nothing."
