A Competitive GW (Solo) Scenario by the Numbers.

Post descriptions of your brilliant successes and unfortunate demises.

Moderator: Shannon V. OKeets

User avatar
rkr1958
Posts: 30977
Joined: Thu May 21, 2009 10:23 am

Re: A Competitive GW (Solo) Scenario by the Numbers.

Post by rkr1958 »

Turn 3. Jan/Feb 1940. Start of Turn.

Start of year scrapping and turn 3 reinforcements.
00-Scrap-Reinf.png
00-Scrap-Reinf.png (67.58 KiB) Viewed 868 times
Germany.
Germany scrapped three of its older land planes, Do 17M, JU 86G and a second JU 86G. Also, Germany elected not to upgrade the KM BB Gneisenau, which would require the BB to be moved from the map to the construction pool and would cost BPs and one year to get it back.

Germany had no reinforcements to place and they removed no air.

Italy
Nothing was scrapped, no reinforcements, and no air removed.

Japan
Nothing was scrapped, the only reinforcement was the Manchurian territorial placed in Tsitsihar. Placement of this territorial reduced partisan chance from 1% to none. However, Japan may rail this territorial into China for Garrison and accept 1% partisan risk in Manchuria.

Nationalists
The Nationalists scrap nothing, have no reinforcements, and remove no air.

CW
The CW scraps the POL PZL P.11 F2 and Battle L2. The CW was also looking to scrap the Anson L2; however, the Anson has 1 strategic bombing factor (SBF), which is always useful; but more significantly has transport and paradrop capability. Therefore; the CW elected not to scrap this plane. The CW also scraped a 3-4-6 Sub Gp.

CW reinforcements consisted of 3 MILs and the CV Furious returning from the repair pool. The 3 MILs were placed in their respective cities of Batavia, NEI; Bombay, India; and Glasgow, UK. The CV Furious, without an air group, was placed in Liverpool. No air was removed.

France
France scraps their old D510 F2. French reinforcements included one pilot, placed in L .298 NAV 2 and deployed to Marseilles, France. Also, the French TRS Gp returned from the repair pool and was placed in Bordeaux France. No air was removed.

USA
The USA scraps a 1936 TBD CAG, a 1934 3-4-8 Sub Gp. USA reinforcements included 1 PIL and the CV Saratoga. The PIL was placed in a SBC 4 CAG, deployed to the Saratoga and both were deployed to North Folk, VA. Also arriving was the PHI Terr, which was deployed to Manila. US removes no air.

USSR
The Soviets scrapped nothing. Their reinforcements included two Garrison armies both of which were deployed to Minsk. The USSR moved an IL-4 DB-3 in Baku to their reserve pool. That pilot will be used next turn and put into a TB-7, Pe-8 L4.

CCP
The CCP scraps nothing and deploys their 2nd inf army to Tungkwan, China.
Last edited by rkr1958 on Mon Jan 27, 2025 6:33 pm, edited 1 time in total.
Ronnie
User avatar
rkr1958
Posts: 30977
Joined: Thu May 21, 2009 10:23 am

Re: A Competitive GW (Solo) Scenario by the Numbers.

Post by rkr1958 »

Turn 3. Jan/Feb 1940. Start of Turn.

Discretionary resource lending

I took a while to look at both German and Italian production. Germany decided it’s more efficient to stop their land lease of two BPs to Italy and instead send two RPs. With both countries having a production multiplier of 0.75, this results in six Italian factories producing 5 BPs. The same output as previous with the previous 2 BP Lend lease. As of now, using a couple of oil, Germany has full production at 18 – 2 TS (USSR) = 16 BPs.

The CW continues their trade of three resources (1 oil) to France. France has an action of getting the idle, Senegal RP to factory which will increase their production by a BP.

France decides to send their idle Hanoi RP to China. MWIF is a bit frustrating because it decided to send mainland French RP instead, which requiring 8 vs 0 CPs to send. However, that was fixed in a few minutes, so for now all is well.

The USA continues sending its one Philippine resource point to China. In Chinese production, the US and French Resource Points result in an idle Chinese resource point. However, this gives China some flexibility if Japan manages to block a Chinese resource point. Of consideration now that it’s 1940 and US entry chips have a lower average value, is will Japan decide to politically close the Burma Road?
00-DTA.png
00-DTA.png (20.16 KiB) Viewed 867 times
00-RES-Lending.png
00-RES-Lending.png (162.37 KiB) Viewed 867 times
Last edited by rkr1958 on Mon Jan 27, 2025 6:33 pm, edited 1 time in total.
Ronnie
User avatar
rkr1958
Posts: 30977
Joined: Thu May 21, 2009 10:23 am

Re: A Competitive GW (Solo) Scenario by the Numbers.

Post by rkr1958 »

Turn 3. Jan/Feb 1940. Start of Turn.

The Western Front.

Germany took a long look at the situation in the low countries and whether or not they wanted to move first. This look included the feasibility of knocking out the Rotterdam redoubt and an invasion of a neutral Belgium. The weather forecast for the north temperate is 10% rain, 50% snow, 10% storm, and 30% blizzard. OKH will launch no offensive operations under any conditions under blizzard or storm (40% chance). However, in the case of snow or rain, 60% chance, there was consideration for operations against Rotterdam and Belgium.

Even under the ideal conditions of moving first and flipping both defenders in Rotterdam, the best estimated odds, which included Rundstedt HQ support of +2, was a +6 assault. This (overly) optimistic estimate gave only a 3% PWIN and carried a 69% chance that Germany would lose their valuable engineering division. So, this option for an assault on the Rotterdam redoubt was ruled out and any need for Germany to move first at all costs was ruled out too. Therefore, Germany voted not to reroll if the Axis lose the first initiative roll.

OKH and OKW also analyzed the potential of invading Belgium and using an O-chit paired with von Rundstedt to take Brussels on the surprise impulse. Estimated odds for snow resulted in a 16.9 assault, which gives a 99.9% PWIN. Given that von Rundstedt would be using an O-Chit and able to reorg flips at half cost, OKH & OKW endorsed invasion Belgium in snow, or rain, and if Germany is guaranteed at least one more impulse.

Therefore; OKH decided that if they win the initiative, they will go first but will not demand a reroll. They’ve also sent out the directive that Belgium will be invaded if snow or rain on the first axis impulse. This will require Germany’s use of one of their two O-Chits, however; OKH considers this worth an early start to Case Yellow, and put the Wehrmacht in a position to flank the French army north of their main defense lines. Though the CW redoubt in Rotterdam remains and there’s a potential for CW reinforcement into Antwerp, this is considered an acceptable result as the BEF would likely be deployed to France anyway. With only three CW transports available on the Western Front, OKH gives the green light to the invasion of Belgium given snow or rain and the guarantee of at least one more Axis impulse this turn.
00-Western-AP.png
00-Western-AP.png (39.97 KiB) Viewed 865 times
00-Western-Front.png
00-Western-Front.png (1.96 MiB) Viewed 866 times
Last edited by rkr1958 on Mon Jan 27, 2025 6:47 pm, edited 2 times in total.
Ronnie
User avatar
rkr1958
Posts: 30977
Joined: Thu May 21, 2009 10:23 am

Re: A Competitive GW (Solo) Scenario by the Numbers.

Post by rkr1958 »

Turn 3. Jan/Feb 1940. Start of Turn.

The Med.

El Duce not only wishes to move first but is willing to reroll if necessary. The weather forecast for the Med is 20% fine, 20% rain, 20% storm, 20% snow, and 20% blizzard. Given fine or snow (40%), the Italian 1st inf division has a straight shot to walk into an undefended Algiers and effectively conquer Algeria.

The Italian RM is primed to continue their mission in the West & East Med to not only confront the RN but continue to break supply to Malta. Looking at the situation with the Italian army in Algeria, the only way to supply the French 5th inf division In Tunis is through the West Med. El Duce hope to also have Tunis and the conquest of Tunisia this turn. After that, his sights will likely turn to the conquest of Morocco. Also, the capture of Oran and getting the Bechar, Algeria coal RP to an Italian factory will be a priority.
00-Med.png
00-Med.png (1.92 MiB) Viewed 864 times
Last edited by rkr1958 on Mon Jan 27, 2025 6:54 pm, edited 1 time in total.
Ronnie
User avatar
rkr1958
Posts: 30977
Joined: Thu May 21, 2009 10:23 am

Re: A Competitive GW (Solo) Scenario by the Numbers.

Post by rkr1958 »

Turn 3. Jan/Feb 1940. Start of Turn.

Asian Theater. China.

Japan elects to move first if the Axis wins the initiative but not reroll if they don’t. With an 80% chance of fine weather in the North Monsoon (southern China), Umezu is looking to push the Nationalist back in the Kweichow Provence. The majority of Chang’s forces in this sector are defending in the mountains just south of the North Temperate weather zone. So, the ability of Yamamoto’s and Umezu’s army groups to make progress depends somewhat on the weather in the north temperate.

Umezu is also looking to capture the critical air base hex at 83, 139, which is two hexes northeast of Chinkiang. This base will allow fighters to escort Japanese strategic bombing raids against Chungking, Chengtu and Kweiyang.

In the North, Terauch is looking to establish a bridgehead south of the Yellow River just east of Tungkwan. This objective can be accomplished without combat if the axis gets the initiative and moves first. Terauch also has the city of Chengchow, currently defended by the Nationalists, in his sights. If he can clear that city early this turn, his armies then have an opportunity to impede the retreat of Mao’s CCP armies in the mountains northeast of Tungkwan.

Also, of priority for Terauch is to clear Naning and for Umezu to clear Ichang. However; the potential for either is really dependent on the weather in the north temperate, which this time of year will likely not cooperate.
00-Asian-China.png
00-Asian-China.png (1.88 MiB) Viewed 863 times
Last edited by rkr1958 on Mon Jan 27, 2025 8:04 pm, edited 1 time in total.
Ronnie
User avatar
rkr1958
Posts: 30977
Joined: Thu May 21, 2009 10:23 am

Re: A Competitive GW (Solo) Scenario by the Numbers.

Post by rkr1958 »

Turn 3. Jan/Feb 1940. Start of Turn.

The Allies.

At this point in the conflict, the Allies are certainly on the defensive. Their situation in France could be precarious if Germany indeed invades Belgium and threatens the northern flank of the French. With only three transports available on the western front the CW will have to make some hard decisions about whether to reinforce at Antwerp if Germany does invade Belgium. Or deploy the BEF led by Lord Gort in northern France.

In the Med, the situation is definitely dire for the French in North Africa having already lost Corsica. The situation in Tunisia and Algeria is dire and both are likely to lost to Italy. The prospect of getting reinforcements into French North Africa looks poor. The major concern for the CW in the Med is reestablishing and maintaining supply to Malta, which has a significant RN fleet trapped there without oil and supply.

The major objective in China for both the Nationalists and CCP is defending in favorable terrain, specifically mountains, and minimizing losses.

The Allies at sea need to strengthen and protect their convoy supply lines. The CW is below max production by 2 BPs. the RN needs to strengthen their position in the Med. However; transporting resources through the Med is dangerous, if not suicidal.

France, CW, China, and the USSR on behalf of the CCP elected to move first if the allies win the initiative. However, at Axis+1, the Allies have no opportunity to re-roll if they do not win the first row.

In closing, it is here while I’m leaving for now, before initiative determination and before the first impulse weather roll. I will return after the conclusion of this turn and provide summaries across each of the fronts and theaters.

This initial start-of-turn description was generated in Microsoft Word using talk-to-text and Grammarly. Let me know what you think and how good a job I was able to do with these tools.

Initiative Voting.
00-Initiative-Voting.png
00-Initiative-Voting.png (16.78 KiB) Viewed 862 times
Initiative Voting Algorithm.
(1) Each MP, except CCP & Vichy, whether active or neutral gets one vote.
(2) If your side (Axis or Allied) cannot reroll, then any MP with a vote may vote 0, 1 or abstain.
(3) If your side can reroll, then any MP with a vote may vote 0, 1, 2 or abstain.
(4) Both sides compute an average of their votes excluding abstain votes.
(5) If Avg = [0,0.5) -> side will move second if win initiative,
[0.5,1.5) -> move first but will not request a reroll,
[1.5,2] -> move first & request a reroll if necessary.
Ronnie
User avatar
rkr1958
Posts: 30977
Joined: Thu May 21, 2009 10:23 am

Re: A Competitive GW (Solo) Scenario by the Numbers.

Post by rkr1958 »

Turn 3. Jan/Feb 1940. Start of Turn Narrative Edits.

FYI. I went back and made extensive edits of my start of turn narratives for this turn. I apologize for being premature and posting these narrative before a more detailed edit. While talk-to-text generates my narratives quickly, it does require a lot of cleaning up (or at least mine do) before posting.

Hopefully, the narratives make much more sense that what I originally posted.

I have made impulse 1 weather roll, but I'm keeping that close to the chest until the end of this turn. :D
Ronnie
User avatar
rkr1958
Posts: 30977
Joined: Thu May 21, 2009 10:23 am

Re: A Competitive GW (Solo) Scenario by the Numbers.

Post by rkr1958 »

Turn 3. Jan/Feb 1940. Turn Summary.

(1) Well, even for me controlling all MPs this simulated war, or counterfactual replication of WW2, took an unexpected turn this turn (pardon the pun).

(2) It definitely presents me with a fun situation that I've personally yet to encounter in any of my (M)WiF play over the past 10-years.

(3) I got the inspiration for the deviation, almost mandate, from https://boardgamegeek.com/thread/345284 ... 5-m-j-1945 (check for posts from "Red Robin" and responses to in this thread)

(4) I guess a more structured Japanese gambit than the reactive one I'm attempting to execute is a fairly standard play for experienced WIF Japanese players?

Weather & Actions.
99-Weather-Actions.png
99-Weather-Actions.png (39.03 KiB) Viewed 781 times
99-Weather-Actions-CL.png
99-Weather-Actions-CL.png (79 KiB) Viewed 781 times
Combat Logs.
Turn.
99-CL-Turn-Counts.png
99-CL-Turn-Counts.png (36.85 KiB) Viewed 781 times
Cumulative.
99-CL-Cumulative-Counts.png
99-CL-Cumulative-Counts.png (38.46 KiB) Viewed 781 times
Ronnie
User avatar
rkr1958
Posts: 30977
Joined: Thu May 21, 2009 10:23 am

Re: A Competitive GW (Solo) Scenario by the Numbers.

Post by rkr1958 »

Turn 3. Jan/Feb 1940. Asian Theater.

Narrative.

Axis #1.
Northern China.
The Harbin Mill was railed from Manchuria to Kaifeng, China. While this increased a partisan chance for 0% to 1% in Manchuria, this rail was considered necessary in support of Army Group Terauchi combat operations against the CCP in northern China. IJA 2nd mot army crossed the Yellow River and establish a beachhead south between Tungkwan and Chengchow, China. This beachhead split the Nationalist armies in the north (defending Chengchow & Nanning) from Mao’s CCP armies to the west.

Terauchi also moved and flip the OOS Peking warlord corps to cover RP 68, 141 from the threat of the adjacent 0-3 CCP partisan. Terauchi maneuvers were limited due to storms and affected supply lines.

Southern China.
Army Group Yamamoto operating mostly in the North Monsoon under fine weather was able to push directly east into the mountains. Through maneuvering, Yamamoto with support from Umezu’s armies, was able to isolate the Nationalist Canton MIL army. Yamamoto was also able to destroy the nationalist 1st inf div and isolate the Nationalist 8th infantry army.

Yamamoto’s successes this impulse have put Chaing and his Nationalist armies in the south in a very precarious position. A withdrawal by Chang is expected; otherwise, he risks being flanked to his north and leaving central China wide open. Imperial Japan HQ is very happy with the progress made especially in southern China this impulse.

I would say the situation in central China looks very dire but given the terrain and the weather in the north temperate, Japan fully expects the Nationalist to be able to stabilize the situation at least for now.

Allied #3.
Northern China
With none of the five Soviet land moves allocated to the CCP, it was up to the Nationalist to occupy the key mountain pass (77, 139). This was accomplished by the Chunking MIL, which because of the weather, flipped moving from Nanning to the crucial Mtn pass. The Nationalist 1st cav corps was then moved out of Ichang, leaving that city undefeated, to move adjacent to and cover Nanyang. The 13th garr army was move from adjacent to Chengchow to join the 20th garrison army for defensive of that city.

Southern China
The OOS Canton MIL and 8th inf armies both retreat one hex east, flipping and moving adjacent to Chinkiang. Also, Chaing pulls his forces back slightly but still maintains a defensive line running from Nanning in the south, northeast through RP 90,139, and continuing northeast to the Mtn west bank of the Hsiang River.

Axis #5.
Imperial Japanese HQ in Tokyo order the immediate closing of the Burma Road. But, to the surprise of Yamamoto, he received orders that pulled some of his forces away in preparations for Operation Scowl, which is an antonym to Operation Countenance, and is a plan for Japan to permanently control the three Persian oil points and within 2 turns be able to use them and/or transport them back to Japan, China or Manchuria. However; the cost of such an endeavor will be war with the Soviet Union and a slowdown of offensive operations in China. However; war with the USSR does open up additional prizes; specifically; up to 4 additional RPs in Soviet Asia.

Southern China
As ordered, Yamamoto directs his 4-4 SNLF corps over the line and to the port of Swatow, currently containing two IJN TRS Gps. Also, Yamamoto order his SNLF 2nd div to Canton to meet up with his 1st eng div in Canton. Yamamoto also as ordered made the appropriate moves with the remainder of his Army Group to properly ensure protection of Hainan, Canton, Antimony RP 86,142 to factory and the Canton-to-Changsha rail line remained open. Yamamoto’s deputy commander, capture I Chang, and his deputy commander Umezu HQ-I was ordered to Wuhan (for likely future redeployment to Manchuria) and for his forces to capture the open city of Ichang.

Closure of the Burma Road prompted a US reaction (2-value chit added to Jp entry pool). However; the capture of Ichang did not elicit any reaction by the US.

While Yamamoto complied with all orders from Imperial HQ, he was given no explicit order to cease or curtail offensive operations. As such, Yamamoto managed a + 7 assault versus the Nationalist Army defending Kweilin. Kweilin was successfully take at +6B, , shattered the defending Nationalist 17th inf army, resulted in no US reaction and cost Yamamoto the loss of the 2nd inf div and disorganization of 2 of 5 surviving div/corps/armies.

Northern China. Fine
General Terauchi was ordered to continue combat operations against the Nationalists in the Chinese cities of Nanyang and Chengchow only. He was also ordered to ensure that his army group remains nimble versus the CCP forward line of troops and to ensure coal RP 73,143 continues to factory. Terauchi was given permission to delay opening the route for the Iron RP 68,141 blocked by the newly spawned CCP partisan.

In addition to Japanese land operations in China, Japanese bombers launched two strategic bombing raids against Chinese factories in Sian and Kweiyang. Both raids were uncontested, though China could have; but elected not to, contest the Kweiyang raid.

The 2 strategic bombing raids targeted a combine 2 Chinese factories with an expected 0.8 hits. The raid against Sian achieved a hit but the raid against Kweiyang missed. The loss of 1 PP from the strategic bombing raid when combined with the loss of another PP from closure of the Burma road knocked Chinese production down by 2 PPs (or 29%, from 7 to 5 BPs).

Allied #8.
In northern China, the Nationalists secured Nanning with their 2nd cav corps, which flip due to being OOS before the move; but was obviously in supply after the move. The CCP was only allocated 1 of the 5 Soviet land moves, and used that move for their 5th Garr army to move 1 hex to China 75,140 putting it contact with Terauchi’s IJN FLOT. Otherwise; all other forces remained static on their current positions.
In southern China, Chaing ordered his armies to link up and form a continuous Flot from 1-hex east of Chinkiang in in the north southwest to 1- hex east of the tine RP 90, 138. Chang’s situation was significantly aided by IJA force redeployments and combat operations slowdown last impulse.

Axis #11.
Japan took a naval, which meant no land moves were available this impulse.

Allied #15.
Now that the USSR is at war with Japan, the USSR and CCP were able to take a land action with unlimited land moves. Mao ordered his armies to establish a FLOT vs Terauchi running east of Tungkwan in the south, running northeast to the Tailrang Mtns 74,141, and then turning northwest to 1-hex south of Taiyuan.

In Soviet Asia, the USSR rail their 3rd Sib corps from Chita to Khabarovsk. The Soviets moved their 4th Sib corps in Vladivostok to the border with Manchuria.

Combat Logs.
99-Asian-CL.png
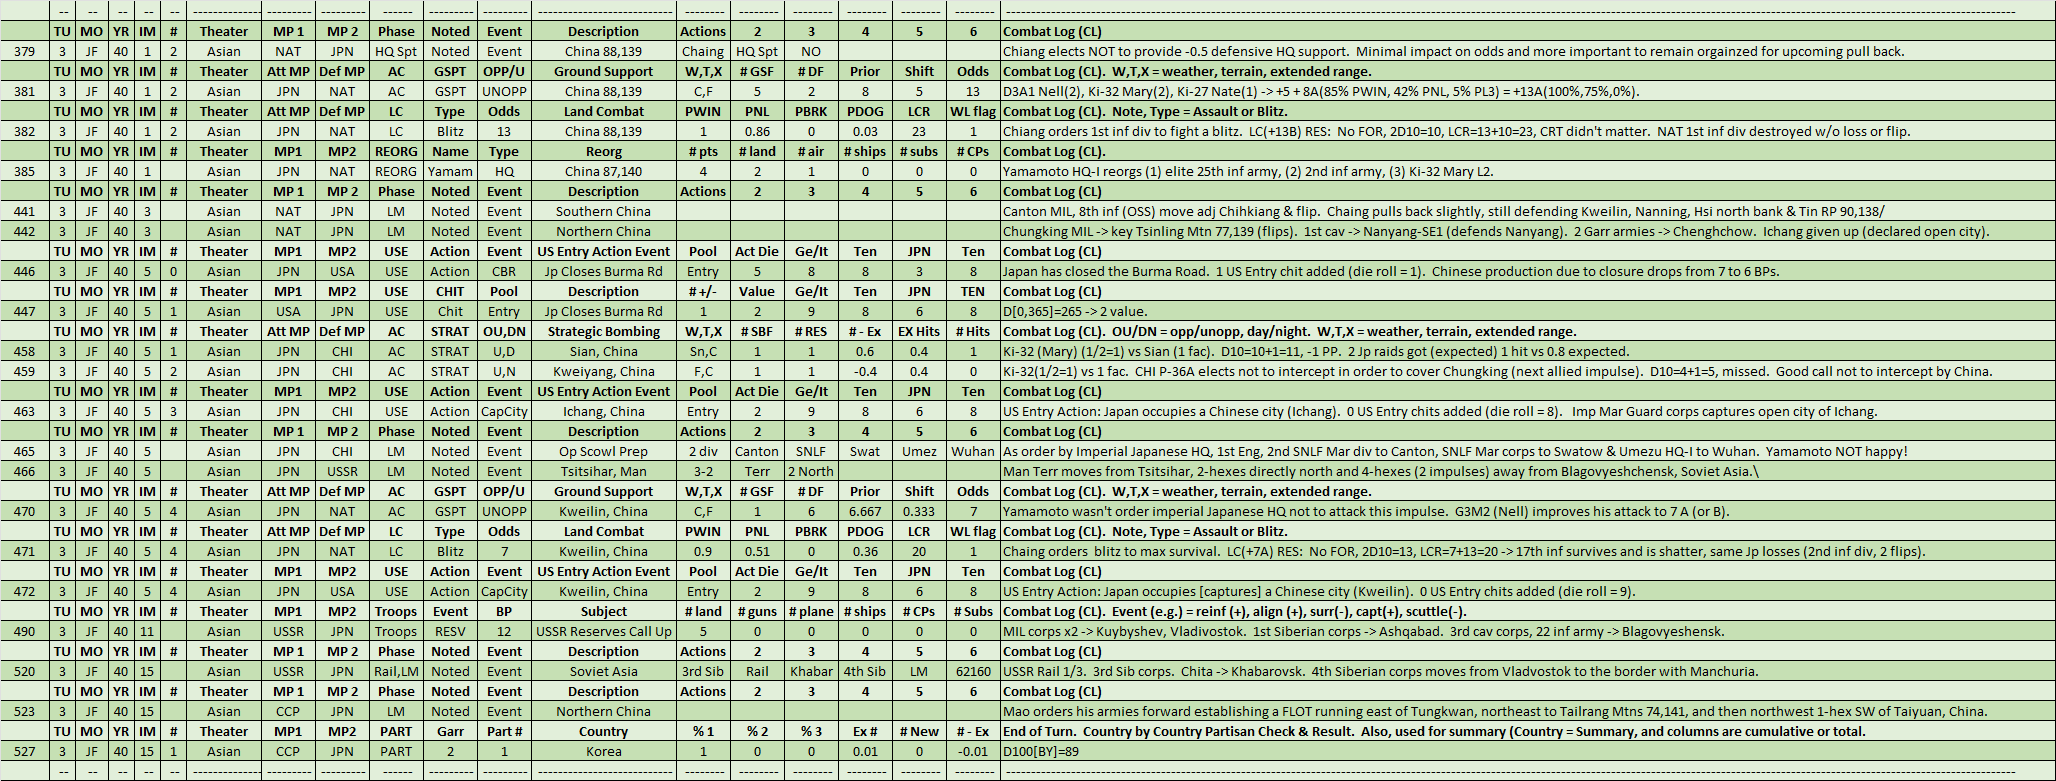
99-Asian-CL.png (162.67 KiB) Viewed 780 times
Attack Planning Logs.
99-Asian-AP.png
99-Asian-AP.png (42.92 KiB) Viewed 771 times
Last edited by rkr1958 on Sat Feb 15, 2025 9:59 pm, edited 1 time in total.
Ronnie
User avatar
rkr1958
Posts: 30977
Joined: Thu May 21, 2009 10:23 am

Re: A Competitive GW (Solo) Scenario by the Numbers.

Post by rkr1958 »

Turn 3. Jan/Feb 1940. Asian Theater.

China. End-of-Turn.
99-Asian-China.png
99-Asian-China.png (2.22 MiB) Viewed 778 times
Ronnie
User avatar
rkr1958
Posts: 30977
Joined: Thu May 21, 2009 10:23 am

Re: A Competitive GW (Solo) Scenario by the Numbers.

Post by rkr1958 »

Turn 3. Jan/Feb 1940. Asian Theater.

Manchuria. Soviet Asia. End-of-Turn.
99-Asian-Soviet-Asia-Manchuria.png
99-Asian-Soviet-Asia-Manchuria.png (1.87 MiB) Viewed 776 times
Ronnie
User avatar
rkr1958
Posts: 30977
Joined: Thu May 21, 2009 10:23 am

Re: A Competitive GW (Solo) Scenario by the Numbers.

Post by rkr1958 »

Turn 3. Jan/Feb 1940. Battle of the Atlantic.

Narrative.

Allied #3.
The RN added 7 more CPS to their Atlantic convoy lines (64 to 71) and was able to increase both French and CW production by 1 PP. A bit frustrating; but not worth the effort fighting, was that this should have been accomplished with 1 less CP. However; I just got tired of fighting with MWIF by trying to force a route that MWIF absolutely refused to take. So, I gave up fighting, which cost the Allies one extra CP.

After passing of US entry option 11 last turn, the US began escorting allied convoys along their East Coast. To start they sent the CV Ranger, with an SDB 3 carrier group, BB Texas, and CA Louisville. Even though there are storms on the East Coast, there is a 70% chance next impulse pair that air will be able to fly; i.e., 70% chance of rain or snow.

The RN and French navy priorities for allocating ships including in order: (1) attacking the 2 KM BBs and two CAs in the North Sea, (2) escorting UK BEF & arty div in the North Sea, (3) getting supply back to Malta in the mad, (4) (possibly) challenging the Italian RM in the West Med and (5) Atlantic convoy escorts and patrols.

Axis #5.
Examination of the situation in the Atlantic by OKH, concluded no real opportunity to go after Alied convoys without significant risk. Therefore, Donitz ordered his U boats to remain in port and; therefore, no need to move any subs or ships, Germany decided to take a land action.

Allied #8.
No action in the Atlantic by the Allies including the US. The US could have added up to 2 more warships to their 3 ship task force off the US east Coast. However; given that the only threat to East Coast convoys is a single Italian subgroup in La Spezia, the current US Task Force of one CV, 1 BB, 1 CA, joined by 1 RN CA should be more than enough.

Axis #11.
2 U-boat flotillas in Kiel sortie into the Faeroes Gap looking to sink allied convoys. However; it was the RN that got the drop on the U-boats by surprising them, managing to sink 1 flotilla, and forcing the 2nd to abort for the cost of an aborted RN CA and CV.

The Italian sent 2 of their 3 subgroups based in La Spaza into Cape St Vincent in the hopes of finding and sinking allied convoys operating there. However; neither the subs or the Allied warships on patrol found.

Allied #15.
Original orders for the RN, was to use the 2C W naval moves of their combine to position escorts in the 1-box to move down to the zero box during the SAS phase. However; this command was rescinded in order for the RN to use the 2 naval moves to bring spare Med supply CPS to the Red Sea, for EOT RTB to Suez.

Combat Logs.
99-BOA-CL.png
99-BOA-CL.png (134.26 KiB) Viewed 775 times
Ronnie
User avatar
rkr1958
Posts: 30977
Joined: Thu May 21, 2009 10:23 am

Re: A Competitive GW (Solo) Scenario by the Numbers.

Post by rkr1958 »

Turn 3. Jan/Feb 1940. Battle of the Atlantic. Allied #3.

Risk Assessment Matrix.
03-AL-BOA-Risk-Assessment-Matrix.png
03-AL-BOA-Risk-Assessment-Matrix.png (48.06 KiB) Viewed 774 times
Risk Assessment (Pre Naval Moves).
03-AL-BOA-Risk-Assessment-Pre-Post-NM.png
03-AL-BOA-Risk-Assessment-Pre-Post-NM.png (27.63 KiB) Viewed 774 times
Escorts & Patrols.
03-AL-BOA-Escort-Patrol.png
03-AL-BOA-Escort-Patrol.png (24.88 KiB) Viewed 774 times
Ronnie
User avatar
rkr1958
Posts: 30977
Joined: Thu May 21, 2009 10:23 am

Re: A Competitive GW (Solo) Scenario by the Numbers.

Post by rkr1958 »

Turn 3. Jan/Feb 1940. BOA.

(1) No CPs (allied or axis) were sunk or aborted this turn.

(2) However; last turn when I posted the below plots I had forgotten to include CP losses for that turn (02ND39) in the plots.

(3) So I providing corrections to those "last turn" plots.

GMT Sunk/Aborted by Year.
99-BOA-GMT-by-Year.png
99-BOA-GMT-by-Year.png (21.54 KiB) Viewed 773 times
GMT Sunk/Aborted (Cumulative).
99-BOA-GMT-Cumulative.png
99-BOA-GMT-Cumulative.png (21.74 KiB) Viewed 773 times
Ronnie
User avatar
rkr1958
Posts: 30977
Joined: Thu May 21, 2009 10:23 am

Re: A Competitive GW (Solo) Scenario by the Numbers.

Post by rkr1958 »

Turn 3. Jan/Feb 1940. CBI.

(1) Partisan in India, occupies a RP, which doesn't impact production due to one Indian RP being idle.

India. Burma. End of Turn.
99-CBI-India-Burma.png
99-CBI-India-Burma.png (2.73 MiB) Viewed 763 times
Ronnie
User avatar
rkr1958
Posts: 30977
Joined: Thu May 21, 2009 10:23 am

Re: A Competitive GW (Solo) Scenario by the Numbers.

Post by rkr1958 »

Turn 3. Jan/Feb 1940. East African Theater.

Narrative.
Axis #5.
Italy, who took a combined, used one of their two precious land moves to move their supply unit in danger of capture in Anglo Egyptian Sudan away from danger by moving it directly west 3-hexes. The intention is for this supply unit to make it to Italian control in Libya and or Tunisia. However; this is going to be a long, long, long track.

Allied #8.
In East Africa, the AES TERR unit broke off pursuit of the Italian supply unit and instead moved towards the border of Eritrea. The AES Terr was move into the plains of the Blue Nile, 3-hexes from the AES capital Khartoum, and 2-hexes from the border with Eritrea.

Combat Logs.
99-East-African-CL.png
99-East-African-CL.png (10.26 KiB) Viewed 762 times
End of Turn.
99-East-Africa.png
99-East-Africa.png (2.62 MiB) Viewed 762 times
Ronnie
User avatar
rkr1958
Posts: 30977
Joined: Thu May 21, 2009 10:23 am

Re: A Competitive GW (Solo) Scenario by the Numbers.

Post by rkr1958 »

Turn 3. Jan/Feb 1940. Eastern Front.

Narrative.
Axis #5.
OKH in evaluating the German garrison in Poland, discovered a garrison shortage of two corps, which gives a 4% chance of partisans in Poland. OKW was directed to address this immediately by moving 2 corps heading west back into Poland. The 4 corps currently in garrison in Poland are also in garrison on the frontier against the Soviet Union (i.e., within 3 hexes of a Soviet controlled hex). OKW was also ordered to get the 2 additional corps reassigned back to Poland onto the frontier as soon as practical. Both reassigned corps were moved back into Poland, dropping partisan chance to 0%. Also, 1 of the 2 corps was able also to make it to the frontier.

Axis #11.
5 of 6 corps in Poland are also on the frontier with the USSR. Because of weather and supply issues, the 1 corps in Poland that’s not on the frontier was order to remain in place (i.e., no move) in order NOT to flip and NOT to increase partisan chance above 0%.

Allied #15.
The USSR used their full land move on the eastern front to rail the 40th garrison army to Villa and the 30th garrison army to Lvov, both of both cities of which are on the frontier. However; because the 2 garrison armies flipped (due to railing), they won’t count in the pact ratio until next turn. The Soviets also rebased two of their fighter wings away from the frontier and back to Minsk and Odessa. The plan is to use their pilots for bombers or fighter wings deployed to the Middle East and/or Soviet Asia.

Combat Logs.
99-Eastern-CL.png
99-Eastern-CL.png (85.14 KiB) Viewed 760 times
Nazi-Soviet Pact.
99-NSP.png
99-NSP.png (27.41 KiB) Viewed 760 times
Ronnie
User avatar
rkr1958
Posts: 30977
Joined: Thu May 21, 2009 10:23 am

Re: A Competitive GW (Solo) Scenario by the Numbers.

Post by rkr1958 »

Turn 3. Jan/Feb 1940. Eastern Front.

End of Turn.
99-Eastern-Front.png
99-Eastern-Front.png (2.08 MiB) Viewed 759 times
Ronnie
User avatar
rkr1958
Posts: 30977
Joined: Thu May 21, 2009 10:23 am

Re: A Competitive GW (Solo) Scenario by the Numbers.

Post by rkr1958 »

Turn 3. Jan/Feb 1940. MTO.

Narrative.
Axis #1.
The Italians decided on a combined action. Italy’s primary plan was to capture Algiers, Algeria and Tunis, Tunisia. The plan to achieve this would have been easier with a land action versus the combined taken; however, the chance success for either action (i.e., land or combine) was 51% and dependent on a successful ground strike of the out of supply and isolated French 5th inf corps in Algiers. Therefore; Italy took the combined as a hedge against the 49% chance that this ground strike would fail. In either case (i.e., successful or unsuccessful ground strike), Italy would embark the Libya Terr in Sousse into the 3-box of the West Med. The embarkation TRS Gp will be accompanied by 2 Italian BBs, joining an Italian CA on station, and all of which covered by an Italian land-based naval air group.
1 of 2 Italian land moves would be to move their 1st inf div (1-3) to capture the open city of Algiers, Algeria, which will cause the inf div to flip because the last hex of this move requires 2 of the remaining 1 MP of the inf div.
If the ground strike fails, the plan is to debark the 1-4 Libyan MIL into Algiers, which will then be in position to capture the undefended city of Oran, Algeria (whether permitting) next axis impulse.
However; if the ground strike was successful (51%), which it was, then the Alpine Mountain Corps (5-4) would move adjacent to the now flipped and outer supply French 5th Infantry Corps and assault that corps. Because only one unit was attacking, a +21 assault was necessary. An additional 5 attack factors to that of the Alpini Mtn corps were needed to get the +21 assault. The Italians decided to get those 5 additional attack factors from 3 shore bombardment factors (1 BB) and 2 ground support factors (1 F/B wing. The French 5th Infantry Corps was destroyed and Tunis captured by this assault.

Allied #3.
The number one priority this impulse for the CW was reestablishing supply to Malta, which the was accomplished through the East Med with the RN providing the supply CP and the French navy providing the escorts (1 CA) and patrols (2 CAs).

A critical decision on whether or not the RN and French navy would confront the Italian RM in the West Med raged in London and Paris. In the end it was decided by the allies to indeed challenge the RM; especially, given the lack of any fighter coverage over the RM task force in the 3-box (of the West Med).

This decision by the RN and French navy paid off in spades. In 2 rounds of naval air action, the Allies managed to surprise the Italians, sink a loaded Italian transport group with the Libyan territorial, and heavily damaged an Italian BB. The cost to the Allies, was an aborted French BB.

The Allies have conceded Tunisia and Algeria (including Oran). A New Zealand Terr corps from the Pacific is headed to Morocco, which will get there until next turn for the defense Morocco.

Axis #5.
A pre brief priority for the Italians in the Med is to get the Alpini mountain core from Tunisia to Algiers, and in position to capture the critical port city of Oran, Algeria next axis impulse (weather permitting).

Critical importance is for the Italian RM to adequately protect the remaining Italian transport group after the disastrous loss of their 4-3 transport group last Allied impulse. Better protecting will be accomplished by the RM operating in the 2-box of the West Med, which will be covered by a Luftwaffe fighter wing, land based naval air group and Italian land base naval air group.

Pre brief requirements were executed by the Italian RM and supporting Luftwaffe fighter wing and naval group. The RM task force included 2 BBS, 1 CA, 1 transport group, one fighter wing, and two naval land based naval air groups. In an attempt to punish the RN, French navy, and drive them out of the West Med, the Italians initiated a naval search. However, it was the Allies that found and surprised the axis, electing to fight the lone Italian RM BB in the 3-box and CA in the 1-box. The result was another allied naval victory in the West Med, which resulted in the sinking of the Italian CA Garibaldi and the forced abort of the BB Conte Di Cavour. The cost to the allies, was heavy damage to the French battleship Dunkirk. After the encounter, with no fighter coverage, the remaining allied ships and planes decided to retire; i.e., abort.

Italy left four organized CAs in La Spezia in hopes that Italy will get another impulse this turn to send a force into the East Med with the goal of breaking supply to Malta (again) and keeping the RN force of 1 CV, 2 CVLs, 3 CAGs, 4 BBs, 3 CAs, 2 CPs unoiled (again).

Allied #8.
The Allies were directed to continue Gort’s advance across Libya. Also, the French were direct to attack Italian factories in Milan. A raid, which came up empty (again) for the second time this turn.

Axis #11.
The Italian RM in the Med were given two objectives this impulse. The first was to break allied supply through the East Med and to Malta. The second was to position one or more RM CAs (or sub Gps) in the 4-box of the West Med to counter to any potential allied attempt to supply Malta through the West Med. Currently, the Allies has no naval presence in the West Med.

In the West Med, The Italian RM sent 1 CA to the 4-box.

In the East Med, the Italian RM sent 3 CAs & 1 Sub Gp to 3-box to attempt to break allied supply to Malta. However; instead, it was the Italians surprised by the 2 French CA on patrol (4-box). The resulting surface action resulted in heavy damaged to 2 Italian CAs and the force abort of the Italian subgroup, leaving one Italian CA. The cost to the French was that both CAs on patrol were aborted (to Port said, in Egypt). This left 1 undamaged and 2 damaged Italian CAs to search for the RN supply CP escorted by 1 French CA. However; the allied supply task force manages to evade detection and combat ended in the East Med. This naval battle is a continuation of Allied victories in both the East and West Med this turn.

Allied #15.
The CW took a combine this impulse and used their two naval moves to move a CP from Mombasa and 2 CPs from Singapore to the Red Sea, 0-box. These 3 CPS will be returned to base at the end of the turn as supply reserve CPs for the East Med.

The CW used 2 of their 3 land moves in Libya. The UK Royal eng div was able to flank the Libyan territorial on the Gulf of Syria. Because the div started out of supply this move caused the div to flip; however, being on the coast of the Gulf of Syria it will be oiled through the East Med. Also, Wavell HQ-A moved directly west and finished 2-hexes directly east of Benghazi.

Combat Logs.
99-Med-CL.png
99-Med-CL.png (330.79 KiB) Viewed 758 times
Attack Planning Logs.
99-Med-AP.png
99-Med-AP.png (22.3 KiB) Viewed 758 times
Ronnie
User avatar
rkr1958
Posts: 30977
Joined: Thu May 21, 2009 10:23 am

Re: A Competitive GW (Solo) Scenario by the Numbers.

Post by rkr1958 »

Turn 3. Jan/Feb 1940. MTO.

East Med. End of Turn.
99-Med-East-Med.png
99-Med-East-Med.png (2.48 MiB) Viewed 757 times
Ronnie
Post Reply

Return to “After Action Report”