AAR - Get the hell off the beach - bloody Omaha!
- Saint Ruth
- Posts: 1504
- Joined: Wed Dec 16, 2009 1:39 pm
AAR - Get the hell off the beach - bloody Omaha!
Hi,
Don Timian (Allies) and myself (Germans) are going to do a multiplayer AAR on "Get the hell off the beach - bloody Omaha!"
The Scenario info is:
Get The Hell Off The Beach! - Bloody OMAHA
Time span: 6 June 1944 - 11 June 1944
Turns: 15
Turns per day: 3
Map size: Small (15 x 23)
Scale: 2500 meters per Hex
Number of units (Axis/Allies): 62 / 100
Force Level: Low Complexity: Medium Advantage: Allies
"Gentlemen, we are being killed on the beaches. Let us go inland and be killed." -- Brigadier General Norman Coda, 29th Infantry Division
“There are two kinds of people who are staying on this beach: those who are dead and those who are going to die. Now let’s get the hell out of here.“ -- Colonel George A. Taylor, 16th Infantry Regiment
Situation: On June 6, 1944, American V Corps launched its assault on OMAHA Beach, the most heavily defended of the five D-Day landing sectors. Tasked with securing the coastal bluffs and moving inland to link up with other Allied forces, the 1st and 29th Infantry Divisions faced a well-entrenched enemy from the 352nd Infantry Division. German strongpoints, rough seas, and disorganized landings turned the beach into a scene of chaos and carnage. Over the next several days, V Corps fought bitterly to break through the coastal defenses and establish a viable beachhead.
Note. This scenario can be played Human vs Human and Human vs AI.
Victory Conditions: Gain more victory points than the other side by destroying enemy units and/or capturing objective hexes. Points are awarded each turn to the player owning the following objective hexes (Axis/Allies):
* St Lo: 0 / 5
* Caumont: 0 / 3
* UTAH Link-up: 0 / 3
* Colleville: 1 / 1
* Isigny: 0 / 2
* Pointe-du-Hoc: 1 / 1
* St. Laurent: 1 / 1
* Ste-Honorine: 1 / 1
* Vierville: 1 / 1
* Bayeux: 0 / 1
* Bridge 1: 0 / 1
* Bridge 2: 0 / 1
Axis / Allies
Men: 14596 / 27968,
Vehicles: 0 / 258,
Guns: 108 / 144,
Planes: 36 / 478,
Command and Control Value (Axis/Allies): -20 / -20
- Saint Ruth
- Posts: 1504
- Joined: Wed Dec 16, 2009 1:39 pm
Re: AAR - Get the hell off the beach - bloody Omaha!
As I am playing the Axis, here is my mission:
Axis Mission. You command elements of the 352nd Infantry Division, positioned in well-prepared strongpoints along the cliffs and draws behind OMAHA Beach. Your mission is to hold the beachhead, prevent the Americans from establishing a secure lodgment, and inflict maximum casualties to disrupt the Allied offensive. Utilize prepared fire zones, minefields, and artillery support to repel the landings.
Special Instructions. During the set-up phase, the only units the German player can move are the white bridge demolition units. The Player is free to move these within their specific set-up zones
- Saint Ruth
- Posts: 1504
- Joined: Wed Dec 16, 2009 1:39 pm
Re: AAR - Get the hell off the beach - bloody Omaha!
Nearly all of my units are Fixed in place (there's a red F on the counter when zoomed in to indicate this:
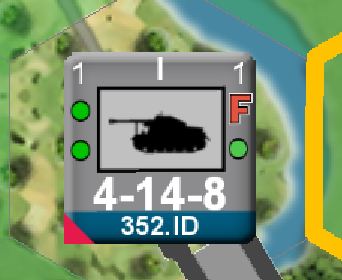
Here's my setup, so there's nothing left to do other than wait for the Americans to land!
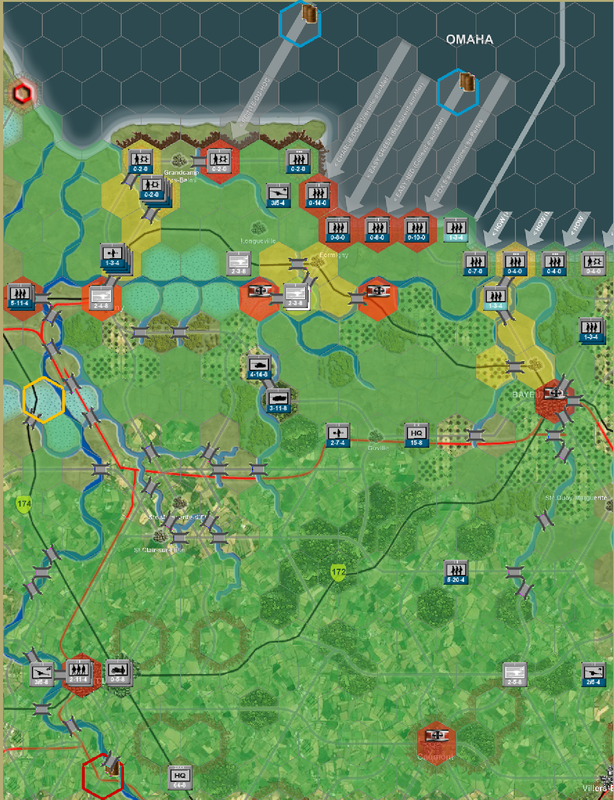

Here's my setup, so there's nothing left to do other than wait for the Americans to land!

Re: AAR - Get the hell off the beach - bloody Omaha!
Hello, Don Timian here …
V Corps’ Mission is to seize OMAHA Beach’s four hexes - plus Pointe du Hoc - then:
o Strike out to the West, seize Isigny, and continue West to link-up with US VII Corps.
o Move to the East / South East to seize Bayeux and link-up with UK XXX Corps.
V Corps’ Mission is to seize OMAHA Beach’s four hexes - plus Pointe du Hoc - then:
o Strike out to the West, seize Isigny, and continue West to link-up with US VII Corps.
o Move to the East / South East to seize Bayeux and link-up with UK XXX Corps.
Re: AAR - Get the hell off the beach - bloody Omaha!
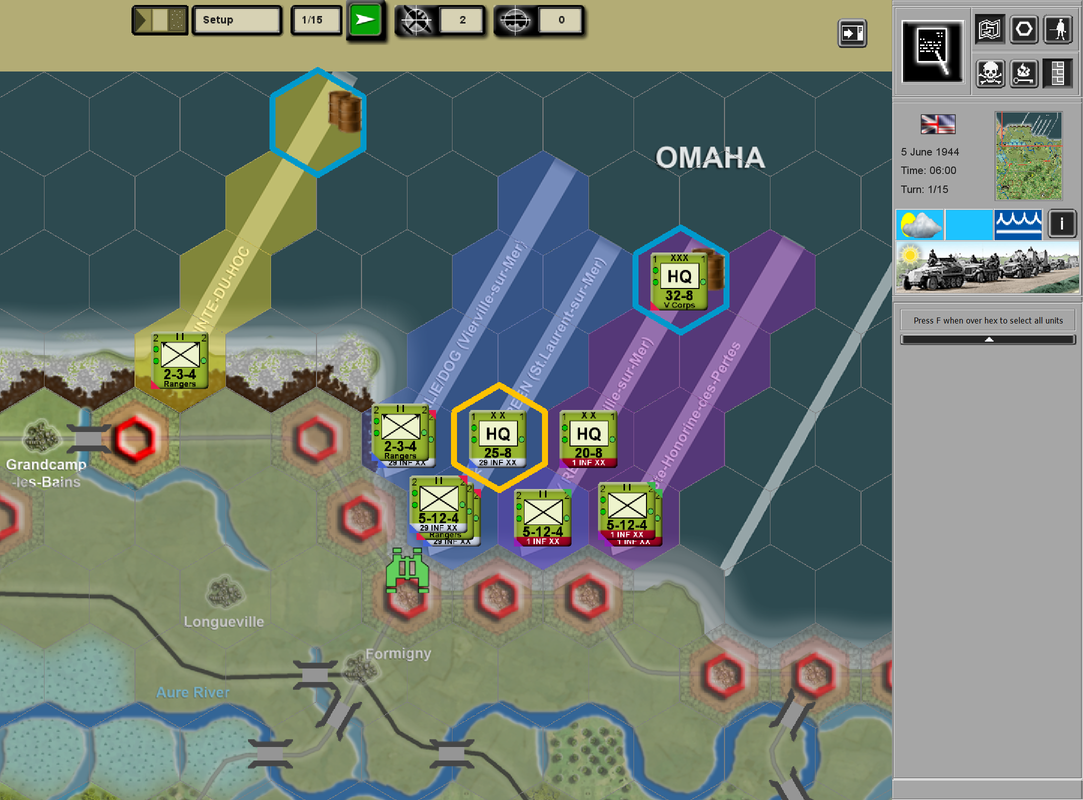
I focused my Recon on the Vierville Draw (one hex to the Northwest of the binoculars), the Les Moulins Draw (to hexes East of the binos), Pointe du Hoc (upper left hand side of screenshot), and the bridge just to the Southeast of Formigny.
With The Blue and Gray Division attacking to seize the Vierville Draw, the Big Red One attack to seize the Lex Moulins Draw, one-half of 2nd Ranger Battalion attacking Pointe du Hoc, and (on Turn 2) the 745th Armor Battalion (a non-DD Battalion of M4A3s) seizing - on the run - the bridge Southeast of Formigny.
Re: AAR - Get the hell off the beach - bloody Omaha!
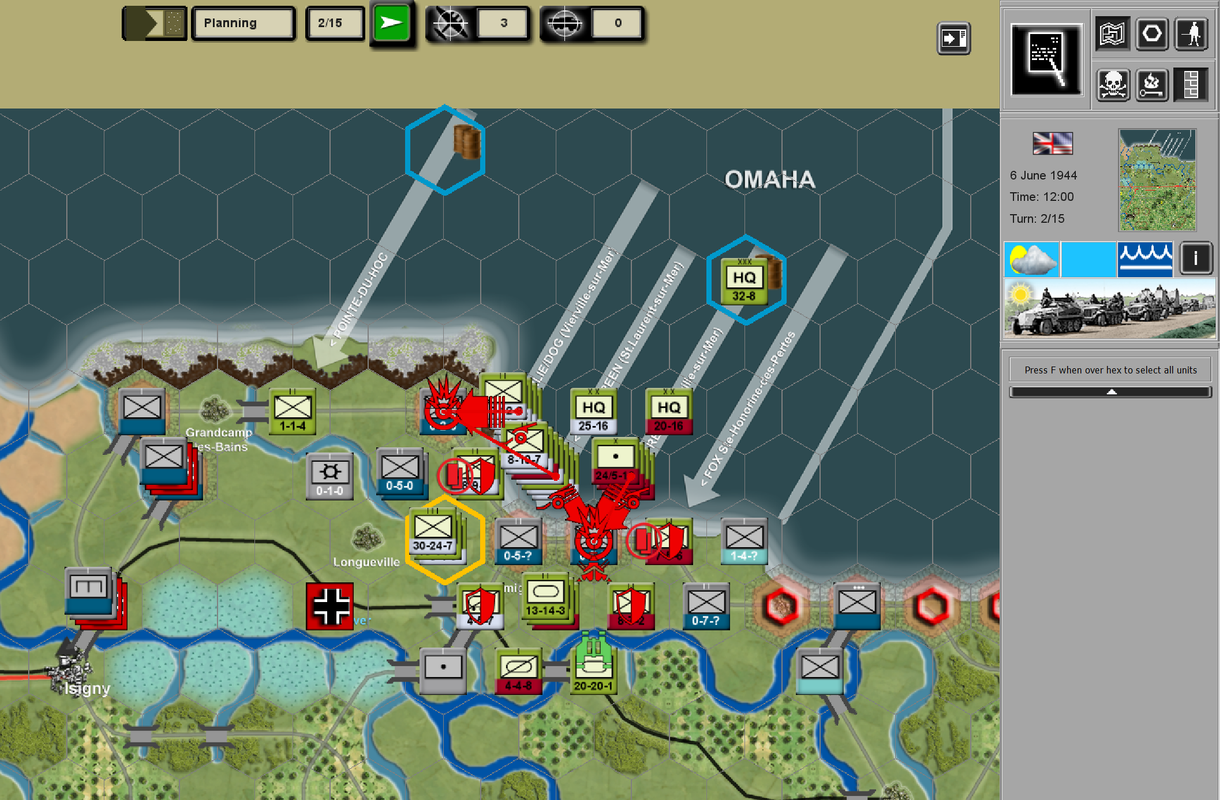
Like a dummy, I forgot to take a screenshot right after I attacked my initial three objectives. The screenshot above shows the end of the Planning Phase of Turn 2.
Needless to say, I was successful in seizing all three objectives (Pointe du Hoc, Verville Draw, and Les Moulins Draw).
During Turn 2 I hope to seize the hex just to the Northwest of Verville Draw (a German Army Weather Station guarded by a Fortified Infantry Platoon), the hex just to the West of 1st Infantry Division's foothold, and the Bridge (mentioned above) with the 745th Armor Battalion.
While the "dice gods" were with me on Turn 1. Turn 2 they somewhat ignored me.
The 1st Infantry Division's attack was successful, but I rolled a 1 vs. the Weather Station (killing all but a handful of the Platoon). And when the 745th got to the Bridge, they discovered the East side was held by two Battalions of German Infantry.
- Saint Ruth
- Posts: 1504
- Joined: Wed Dec 16, 2009 1:39 pm
Re: AAR - Get the hell off the beach - bloody Omaha!
AXIS: Turn 2
--------------
The US 29th and 1st US divisions are ashore.
My 352nd Infantry Divisons did what they could but were overcome.
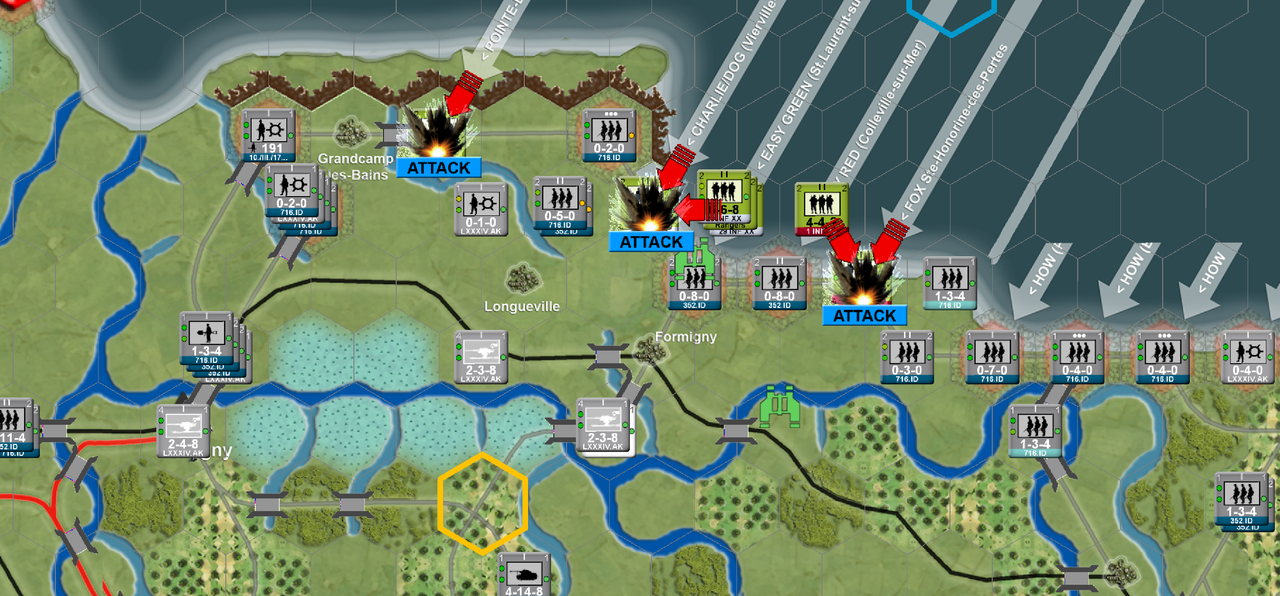
Now I need to get as many units as I can to the beaches as quickly as possible
to contain the US landing. The rivers should also hold them (you can see
the river effects with Hotkey-E - they should the hex edges, black means
the hexside is impassible, red means their is a defensive bonus).
I have a bridging engineer so I immediately order it to destory one of the
bridges.
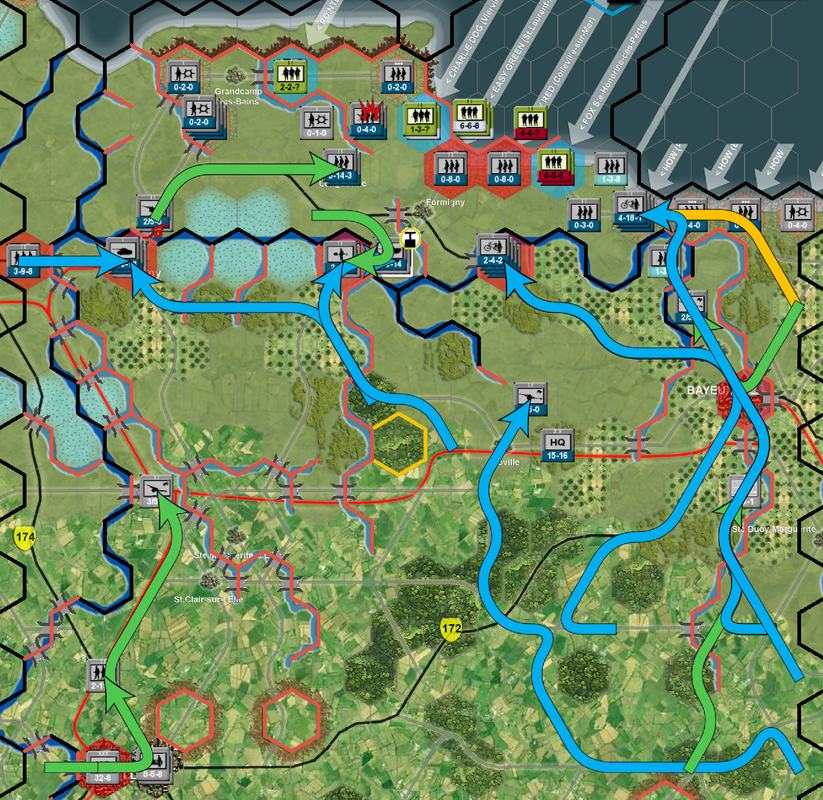
For the other units I use Road Movement to get them to the beaches as quickly
as possible - to use Road movement, a unit must have Move+ supply and have Road
Movement set - their movement will be shown by a Blue arrow.
I also set all units orders to Hold At All Cost - this orders a unit to take excess
casualties instead of retreating. Note that Quality affects this, so a high quality unit
attacking a low quality unit is more likely to force a unit to retreat, even with
Hold At All Cost orders.
Here's my orders (you can see all move orders by pressing Shift-M)
--------------
The US 29th and 1st US divisions are ashore.
My 352nd Infantry Divisons did what they could but were overcome.

Now I need to get as many units as I can to the beaches as quickly as possible
to contain the US landing. The rivers should also hold them (you can see
the river effects with Hotkey-E - they should the hex edges, black means
the hexside is impassible, red means their is a defensive bonus).
I have a bridging engineer so I immediately order it to destory one of the
bridges.
For the other units I use Road Movement to get them to the beaches as quickly
as possible - to use Road movement, a unit must have Move+ supply and have Road
Movement set - their movement will be shown by a Blue arrow.
I also set all units orders to Hold At All Cost - this orders a unit to take excess
casualties instead of retreating. Note that Quality affects this, so a high quality unit
attacking a low quality unit is more likely to force a unit to retreat, even with
Hold At All Cost orders.
Here's my orders (you can see all move orders by pressing Shift-M)

Last edited by Saint Ruth on Tue Oct 21, 2025 10:36 pm, edited 1 time in total.
- Saint Ruth
- Posts: 1504
- Joined: Wed Dec 16, 2009 1:39 pm
Re: AAR - Get the hell off the beach - bloody Omaha!
AXIS TURN 3
--------------
Oh dear, well, one of the 352nd Infantry Battalions didn't last long. It was pushed back and then overrun (overruns happen automatically when the attacker has greater than 10:1 odds and the defender is in the open).
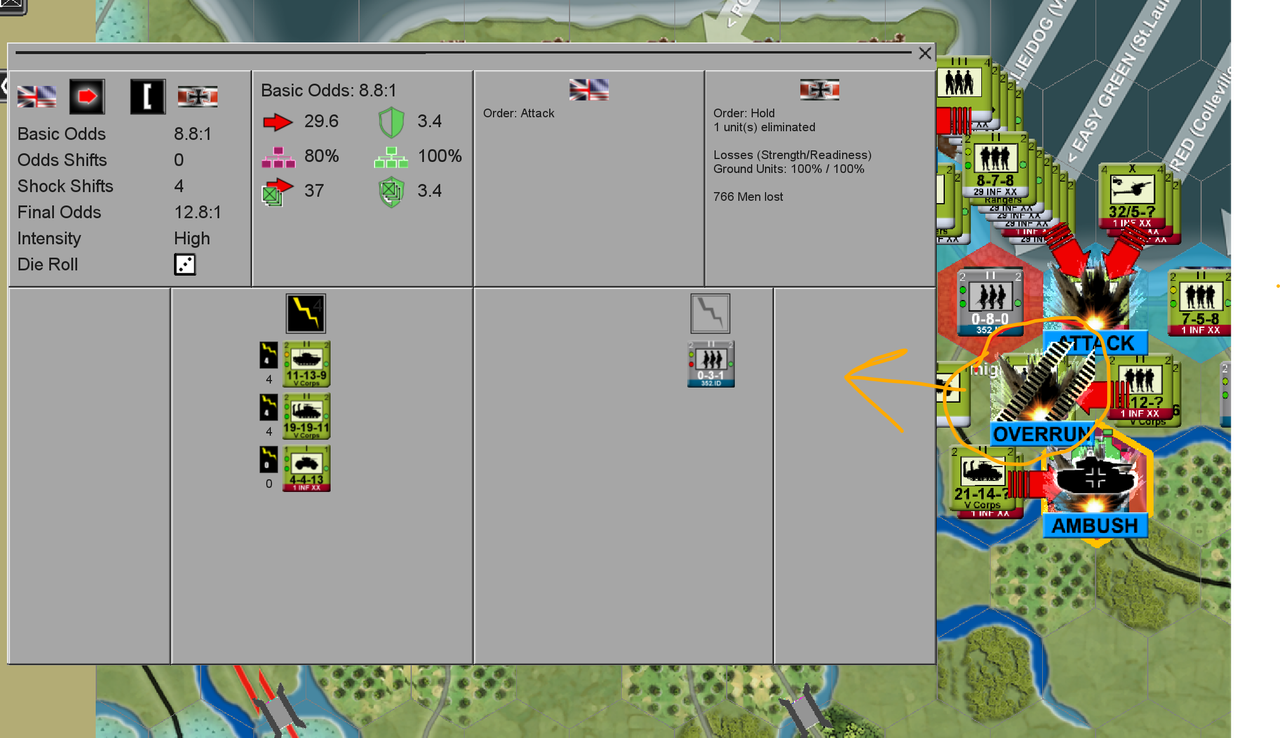
The Americans pushed to the bridge more quickly than I expected and ambushed my units that were deploying using Road Movement (any unit using Road Movement that moves adjacent to an enemy unit is attacked - this is a "free" attack and the attacker suffers no effects).
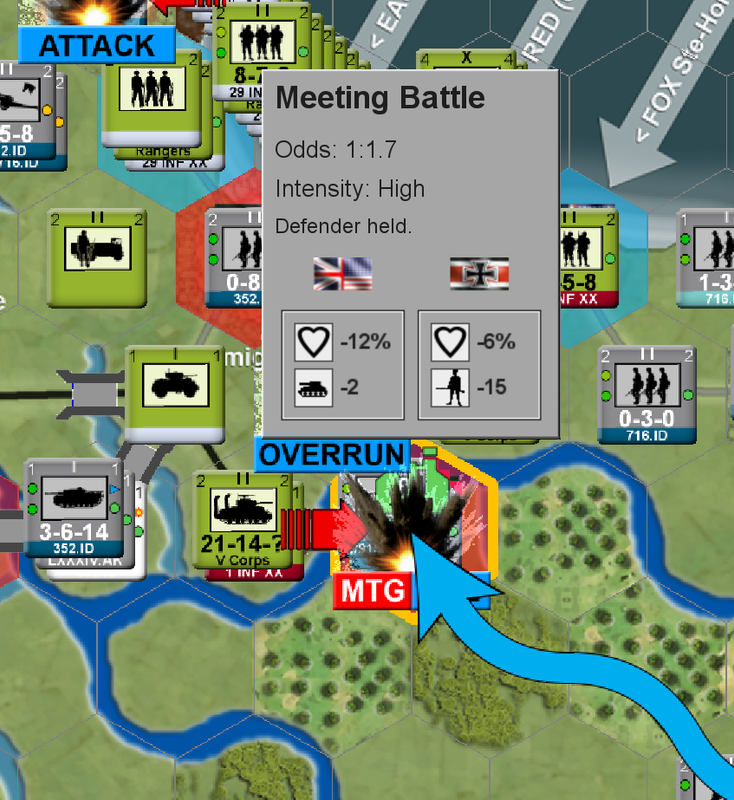
Still, it is an attack over a bridge so the attacker is halved and damage to my units is limited.
The US units do howver push on, and there is a meeting engagement, but my units held.
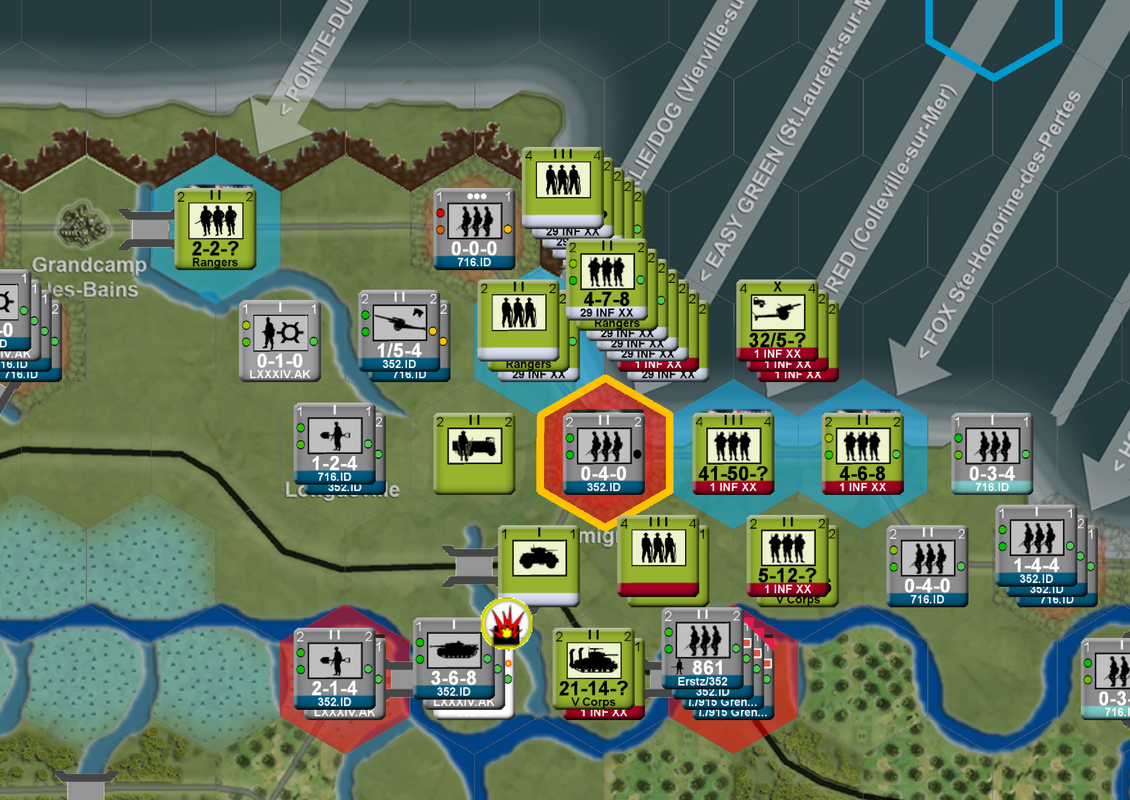
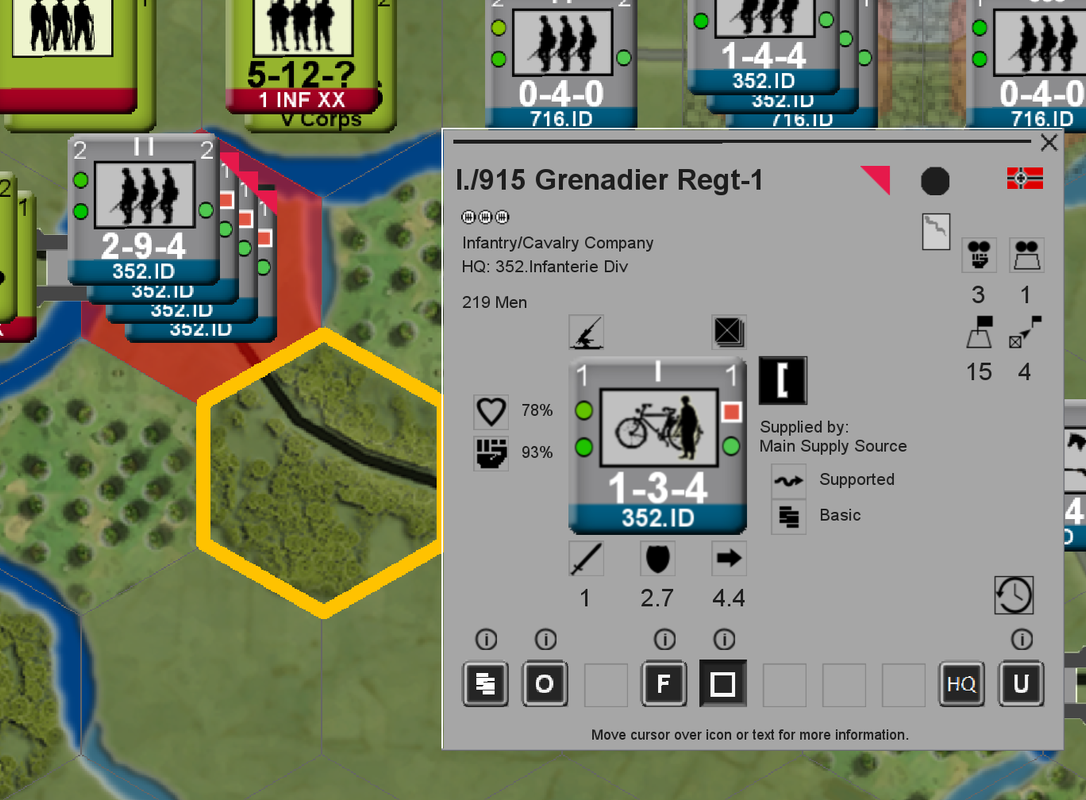
The Bridging unit did not blow the bridge unfortunately, but it is now a night turn, so all I can do is hold.
Units with a triangle on their upper right can be combined into a single counter (e.g. 3 companies into a battalion, or 3 battalions into a regiment). As I have 3 such units I am combining them (this can be done either
with the move controls or using Hotkey-B)
--------------
Oh dear, well, one of the 352nd Infantry Battalions didn't last long. It was pushed back and then overrun (overruns happen automatically when the attacker has greater than 10:1 odds and the defender is in the open).

The Americans pushed to the bridge more quickly than I expected and ambushed my units that were deploying using Road Movement (any unit using Road Movement that moves adjacent to an enemy unit is attacked - this is a "free" attack and the attacker suffers no effects).

Still, it is an attack over a bridge so the attacker is halved and damage to my units is limited.
The US units do howver push on, and there is a meeting engagement, but my units held.

The Bridging unit did not blow the bridge unfortunately, but it is now a night turn, so all I can do is hold.
Units with a triangle on their upper right can be combined into a single counter (e.g. 3 companies into a battalion, or 3 battalions into a regiment). As I have 3 such units I am combining them (this can be done either
with the move controls or using Hotkey-B)

Re: AAR - Get the hell off the beach - bloody Omaha!
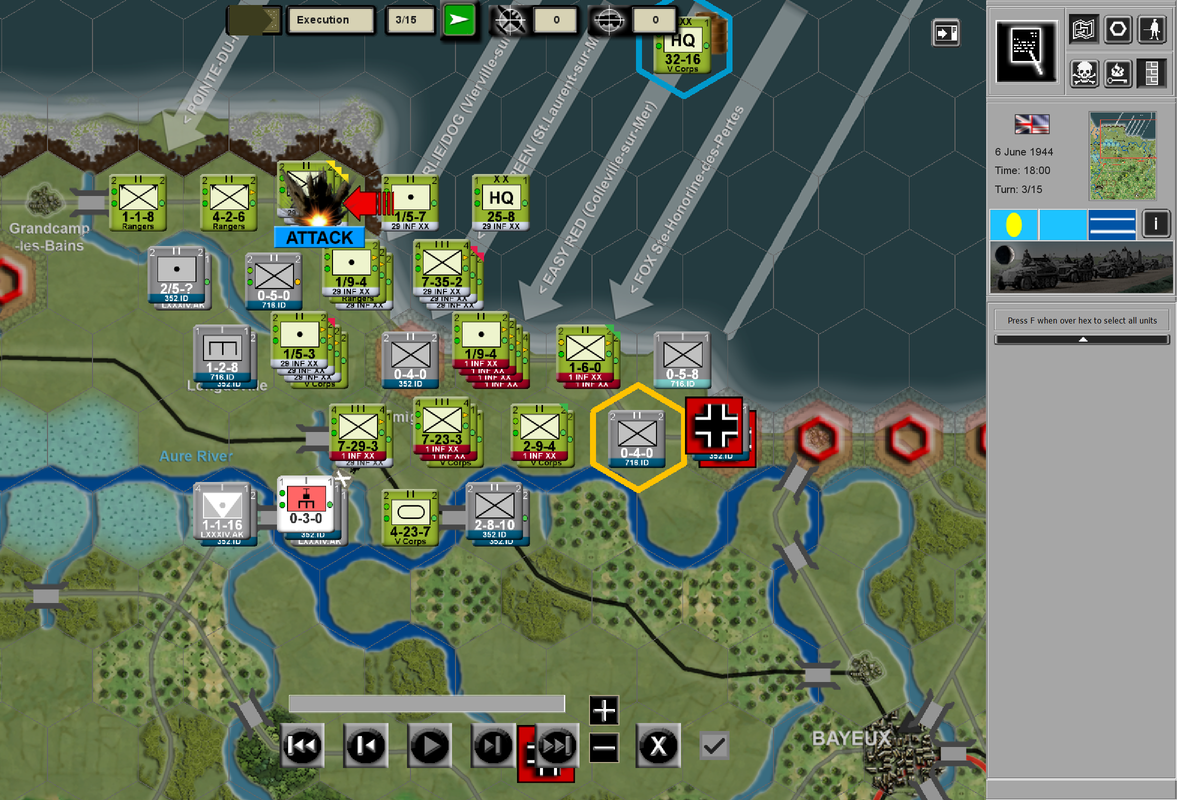
OMAHA - - End of Turn 3
The Infantry Battalions that Invaded (on Turn 1) + my two Duplex Drive Shermans, I elected not to move. Their Readiness was no longer Green (a.k.a., under 80%). However, I did elect to attack the Weather Station - one last time - and was successful.
Don.
- Saint Ruth
- Posts: 1504
- Joined: Wed Dec 16, 2009 1:39 pm
Re: AAR - Get the hell off the beach - bloody Omaha!
AXIS Turn 4
-----------
Not much happened during the night, but the Americans are firmly established
ashore, but are not across the river. One of the bridges is blown, but now
that I realize that the 352 ID's Demo unit cannot move, I should have ordered
it to destroy all adjacent briges. Never too late to try!
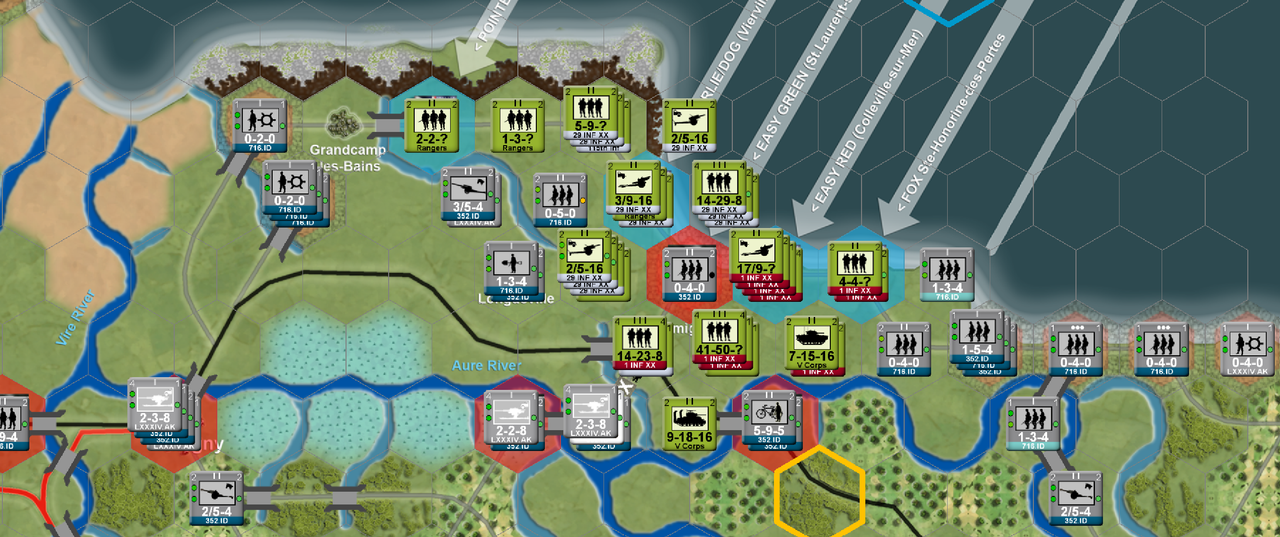
My aim now is to try and delay the Americans as much as possible.
I added some defensive artillery fire (you can toggle on/off the
artillery missions lines using Hotkey-G), and added some defensive
Ground Asset Command missions to my unit in Longueville - that'll give
me a +2 shift in my favour if attacked.
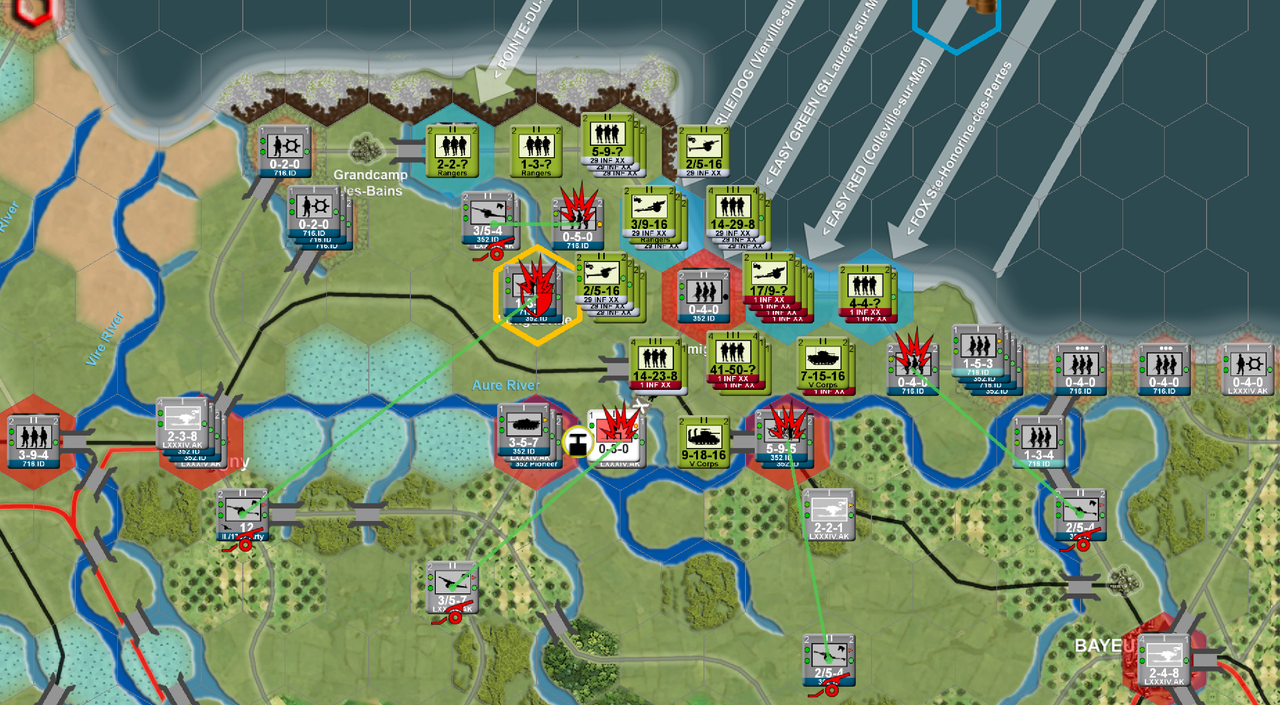
All my units now have Hold At All Costs orders. You can view current
orders on all units using the Hotkey SHIFT-O.
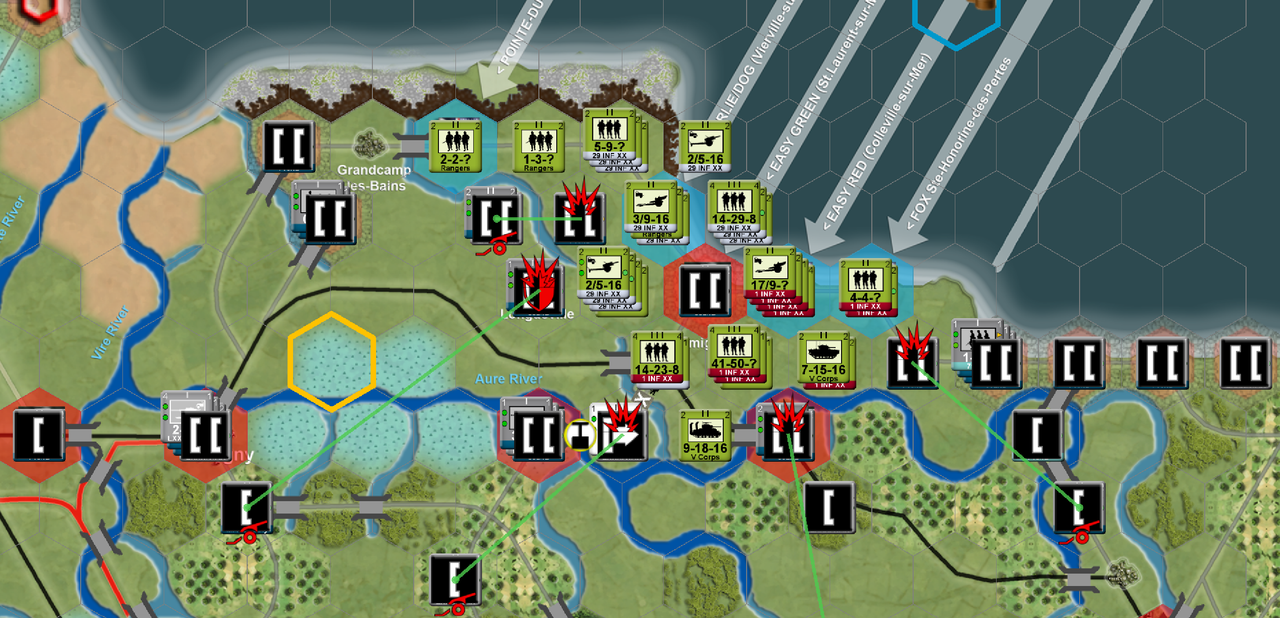
-----------
Not much happened during the night, but the Americans are firmly established
ashore, but are not across the river. One of the bridges is blown, but now
that I realize that the 352 ID's Demo unit cannot move, I should have ordered
it to destroy all adjacent briges. Never too late to try!

My aim now is to try and delay the Americans as much as possible.
I added some defensive artillery fire (you can toggle on/off the
artillery missions lines using Hotkey-G), and added some defensive
Ground Asset Command missions to my unit in Longueville - that'll give
me a +2 shift in my favour if attacked.

All my units now have Hold At All Costs orders. You can view current
orders on all units using the Hotkey SHIFT-O.

Re: AAR - Get the hell off the beach - bloody Omaha!
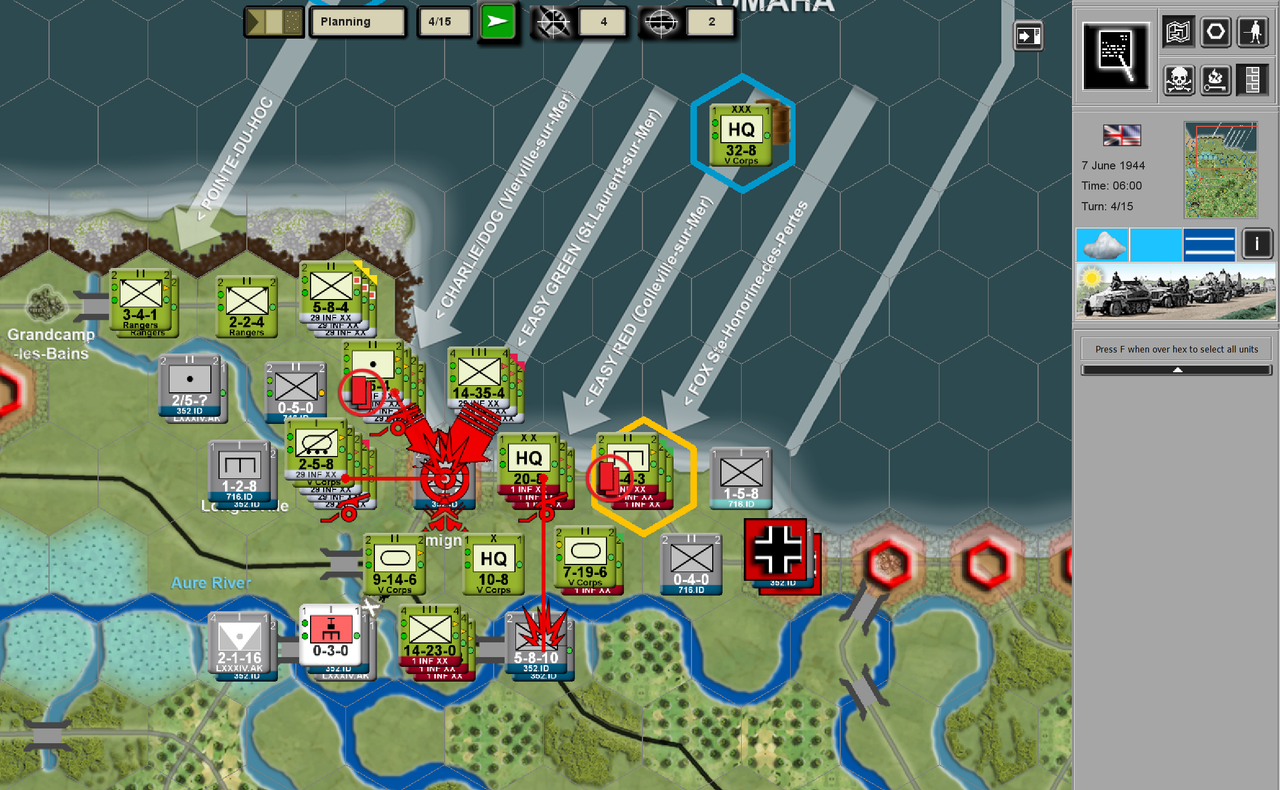
OMAHA - - End of Allied Turn 4 Planning Phase
With parts of the 29th Infantry Division, I'm going to try and clear the last German Strong Point on OMAHA.
I'm also moving parts of the 1st Infantry Division to 1) attack along the coast to the East and 2) try and take the East end of the bridge (where Brian has two German Infantry Battalions). The hex immediately West of the the "Big Red One's" 14-23-0 Infantry Regiment.
However, in the end, the 29th was unable to mop-up the last Strong Point. So on to Turn 5.
Don.
- Saint Ruth
- Posts: 1504
- Joined: Wed Dec 16, 2009 1:39 pm
Re: AAR - Get the hell off the beach - bloody Omaha!
AXIS Turn 5
-----------
Oh, the 352nd's battalion survived at the beach! Good work! Medals all round.
The units across the river also survived the American's Big Red One's attack.
So all good, except for the supply situation. I allocated 2 air units to counter
air but the allies had also 2 units on Counter Air PLUS has a Air Superiority of 2
so that nullified my Counter Air.
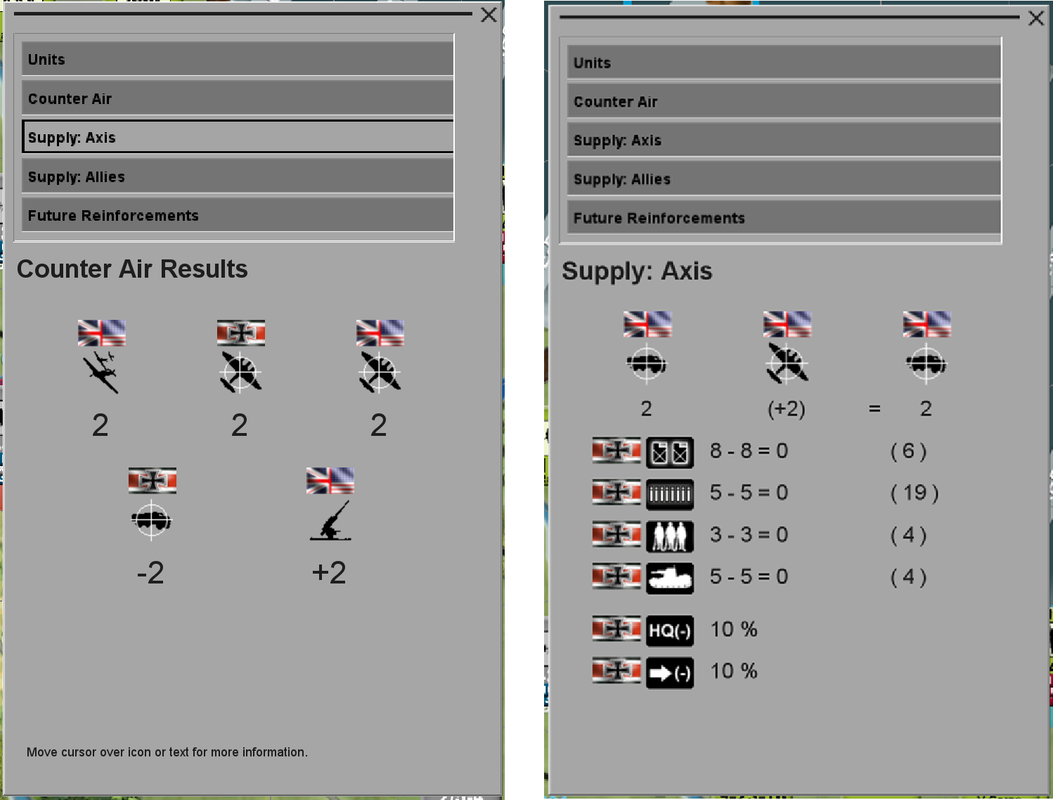
On the right hand panel below, you can see the Allies had 2 Interdiction Missions
and a surplus of 2 Counter Air - the (+2), which leaves the Allies Interdiction unchanged
at 2.
Which is enough to cut off all my supply (my supply increase is 0), and reduces HQ range
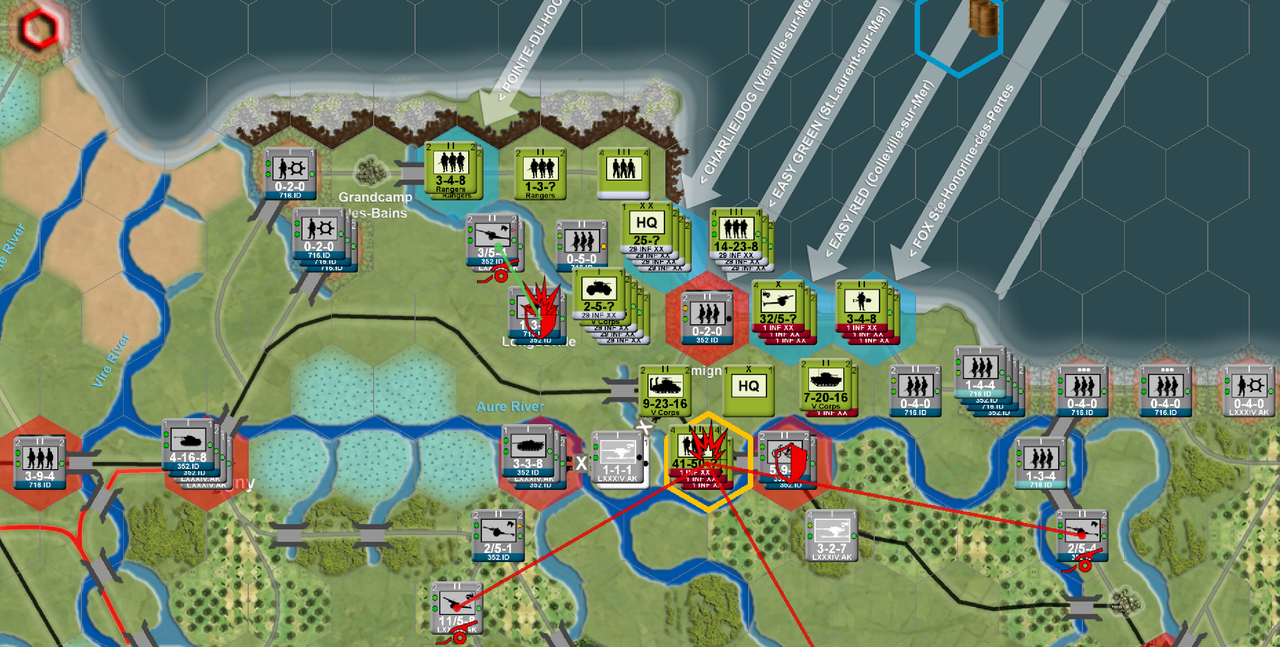
by 10% and movement by 10%.
This turns, I'm giving the 352 ID Combat+ supply so it's artilley will be quadruppled,
and everyone just needs to HOLD!
-----------
Oh, the 352nd's battalion survived at the beach! Good work! Medals all round.
The units across the river also survived the American's Big Red One's attack.

So all good, except for the supply situation. I allocated 2 air units to counter
air but the allies had also 2 units on Counter Air PLUS has a Air Superiority of 2
so that nullified my Counter Air.

On the right hand panel below, you can see the Allies had 2 Interdiction Missions
and a surplus of 2 Counter Air - the (+2), which leaves the Allies Interdiction unchanged
at 2.
Which is enough to cut off all my supply (my supply increase is 0), and reduces HQ range
by 10% and movement by 10%.
This turns, I'm giving the 352 ID Combat+ supply so it's artilley will be quadruppled,
and everyone just needs to HOLD!

Re: AAR - Get the hell off the beach - bloody Omaha!
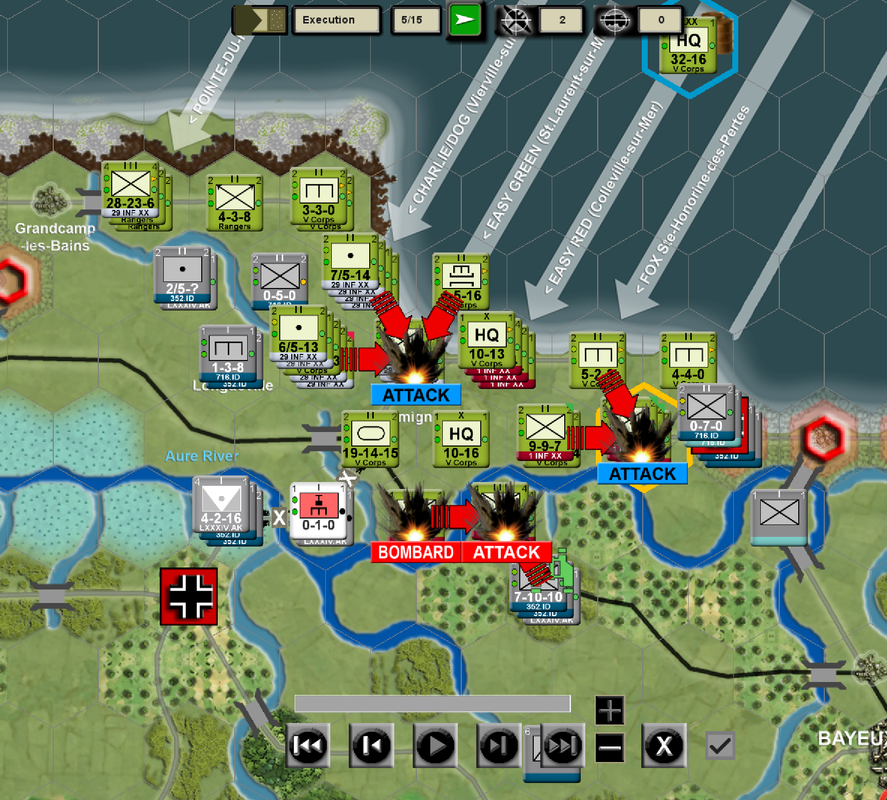
OMAHA End of Allied Turn 5
I was quite surprised when 1st Infantry Division's attack - with two Infantry Regiments + all of the Division's Artillery - vs. the two German Infantry Battalions, on the East side of the bridge, was a success. Didn't expect this. Thought I'd have to build a bridge further down the river to the East.
1st Infantry was also able to push the Germans back, to the East, near the coast. While the 29th Infantry Division was able to reduce the remaining German Strong Point on OMAHA.
Last edited by Timian on Tue Oct 28, 2025 8:04 pm, edited 1 time in total.
Re: AAR - Get the hell off the beach - bloody Omaha!
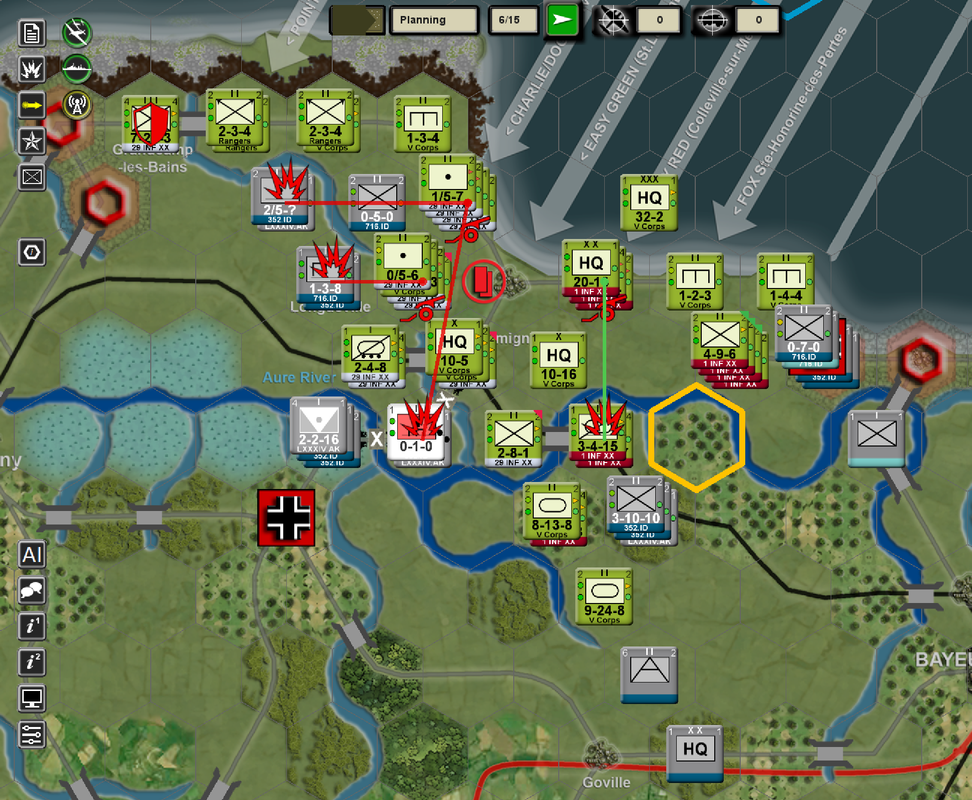
OMAHA End of Allied Turn 6 Planning Phase
Fortunately, I have two tank battalions near by to exploit 1st Infantry's successful attack. While 29th Infantry begins its push West to secure Isigny.
- Saint Ruth
- Posts: 1504
- Joined: Wed Dec 16, 2009 1:39 pm
Re: AAR - Get the hell off the beach - bloody Omaha!
AXIS Turn 6
-----------
Not a good turn. The US 1st Infantry Divison is over the river, and I accidentally
gave a unit that was moving to the bridge as reinforcements a Move And Attack orders instead of Move and Defend Orders.
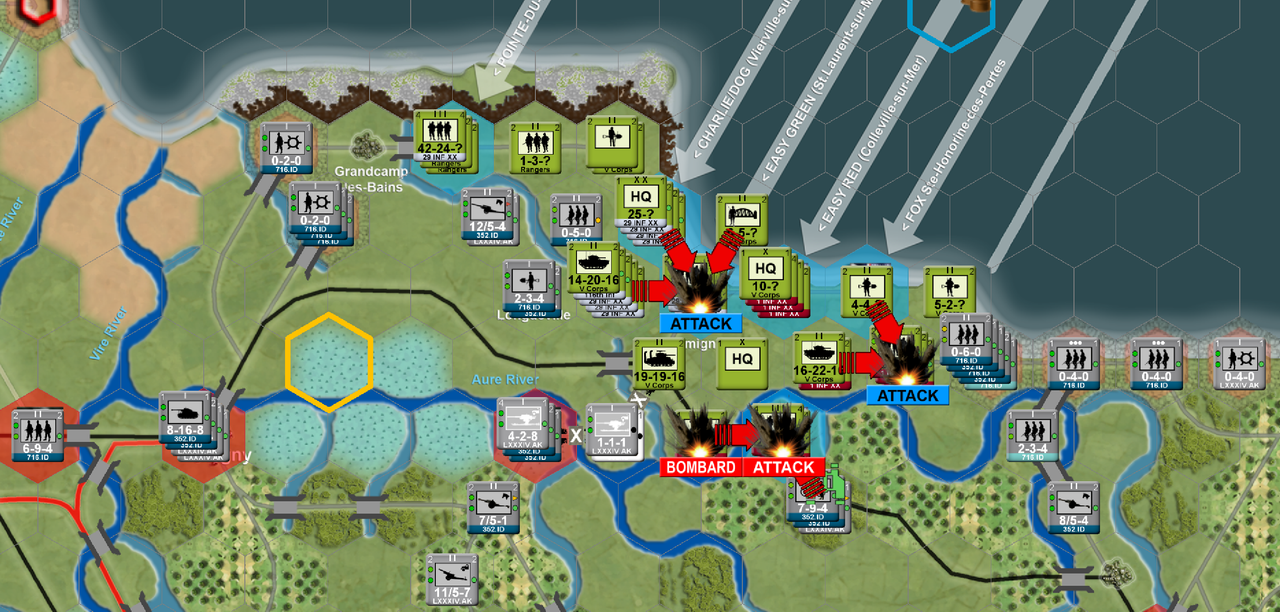
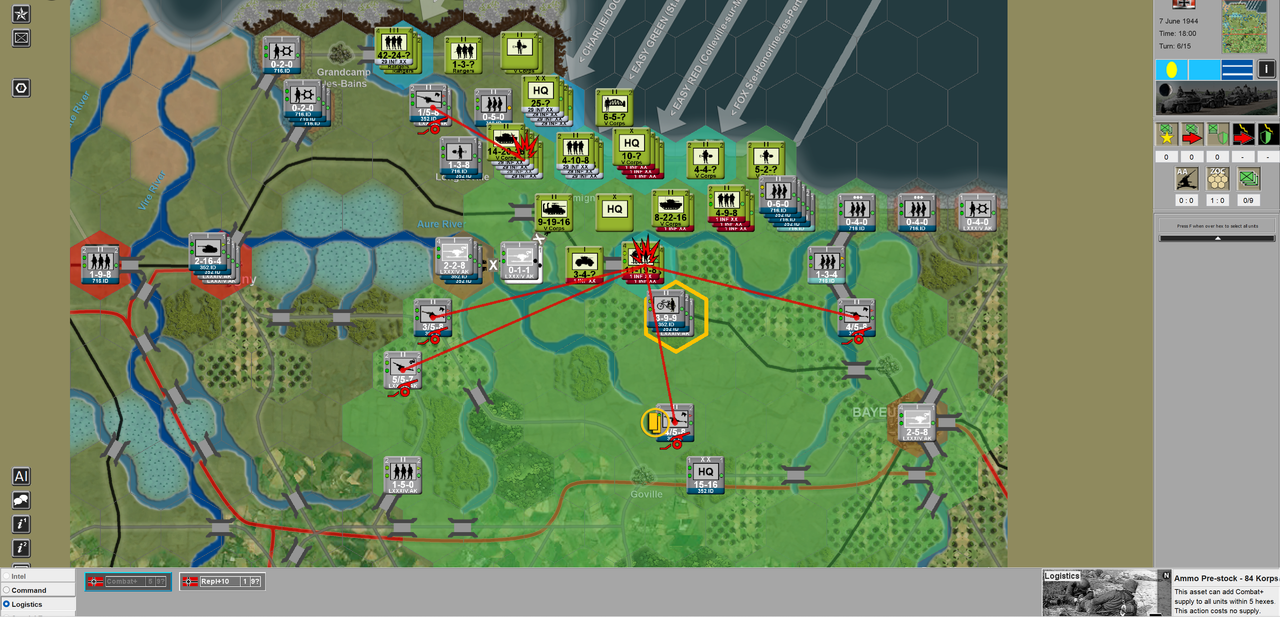
I need to reinforce those units as quickly as possible, so I gave Move+ supply to
my 1/352 Panzerjaeger Battalion (which doubles its move points) so it can make its
travel through the night and get their in time.
I also used logistics to (Ammo prestock) to my units so I can bombard them overnight.
We'll now have to wait to see what morning brings.
-----------
Not a good turn. The US 1st Infantry Divison is over the river, and I accidentally
gave a unit that was moving to the bridge as reinforcements a Move And Attack orders instead of Move and Defend Orders.

I need to reinforce those units as quickly as possible, so I gave Move+ supply to
my 1/352 Panzerjaeger Battalion (which doubles its move points) so it can make its
travel through the night and get their in time.
I also used logistics to (Ammo prestock) to my units so I can bombard them overnight.
We'll now have to wait to see what morning brings.

- Saint Ruth
- Posts: 1504
- Joined: Wed Dec 16, 2009 1:39 pm
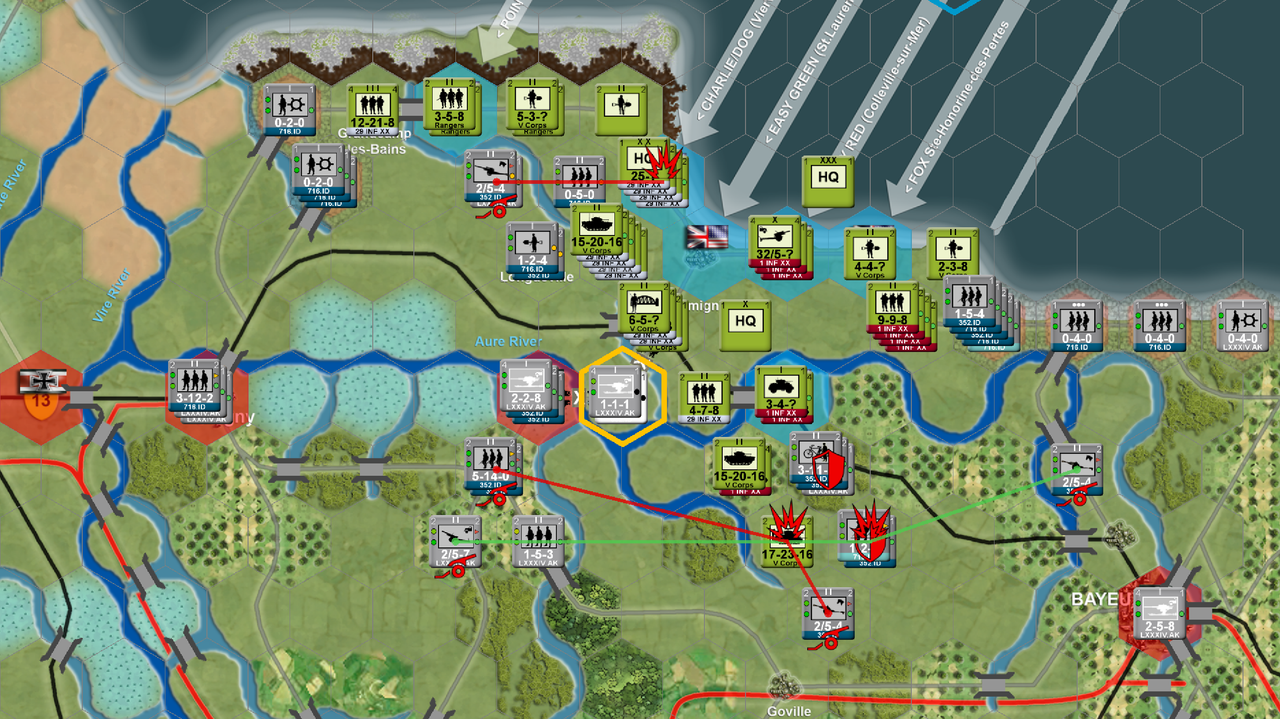
Re: AAR - Get the hell off the beach - bloody Omaha!
AXIS TURN 7
--------------
This was a night turn so not much happened other than some artillery missions.
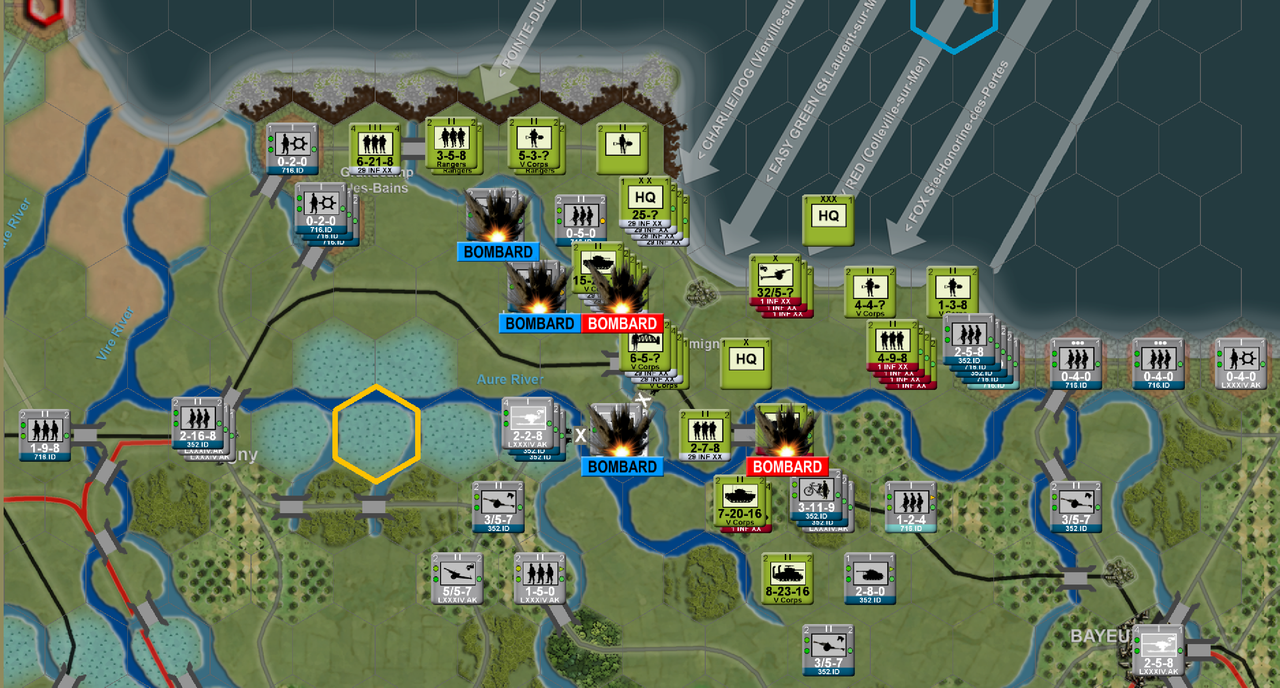
For the new turn, it's a defensive posture:
--------------
This was a night turn so not much happened other than some artillery missions.

For the new turn, it's a defensive posture:

Re: AAR - Get the hell off the beach - bloody Omaha!
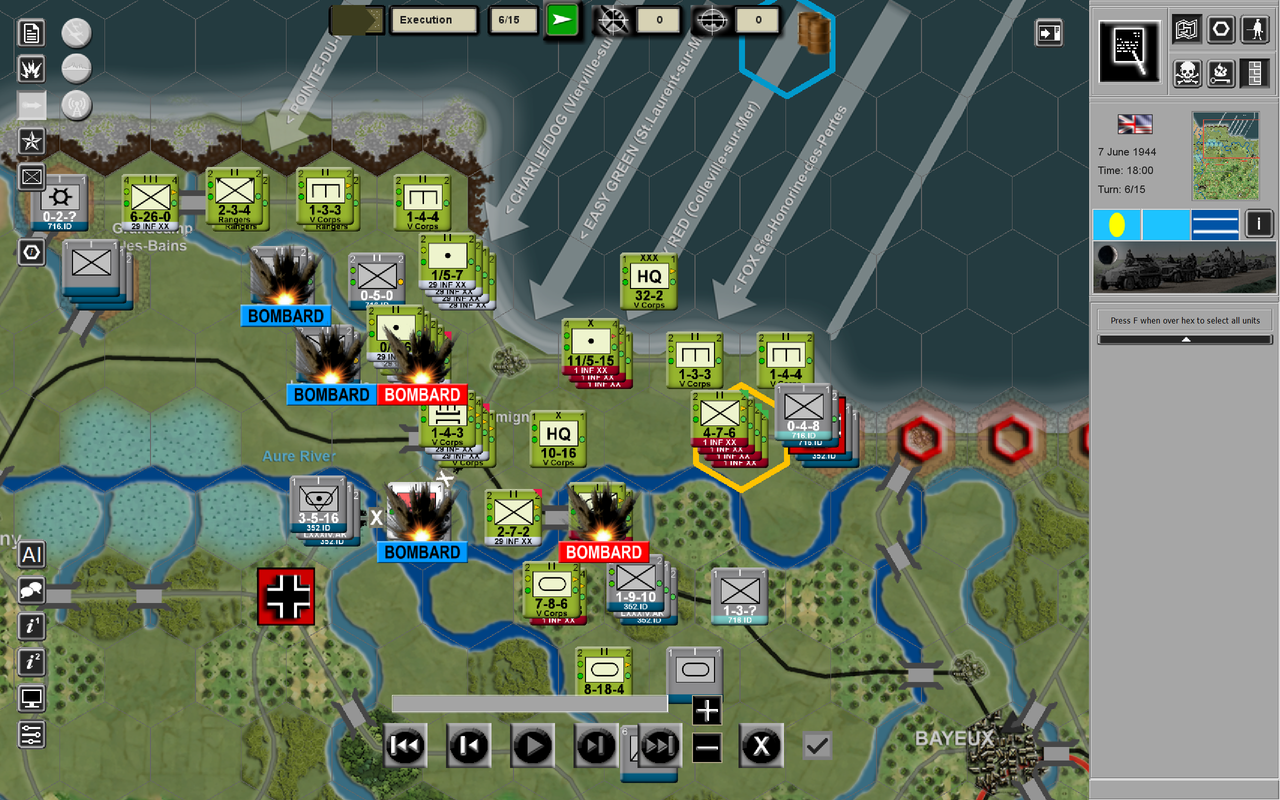
OMAHA End of Allied Turn 6
I managed to push two Armor Battalions to exploit 1st Infantry Division's success and slowly - in the North - 29th Infantry Divisions begins to move to the West.
Re: AAR - Get the hell off the beach - bloody Omaha!
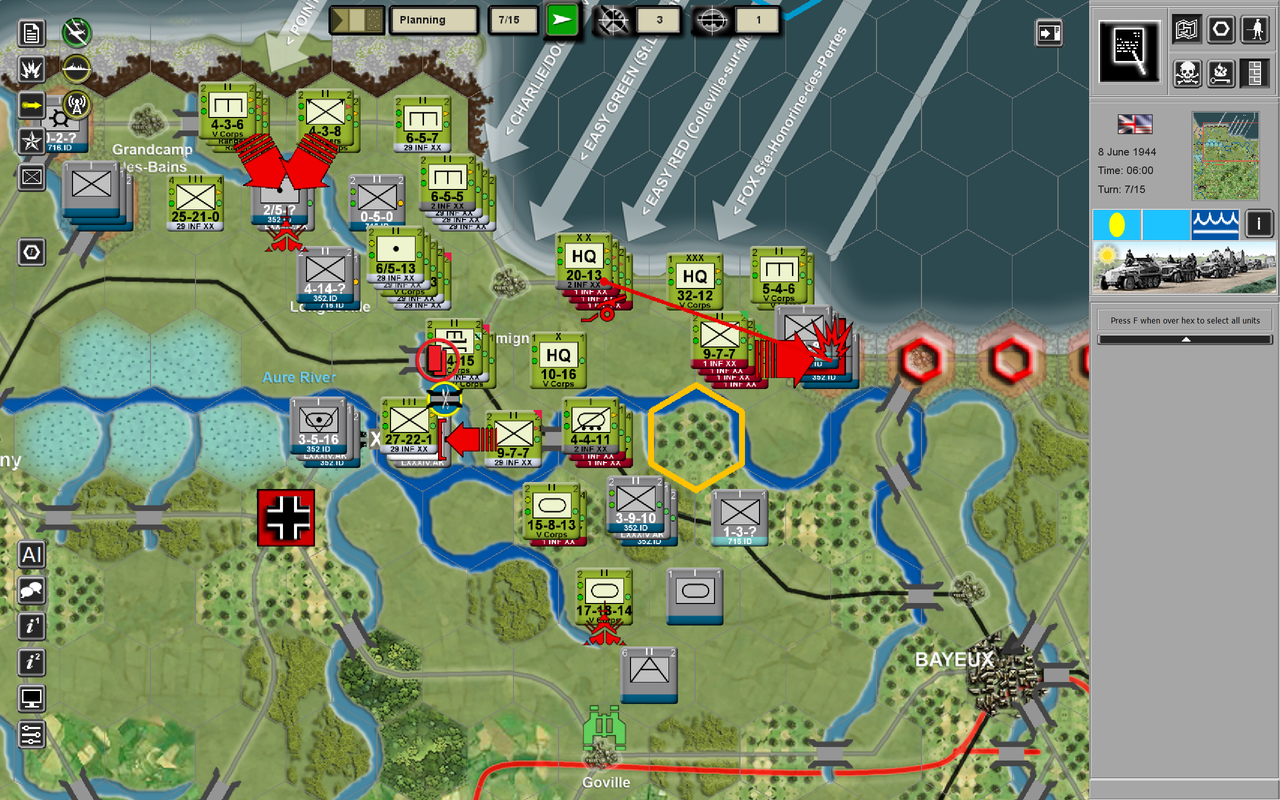
OMAHA End of Allied Turn 7 Planning Phase
In the North, the Rangers with some assistance from some US Destroyers are attacking the German Artillery Battalion just South of Pointe du Hoc. In the East, 1st Infantry is trying to push along the coast. In the Center, the 29th Infantry Division is attacking to eliminate the German Demolition Unit and Flak Battery underneath the 175th Infantry Regiment (27-22-1).
For now, I've elected to hold what I've got vicinity my two Armor Battalions + two of 1st Infantry Division's Regiments. Three of the four are below 80% Readiness (no longer showing dark Green), so want to take a turn or so to "catch my breath".
-
GiveWarAchance
- Posts: 538
- Joined: Tue Feb 10, 2015 10:42 pm
Re: AAR - Get the hell off the beach - bloody Omaha!
This is really cool. I like the screenshots.
Please continue and do more AARs of this game.
Please continue and do more AARs of this game.
Re: AAR - Get the hell off the beach - bloody Omaha!
Brian Kelly is busy working on Overlord Steam + his day job.
How ‘bout you and I playing a scenario + writing an AAR? You pick the scenario and sides.
All the best,
Don.
How ‘bout you and I playing a scenario + writing an AAR? You pick the scenario and sides.
All the best,
Don.


