

House Rules = None
Background
5 June 1944 through 20 July 1944
Turns in Campaign: 135
Turns per day: 3
Map size: Medium (64 x 62)
Scale: 2500 meters per Hex
Number of units (Axis/Allies): 800/972
Force Level: High
Complexity: High
Advantage: Allies
Force makeup
Axis / Allies
Men: 216577 / 308620
Vehicles: 1607 /6182
Guns: 1551 /2834
Planes: 658 /2743
Command and control Value (Axis/Allies): -20 / -20
AAR OVERLORD (135 Turns) Timian (Allies) vs OrderInChaos (Germans) D-Day to Falaise Campaign Game Scenario
-
OrderInChaos

- Posts: 274
- Joined: Thu Dec 29, 2016 4:58 pm
AAR OVERLORD (135 Turns) Timian (Allies) vs OrderInChaos (Germans) D-Day to Falaise Campaign Game Scenario
Last edited by OrderInChaos on Sun Aug 09, 2026 7:18 pm, edited 2 times in total.
-
OrderInChaos
- Posts: 274
- Joined: Thu Dec 29, 2016 4:58 pm
Re: AAR OVERLORD (135 Turns) Timian (Allies) vs OrderInChaos (Germans)
Thank you Timian for the game and doing the Allied side of the AAR. I already know I have my work cut out for me with your experience in the game. I hope to put up at least decent fight.
Please if any have any tips as I play please send them my way since I will be trying to keep this close to current turn as possible.
Please if any have any tips as I play please send them my way
since I will be trying to keep this close to current turn as possible.-
OrderInChaos
- Posts: 274
- Joined: Thu Dec 29, 2016 4:58 pm
Re: AAR OVERLORD (135 Turns) Timian (Allies) vs OrderInChaos (Germans)
Victory Conditions (per the Scenario):
The goal is to gain more victory points than the other side by destroying enemy units and/or capturing objective hexes. Points are awarded "each turn" to the player owning the following objectives numbered on the map 1 through 17 starting at the top working to the bottom from left to right
(Axis points/Allies points) if held:
1. Cherbourg: 1/2
2. Valognes: 1/1
3. Saint Mere Eglise: 1/1
4. Carentain: 2/1
5. Bayeux: 2/1
6. Entry A: 0/1
7. St Lo: 0/1
8. Caumont: 0/1
9. Villers-Bocage: 0/1
10. Caen: 1/2
11. Entry B: 0/1
12. Granville: 0/1
13. Vire: 0/1
14. Falaise: 0/1
15. Entry G: 0/2
16. Flers: 0/1
17. Entry C: 0/1
Here is a visual map of these Victory Point locations:
The goal is to gain more victory points than the other side by destroying enemy units and/or capturing objective hexes. Points are awarded "each turn" to the player owning the following objectives numbered on the map 1 through 17 starting at the top working to the bottom from left to right
(Axis points/Allies points) if held:
1. Cherbourg: 1/2
2. Valognes: 1/1
3. Saint Mere Eglise: 1/1
4. Carentain: 2/1
5. Bayeux: 2/1
6. Entry A: 0/1
7. St Lo: 0/1
8. Caumont: 0/1
9. Villers-Bocage: 0/1
10. Caen: 1/2
11. Entry B: 0/1
12. Granville: 0/1
13. Vire: 0/1
14. Falaise: 0/1
15. Entry G: 0/2
16. Flers: 0/1
17. Entry C: 0/1
Here is a visual map of these Victory Point locations:
- VP Locations.png (1.83 MiB) Viewed 1190 times
-
OrderInChaos
- Posts: 274
- Joined: Thu Dec 29, 2016 4:58 pm
Re: AAR OVERLORD (135 Turns) Timian (Allies) vs OrderInChaos (Germans)
Considering that in real life Bayeux fell on June 7, Carentain by June 14th, Valognes on the 20th, and Cherburg by the 30th of June the Germans are going to have to do a great deal of eliminating units it looks like to gain Victory Points. But this is just me thinking out loud here looking over the VP aquisition cities that give Germans VP's.
Looks like I am going to have to defend forward as best I can to preserve these VP locations.
Will update each turn using this snapshot in the AAR keeping an eye on the VP's for kill on units and locations
Looks like I am going to have to defend forward as best I can to preserve these VP locations.
Will update each turn using this snapshot in the AAR keeping an eye on the VP's for kill on units and locations
- VP's.png (135.63 KiB) Viewed 1186 times
-
OrderInChaos
- Posts: 274
- Joined: Thu Dec 29, 2016 4:58 pm
Re: AAR OVERLORD (135 Turns) Timian (Allies) vs OrderInChaos (Germans)
For those that have not read the following AAR I would highly recommend reading this short AAR to get some really nice insight into the game.
https://forums.matrixgames.com/viewtopic.php?t=413483
Setup Phase
Our Game starts with a "setup phase". This phase is where certain units can be repositioned in specified areas within their command area highlighted for ease of reference prior to the actual commencement of Turn 1. For the German player everything, and I mean everything is locked down and unable to move, refered to as "FIXED" in place except for "DEMO" units (Demolition Companies).
These DEMO units can be moved to a bridge hex during the "Setup phase" to blow the bridges, during planning phase, or used to defend.
https://forums.matrixgames.com/viewtopic.php?t=413483
Setup Phase
Our Game starts with a "setup phase". This phase is where certain units can be repositioned in specified areas within their command area highlighted for ease of reference prior to the actual commencement of Turn 1. For the German player everything, and I mean everything is locked down and unable to move, refered to as "FIXED" in place except for "DEMO" units (Demolition Companies).
These DEMO units can be moved to a bridge hex during the "Setup phase" to blow the bridges, during planning phase, or used to defend.
Typical DEMO unit40% chance to blow a major river bridge
80% chance to blow a minor river bridge
Unknown if other factors contribut to lower or raise this percentage.
- Demo Company.png (17.44 KiB) Viewed 1158 times
Last edited by OrderInChaos on Tue Aug 04, 2026 10:05 pm, edited 3 times in total.
-
OrderInChaos
- Posts: 274
- Joined: Thu Dec 29, 2016 4:58 pm
Re: AAR OVERLORD (135 Turns) Timian (Allies) vs OrderInChaos (Germans)
Setup phase moves
Here are my reposition of some of the Demo Units. Please realize that once these DEMO units are repositioned they are fixed in place for the rest of the game. These units can retreat when attacked but realize they have "zero" movement points.
Cherburg - Move one hex to SW. Figured just start digging in and can always blow bridges when Allies get closer
West of St Mere Eglise - Move to to bridge south east in the picture. Note that this unit can be set up anywhere in the yellow highlighted area. This was a hard choice for me since I could have put it North of St Mere Eglise to stop the Allies rushing North. But in the end I didn't want the allies get across this bridge early thus cutting off the Peninsula.
Carentan - Move to the north east to blow a key bridge, seems to be a no brainer there.
352 DEMO company behind Omaha - Move this unit two hexes to the east to blow this bridge, I hope since this looks to be a key area to get over the river. remember that dark blue rivers are impassable in this game without a bridge. Thus knocking out this bridge is key to slowing the Allies advance until they get their bridging units on the map buying the Germans some critical "time".
Here are my reposition of some of the Demo Units. Please realize that once these DEMO units are repositioned they are fixed in place for the rest of the game. These units can retreat when attacked but realize they have "zero" movement points.
Cherburg - Move one hex to SW. Figured just start digging in and can always blow bridges when Allies get closer
- 1.png (392.73 KiB) Viewed 1157 times
- 2.png (704.43 KiB) Viewed 1157 times
Carentan - Move to the north east to blow a key bridge, seems to be a no brainer there.
- 3.png (485.37 KiB) Viewed 1157 times
- 4.png (669.09 KiB) Viewed 1157 times
-
OrderInChaos
- Posts: 274
- Joined: Thu Dec 29, 2016 4:58 pm
Re: AAR OVERLORD (135 Turns) Timian (Allies) vs OrderInChaos (Germans)
Setup Phase Moves continued
Bayeux - I leave this DEMO company in the hex, no repositioning required here to "try" and blow the 3 bridges. Bayeux is also a Victory Point hex and in real life this fell on June 7 1944. Something is telling me I have my work cut out for me defending this area. Just a note that I have never played this game so all of this is learn as I go and figure it out. I am sure it will be fun and interesting
Caen - I move the 716th DEMO company to cut the bridge at Ranville, Ranville is a town also which gives Infantry types a 200% increase in defense. So I take the chance at blowing up this bridge.
Cabourg - I move the 21st PZ DEMO to Cabourg to add in the defense
Bayeux - I leave this DEMO company in the hex, no repositioning required here to "try" and blow the 3 bridges. Bayeux is also a Victory Point hex and in real life this fell on June 7 1944. Something is telling me I have my work cut out for me defending this area. Just a note that I have never played this game so all of this is learn as I go and figure it out. I am sure it will be fun and interesting
- Bayeux.png (1.16 MiB) Viewed 1155 times
- 5.png (637.99 KiB) Viewed 1155 times
- 6.png (463.15 KiB) Viewed 1155 times
-
OrderInChaos
- Posts: 274
- Joined: Thu Dec 29, 2016 4:58 pm
Re: AAR OVERLORD (135 Turns) Timian (Allies) vs OrderInChaos (Germans)
T1 Planning Phase
Really nothing much I can do turn 1 other than set the DEMO units to "try" and blow up the bridges.
and
I set the defensive posture of my units using the following commands
Just for future reference can also have offensive postures too
Really nothing much I can do turn 1 other than set the DEMO units to "try" and blow up the bridges.
and
I set the defensive posture of my units using the following commands
- Defensive posture.png (83.51 KiB) Viewed 1135 times
Just for future reference can also have offensive postures too
- Offensive Posture.png (79.93 KiB) Viewed 1135 times
-
OrderInChaos
- Posts: 274
- Joined: Thu Dec 29, 2016 4:58 pm
Re: AAR OVERLORD (135 Turns) Timian (Allies) vs OrderInChaos (Germans)
Here are my defensive postures for Turn 1 across the line (you will also notices the bridge blowing icon too on the bridges set for DEMO)
Utah area
Omaha / Gold area
Sword area
Utah area
- Utah.png (1.62 MiB) Viewed 1134 times
- Omaha Gold beaches.png (1.66 MiB) Viewed 1134 times
- Sword.png (1.62 MiB) Viewed 1134 times
-
OrderInChaos
- Posts: 274
- Joined: Thu Dec 29, 2016 4:58 pm
Re: AAR OVERLORD (135 Turns) Timian (Allies) vs OrderInChaos (Germans)
Weather & Casualties
Next time I will put the weather at the beginning of the turn along with the casualties, makes more sense.
Next time I will put the weather at the beginning of the turn along with the casualties, makes more sense.
- Weather.png (691.19 KiB) Viewed 1131 times
- Casualties.png (550.42 KiB) Viewed 1131 times
-
OrderInChaos
- Posts: 274
- Joined: Thu Dec 29, 2016 4:58 pm
Re: AAR OVERLORD (135 Turns) Timian (Allies) vs OrderInChaos (Germans)
End of Turn 1 June 6 Morning
I have put in a great deal of basic information because I am learning the game and putting my learning here in this AAR. Please bear with me as I get through the basics. I am hoping it is helping others too. But this ends Turn 1 (morning phase of a 3 phase day (morning/afternoon/night)
I have put in a great deal of basic information because I am learning the game and putting my learning here in this AAR. Please bear with me as I get through the basics. I am hoping it is helping others too. But this ends Turn 1 (morning phase of a 3 phase day (morning/afternoon/night)
-
OrderInChaos
- Posts: 274
- Joined: Thu Dec 29, 2016 4:58 pm
Re: AAR OVERLORD (135 Turns) Timian (Allies) vs OrderInChaos (Germans)
In an earlier post I mentioned all units were pretty much "fixed" in place for turn 1. I was incorrect in that "Von Der Heydte's 6th Fallschirmjager Regiment is not "fixed" on turns 1 and 2". It was the only German unit that immediately responded to the Allied Landings. Specifically, to the drop of the 101st Air landings.
Thank you Don (Timian) for correcting me on that statement. Feel free to post in the AAR any of my misgivings, greatly appreciate the feedback
P.S. I did overlook moving it because I was under the assumption everything was fixed . Live and learn...
Thank you Don (Timian) for correcting me on that statement. Feel free to post in the AAR any of my misgivings, greatly appreciate the feedback
P.S. I did overlook moving it because I was under the assumption everything was fixed
. Live and learn...-
OrderInChaos
- Posts: 274
- Joined: Thu Dec 29, 2016 4:58 pm
Re: AAR OVERLORD (135 Turns) Timian (Allies) vs OrderInChaos (Germans)
Here is a picture of 6th Fallschirmjager being not fixed in place on turn 1. My next game as Germany I will "not" be forgetting to move these units
- 6th Fallschirmjager.png (1.81 MiB) Viewed 1061 times
Re: AAR OVERLORD (135 Turns) Timian (Allies) vs OrderInChaos (Germans)
Start of Allied Turn 3 Planning (12 PM / 6 June 1944
The Allies are ashore and all three Airborne Divisions are close to achieving or achieved their initial objectives.
In the West, the 4th Infantry Division seized the hex just Northwest of Tare Green (24, 19) and was able to eliminate the German unit in 25, 21 (Uncle Red), but is still along the water’s edge (not yet in the hex).
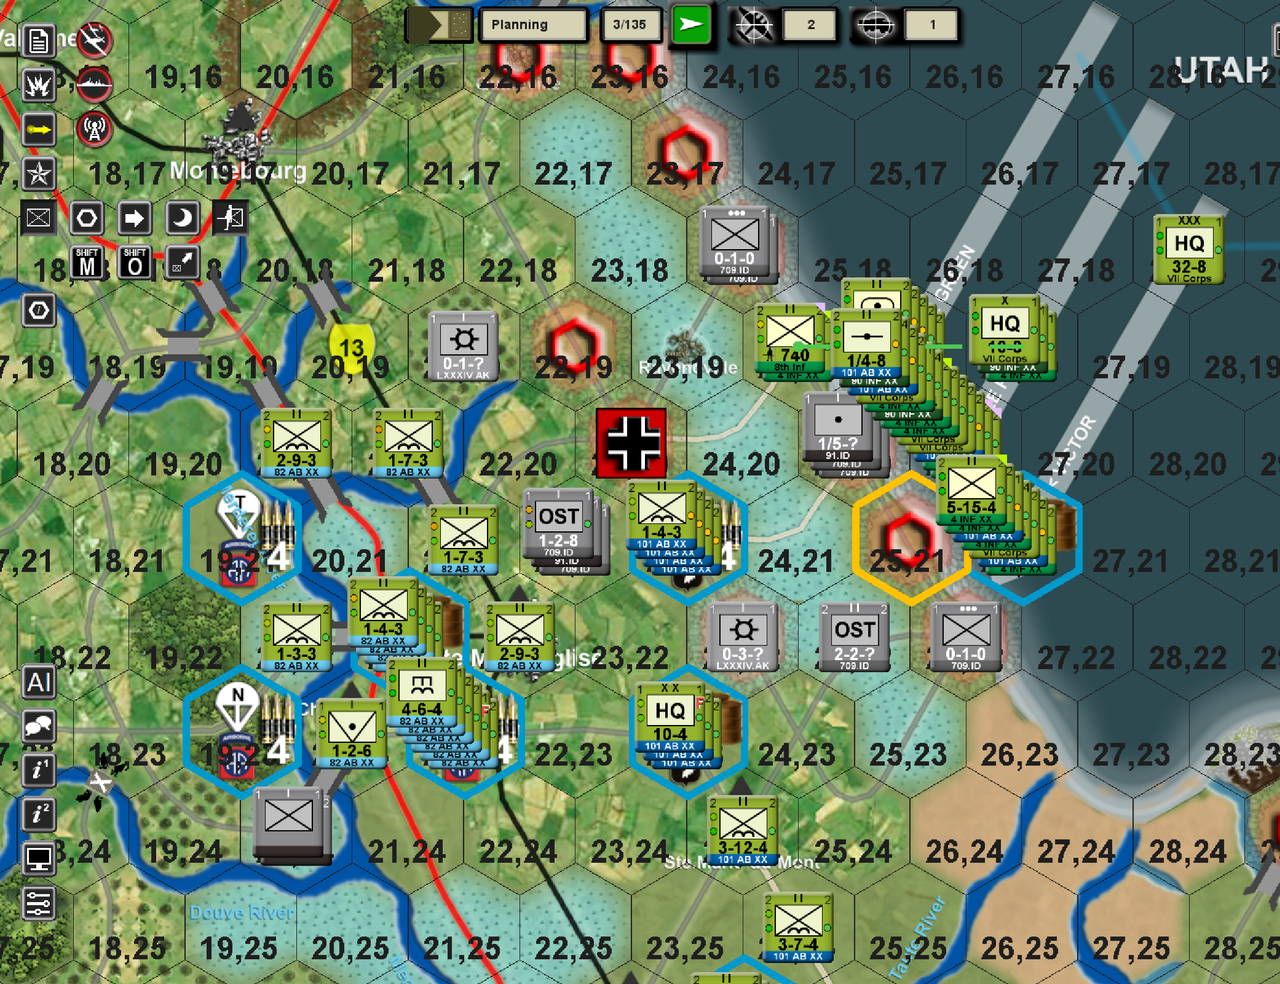
The 101st is in good shape, about to start attacking to help clear the causeways. And the 82nd has captured Ste. Mare Englise. In addition the 82nd’s 507th and 508th Parachute Infantry Regiments are just about done pulling back behind the Merdievel River (just West of Ste. Mare Englise).*
* For what it’s worth, . . . In previous games . . . Both Regiments got badly beat-up by the German 91st Air Landing Division and the 243rd Infantry Divisions.
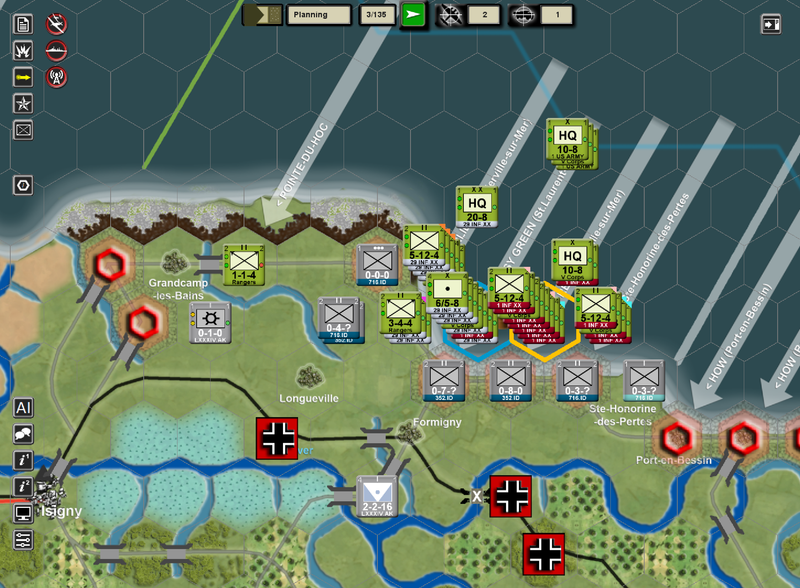
The Rangers have secured Pointe du Hoc – thanks in no small part to the Battleship Texas – and Norm Cota was able to secure the Vierville Draw (Exit D-1). But the 1st Infantry Division is still fighting to get ashore.
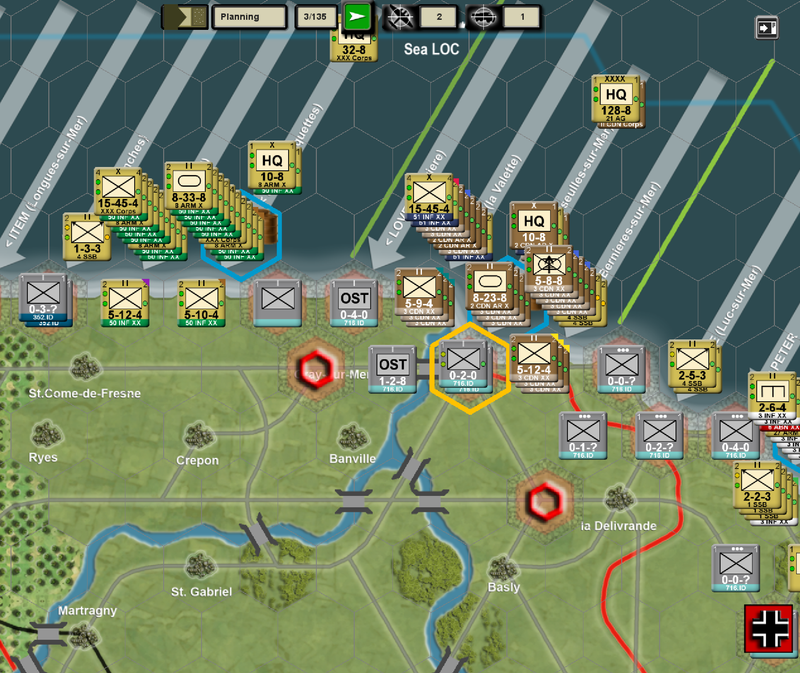
In the East, the British + Canadians are all ashore, although Lord Lovat has not yet linked-up with Major Howard (at Pegasus Bridge).
Speaking of Pegasus Bridge, had a bit of a fight (using just about all 6th Para troops, who landed just after Midnight with help from the Battleship Warspite) destroying a German Bridge Demo unit in hex 53, 34. Fortunately, Pegasus and Horsa Bridges are intact and in British hands.
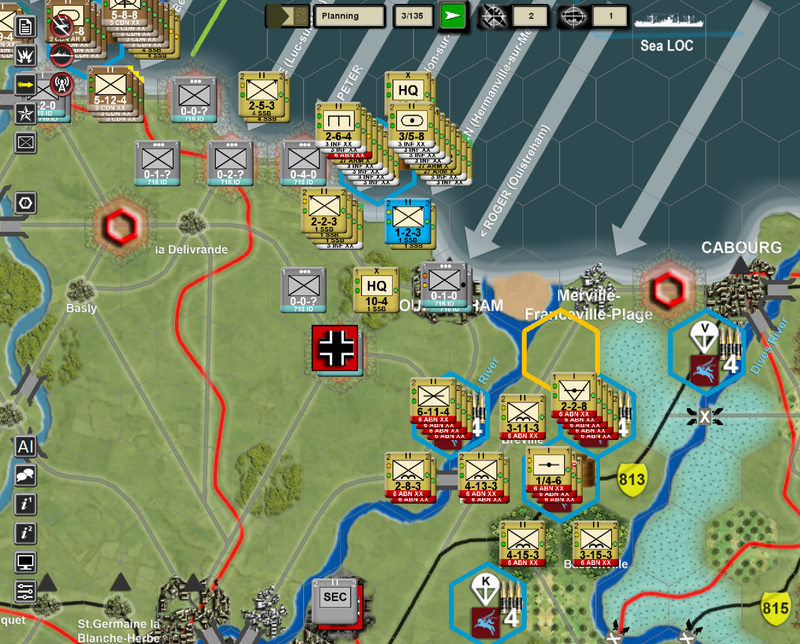
The Allies are ashore and all three Airborne Divisions are close to achieving or achieved their initial objectives.
In the West, the 4th Infantry Division seized the hex just Northwest of Tare Green (24, 19) and was able to eliminate the German unit in 25, 21 (Uncle Red), but is still along the water’s edge (not yet in the hex).
The 101st is in good shape, about to start attacking to help clear the causeways. And the 82nd has captured Ste. Mare Englise. In addition the 82nd’s 507th and 508th Parachute Infantry Regiments are just about done pulling back behind the Merdievel River (just West of Ste. Mare Englise).*
* For what it’s worth, . . . In previous games . . . Both Regiments got badly beat-up by the German 91st Air Landing Division and the 243rd Infantry Divisions.
The Rangers have secured Pointe du Hoc – thanks in no small part to the Battleship Texas – and Norm Cota was able to secure the Vierville Draw (Exit D-1). But the 1st Infantry Division is still fighting to get ashore.
In the East, the British + Canadians are all ashore, although Lord Lovat has not yet linked-up with Major Howard (at Pegasus Bridge).
Speaking of Pegasus Bridge, had a bit of a fight (using just about all 6th Para troops, who landed just after Midnight with help from the Battleship Warspite) destroying a German Bridge Demo unit in hex 53, 34. Fortunately, Pegasus and Horsa Bridges are intact and in British hands.
Last edited by Timian on Sat Aug 01, 2026 6:24 pm, edited 1 time in total.
-
OrderInChaos
- Posts: 274
- Joined: Thu Dec 29, 2016 4:58 pm
Re: AAR OVERLORD (135 Turns) Timian (Allies) vs OrderInChaos (Germans)
Thank you Timian (Don) for the upate for the Allies. Looks like you have done to the end of Turn 2 execution phase, I will update the AAR Saturday night/Sunday Morning since I will be away for a little bit. I am currently finishing up turn 4 (Night Turn for 6 June) which should be back this afternoon.
Just some disclosures;
* Never played the Campaign Game before (Nor played more than 9 turns learning basic basic info in any WEGO game) - so if I mess up and Timian (Don) decimates me quickly please bear with me.
* There will be some items I put into the AAR that I am just asking questions for a clearer picture of "why" something was put into the game that way.
* I really like the system how the game plays, really makes you think ahead
Just some disclosures;
* Never played the Campaign Game before (Nor played more than 9 turns learning basic basic info in any WEGO game) - so if I mess up and Timian (Don) decimates me quickly please bear with me.
* There will be some items I put into the AAR that I am just asking questions for a clearer picture of "why" something was put into the game that way.
* I really like the system how the game plays, really makes you think ahead
-
OrderInChaos
- Posts: 274
- Joined: Thu Dec 29, 2016 4:58 pm
Re: AAR OVERLORD (135 Turns) Timian (Allies) vs OrderInChaos (Germans)
Just a note on the Phases just in case some have not played this game (If you have played WITP AE it is sort of like that game)
Phases in the game
Setup phase - happens once at the beginning of the scenario where specific units can be moved within designated same-colored zones. After the setup phase the turns will alternate between Planning phases between players
Exectuion Phase - This begins on Turn 2 after the Germans and Allies have done their "Planning phase". This phase generates what the game calls a "film" where the turn shows the movements and attacks of the previous turns plotting. (Those familiar with WITP AE has a very similar experience).
***I personally like the experience this phase presents since, just like a movie, I can step through the whole playback what I want to see. At the end of the "film" you can just hover over the battle for the results (which are pretty well detailed when right clicking (will show later))
Planning Phase - This is the meat of the game where Germans and Allies plot their moves (either drag and drop or click to move options in the UI). When all moves are completed, the end turn button is pressed and the phase advances
Victory Phase - happens on the last turn of the scenario to determine the winner.
Phases in the game
Setup phase - happens once at the beginning of the scenario where specific units can be moved within designated same-colored zones. After the setup phase the turns will alternate between Planning phases between players
Exectuion Phase - This begins on Turn 2 after the Germans and Allies have done their "Planning phase". This phase generates what the game calls a "film" where the turn shows the movements and attacks of the previous turns plotting. (Those familiar with WITP AE has a very similar experience).
***I personally like the experience this phase presents since, just like a movie, I can step through the whole playback what I want to see. At the end of the "film" you can just hover over the battle for the results (which are pretty well detailed when right clicking (will show later))
Planning Phase - This is the meat of the game where Germans and Allies plot their moves (either drag and drop or click to move options in the UI). When all moves are completed, the end turn button is pressed and the phase advances
Victory Phase - happens on the last turn of the scenario to determine the winner.
-
OrderInChaos
- Posts: 274
- Joined: Thu Dec 29, 2016 4:58 pm
Re: AAR OVERLORD (135 Turns) Timian (Allies) vs OrderInChaos (Germans)
Turn 2 (Execution Phase (this is execution of phase 1 planning by both the German and Allies)
Well.....
I am sad at my DEMO unit. This was the ONE bridge that I really wanted to be blown out of all of them, did not happen. BUT as fate would have it it didn't get blown
To make matters worse the British 6th airborne decided the DEMO unit was to be eliminated at all cost. Here are the attacks on the DEMO unit (showing one of the two. You can see the unit was attacked twice where the pink arrows point to)
In this snapshot if you look at the previous turn I had this units set to "Hold at all Cost". But from the yellow arrow it looks like this turned into just a hold. Since "Hold at all cost" is based on unit experience with Elite units having a much better chance than a regular unit (see orange arrow pointing to the 3 German crosses in the snapshot (elite would have 5)
The DEMO unit did HOLD as you can see where the black underline along with black arrow is pointing to in the snapshot. A little archaic language but I figured it out after a bit of head scratching
In light blue you can see the losses so far to the DEMO unit. From the attacks I lost 37 men, lost 28 strength to the unit, and 74 to readiness (OUCH)
Here you can see a more detailed information of the battle in the below snapshot of the attack by right clicking the unit. You will notice in yellow is the units integrity. This is whenever ground units subordinate to different HQ's attack or defend together penalties are imposed on the final attack and/or defense value. I can post the chart from the manual if anyone is interested, but as you can see here the affect can be pretty substantial so will have to pay attention to what you attack with.
The Orange arrow is shock value below. It is of no affect in this battle since they are both "zero. But tanks, and other units to a lesser extent, add shock value that represents the psychological and tactical impact of armored and Mechanized forces on the enemy. Shock value shifts combat odds based on that value. For instance, a German Tank company or battalion has a 4 shock value, thus a 4 combat odds shift. Please also note that shock is not usable in all terrain, mainly open
Well.....
I am sad at my DEMO unit. This was the ONE bridge that I really wanted to be blown out of all of them, did not happen.
BUT as fate would have it it didn't get blown To make matters worse the British 6th airborne decided the DEMO unit was to be eliminated at all cost. Here are the attacks on the DEMO unit (showing one of the two. You can see the unit was attacked twice where the pink arrows point to)
In this snapshot if you look at the previous turn I had this units set to "Hold at all Cost". But from the yellow arrow it looks like this turned into just a hold. Since "Hold at all cost" is based on unit experience with Elite units having a much better chance than a regular unit (see orange arrow pointing to the 3 German crosses in the snapshot (elite would have 5)
The DEMO unit did HOLD as you can see where the black underline along with black arrow is pointing to in the snapshot. A little archaic language but I figured it out after a bit of head scratching
In light blue you can see the losses so far to the DEMO unit. From the attacks I lost 37 men, lost 28 strength to the unit, and 74 to readiness (OUCH)
- 6th Airborne attacks.png (868.2 KiB) Viewed 867 times
The Orange arrow is shock value below. It is of no affect in this battle since they are both "zero. But tanks, and other units to a lesser extent, add shock value that represents the psychological and tactical impact of armored and Mechanized forces on the enemy. Shock value shifts combat odds based on that value. For instance, a German Tank company or battalion has a 4 shock value, thus a 4 combat odds shift. Please also note that shock is not usable in all terrain, mainly open
- 6th airborne detailed results.png (377.01 KiB) Viewed 867 times
Last edited by OrderInChaos on Tue Aug 04, 2026 10:06 pm, edited 1 time in total.
-
OrderInChaos
- Posts: 274
- Joined: Thu Dec 29, 2016 4:58 pm
Re: AAR OVERLORD (135 Turns) Timian (Allies) vs OrderInChaos (Germans)
Turn 2 (Execution Phase (this is execution of phase 1 planning by both the German and Allies)
Caen Area
You will notice the "green" binoculars multiple times in this snapshot. This is recon/intel done. The better the intel the more damage you will do in a nutshell. There are levels from 0 (no intel) to 5 (full info)
The yellow arrows point to bombardment or airstrikes against tagets. Most are just rediness losses (still affects combat) (please see example at the bottom of this post of one of the airstrikes)
In the White box you will notice this DEMO unit was able to blow all three bridges over this minor river (they call them streams on the map and manual ;-P )
Just like ground combat you can look at the bombardments affects. In this snapshot the allies lost 5 readiness and a plane while the Germans lost 4 readiness.
And then you can get even more detail by right clicking the hex.
Caen Area
You will notice the "green" binoculars multiple times in this snapshot. This is recon/intel done. The better the intel the more damage you will do in a nutshell. There are levels from 0 (no intel) to 5 (full info)
The yellow arrows point to bombardment or airstrikes against tagets. Most are just rediness losses (still affects combat) (please see example at the bottom of this post of one of the airstrikes)
In the White box you will notice this DEMO unit was able to blow all three bridges over this minor river (they call them streams on the map and manual ;-P )
- CaenArea.png (2.39 MiB) Viewed 858 times
Just like ground combat you can look at the bombardments affects. In this snapshot the allies lost 5 readiness and a plane while the Germans lost 4 readiness.
- Example of bombardment.png (169.33 KiB) Viewed 858 times
- Detail bombardment.png (160.72 KiB) Viewed 858 times
-
OrderInChaos
- Posts: 274
- Joined: Thu Dec 29, 2016 4:58 pm
Re: AAR OVERLORD (135 Turns) Timian (Allies) vs OrderInChaos (Germans)
Turn 2 (Execution Phase (this is execution of phase 1 planning by both the German and Allies)
Omaha Area
More bombardment shown in yellow.
DEMO units do their Job on the bridges in two places here blowing the bridges in both places
Omaha Area
More bombardment shown in yellow.
DEMO units do their Job on the bridges in two places here blowing the bridges in both places
- Omaha Area.png (1.99 MiB) Viewed 856 times
-
OrderInChaos
- Posts: 274
- Joined: Thu Dec 29, 2016 4:58 pm
Re: AAR OVERLORD (135 Turns) Timian (Allies) vs OrderInChaos (Germans)
Turn 2 (Execution Phase (this is execution of phase 1 planning by both the German and Allies)
Utah Area
More bombardment in yellow. (Yes, the allies get a metric ton of Air and Naval bombardment in the game)
In the white box the DEMO unit did his job too, blowing the bridge.
Utah Area
More bombardment in yellow
. (Yes, the allies get a metric ton of Air and Naval bombardment in the game)In the white box the DEMO unit did his job too, blowing the bridge
. - Utah Area.png (1.43 MiB) Viewed 856 times