AAR OVERLORD (135 Turns) Timian (Allies) vs OrderInChaos (Germans)

OrderInChaos
Posts: 45
Joined: Thu Dec 29, 2016 4:58 pm

Re: AAR OVERLORD (135 Turns) Timian (Allies) vs OrderInChaos (Germans)

Post by OrderInChaos »

Turn 2 Planning Phase

With turn 1 officially over at the end of the execution phase (done at the beginning of turn 2) we proceed to the German Planning phase.

In the Planning phase of turn 2 "ONLY" the German units that are next to Allie units are able to move. (please note that 6th Fallschirmjager can move and is still the only exception to the rule and "YES" I still did not move them in my game on turn 2 :cry: I have lost out on two turns of moves and will end up costing me in the long run)


For the planning phase here are my moves scheduled (and only moves since 6th Airborne made sure they were not next to a German unit) A green arrow for the unit is a planned "move and defend". Having a few turns under my belt now as Germany I can see a few errors that I would not do now.

Moves for the turn 2.png
Moves for the turn 2.png (1.86 MiB) Viewed 113 times
OrderInChaos
Posts: 45
Joined: Thu Dec 29, 2016 4:58 pm

Re: AAR OVERLORD (135 Turns) Timian (Allies) vs OrderInChaos (Germans)

Post by OrderInChaos »

Turn 2 Planning Phase

Victory Points


If the game were to end right now, I would WIN!!!!! :mrgreen: BUT, there are still 133 turns to go :roll:

I am still getting this feeling this game is "ALL" about attacking because of how these VP's are given

VP.png
VP.png (179.38 KiB) Viewed 110 times
OrderInChaos
Posts: 45
Joined: Thu Dec 29, 2016 4:58 pm

Re: AAR OVERLORD (135 Turns) Timian (Allies) vs OrderInChaos (Germans)

Post by OrderInChaos »

Turn 3 (Execution Phase (this is execution of phase 2 planning by both the German and Allies)

Caen Area

The British, Canadians, and the Free French establish beacheads easily shown by the yellow arrows. The 6th airborne decimates the DEMO company! Shown by the yellow box
T2 Execution.png
T2 Execution.png (1.88 MiB) Viewed 103 times

716 DEMO company eliminated by 6th airborne. 716 DEMO company did not get to blow up the bridge either :(. Here is the combat results for the poor company.
716 demo destroyed.png
716 demo destroyed.png (183.03 KiB) Viewed 103 times


A deeper dive shows us that in fact the 716 DEMO company did in fact "Hold at all Cost" by the light blue box symbol this time (snapshot below) (it passed it check for "hold at all cost" it seems.

Highlighted in Yellow (snapshot below) you can see that "cards" were played to give events in game. There is a brief desciption of what the cards do, when the card is withdrawn, and how long this card will take to come back into play, if reusable, and the stats on these cards since they can be eliminated if taking damage i.e. planes. (My opinion - To me the first time I saw this I was like, "yeah no thank you I am done with the game". Something inside my head said, "just give it a try" so I did. After playing the cards, it really does give depth and value to the game without adding a bazillion playing pieces. I now appreciate these cards making the game faster, fluid, and a great deal less units in the game. To me this is a great system and wish it was in other games that have a hard (if not difficult) time combining land, air, and sea into a cohesive system. In this game it is all about land combat and I love it!
716 DEMO destroyed deep dive.png
716 DEMO destroyed deep dive.png (534.89 KiB) Viewed 100 times
Highlight in Orange (snapshot above) you can actually dig down into "why" the odd shifts happen (snapshot below). Here you can see the command cards shifted the 4 (think of it as leader bonus making the right decision at the right time) and a quality of unit(s). 6th airborne are Veteran (4 stars) vs Regular German (3 stars). (Note the battle could have had Air attack adding more shifts, Engineers for even more shifts, and adding flanking. Can have a lot of fun with this coupled even more with Shock! Fun fun fun)
Odds shift.png
Odds shift.png (45.15 KiB) Viewed 100 times
OrderInChaos
Posts: 45
Joined: Thu Dec 29, 2016 4:58 pm

Re: AAR OVERLORD (135 Turns) Timian (Allies) vs OrderInChaos (Germans)

Post by OrderInChaos »

Turn 3 (Execution Phase (this is execution of phase 2 planning by both the German and Allies)
Omaha area.png
Omaha area.png (1.06 MiB) Viewed 95 times
Americans at Omaha having a bit of a problem establishing only one beachhead at Charlie/Dog marked in a green box. The other two attacks were stopped marked by a red box and the ranger take their objective in the light blue box.

The yellow box shows a follow up attack on a German strongpoint and an Artillary company trying to move away. The ranger inflicted nice losses on these units :(. (See snapshot below). Notice this was a "Moving attack"
ranger attacks.png
ranger attacks.png (121.6 KiB) Viewed 93 times


And snapshot below is a deeper dive in the results. I had a defend withdraw (shown in snapshot) but failed my roll and stayed in the hex (the artillary company was trying :(


Ranger attacks deep dive.png
Ranger attacks deep dive.png (172.99 KiB) Viewed 93 times


and the shifts in combat were because of the quality unit.


Ranger shifts in combat.png
Ranger shifts in combat.png (33.97 KiB) Viewed 93 times


Got to love the detail :)
OrderInChaos
Posts: 45
Joined: Thu Dec 29, 2016 4:58 pm

Re: AAR OVERLORD (135 Turns) Timian (Allies) vs OrderInChaos (Germans)

Post by OrderInChaos »

Turn 3 (Execution Phase (this is execution of phase 2 planning by both the German and Allies)

Utah Area

Americans take two beacheads shown with yellow arrow

Americans also take the first VP town :? (marked in the red box)
Utah.png
Utah.png (1.27 MiB) Viewed 87 times
(snapshot below) A "meeting battle" at St Mere Eglise and I lost a boatload of men (I am going to rethink my "Hold at all cost" strat, costing me greatly in manpower(still learning the game the hardway))
stmereeglise.png
stmereeglise.png (137.4 KiB) Viewed 87 times
OrderInChaos
Posts: 45
Joined: Thu Dec 29, 2016 4:58 pm

Re: AAR OVERLORD (135 Turns) Timian (Allies) vs OrderInChaos (Germans)

Post by OrderInChaos »

Turn 3 (Execution Phase (this is execution of phase 2 planning by both the German and Allies)

Planning Phase

Victory points as of T3 you can see that the Allies scored 5 points on destroyed units and 1 point for the capture of St Mere Eglise :roll: Will score 1 point every turn until the end of the game :roll: :roll:
T3 VP.png
T3 VP.png (196.38 KiB) Viewed 82 times
OrderInChaos
Posts: 45
Joined: Thu Dec 29, 2016 4:58 pm

Re: AAR OVERLORD (135 Turns) Timian (Allies) vs OrderInChaos (Germans)

Post by OrderInChaos »

Turn 3 (Execution Phase (this is execution of phase 2 planning by both the German and Allies)

Planning Phase


Here are my proposed moves for the coming turn. I learned a couple of hard lessons from these moves that I won't repeat. Again this comes from learning the game on the fly but it sure is fun learning it this way. Everything is on the move including 6th Fallschirmjager (moving 2 turns late :oops: :oops: :oops: :oops: :oops:

Reference for arrows on snapshot below
Yellow Arrows = Move and attack
Green Arrows = Move and defend
Blue Arrows = Road movement

Here is the birds eye view of moves on the eastern part of the map

Caen Area.png
Caen Area.png (2.73 MiB) Viewed 80 times


and the Western part of the map

Cherburg area.png
Cherburg area.png (2.39 MiB) Viewed 80 times
OrderInChaos
Posts: 45
Joined: Thu Dec 29, 2016 4:58 pm

Re: AAR OVERLORD (135 Turns) Timian (Allies) vs OrderInChaos (Germans)

Post by OrderInChaos »

Turn 3 (Execution Phase (this is execution of phase 2 planning by both the German and Allies)

Planning Phase


Here are the maps with a "representation" of where the units will be at the end of the execution phase (depending on what allies they happen to encounter) a little closer in for viewing pleasure. Again the view is where the units "possibly" could end up and more than likely have some encounters or not get there at all. Love the unknown feature

----> Major rivers are impassable by the way in the photos unless at a bridge or pontoon bridge<----

Here is a closer view of Caen area with 21st Pz(light pinkish color), 711 Inf Div(red color), and 716 Inf Div (light blue color) proposed positions

711 & 716 & 21pz.png
711 & 716 & 21pz.png (1.84 MiB) Viewed 75 times

Here are the proposed 352nd Inf Division positions. This division is covering a very large front at the moment.

352.png
352.png (1.91 MiB) Viewed 75 times

Then finally I have the 91st Inf Division and 709th Inf Division positions


91 & 709.png
91 & 709.png (1.54 MiB) Viewed 75 times
OrderInChaos
Posts: 45
Joined: Thu Dec 29, 2016 4:58 pm

Re: AAR OVERLORD (135 Turns) Timian (Allies) vs OrderInChaos (Germans)

Post by OrderInChaos »

Turn 3 (Execution Phase (this is execution of phase 2 planning by both the German and Allies)

Planning Phase

Now having shown those moves I did have to expend some of my "Fuel" supply to enhance movement. In the game there is movement supply, attack supply, and basic supply. The Germans get very little of both fuel and supplies and most of these two resources are lost to interdiction bombing :(

In the first example in the snapshot below you can see the Germans have 218 Fuel onhand and 208 Ammo in the green box area. This current turn the Germans received 18 Fuel and 16 ammo in the blue box. The Red arrow is how much it cost in fuel to give the extra MP's to the 21st PZ division which is 20 fuel, which I select to do. If I also wanted to double the attack value of all the units in 21st PZ I could pay an additional 12 in Ammo, I decided not to buy this.

21st PZ move supply.png
21st PZ move supply.png (359.56 KiB) Viewed 71 times
OrderInChaos
Posts: 45
Joined: Thu Dec 29, 2016 4:58 pm

Re: AAR OVERLORD (135 Turns) Timian (Allies) vs OrderInChaos (Germans)

Post by OrderInChaos »

Turn 3 (Execution Phase (this is execution of phase 2 planning by both the German and Allies)

Planning Phase

I also pay for the fuel for these Division too... I put faith in getting there to hold a position. 38 points of fuel spent :cry: :cry: Very hard to come by but I am trying to hold onto as much land as possible.
LXXXIV move supply.png
LXXXIV move supply.png (334.84 KiB) Viewed 66 times
711 move supply.png
711 move supply.png (339.1 KiB) Viewed 66 times
709 move supply.png
709 move supply.png (355.97 KiB) Viewed 66 times
352 move supply .png
352 move supply .png (346.98 KiB) Viewed 66 times
OrderInChaos
Posts: 45
Joined: Thu Dec 29, 2016 4:58 pm

Re: AAR OVERLORD (135 Turns) Timian (Allies) vs OrderInChaos (Germans)

Post by OrderInChaos »

Turn 3 (Execution Phase (this is execution of phase 2 planning by both the German and Allies)

Planning Phase

Current Strength & Running losses on the map for the game so far at the end of Turn 3 Planning Phase

Running losses.png
Running losses.png (113.16 KiB) Viewed 62 times
User avatar
Timian
Posts: 218
Joined: Sat Sep 14, 2013 6:53 pm
Location: Tucson, AZ

Re: AAR OVERLORD (135 Turns) Timian (Allies) vs OrderInChaos (Germans)

Post by Timian »

Allied Turn 4 Planning (Night / 6 PM / 6 June 1944)

While there are one or more German Strong Points just behind all five Allied Beaches – to be cleared – the Allies are in good shape.

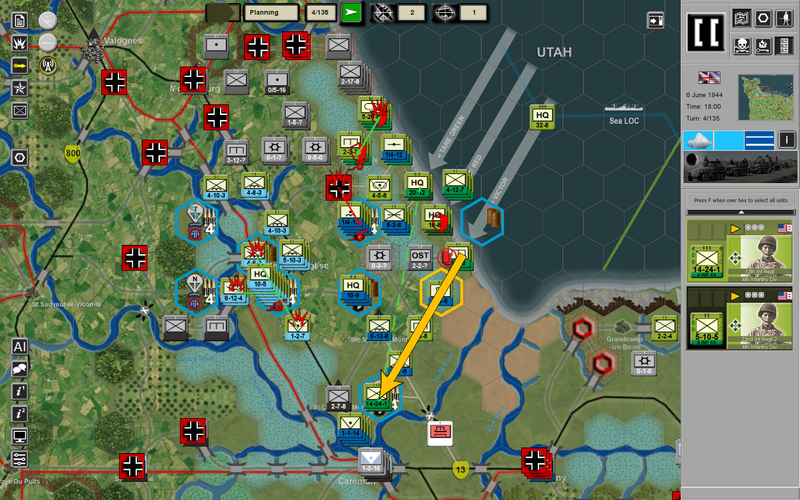
At Utah, even though it’s a Night Turn, Lighting Joe Collins has elected to push a 4th Infantry Division Regiment (the 12th Infantry Regiment) plus Battalion (2nd Battalion / 22nd Infantry Regiment) toward Carentan.
Image

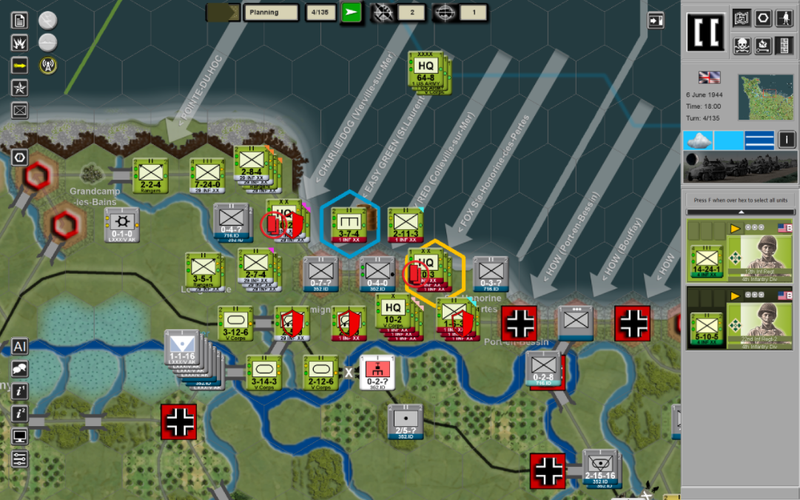
Omaha - Lenard Gerow - is “Holding what they’ve got” . . . In order to improve their Readiness ("Heart").
Image

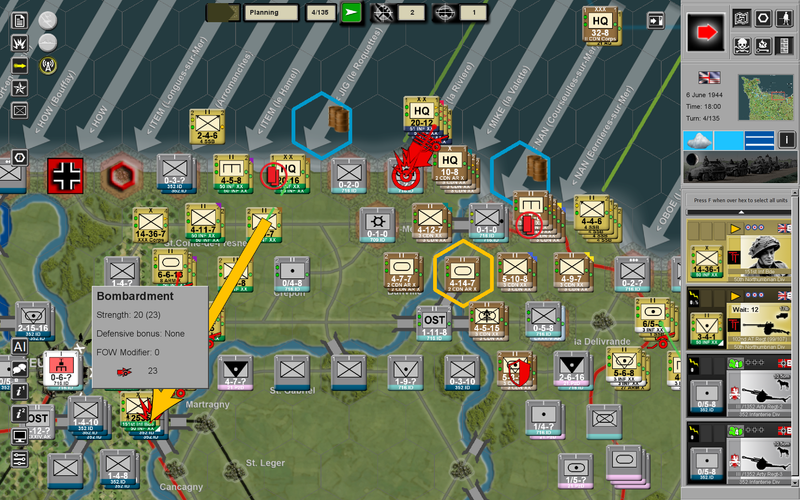
Gerard Bucknall - XXX Corps - has ordered the 151st Brigade (50th Division) and the 50th Division’s AT Regiment to make an “On the Move” attack vs. two (exposed) 105mm German Artillery Batteries.
Image

2nd Canadian Division (Juno) is also “Holding what they’ve got”; to improve their Readiness.* While the lead Brigade of the 51st Division is attacking (at Night) the German Strong Points on the far West end of Juno.

* Historically, Omaha followed by Juno had the most casualties on 6 June.

At Sword and Pegasus Bridge the Brit’s managed to push a Sherman Battalion (27th Armored Brigade . . . Attached to 3rd British Infantry Division) + 3rd British’s Recon Battalion to block the main Southern approach to Pegasus and Horsa Bridges.
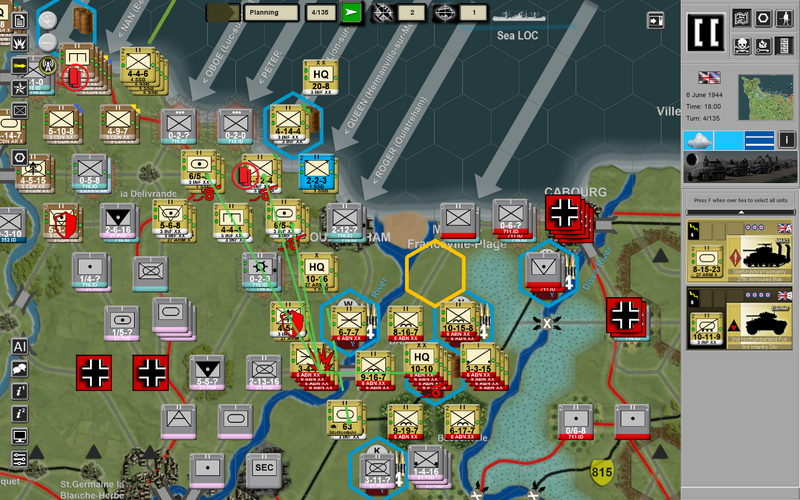
Image

Quick note on “A Way” to Attack in WEGO.

Hit the hex hard, using “Mass” + Command Assets, Artillery, Naval Gunfire, Air, etc. Then have a Reserve attack** the hex again - during the Movement Phase - using a Moving Attack.

** Starting their move from one or two hexes away from the enemy hex.

Quite often, the Deliberate Attack will beat-up the Defending Troops, but fail to seize the hex. While there are no guarantees, the Reserve just may push the enemy out of the hex (a.k.a., make them Retreat).

However, Stacking, in WEGO, is enforced "24/7." So you either need to attack with six or seven stacking points, leaving room for the Reserve to push though the attacking units or, from a from a different adjacent hex, hit the enemy hex.
Post Reply

Return to “WEGO World War II: Overlord”