I am worried about what will happen in front of Omaha with an open bridge I "gifted" to the Americans
AAR OVERLORD (135 Turns) Timian (Allies) vs OrderInChaos (Germans) D-Day to Falaise Campaign Game Scenario
- OrderInChaos
- Posts: 274
- Joined: Thu Dec 29, 2016 4:58 pm
Re: AAR OVERLORD (135 Turns) Timian (Allies) vs OrderInChaos (Germans) D-Day to Falaise
End of Turn 8
I am worried about what will happen in front of Omaha with an open bridge I "gifted" to the Americans
I am also worried about the bridge to the NE of Carentain with only the DEMO 0-3-0 unit there to defend at the start of the attack phase. I am hoping beyond hope that one of my units get there in time to save the day, but we will see. I feel comfortable with the 709th and 243rd Inf Div positions towards Cherbourg. The British sector I am fine with the slow pace the British and Canadians are advancing. But I wait for the unexpected there sooner or later.
I am worried about what will happen in front of Omaha with an open bridge I "gifted" to the Americans
- OrderInChaos
- Posts: 274
- Joined: Thu Dec 29, 2016 4:58 pm
Re: AAR OVERLORD (135 Turns) Timian (Allies) vs OrderInChaos (Germans) D-Day to Falaise
Turn 9 (Execution Phase (this is execution of phase 8 planning by both the German and Allies)
Execution Phase
Caen Area
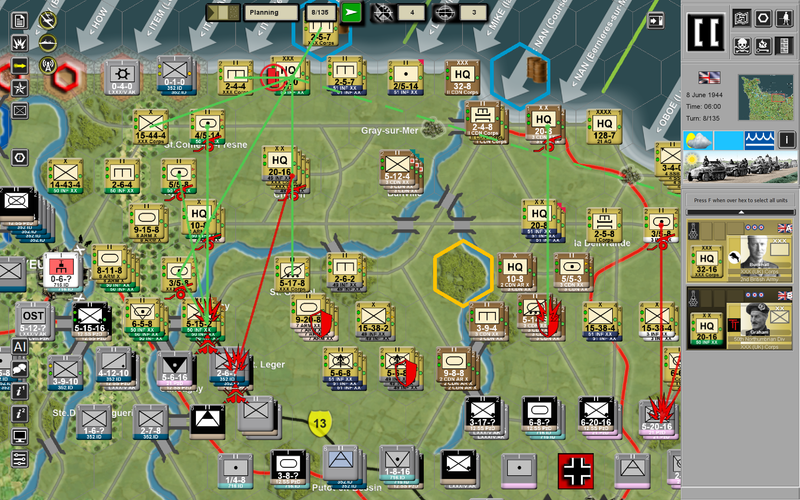
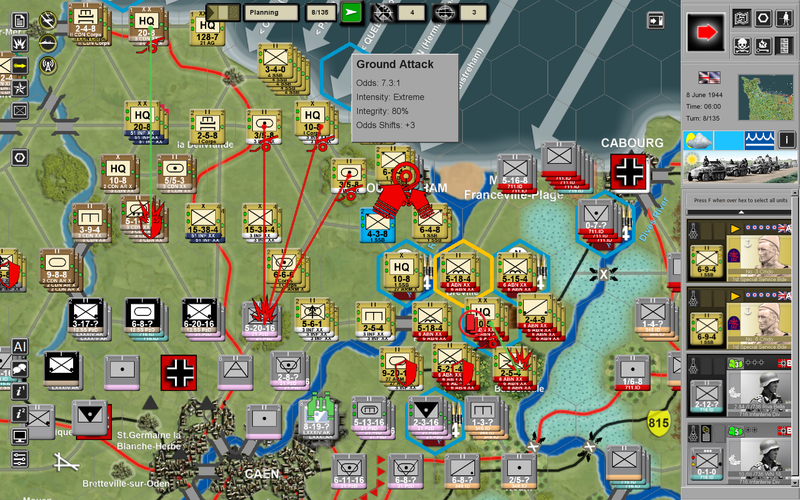
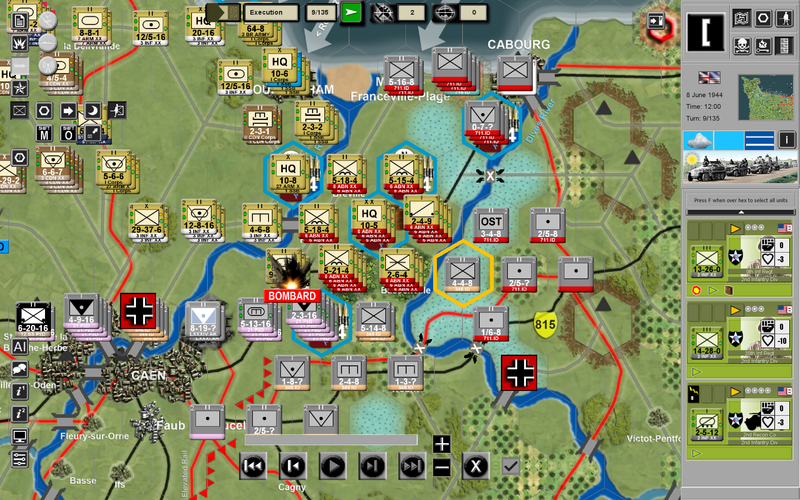
The Green box units got shelled and seems like they didn't want to move at all. Well not "seems", they did not at all.
The Pink box another unit that didn't move. Looks like I might have forgotten to give an order to move
The Yellow box units got shelled, Starts with 10 MP's (1st snapshot below) and lost 2 MP's because of the shelling (2nd snapshot below).
Then had to move into a ZOC. ZOC cost movement point cost equal the stacking point (top right corner of counter) of an enemy unit added together plus terrain cost. But always able to move one hex. So by those British units moving there kept my AA unit from going where I wanted it to go because of the extra cost of ZOC moving(not to mention unit quality has an affect on ZOC cost. Better the quality of the unit the cheaper it is to move through with low cost units paying more).
Execution Phase
Caen Area
The Green box units got shelled and seems like they didn't want to move at all. Well not "seems", they did not at all.
The Pink box another unit that didn't move. Looks like I might have forgotten to give an order to move
The Yellow box units got shelled, Starts with 10 MP's (1st snapshot below) and lost 2 MP's because of the shelling (2nd snapshot below).
Then had to move into a ZOC. ZOC cost movement point cost equal the stacking point (top right corner of counter) of an enemy unit added together plus terrain cost. But always able to move one hex. So by those British units moving there kept my AA unit from going where I wanted it to go because of the extra cost of ZOC moving(not to mention unit quality has an affect on ZOC cost. Better the quality of the unit the cheaper it is to move through with low cost units paying more).
- OrderInChaos
- Posts: 274
- Joined: Thu Dec 29, 2016 4:58 pm
Re: AAR OVERLORD (135 Turns) Timian (Allies) vs OrderInChaos (Germans) D-Day to Falaise
Turn 9 (Execution Phase (this is execution of phase 8 planning by both the German and Allies)
Execution Phase
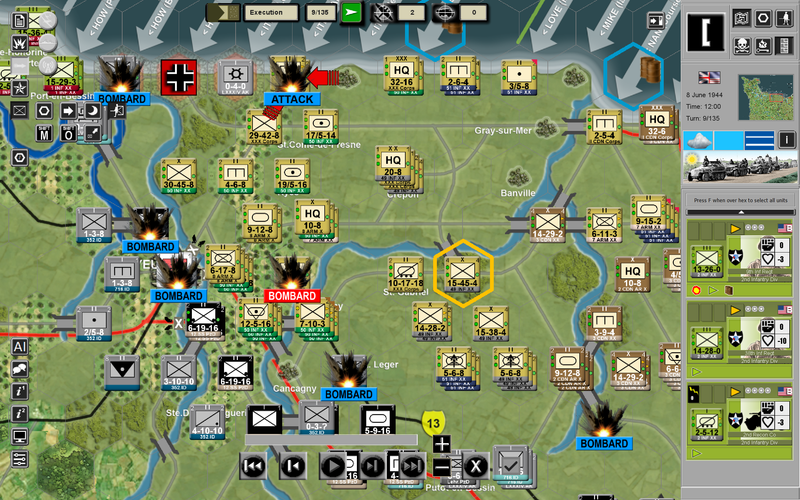
Omaha Area
Americans still cleaning up the beach area of Omaha.
British are still in front of Bayeaux
American come streaming across the open bridge I gifted to them in the green box area
American attack Insigny and defenders held in red box
In the yellow box area I have a token force of ad hoc units thrown together to try and stop any advance forward. (Flak units are your bread and butter for the Germans. Can move fast, great defense value, great AA strength , and has "Shock" value. On top of that you give them attack supply and they are lethal
(attack supply doubles combat str)
Execution Phase
Omaha Area
Americans still cleaning up the beach area of Omaha.
British are still in front of Bayeaux
American come streaming across the open bridge I gifted to them in the green box area
American attack Insigny and defenders held in red box
In the yellow box area I have a token force of ad hoc units thrown together to try and stop any advance forward. (Flak units are your bread and butter for the Germans. Can move fast, great defense value, great AA strength , and has "Shock" value. On top of that you give them attack supply and they are lethal
- OrderInChaos
- Posts: 274
- Joined: Thu Dec 29, 2016 4:58 pm
Re: AAR OVERLORD (135 Turns) Timian (Allies) vs OrderInChaos (Germans) D-Day to Falaise
Turn 9 (Execution Phase (this is execution of phase 8 planning by both the German and Allies)
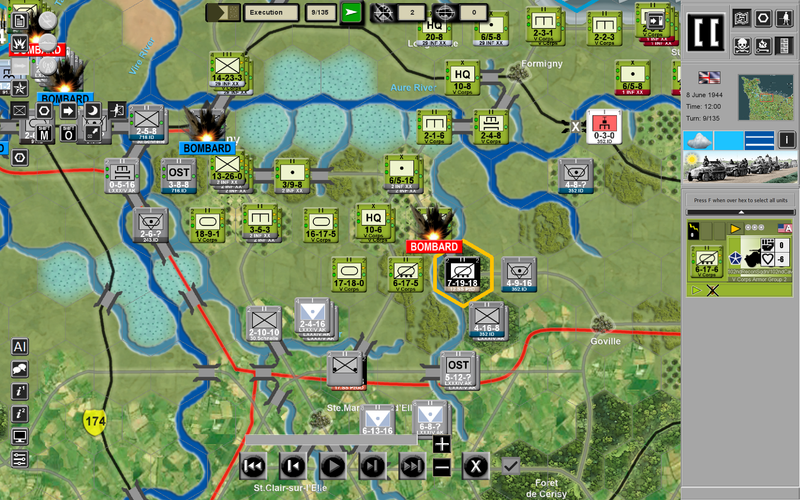
Execution Phase
Carentan Area
I zoomed in on this area of the map for the battle across the bridge marked in a yellow box the bridge. Please realize that attacking across a bridge the attackers attack at only 25% of their Strength (1/4 str). Attackers also get "no" shock(armor effects of column shifts on crt) BUT the defenders do get shock!
The plan moves put in last turn was to bring the Flak Company and Infantry Battalion from LXXXIV.AK Corps (light blue box) to the the rescue of the DEMO unit of 91 Inf Div. Also the 77 Inf Divisions Battalion (Green box) of 88's (the 13-7-9 unit) and the battalion of Anti Tank guns will also rush to the bridge. I gave the 77 Inf Division Combat supply for the turn, thus the (13) on the 13-7-9 counter which normally would be a 6 or 7 attack (doubling the attack value if you will).
Execution Phase
Carentan Area
I zoomed in on this area of the map for the battle across the bridge marked in a yellow box the bridge. Please realize that attacking across a bridge the attackers attack at only 25% of their Strength (1/4 str). Attackers also get "no" shock(armor effects of column shifts on crt) BUT the defenders do get shock!
The plan moves put in last turn was to bring the Flak Company and Infantry Battalion from LXXXIV.AK Corps (light blue box) to the the rescue of the DEMO unit of 91 Inf Div. Also the 77 Inf Divisions Battalion (Green box) of 88's (the 13-7-9 unit) and the battalion of Anti Tank guns will also rush to the bridge. I gave the 77 Inf Division Combat supply for the turn, thus the (13) on the 13-7-9 counter which normally would be a 6 or 7 attack (doubling the attack value if you will).
- OrderInChaos
- Posts: 274
- Joined: Thu Dec 29, 2016 4:58 pm
Re: AAR OVERLORD (135 Turns) Timian (Allies) vs OrderInChaos (Germans) D-Day to Falaise
Turn 9 (Execution Phase (this is execution of phase 8 planning by both the German and Allies)
Execution Phase
Carentan Area
The Germans strike FIRST during the execution phase with my bombardment of the marshalling attack force. I hoped to cause some readness loss, mp loss, and/or casualties. In this battle only men were lost and I suffer a 10% readiness penalty for my attacks. The FOW was -4 severly hampering the effects of the bombardment along with only a single point bombarding. But hey, I will take the 26 losses to the Americans inflicted
Execution Phase
Carentan Area
The Germans strike FIRST during the execution phase with my bombardment of the marshalling attack force. I hoped to cause some readness loss, mp loss, and/or casualties. In this battle only men were lost and I suffer a 10% readiness penalty for my attacks. The FOW was -4 severly hampering the effects of the bombardment along with only a single point bombarding. But hey, I will take the 26 losses to the Americans inflicted
- OrderInChaos
- Posts: 274
- Joined: Thu Dec 29, 2016 4:58 pm
Re: AAR OVERLORD (135 Turns) Timian (Allies) vs OrderInChaos (Germans) D-Day to Falaise
Turn 9 (Execution Phase (this is execution of phase 8 planning by both the German and Allies)
Execution Phase
Carentan Area
Then comes the attack by the American's across the bridge. The DEMO company held inflicting 52 losses to the Americans to a loss of 7 Germans. The hearts are readiness losses and affects the unit performance (would need to rest to recover readiness)
Execution Phase
Carentan Area
Then comes the attack by the American's across the bridge. The DEMO company held inflicting 52 losses to the Americans to a loss of 7 Germans. The hearts are readiness losses and affects the unit performance (would need to rest to recover readiness)
- OrderInChaos
- Posts: 274
- Joined: Thu Dec 29, 2016 4:58 pm
Re: AAR OVERLORD (135 Turns) Timian (Allies) vs OrderInChaos (Germans) D-Day to Falaise
Turn 9 (Execution Phase (this is execution of phase 8 planning by both the German and Allies)
Execution Phase
Carentan Area
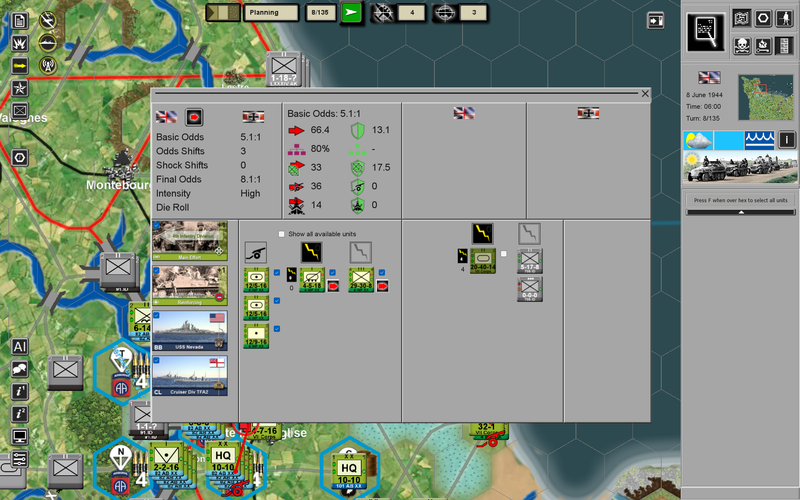
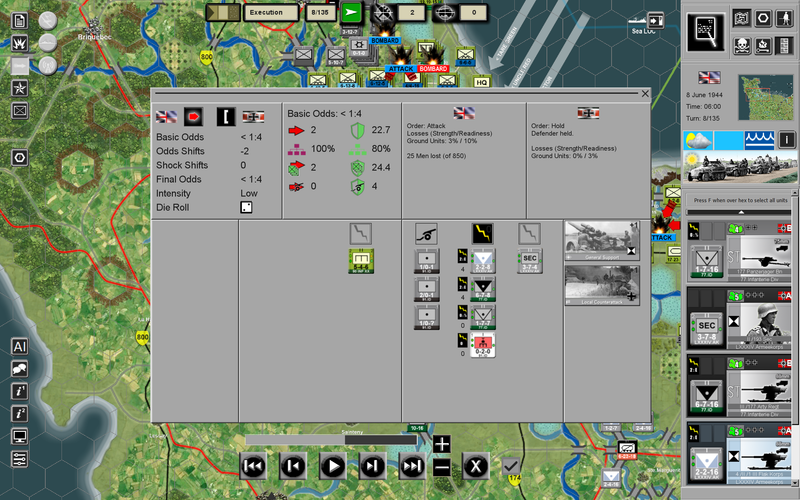
Digging into the combat detail can see the Americans and the Germans played cards (representing assets instead of cluttering up the map with a bazzilion extra counters) which nullified each other on column shifts. The attacking armor had "no" shock (greyed out lightning bolt above the armor) but the defenders were Shock 0 (no column shifts on the CRT). Both sides had artillery with Americans as Offensive artillery (33 points worth
) and Germans defensive artillery (a whopping 4
) that was set in the planning phase from last turn.
BTW the 90th INF Div of the Americans are "Conscript" quality
Here is the CRT for this battle that was set at High Intensity (please note the yellow box area for additional or less losses based on quality)
Execution Phase
Carentan Area
Digging into the combat detail can see the Americans and the Germans played cards (representing assets instead of cluttering up the map with a bazzilion extra counters) which nullified each other on column shifts. The attacking armor had "no" shock (greyed out lightning bolt above the armor) but the defenders were Shock 0 (no column shifts on the CRT). Both sides had artillery with Americans as Offensive artillery (33 points worth
BTW the 90th INF Div of the Americans are "Conscript" quality
Here is the CRT for this battle that was set at High Intensity (please note the yellow box area for additional or less losses based on quality)
Last edited by OrderInChaos on Sun Aug 09, 2026 6:34 pm, edited 1 time in total.
- OrderInChaos
- Posts: 274
- Joined: Thu Dec 29, 2016 4:58 pm
Re: AAR OVERLORD (135 Turns) Timian (Allies) vs OrderInChaos (Germans) D-Day to Falaise
Turn 9 (Execution Phase (this is execution of phase 8 planning by both the German and Allies)
Execution Phase
Carentan Area
My 88's from LXXXIV.ak arrive before the American attack (hasty attack I would call it) and we have a moving battle (hasty) instead of a deliberate battle like the first American Attack.
You will notice the 88's have a shock value of 2. The two cards are still in play for this battle too.
And explanation of Shock
Execution Phase
Carentan Area
My 88's from LXXXIV.ak arrive before the American attack (hasty attack I would call it) and we have a moving battle (hasty) instead of a deliberate battle like the first American Attack.
You will notice the 88's have a shock value of 2. The two cards are still in play for this battle too.
And explanation of Shock
- OrderInChaos
- Posts: 274
- Joined: Thu Dec 29, 2016 4:58 pm
Re: AAR OVERLORD (135 Turns) Timian (Allies) vs OrderInChaos (Germans) D-Day to Falaise
Turn 9 (Execution Phase (this is execution of phase 8 planning by both the German and Allies)
Execution Phase
Carentan Area
Finally the rest of the 77th Inf Div units get to the hex and the American attack with a Lone Engineer Battalion.
Detail battle results for the last attack
Execution Phase
Carentan Area
Finally the rest of the 77th Inf Div units get to the hex and the American attack with a Lone Engineer Battalion.
Detail battle results for the last attack
- OrderInChaos
- Posts: 274
- Joined: Thu Dec 29, 2016 4:58 pm
Re: AAR OVERLORD (135 Turns) Timian (Allies) vs OrderInChaos (Germans) D-Day to Falaise
Turn 9 (Execution Phase (this is execution of phase 8 planning by both the German and Allies)
Execution Phase
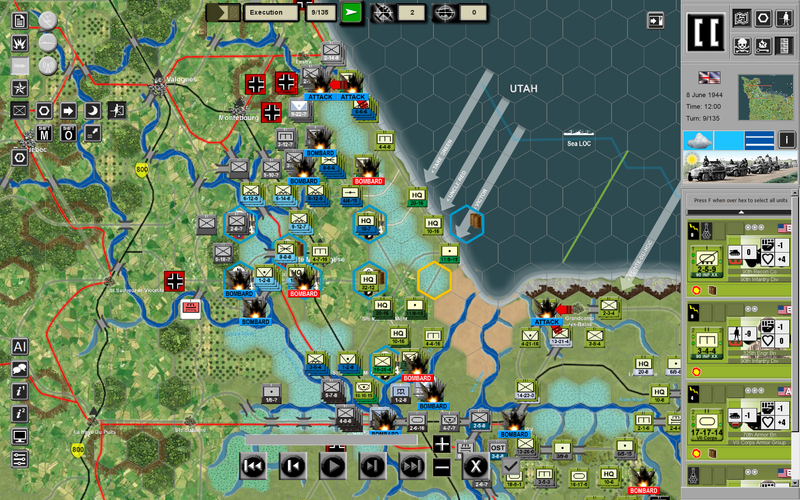
Utah Area
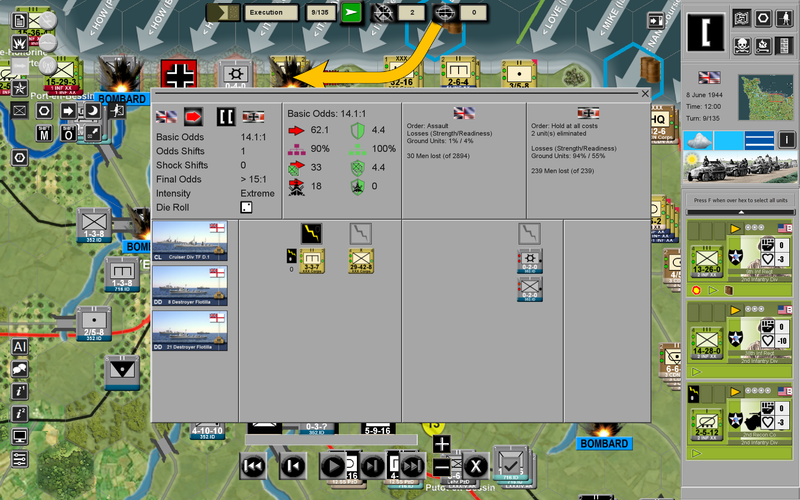
Two attacks by Americans marked with yellow arrow and bombardment. I also bombard but just causes a flesh wound.
Execution Phase
Utah Area
Two attacks by Americans marked with yellow arrow and bombardment. I also bombard but just causes a flesh wound.
Re: AAR OVERLORD (135 Turns) Timian (Allies) vs OrderInChaos (Germans) D-Day to Falaise Campaign Game Scenario
End of Allied Turn 8 Planning Phase
At Utah the VII Corps plans three attacks.
In the Northwest, 4th Infantry Division’s 8th Infantry Regiment + the Division’s Recon Company and (Reserve) the 746th Tank Battalion vs. the last German Strong Point along the coast. (Plus *a lot* of Naval Gunfire.)

Center: 505th Parachute Infantry Regiment + (Reserve) 101st’s Engineer Battalion vs. the Kriegsmarine Battery Marcouf.

And VII Corps’ Main Effort, in the South / to seize the bridge just East of Carentan, the 90th Infantry Division’s 357th Infantry Regiment + the Division’s Recon Company and (Reserve) the 70th Tank Battalion + the 90th’s Engineer Battalion. (Plus all of the 90th's Artillery)

Omaha: A fixing attack vs. Isgny (with V Corps two Cavalry Squadrons and a Tank Battalion in Reserve) + hitting three of the remaining four Strong Points along the coast.

Gold and Juno: Using XXX Corps Fuel Resupply Column to push the 49th Infantry’s three Regiments + its Engineer Battalion forward into the center of the British line.

Sword: Just like in the movie D-Day, the Free French Commando Battalion attacks to seize the Casino in Ouistreham (with support from the rest of 1st Special Service (Commando) Brigade).

At Utah the VII Corps plans three attacks.
In the Northwest, 4th Infantry Division’s 8th Infantry Regiment + the Division’s Recon Company and (Reserve) the 746th Tank Battalion vs. the last German Strong Point along the coast. (Plus *a lot* of Naval Gunfire.)

Center: 505th Parachute Infantry Regiment + (Reserve) 101st’s Engineer Battalion vs. the Kriegsmarine Battery Marcouf.

And VII Corps’ Main Effort, in the South / to seize the bridge just East of Carentan, the 90th Infantry Division’s 357th Infantry Regiment + the Division’s Recon Company and (Reserve) the 70th Tank Battalion + the 90th’s Engineer Battalion. (Plus all of the 90th's Artillery)

Omaha: A fixing attack vs. Isgny (with V Corps two Cavalry Squadrons and a Tank Battalion in Reserve) + hitting three of the remaining four Strong Points along the coast.

Gold and Juno: Using XXX Corps Fuel Resupply Column to push the 49th Infantry’s three Regiments + its Engineer Battalion forward into the center of the British line.

Sword: Just like in the movie D-Day, the Free French Commando Battalion attacks to seize the Casino in Ouistreham (with support from the rest of 1st Special Service (Commando) Brigade).

Re: AAR OVERLORD (135 Turns) Timian (Allies) vs OrderInChaos (Germans) D-Day to Falaise Campaign Game Scenario
End of Allied Turn 8 / (select) Combat Result Screenshots
On Utah, I was unable to seize the Northwest Strong Point. The 505th + 101st’s Engineer Battalion (Reserve) were able to secure Kriegsmarine Battery Marcouf. The 90th was unable to get across the Bridge (to the Northeast of Carentan) / The Germans were able to flex four units into the hex. The first (a Motorized Flak Gun Battery) arriving just before the Reserve Tank Battalion assaulted (-2 Shock for the Tank Battalion’s Attack) and the other three before the 90th’s Engineer Battalion attacked.
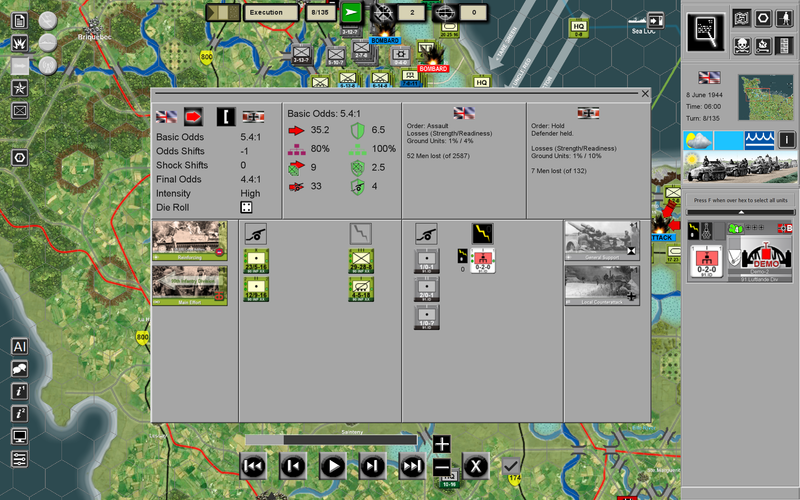
Notice how the Artillery and Command Assets used by the Defender (the Germans) are reflected in each attack. While the Allies’ (the Attacker’s) Command Assets are only used in the first attack (not in the Moving Attacks by the Reserves).
Deliberate Attack: 90th Infantry Division’s . . .
1st (of two) Moving Attacks (90th Division's Attached Tank Battalion) . . .
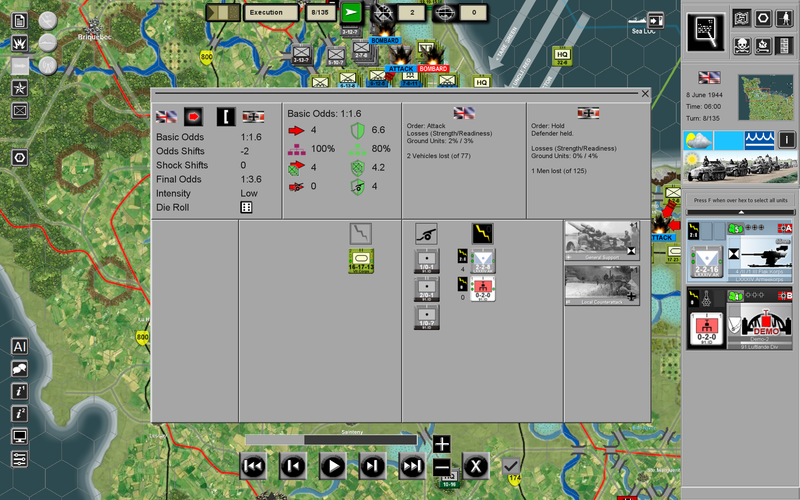
Why only -2 Shock when the Flak Battalion (with 88's) has a 4 for Shock? Because the Demo Company has a 0 Shock "rating" . . . Four Shock Points spread between one non-motorized company and one motorized company = -2 Shock (for the Germans). [Motorized units (as well as Armored units) are neutral in Shock calculations. Also, both towed 88's and towed 17 pdr's = 4 Shock in Defense and 2 Shock when Attacking.]
2nd (of two) Moving Attacks (90th's Division's Organic Engineer Battalion) . . .
Needless to say, I tried to have both the Tank Battalion and the Engineer Battalion attack at the same time. But it's very difficult to synchronize the movement of a Motorized or Armored unit with a "leg" unit. See . . . https://forums.matrixgames.com/viewtopic.php?t=412427 (by St. Ruth / One of the Game's Developers . . . Explains how Movement is sequenced in WEGOWWII).
Next time, probably best (for me to "Keep It Simple Stupid" or KISS) . . . Use - as a Reserve - all Motorized or all Armored or Motorized + Armored. Also good idea if all of the Reserve units have the same Quality Ratings and (about the same) Readiness ("Heart") Values.
With the exception of Isgney, all of V Corps attacks (vs. German Strong Points) were successful. Same for 1st Sepecial Service Brigade's attack vs. Ouistreham's Casino (Strong Point).
The Isgney attack appears to have done what I wanted it to . . . Keep the Germans from moving units to stop 2nd Infantry Division (who was moving on Isgney from the East / Southeast).
On Utah, I was unable to seize the Northwest Strong Point. The 505th + 101st’s Engineer Battalion (Reserve) were able to secure Kriegsmarine Battery Marcouf. The 90th was unable to get across the Bridge (to the Northeast of Carentan) / The Germans were able to flex four units into the hex. The first (a Motorized Flak Gun Battery) arriving just before the Reserve Tank Battalion assaulted (-2 Shock for the Tank Battalion’s Attack) and the other three before the 90th’s Engineer Battalion attacked.
Notice how the Artillery and Command Assets used by the Defender (the Germans) are reflected in each attack. While the Allies’ (the Attacker’s) Command Assets are only used in the first attack (not in the Moving Attacks by the Reserves).
Deliberate Attack: 90th Infantry Division’s . . .

1st (of two) Moving Attacks (90th Division's Attached Tank Battalion) . . .

Why only -2 Shock when the Flak Battalion (with 88's) has a 4 for Shock? Because the Demo Company has a 0 Shock "rating" . . . Four Shock Points spread between one non-motorized company and one motorized company = -2 Shock (for the Germans). [Motorized units (as well as Armored units) are neutral in Shock calculations. Also, both towed 88's and towed 17 pdr's = 4 Shock in Defense and 2 Shock when Attacking.]
2nd (of two) Moving Attacks (90th's Division's Organic Engineer Battalion) . . .

Needless to say, I tried to have both the Tank Battalion and the Engineer Battalion attack at the same time. But it's very difficult to synchronize the movement of a Motorized or Armored unit with a "leg" unit. See . . . https://forums.matrixgames.com/viewtopic.php?t=412427 (by St. Ruth / One of the Game's Developers . . . Explains how Movement is sequenced in WEGOWWII).
Next time, probably best (for me to "Keep It Simple Stupid" or KISS) . . . Use - as a Reserve - all Motorized or all Armored or Motorized + Armored. Also good idea if all of the Reserve units have the same Quality Ratings and (about the same) Readiness ("Heart") Values.
With the exception of Isgney, all of V Corps attacks (vs. German Strong Points) were successful. Same for 1st Sepecial Service Brigade's attack vs. Ouistreham's Casino (Strong Point).
The Isgney attack appears to have done what I wanted it to . . . Keep the Germans from moving units to stop 2nd Infantry Division (who was moving on Isgney from the East / Southeast).
Re: AAR OVERLORD (135 Turns) Timian (Allies) vs OrderInChaos (Germans) D-Day to Falaise Campaign Game Scenario
End of Allied Turn 9
Not much to report . . .
The 8th Infantry Regimental Combat Team (8th Infantry Regiment (4th Infantry Division) + 4th Infantry’s Recon Company + 746th Armor Battalion + both 4th Infantry’s Self-Propelled 105mm (Priest) Battalions) attacked and seized the German Strong Point they initially attacked during Turn 8. (III(-)/729th Grenadier Regiment (709th Infantry Division) retreated.)


Two (US) Armored Groups (from V Corps) jointed 2nd Infantry Division’s efforts to the East / Southeast of Isgney and the last German Strong Point vicinity Omaha was seized.

And Monty continues to “tidy-up his lines”. (Note the 52nd Independent Infantry Brigade + two XXX Corps Engineer Battalions) attack vs. Kriegsmarine Battery Longues.)


Not much to report . . .
The 8th Infantry Regimental Combat Team (8th Infantry Regiment (4th Infantry Division) + 4th Infantry’s Recon Company + 746th Armor Battalion + both 4th Infantry’s Self-Propelled 105mm (Priest) Battalions) attacked and seized the German Strong Point they initially attacked during Turn 8. (III(-)/729th Grenadier Regiment (709th Infantry Division) retreated.)


Two (US) Armored Groups (from V Corps) jointed 2nd Infantry Division’s efforts to the East / Southeast of Isgney and the last German Strong Point vicinity Omaha was seized.

And Monty continues to “tidy-up his lines”. (Note the 52nd Independent Infantry Brigade + two XXX Corps Engineer Battalions) attack vs. Kriegsmarine Battery Longues.)


- OrderInChaos
- Posts: 274
- Joined: Thu Dec 29, 2016 4:58 pm
Re: AAR OVERLORD (135 Turns) Timian (Allies) vs OrderInChaos (Germans) D-Day to Falaise Campaign Game Scenario
Turn 9 (Execution Phase (this is execution of phase 8 planning by both the German and Allies)
Planning Phase
Utah Area
Here are my moves for the Utah area.
*I rebuild the bridge in the yellow box for my units moving south
*Getting the rest of the 91st Inf Division units (Grey with black bottom of the counter) towards Carentan after being replaced by the 243rd Inf Division
*Expected American attack on the Green box area - I play a card for defense shifts in CRT and add a bit of Defensive Art
*Learning what the German Artillery is good for this turn to see if I can do any damage. I didn't burn any Combat Supply on it so not expecting any mircles (You must have good intel for good results, thus Intel is King on those bombardments)
Planning Phase
Utah Area
Here are my moves for the Utah area.
*I rebuild the bridge in the yellow box for my units moving south
*Getting the rest of the 91st Inf Division units (Grey with black bottom of the counter) towards Carentan after being replaced by the 243rd Inf Division
*Expected American attack on the Green box area - I play a card for defense shifts in CRT and add a bit of Defensive Art
*Learning what the German Artillery is good for this turn to see if I can do any damage. I didn't burn any Combat Supply on it so not expecting any mircles (You must have good intel for good results, thus Intel is King on those bombardments)
- OrderInChaos
- Posts: 274
- Joined: Thu Dec 29, 2016 4:58 pm
Re: AAR OVERLORD (135 Turns) Timian (Allies) vs OrderInChaos (Germans) D-Day to Falaise Campaign Game Scenario
Turn 9 (Execution Phase (this is execution of phase 8 planning by both the German and Allies)
Planning Phase
Carentan Area
My moves to reinforce the Carentan area. I want to keep the American apart from each other as long as I can. Thus contesting as much as I can.
* I move the Bridge unit to blow the two bridges in the Yellow box
* I am going to try to DEMO the bridge again after the Americans fixed it (Green box)
* Yellow arrow points to American Bridge unit - I bet he is going to try and build a pontoon bridge here (I would have picked another area) but we will see if Timian does
Planning Phase
Carentan Area
My moves to reinforce the Carentan area. I want to keep the American apart from each other as long as I can. Thus contesting as much as I can.
* I move the Bridge unit to blow the two bridges in the Yellow box
* I am going to try to DEMO the bridge again after the Americans fixed it (Green box)
* Yellow arrow points to American Bridge unit - I bet he is going to try and build a pontoon bridge here (I would have picked another area) but we will see if Timian does
- OrderInChaos
- Posts: 274
- Joined: Thu Dec 29, 2016 4:58 pm
Re: AAR OVERLORD (135 Turns) Timian (Allies) vs OrderInChaos (Germans) D-Day to Falaise Campaign Game Scenario
Turn 9 (Execution Phase (this is execution of phase 8 planning by both the German and Allies)
Planning Phase
Omaha/St Lo Area
Still moving into place with a bunch of AD HOC units to contain the American from me being stupid of not defending behind the bridge I blew up only to be repaired by the Americans. Instead of 4-6 units I need like 15+ to contain the Americans when the Germans are scrambling for every unit they can get their hands on.
Planning Phase
Omaha/St Lo Area
Still moving into place with a bunch of AD HOC units to contain the American from me being stupid of not defending behind the bridge I blew up only to be repaired by the Americans. Instead of 4-6 units I need like 15+ to contain the Americans when the Germans are scrambling for every unit they can get their hands on.
- OrderInChaos
- Posts: 274
- Joined: Thu Dec 29, 2016 4:58 pm
Re: AAR OVERLORD (135 Turns) Timian (Allies) vs OrderInChaos (Germans) D-Day to Falaise Campaign Game Scenario
Turn 9 (Execution Phase (this is execution of phase 8 planning by both the German and Allies)
Planning Phase
Bayeux Area
Moving my Bridging unit to blow the two bridges in between the American and British landing zones. Hope to close off this entrence into the middle of the field where I have very few units
The rest of the moves are just repositioning units to better locations.
Planning Phase
Bayeux Area
Moving my Bridging unit to blow the two bridges in between the American and British landing zones. Hope to close off this entrence into the middle of the field where I have very few units
The rest of the moves are just repositioning units to better locations.
- OrderInChaos
- Posts: 274
- Joined: Thu Dec 29, 2016 4:58 pm
Re: AAR OVERLORD (135 Turns) Timian (Allies) vs OrderInChaos (Germans) D-Day to Falaise Campaign Game Scenario
Turn 9 (Execution Phase (this is execution of phase 8 planning by both the German and Allies)
Planning Phase
Caen Area
* Repositioning units to defensive locations with better protection from bombardment.
* talking about bombardment I have a 24 point bombardment set up here and want to see what it does (Americans and British have units that give like 20+ish from just one unit, lol)
Planning Phase
Caen Area
* Repositioning units to defensive locations with better protection from bombardment.
* talking about bombardment I have a 24 point bombardment set up here and want to see what it does (Americans and British have units that give like 20+ish from just one unit, lol)
- OrderInChaos
- Posts: 274
- Joined: Thu Dec 29, 2016 4:58 pm
Re: AAR OVERLORD (135 Turns) Timian (Allies) vs OrderInChaos (Germans) D-Day to Falaise Campaign Game Scenario
Been having a blast in the game so far. Timian is still out of range of my lines in the British Sector. Good for me since I should be out of his range of the darn Navy too
. We can sit like this as long as he wants because ever turn that goes by gives me closer to more reinforcements... wait he will get more too... maybe that is not a good thing!
* Hold at all costs seems pretty powerful in the game. I did feel the bite of its effect on turn 13 where I lost a great many men only to retreat anyway, lol (lost my roll to hold at all costs I guess(low quality unit))
* Allies still getting a metric boat load of Victory Points from killing units
Victory Points June 8 2nd day turn
* Hold at all costs seems pretty powerful in the game. I did feel the bite of its effect on turn 13 where I lost a great many men only to retreat anyway, lol (lost my roll to hold at all costs I guess(low quality unit))
* Allies still getting a metric boat load of Victory Points from killing units
Victory Points June 8 2nd day turn
- OrderInChaos
- Posts: 274
- Joined: Thu Dec 29, 2016 4:58 pm
Re: AAR OVERLORD (135 Turns) Timian (Allies) vs OrderInChaos (Germans) D-Day to Falaise Campaign Game Scenario
Turn 10 (Execution Phase (this is execution of phase 9 planning by both the German and Allies)
Execution Phase
Utah Area
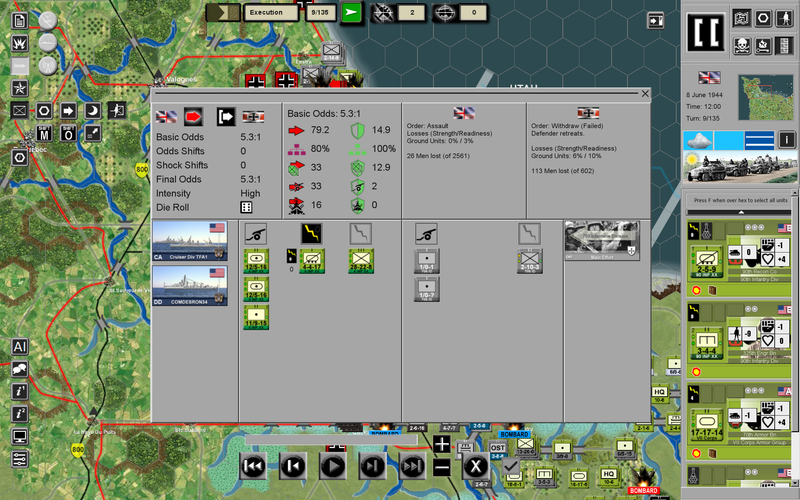
One major battle in this area along the coast in the Yellow Box, I lost the battle on this one
Out of 602 men I lost 113 men... 6% loss
. Along with 10% readiness loss
Lets dig into what I got hit by
I had ordered my Battlion to withdraw from any battle as seen by the icon in yellow box top left below. BUT follow the yellow arrow across the top to the yellow box at top right you can see I "FAILED" to withdraw from the battle (was a conscript unit failed it's roll I would say)
Notice how much artillery units the US has (33 points worth) compared to my meger 2 points worth
At least I had ammo to fire with
Just shelling on the rest of the battlefield
Execution Phase
Utah Area
One major battle in this area along the coast in the Yellow Box, I lost the battle on this one
Out of 602 men I lost 113 men... 6% loss
Lets dig into what I got hit by
I had ordered my Battlion to withdraw from any battle as seen by the icon in yellow box top left below. BUT follow the yellow arrow across the top to the yellow box at top right you can see I "FAILED" to withdraw from the battle (was a conscript unit failed it's roll I would say)
Notice how much artillery units the US has (33 points worth) compared to my meger 2 points worth
Just shelling on the rest of the battlefield