Inkorp wrote: Sat Aug 15, 2026 5:08 am
Hey FortTell!
I just read your reply. This is exactly the kind of stuff I wanted! Really, thanks for taking the time to help a kinda new player out! And if you don't mind, I have a question. The main focus for the Soviets in 1941, of course is on protecting Leningrad and Moscow. The problem with that is: how does one manage the south at the same time, given that the Panzers can cut right through to Rostov?
Mainly, you move so you don't get pocketed, keep falling back while providing resistance where it is safe (like the Dnepr and, if the position seems safe, minor rivers). The terrain is flat, there is little to stop panzers, so keep your army intact and wait for their supply to decrease and watch them take small losses after small losses in fights. You can refit, the Germans in 41 generally cannot (there is usually not enough supply to reliably refit units). Let's take a counterexample of bad defending (with stronger defensive positions and the concentration of enemy mobile units marked):

- early-south.png (980.07 KiB) Viewed 550 times
It is the end of turn 3, the Germans have misplayed the opening and unlocked the Southern front on T1 (nowadays, there is a map marker so this doesn't happen). The Rovno pocket was not the meta yet, and the result is that a lot more of Soviet forces escaped than you would expect.
But they have been set up poorly. First of all, the Southern front (blue) has fallen back very far from the enemy. Not a bad position by itself - after all, there is little to defend in front of Odessa, but if you are so far, that is way too many units. They should be sent to other sectors on rail. Leave a screen of cavalry, tanks/mech unfit for combat and some infantry to keep the Germans from driving forward for free. Cavalry and tanks should always present a danger of cutting off exposed forward units. They will not get fuel next turn, and considering they were driving forward, their stash of fuel should be low. Thus, they will have less moves next turn. Perhaps you can even rout something (not as early as T3, of course).
Of course, that is not the biggest problem. The SW front (pink) is set up with too much of its strength forward and gets a significant part of it, including a couple of very high morale divisions, pocketed next turn. The Germans have simply avoided the strong points of the line and set up so there can be no movement inside the pocket without moving ZoC to ZoC (that is, hexes within Zone of Control of enemy units), which costs a very high amount of movement.

- early-south-pocket.png (1.7 MiB) Viewed 550 times
Just a couple combats and 200k+ pocket secured.
So what to do if you manage to avoid major pockets (you will usually still have some small ones unless you employ the once-popular "Forget the South" strategy, which strips everything except cavalry from everything south of the Dnepr)? Fall back, fight somewhere, and hope the enemy supply decays enough for fights to become less one-sided. Let's look at the situation at the end of turn 9 of another game.
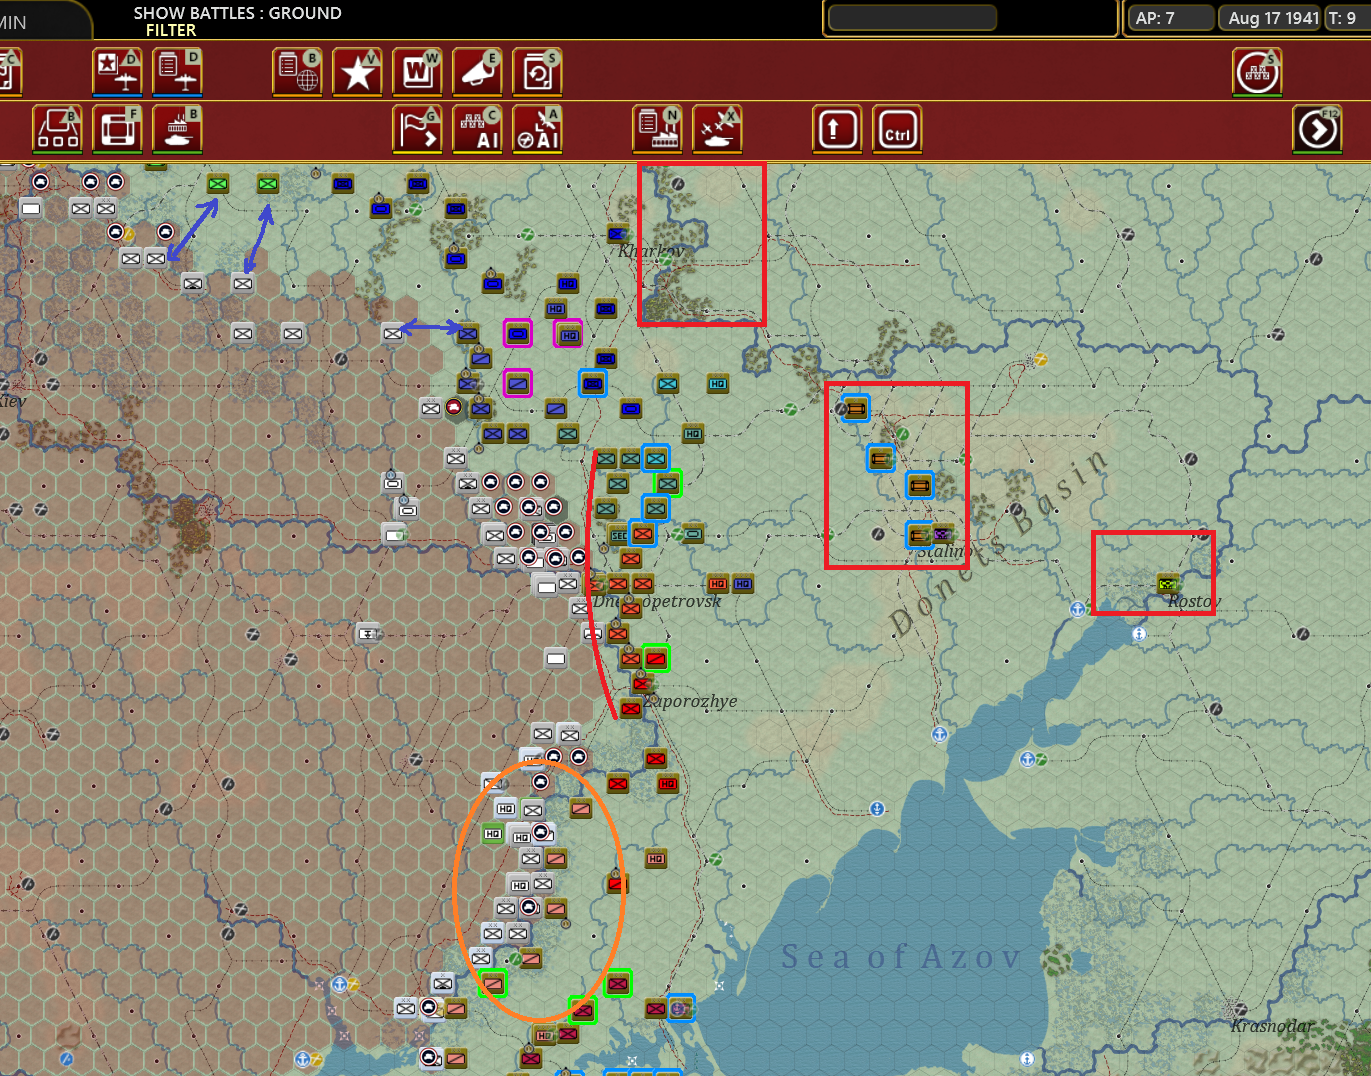
- not-really-early-south.png (1.67 MiB) Viewed 550 times
a) The blue arrows at the top: keeping distance from enemy infantry
In places where you do not expect ot be hit with tanks, but are still unable or unwilling to stop German infantry, you fall back two or three hexes per turn. Consider that in absense of roads a division must pay at least 3 MP for entering an enemy hex or a hex that was captured this turn. A regular division has 16 MP, and Germans in 41 with low supply usually have less after the first couple of turns (because the division's trucks are used to bring supply from distant depots). If they need to occupy three hexes first, it is already 9MP used (even without terrain or rivers or if the unit is not in the foremost friendly hex at the beginning of turn), which means they needed to have at least 15 at turn start to get a deliberate attack afterwards. So an orderly fallback preserves your units and may bait the enemy into hasties which may fail (or they still win, but with a better K:D for you and they still waste CPP and ammo). Of course, this only works until you have land to retreat to.
b) The red line: sometimes you have to fight anyway
And the bend of the Dnepr around Dnepropetrovsk and Zaporozhye (also known as the D-Z line) is one of the best places to do that before Rostov. A major river, two cities providing high protection against tanks, a couple of forest hexes - certainly not impregnable, it's just that everything else around is terrible for defending. The cities are both worth Victory points, too, and you can often knock off at least some of the early capture bonus for D-town (Z-town is much harder). Moreover, they are both big railyards, and every train denied to the Germans stops them from recovering their supply.
Do not hold them too hard and get pocketed, though. Keeping your army alive takes priority.
c) The orange circle: cavalry use
Cavalry is very mobile and shines most in the south (though keep some winning battles elsewhere to prepare Guards cav corps in the winter) where it is just annoying. You put it up next to the enemy - the enemy takes logistics phase losses, you get hastied and flee with low casualties or they spent a deliberate attack to maybe kill 4k men, such trade, much value (high Morale generals help cav unrout more often, but do not pay AP for that, just select existing armies/corps you can spare). Or you put it up to strengthen a checkerboard line into a full line (which means a guaranteed 1 combat delay despite the final odds if a firendly unit was next to the combat hex, and that is +3MP for moto units to get out of the hex). Or you put it up behind a river to force cross-river attacks for more MP. Or you put it one hex behind a river to force extra MP cost for crossing into enemy ZoC. Or you have it to the side and sneak into the German backlines and snipe an HQ or recapture a Victory point city. The possibilities are endless, and you do get a lot of cav during 41.
Mountain cav units or 9k men divs which haven't yet downsized are actual mobile combat units of moderate value (because they cannot attach SUs but easier to replenish than tank/mech divs).
d) The red squares: other good places for forts, prepare in advance where you feel necessary.
Wiedrock wrote: Sat Aug 15, 2026 2:55 pm
You defend behind Rostov.

And yeah, if the German player knows the supply system and has commited enough forces, you end up behind Rostov, oh well.